
Setting Up Your Streaming Device
Congratulations on purchasing your new streaming device! Setting it up is an exciting first step towards enjoying a world of entertainment right at your fingertips. Whether you’ve opted for a Roku, Fire TV Stick, Apple TV, or another popular streaming device, the setup process is usually straightforward. Here’s a step-by-step guide to get you started.
1. Connect the streaming device to your TV: Begin by plugging one end of the HDMI cable into the streaming device and the other end into an available HDMI port on your TV. Make sure to take note of the HDMI port number you’ve used.
2. Power it up: Connect the power adapter to the streaming device and plug it into an electrical outlet. Once powered on, your streaming device should display its logo or a welcome screen on your TV.
3. Select the correct input: Use your TV remote to navigate to the input/source selection menu. Choose the HDMI input port that corresponds to the one you connected your streaming device to earlier. This will allow your TV to establish a connection with the streaming device.
4. Connect to your network: Most streaming devices support both wired and wireless connections. If you’re using a wired connection, simply connect an Ethernet cable from your router to the streaming device. For wireless connectivity, go to the device’s network settings and select your Wi-Fi network. Enter the network password if prompted.
5. Update the software: Once connected to the internet, your streaming device may prompt you to update its software to the latest version. It’s important to perform this update to ensure optimal performance and access to new features.
6. Create or sign in to your account: Depending on the device, you’ll either need to create a new account or sign in with an existing one. Follow the on-screen instructions to set up your account and link it to your streaming device. This account will enable you to download apps, stream content, and personalize your experience.
7. Customize your settings: Take some time to explore the settings menu of your streaming device. You can adjust display settings, audio preferences, parental controls, and more to tailor your streaming experience to your liking.
That’s it! You’ve successfully set up your streaming device and are ready to start streaming your favorite movies, TV shows, and more. Remember that each streaming device may have specific features and settings, so consult the user manual or online support resources for more information. Enjoy the endless entertainment possibilities that your new streaming device has to offer!
Connecting Your Streaming Device to Your TV
To fully enjoy the streaming experience, it’s essential to connect your streaming device to your TV properly. Whether you have a smart TV or a regular TV, the process is quite similar. Follow these simple steps to ensure a seamless connection.
1. Check the available ports on your TV: Take a look at the back or side of your TV to identify the available input ports. Most commonly, you’ll find HDMI ports, but older TVs may have component or composite video ports. HDMI is the preferred connection type as it supports high-definition video and audio.
2. Insert the HDMI cable: Once you’ve identified the HDMI port, plug one end of the HDMI cable into the streaming device and the other end into the corresponding HDMI port on your TV. Remember the HDMI port number you used as you’ll need it to select the correct input later.
3. Power up the streaming device: Connect the power adapter to the streaming device and plug it into a power outlet. Turn on the TV and select the HDMI input port that you connected the streaming device to. This can usually be done by pressing the “Input” or “Source” button on your TV remote. The streaming device’s logo or welcome screen should appear on your TV.
4. Set up the Wi-Fi connection (if applicable): If your streaming device connects to the internet wirelessly, navigate to the network settings on the device and select your Wi-Fi network. Enter the network password if prompted. For a wired connection, simply connect an Ethernet cable from your router to the streaming device.
5. Update the firmware (if necessary): Upon connecting to the internet, your streaming device may prompt you to update its firmware. It’s recommended to perform this update to ensure you have the latest features and bug fixes for optimal performance.
6. Follow the on-screen instructions: Once your streaming device is connected and updated, you may be prompted to follow on-screen instructions to complete the setup process. This could involve creating or logging into an account, selecting your preferred language and location, and customizing settings according to your preferences.
7. Test the connection: Finally, verify that your streaming device is working properly by launching a streaming app or playing a video. If you see the content on your TV screen and hear the audio, you’re successfully connected!
Remember, the steps may vary slightly depending on the brand and model of your streaming device. Refer to the user manual or online support resources for specific instructions. With your streaming device successfully connected to your TV, you can now enjoy a wide range of content from streaming services and apps, transforming your TV into an entertainment hub.
Connecting to Wireless Networks with Your Streaming Device
One of the key features of streaming devices is the ability to connect to the internet wirelessly, allowing you to stream your favorite content without the hassle of cables. Setting up a wireless connection on your streaming device is usually a simple process. Here’s how to connect to a Wi-Fi network with your streaming device.
1. Access the settings: Use your streaming device remote control to navigate to the settings menu. The location of the settings may vary depending on the device, but it is typically found in the main menu or on the home screen.
2. Select network settings: Within the settings menu, look for the option labeled “Network” or “Wi-Fi.” Select this option to proceed to the network settings.
3. Scan for available networks: Your streaming device will automatically scan for nearby Wi-Fi networks. Wait for the scan to complete, and a list of available networks will be displayed on your screen.
4. Choose your Wi-Fi network: Select your desired Wi-Fi network from the list. If your network is not displayed, ensure that your Wi-Fi router is powered on and within range of your streaming device.
5. Enter the Wi-Fi password (if required): If your Wi-Fi network is password-protected, your streaming device will prompt you to enter the password. Use the on-screen keyboard (if available) or the remote control to input the password carefully.
6. Connect to the network: Once you’ve entered the correct password, select the “Connect” or “Join” button to establish a connection to the Wi-Fi network. Your streaming device will attempt to connect to the network, and once connected, you will see a confirmation message or symbol.
7. Test the connection: To ensure that your streaming device is successfully connected to the Wi-Fi network, launch a streaming app or play a video. If the content loads and plays smoothly, your wireless connection is working properly.
In some cases, you may encounter connection issues or an inability to find your Wi-Fi network. In such situations, try the following troubleshooting steps:
- Restart your streaming device and Wi-Fi router.
- Double-check that you have entered the correct Wi-Fi password.
- Ensure that your streaming device is within range of the Wi-Fi router and not blocked by any obstacles.
- Update the firmware of your streaming device, if available.
- Contact your internet service provider for assistance with your Wi-Fi network.
Remember to always use a secure Wi-Fi network to protect your personal information and ensure a safe streaming experience. Connecting your streaming device to a wireless network opens up a world of entertainment possibilities, allowing you to access a wide range of streaming services, apps, and online content from the comfort of your home.
Troubleshooting Common Issues with Your Streaming Device
While streaming devices offer a convenient and immersive entertainment experience, it’s not uncommon to encounter certain issues along the way. The good news is that many common problems can be easily resolved with a bit of troubleshooting. Here are some common issues you may encounter with your streaming device and how to troubleshoot them.
1. Connectivity issues:
– Make sure your streaming device is connected to the correct Wi-Fi network and that the signal strength is strong. Consider moving the device closer to the router if the signal is weak.
– Restart your streaming device and Wi-Fi router to refresh the connection.
– Check if other devices connected to the same network are experiencing connectivity issues. If so, contact your internet service provider.
– Update the firmware of your streaming device to the latest version to ensure optimal performance.
2. Streaming app issues:
– Ensure that the app you’re trying to use is up to date. Check for updates in the app store or settings menu of your streaming device.
– Clear the cache and data of the app. This can be done in the app settings or through the device’s settings menu.
– Uninstall and reinstall the app if the issue persists.
– Check if the app is experiencing known server issues by visiting their official website or social media channels.
3. Video playback issues:
– Check your internet connection speed. Slower connections may struggle to stream high-quality videos. Consider upgrading your internet plan if necessary.
– Close other apps or devices that are using a significant amount of bandwidth on your network, as they may affect the streaming quality.
– Restart your streaming device and try playing the video again.
– If using a streaming service, check their support page for any known playback issues or troubleshooting steps specific to that service.
4. Audio issues:
– Make sure the volume on your streaming device as well as your TV or home theater system is turned up and not muted.
– Check the audio settings of your streaming device and make sure they are configured correctly.
– Ensure that your audio cables are securely connected to both your streaming device and your audio output device.
– Try using a different audio output option (e.g., HDMI, optical, or analog) to see if the issue persists.
5. Remote control issues:
– Replace the batteries in your remote control if it’s not functioning properly.
– Ensure that there are no obstructions between the remote control and the streaming device.
– Check if the remote control needs to be paired with the streaming device. Refer to the device’s user manual or support resources for instructions on how to do this.
– If possible, try using a smartphone app or a universal remote control as an alternative to troubleshoot remote control issues.
If you’ve tried troubleshooting the issue and are still experiencing problems, it may be helpful to consult the user manual or contact the manufacturer’s customer support for further assistance. Remember that each streaming device may have its own unique troubleshooting steps, so it’s important to refer to the appropriate resources from the manufacturer. By addressing common issues with your streaming device, you’ll ensure a smoother and more enjoyable streaming experience.
How to Install Apps and Channels on Your Streaming Device
One of the great features of streaming devices is the ability to install various apps and channels, opening up a world of entertainment options. Whether you want to stream movies, TV shows, sports, or even play games, here’s a step-by-step guide on how to install apps and channels on your streaming device.
1. Access the app store: Every streaming device has its own app store or channel store where you can find and download apps and channels. Look for the app store icon on the main menu or home screen of your device and select it to open the store.
2. Browse or search for apps/channels: Once in the app store, you can browse through the available apps and channels or use the search function to find specific ones. Most stores provide categories and recommendations to help you discover new content.
3. Select the app/channel: When you find an app or channel you want to install, select it to view more details such as ratings, descriptions, and screenshots. This information can help you decide if it’s the right choice for you.
4. Install the app/channel: After confirming your selection, look for the “Install” or “Add” button and select it to begin the installation process. Some apps may require you to agree to terms and conditions before proceeding.
5. Wait for the installation to complete: The app/channel installation may take a few seconds or minutes, depending on the size of the app and the speed of your internet connection. You’ll usually see a progress bar or loading icon indicating the installation progress.
6. Launch the app/channel: Once the installation is complete, you can either select “Open” or go back to the main menu/home screen and find the newly installed app/channel there. Select it to launch and start using it.
7. Sign in or activate the app/channel (if required): Some apps and channels may require you to sign in with your account credentials or activate them using a unique code. Follow the on-screen instructions to complete this process. If you don’t have an account, you’ll usually have the option to create one.
8. Keep your apps/channels updated: Regularly check for updates to your installed apps and channels. App updates often bring bug fixes, performance improvements, and new features. Open the app store and navigate to the “Updates” section to see if any updates are available.
Note that the availability of apps and channels may vary depending on the streaming device you have. Additionally, some apps and channels may require a subscription or may offer both free and premium content. Be sure to check the details and any associated costs before installing.
With the ability to install apps and channels on your streaming device, you can customize your entertainment experience to suit your preferences. Discover new content, stream your favorite shows, and enjoy a wide range of entertainment options right from the comfort of your couch.
How to Stream Content on Your Streaming Device
Streaming devices offer a convenient way to access and stream a wide range of content, including movies, TV shows, music, and more. If you’re new to streaming or looking for guidance on how to get started, here’s a step-by-step guide on how to stream content on your streaming device.
1. Launch the streaming app: Depending on your streaming device, you may have a pre-installed app or multiple streaming apps to choose from. Locate the app on your device’s main menu or home screen and select it to launch the app.
2. Sign in or create an account (if required): Some streaming apps may require you to sign in with your account credentials, while others may allow you to browse content without signing in. If you don’t have an account for the app you’re using, you’ll usually have the option to create one.
3. Navigate the app interface: Once inside the streaming app, familiarize yourself with the interface. You’ll find various sections such as featured content, genres, search, and your library. Use the navigation buttons on your remote control to navigate through the app’s menus and options.
4. Search for content: If you have a specific movie, TV show, or artist in mind, use the search function within the app to find it. Simply enter the title or keywords related to the content you’re looking for and select the correct result that appears.
5. Select and play the content: Once you’ve found the content you want to stream, select it to view the details. This may include a description, cast information, ratings, and related content. If you’re ready to watch or listen, select the “Play” or “Watch” button to start streaming the content.
6. Customize playback settings: While streaming, you’ll have control over various playback settings. You can pause, play, rewind, fast-forward, and adjust the volume using your streaming device’s remote control. Some apps may also provide options for subtitles, audio language, or picture quality. Take the time to explore and customize these settings to suit your preferences.
7. Explore recommended content: Many streaming apps offer personalized recommendations based on your viewing history and preferences. Take advantage of these recommendations to discover new content that you might enjoy. These recommendations could be found on the app’s home screen or in a dedicated “Recommended” section within the app.
8. Create playlists or favorites: Some streaming apps allow you to create playlists or mark content as favorites for quick access later. If this feature is available, take advantage of it to curate a personalized collection of content that you enjoy.
9. Discover live streaming and scheduled events: In addition to on-demand content, some streaming apps offer live streaming options or scheduled events, such as sports games, concerts, or TV shows. Look for sections dedicated to live or upcoming events within the app to explore this type of content.
Remember to ensure that your streaming device is connected to a stable internet connection for optimal streaming performance. If you encounter any buffering issues or playback errors, try restarting your device or checking your internet connection speed.
With these steps, you’re well-equipped to start streaming your favorite movies, TV shows, and more on your streaming device. Enjoy the convenience and abundance of content that streaming has to offer, and make the most out of your entertainment experience.
Customizing Your Streaming Device’s Settings
Customizing your streaming device’s settings allows you to tailor your entertainment experience to your preferences, and make the most out of your streaming device. Whether you want to adjust the display settings, enhance audio quality, or enable parental controls, here’s a guide on how to customize your streaming device’s settings.
1. Display settings:
– Access the settings menu of your streaming device.
– Look for the display or video settings.
– Adjust the resolution, aspect ratio, and screen size to match your TV’s capabilities.
– Enable any additional display features, such as HDR or Dolby Vision, if supported by your streaming device and TV.
2. Audio settings:
– Navigate to the audio or sound settings in your streaming device’s settings menu.
– Customize the audio output, including the type of audio (stereo, surround sound, etc.), audio format, and volume normalization.
– Adjust any equalizer settings or audio enhancements based on your preference.
3. Network settings:
– Access the network or Wi-Fi settings on your streaming device.
– Modify network connection settings, such as manually setting the IP address or DNS server if needed.
– Enable or disable features like Wi-Fi sleep mode or Wi-Fi roaming.
4. Parental controls:
– Ensure a safe streaming experience by setting up parental controls on your streaming device.
– Look for parental control settings in the settings menu, and follow the prompts to set a PIN or password.
– Customize content restrictions based on age ratings or content categories.
– Block or allow specific apps or channels.
5. Accessibility settings:
– Enable accessibility features to make streaming more accessible for users with disabilities.
– Look for the accessibility settings in the settings menu, and explore options such as closed captioning, audio descriptions, and text-to-speech.
– Customize these settings to suit your specific accessibility needs.
6. Device updates:
– Regularly check for firmware or software updates for your streaming device.
– Look for the system or software update settings in the settings menu.
– Enable automatic updates if available, or manually check for updates periodically to ensure you have the latest features and bug fixes.
7. App and channel settings:
– Some apps and channels have their own settings within the app itself.
– Launch the app, navigate to its settings or preferences menu, and customize options such as subtitles, language preferences, background playback, or autoplay settings.
8. Resetting or restoring:
– If you encounter persistent issues or want to start fresh, your streaming device may offer a reset or restore option.
– Access the reset or restore settings in the device’s settings menu.
– Follow the instructions to reset your device to its factory settings, which will erase all personalized settings and data.
Remember that the specific settings available may vary depending on your streaming device model and manufacturer. Refer to the user manual or online support resources for detailed instructions on customizing settings specific to your device. By customizing your streaming device’s settings, you can optimize your streaming experience, enhance audio and video quality, and ensure a personalized and enjoyable entertainment experience.
How to Cast Content to Your Streaming Device
Casting content to your streaming device allows you to enjoy videos, music, and more from your mobile device or computer on the larger screen of your TV. Whether you want to share photos, stream YouTube videos, or play music, here’s a step-by-step guide on how to cast content to your streaming device.
1. Ensure your streaming device is set up and connected to the same Wi-Fi network as your casting device (e.g., smartphone, tablet, or computer).
2. On your casting device, open the app or content you want to cast. Many popular apps, such as YouTube, Netflix, and Spotify, have a cast icon (usually represented by a rectangle with curved lines in the corner) that you can tap or click.
3. Find and tap or click the cast icon within the app. A list of available casting devices should appear.
4. Select your streaming device from the list of available devices. The casting device will establish a connection with your streaming device.
5. Once the connection is established, the content on your casting device will be mirrored or streamed on your TV screen. You can control the playback using the controls on your casting device, such as pausing, skipping, or adjusting the volume.
6. To stop casting, simply tap or click the cast icon again within the app on your casting device and select “Stop Casting” or a similar option. The connection between your casting device and streaming device will be terminated.
7. Some casting devices may offer additional features, such as the ability to cast your entire screen or specific tabs from your web browser. Explore the casting options on your streaming device to discover these additional functionalities.
It’s worth noting that not all apps or content may support casting, so the availability of the cast icon within an app may vary. Additionally, the casting process may differ slightly depending on your streaming device and casting device. Familiarize yourself with the specific casting instructions for your streaming device by referring to the device’s user manual or online support resources.
Casting content to your streaming device offers a convenient way to enjoy your favorite media on the big screen. Whether you’re sharing a video with friends or simply want to enjoy a more immersive experience, casting allows you to easily bridge the gap between your mobile device or computer and your TV screen.
Optimize Your Streaming Device’s Performance
To ensure a smooth and enjoyable streaming experience, it’s important to optimize your streaming device’s performance. By following these tips and tricks, you can enhance the speed, reliability, and overall performance of your streaming device.
1. Check your internet connection:
– Make sure your streaming device is connected to a stable and high-speed internet connection.
– If possible, use a wired Ethernet connection instead of relying solely on Wi-Fi for better stability and speed.
– Consider upgrading your internet plan if you frequently experience buffering or slow streaming speeds.
2. Position your streaming device and router:
– Place your streaming device and Wi-Fi router in close proximity to each other to minimize signal interference and ensure a strong connection.
– Keep your streaming device away from obstructions, such as walls or large objects, that can block the Wi-Fi signal.
– If using Wi-Fi, consider positioning your router at an elevated location to improve coverage.
3. Update your streaming device’s firmware:
– Regularly check for updates for your streaming device’s firmware or operating system.
– Firmware updates often include bug fixes, performance enhancements, and new features.
– Enable automatic firmware updates if available, or manually check for updates in the settings menu of your streaming device.
4. Clear cache and data:
– Over time, cached data from apps and channels can accumulate and slow down your streaming device.
– Clear the cache and data regularly to free up storage space and improve performance.
– Access the app settings or storage settings of your streaming device to clear cache and data for individual apps or channels.
5. Limit background processes:
– Close unused apps or channels running in the background to free up system resources.
– Many streaming devices allow you to view and manage running apps or processes in the settings menu.
– Quitting unnecessary processes can help optimize the performance of your streaming device and reduce the chances of slowdowns or crashes.
6. Remove unnecessary apps or channels:
– Uninstall any apps or channels that you no longer use to declutter your streaming device.
– Removing unwanted apps can help improve storage space and streamline navigation.
– Access the settings menu or app management section of your streaming device to uninstall apps or channels.
7. Restart your streaming device:
– Restarting your streaming device periodically can help clear any temporary glitches or issues that may affect performance.
– Power off your streaming device, unplug it from the power source, wait a few seconds, and then plug it back in.
– Allow your streaming device to boot up fully before using it again.
By implementing these optimization techniques, you can maximize the performance and efficiency of your streaming device. Enjoy uninterrupted streaming and a seamless entertainment experience with improved speed and reliability.
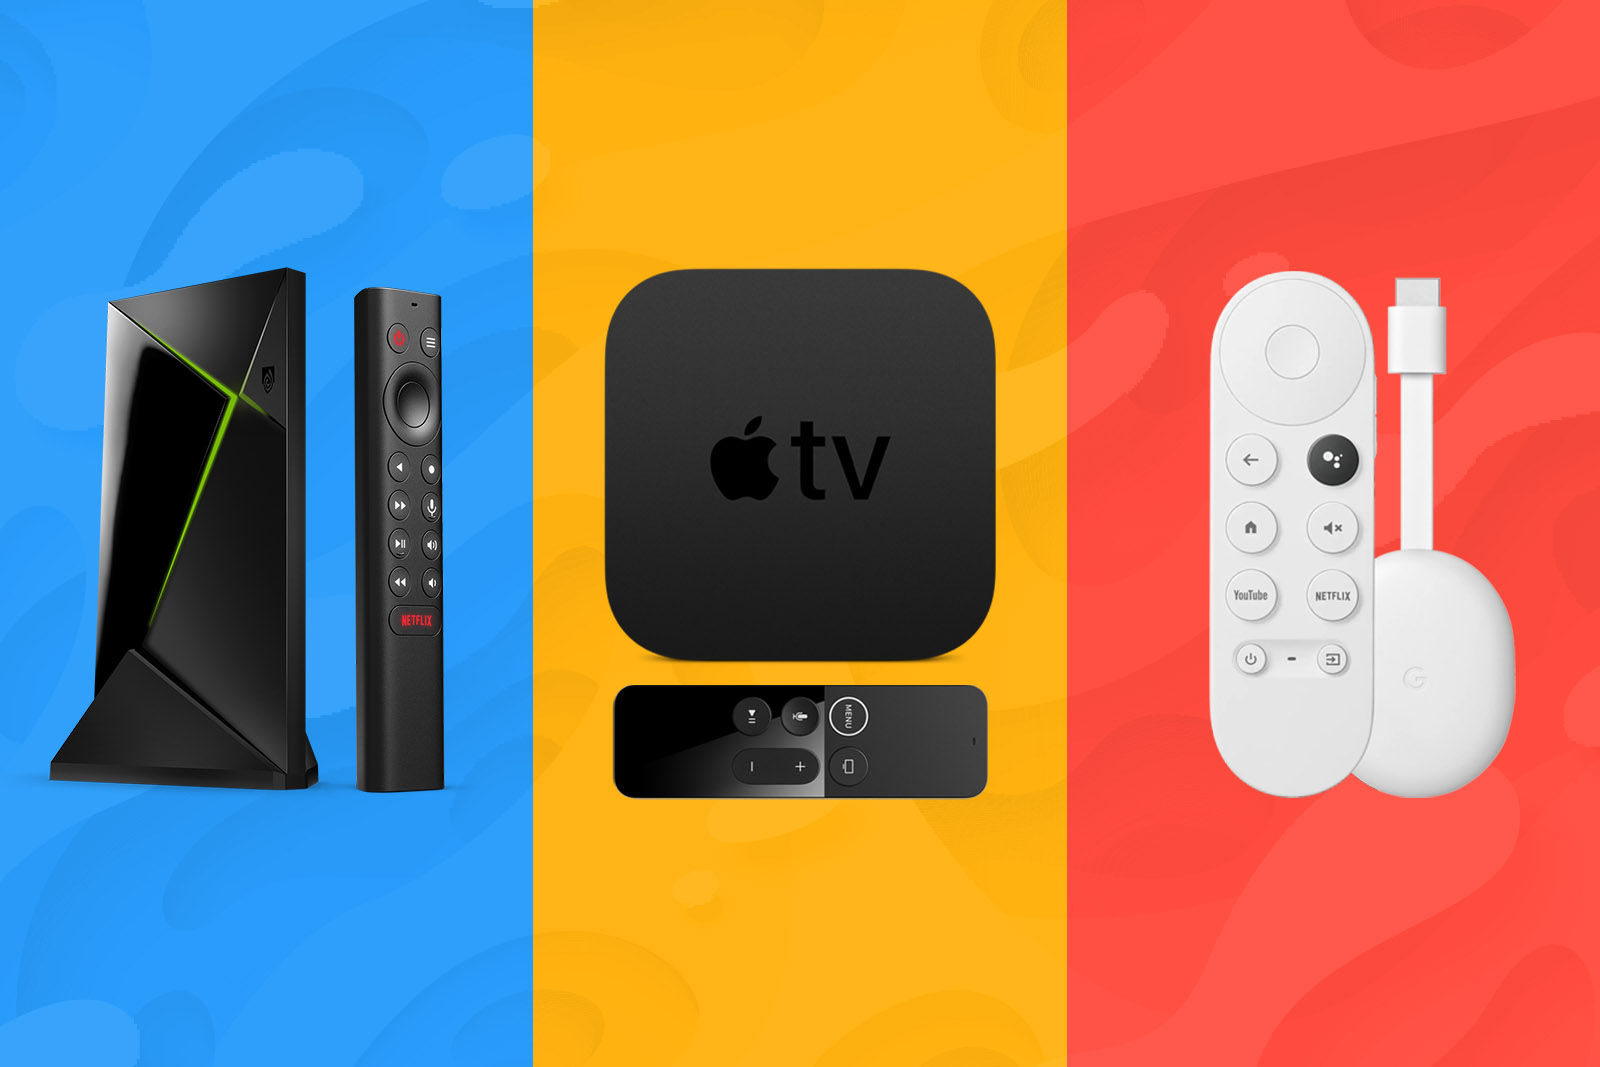
Streaming Device Comparison: Which One is Right for You?
With the wide variety of streaming devices available in the market, choosing the right one for your entertainment needs can be a daunting task. To help you make an informed decision, let’s compare some popular streaming devices and highlight their key features and benefits.
1. Roku:
– Roku offers a range of streaming devices at different price points, making it accessible for various budgets.
– It supports a vast selection of streaming services and apps, including popular ones like Netflix, Hulu, and Amazon Prime Video.
– Roku devices are known for their user-friendly interface and straightforward navigation.
– They also offer a universal search feature, allowing you to search for content across multiple streaming platforms.
2. Amazon Fire TV Stick:
– The Fire TV Stick provides seamless integration with Amazon’s ecosystem, making it a great choice for Amazon Prime members.
– It offers a voice-controlled remote with Alexa built-in, allowing you to easily search for content and control your TV with voice commands.
– The Fire TV Stick also has access to a wide range of streaming apps and games.
– It supports 4K Ultra HD and HDR streaming for a superior viewing experience.
3. Apple TV:
– Apple TV delivers a premium streaming experience with its sleek design and powerful hardware.
– It seamlessly integrates with the Apple ecosystem, allowing you to access your iTunes library, Apple Music, and AirPlay content from other Apple devices.
– Apple TV offers a user-friendly interface and boasts a vast selection of apps and services.
– With the Siri Remote, you can use voice commands to control your TV and search for content.
4. Google Chromecast:
– Chromecast is a unique streaming device that wirelessly casts content from your smartphone, tablet, or computer to your TV.
– It supports a wide range of streaming apps and services and offers the ability to mirror your device’s screen onto the TV.
– Chromecast Ultra supports 4K Ultra HD and HDR streaming for a superior visual experience.
– With the Google Home app, you can control your Chromecast using voice commands.
When choosing a streaming device, consider factors such as your budget, preferred streaming services, device compatibility, and desired features. Additionally, take into account other factors like resolution support, storage capacity, and additional features like gaming capabilities or smart home integration.
Ultimately, the best streaming device for you depends on your personal preferences and needs. Consider your favorite streaming services, device compatibility, and desired features to make an informed decision. Each streaming device offers unique advantages and features that cater to different users, so take your time to research and compare before making your final choice.
Protecting Your Streaming Device: Security Tips and Best Practices
Streaming devices have become an integral part of our entertainment setup, offering a plethora of content at our fingertips. However, it’s important to prioritize the security of your streaming device to safeguard your personal information and ensure a safe streaming experience. Here are some security tips and best practices to protect your streaming device:
1. Keep your device firmware and software up to date:
– Regularly check for firmware or software updates for your streaming device.
– Updates often include security patches and bug fixes that protect against vulnerabilities.
– Enable automatic updates if available, or routinely check for updates in the settings menu.
2. Secure your Wi-Fi network:
– Set a strong password for your Wi-Fi network to prevent unauthorized access to your streaming device and personal information.
– Use a combination of letters, numbers, and special characters in your password.
– Change the default network name (SSID) to something unique to make it more difficult for unauthorized users to identify your network.
3. Use a Virtual Private Network (VPN):
– Consider using a VPN to encrypt your internet connection and protect your streaming activities from prying eyes.
– A VPN masks your IP address and adds an additional layer of security.
– Ensure you choose a reputable and trustworthy VPN provider for maximum protection.
4. Be cautious when downloading apps or streaming from unofficial sources:
– Stick to reputable app stores or official streaming services to download apps and channels.
– Avoid downloading apps or streaming content from unknown or unofficial sources, as they may contain malware or other security risks.
– Check reviews and ratings before downloading apps to ensure their legitimacy and security.
5. Keep personal information private:
– Be cautious when providing personal information during the setup process or when creating accounts for streaming apps.
– Avoid sharing sensitive information, such as your full name, address, or credit card details, unless necessary and with trusted sources.
– Regularly review and update your privacy settings within streaming apps to control what information is collected and shared.
6. Enable parental controls:
– If you have children or want to limit inappropriate content, enable parental controls on your streaming device.
– Set up a PIN or password to restrict access to certain apps, channels, or content based on age ratings or categories.
– Adjust the level of control to suit your family’s preferences and needs.
7. Educate yourself on phishing scams and suspicious links:
– Be wary of unsolicited emails, messages, or pop-ups asking for personal information or urging you to click on links.
– Avoid clicking on suspicious links or downloading attachments from unknown sources, as they can potentially contain malware.
– Verify the legitimacy of emails or messages before taking any action, especially if they claim to be from a streaming service or app provider.
By implementing these security tips, you can protect your streaming device and enjoy a safe and worry-free streaming experience. Prioritize security to safeguard your personal information and ensure that your streaming activities remain private and secure.
Streaming Device Remote Control Tips and Tricks
The remote control is an essential part of your streaming device, allowing you to navigate menus, control playback, and access various features. To enhance your streaming experience and take full advantage of the remote control, here are some useful tips and tricks:
1. Master the basic controls:
– Familiarize yourself with the basic buttons and functions of your remote control, such as power, volume, play/pause, and navigation buttons (up, down, left, right).
– Take note of any dedicated buttons specific to your streaming device, such as a home button or voice control button.
2. Learn the shortcuts:
– Each streaming device may have its own set of shortcuts to quickly access certain features or menus.
– Explore the user manual or online support resources for your device to discover these shortcuts.
– Common shortcuts include direct access to settings, search, or specific apps/channels.
3. Utilize voice control:
– If your remote control supports voice control, take advantage of this feature to navigate menus, search for content, and control playback using voice commands.
– Familiarize yourself with the specific voice commands supported by your device and use natural language for faster and more accurate control.
4. Enable HDMI-CEC:
– HDMI-CEC (Consumer Electronics Control) is a feature that allows control of multiple HDMI-connected devices with a single remote control.
– Check if your streaming device and TV support HDMI-CEC and enable it in the settings menu.
– Once enabled, you can control basic functions of your TV, such as power and volume, using the streaming device’s remote control.
5. Take advantage of app-specific buttons:
– Look for any dedicated buttons on your remote control for popular streaming apps or channels, such as Netflix or YouTube.
– These buttons provide direct access to the respective app, saving you time and simplifying navigation.
6. Customize the remote control layout:
– Some streaming devices allow you to customize the layout or mapping of buttons on your remote control.
– Explore the settings menu of your streaming device to see if this option is available.
– Personalize the layout based on your preferences and frequently used features.
7. Use smartphone apps as remote control alternatives:
– Many streaming devices offer companion apps that turn your smartphone or tablet into a virtual remote control.
– Install the companion app for your streaming device and connect it to the same Wi-Fi network as your streaming device.
– These apps often provide additional features, such as a keyboard for easier text input and the ability to browse content on your mobile device.
8. Keep spare batteries on hand:
– To avoid interruptions in your streaming experience, always have spare batteries available for your remote control.
– How often you replace batteries will depend on usage, but it’s a good practice to keep a set of fresh batteries nearby.
– Consider using rechargeable batteries to reduce waste and save money in the long run.
By utilizing these remote control tips and tricks, you can enhance your streaming experience and navigate your streaming device with ease. Take advantage of the various features and functionalities of your remote control to streamline your viewing and make the most out of your entertainment options.
Streaming Device Accessories: Enhance Your Viewing Experience
While streaming devices offer a convenient way to access a wide range of content, there are several accessories available that can further enhance your viewing experience. Whether you want to improve audio quality, expand storage, or simplify navigation, here are some streaming device accessories worth considering:
1. HDMI Cable:
– A high-quality HDMI cable can significantly improve the audio and video performance of your streaming device.
– Choose an HDMI cable that supports 4K Ultra HD and HDR if your TV and streaming device are capable of delivering these resolutions.
– Look for cables with gold-plated connectors for better durability and signal quality.
2. Streaming Media Remote:
– While the remote control that comes with your streaming device is sufficient, a dedicated streaming media remote can provide additional features and convenience.
– Streaming media remotes often have built-in keyboards, voice control, and dedicated buttons for popular streaming apps or channels.
– These remotes streamline navigation and make it easier to search for content or input text.
3. Wireless Keyboard with Touchpad:
– If you find typing on the on-screen keyboard of your streaming device cumbersome, consider using a wireless keyboard with a touchpad.
– Wireless keyboards allow for faster and more accurate text input, making it easier to search for content or enter login information.
– Look for keyboards with a compact and ergonomic design for comfortable use.
4. External Hard Drive or USB Storage:
– If your streaming device has limited internal storage, an external hard drive or USB storage device can expand your storage capacity.
– Use it to store local media files, including movies, TV shows, and music, and access them directly from your streaming device.
– Ensure compatibility with your streaming device and choose a storage device with ample capacity to meet your needs.
5. Soundbar or Surround Sound System:
– Enhance your audio experience by connecting a soundbar or surround sound system to your streaming device.
– Soundbars offer improved sound quality and a more immersive experience compared to the built-in speakers of your TV or streaming device.
– Depending on your budget and space, you can choose between a soundbar or a complete surround sound system for a cinema-like experience.
6. Universal Remote Control:
– If you have multiple devices connected to your TV, a universal remote control can simplify the control and eliminate the need for multiple remotes.
– Look for a universal remote control that is compatible with your streaming device and other devices like your TV, Blu-ray player, or sound system.
– Universal remotes often offer advanced features like macros or activities, allowing you to customize and automate tasks with a single button press.
7. Streaming Stick Mount or Stand:
– If space around your TV is limited, a streaming stick mount or stand can help keep your streaming device organized and provide better access for remote controls.
– Some mounts attach directly to the back of your TV, while others stand on their own near the TV.
– Choose a mount or stand that is compatible with your streaming device model for a secure and stable installation.
These streaming device accessories can enhance your viewing experience and take your streaming enjoyment to the next level. Consider your specific needs and preferences when selecting accessories for your streaming device, and choose quality products from reputable brands to ensure optimal performance and durability.