
Back Up Your Data
Before embarking on the journey of resetting your iPhone 14 to its factory settings, it's crucial to safeguard your precious data. Your iPhone likely contains a treasure trove of memories, important documents, and personalized settings that you wouldn't want to lose. Therefore, backing up your data is the pivotal first step in this process.
Why Backing Up Is Essential
Imagine the sinking feeling of realizing that all your photos, contacts, messages, and app data are irretrievably lost. To avoid such a nightmare, creating a backup ensures that your information remains safe and accessible even after the reset. Whether you're resetting your device to troubleshoot issues, prepare for an upgrade, or simply starting afresh, having a backup provides peace of mind.
How to Back Up Your Data
iCloud Backup
Apple offers a convenient and reliable method for backing up your iPhone through iCloud. To initiate an iCloud backup, follow these simple steps:
- Connect your iPhone to a Wi-Fi network.
- Go to "Settings" and tap on your name at the top.
- Select "iCloud" and then "iCloud Backup."
- Toggle on the "iCloud Backup" option and tap "Back Up Now."
iTunes Backup
If you prefer using your computer to back up your iPhone, iTunes provides an alternative method. Here's how to create an iTunes backup:
- Connect your iPhone to your computer using a USB cable.
- Open iTunes and select your device.
- Click on "Back Up Now" to initiate the backup process.
Verify Your Backup
Once the backup process is complete, it's prudent to verify that your data has been successfully backed up. You can do this by navigating to "Settings," tapping on your name, selecting "iCloud," then "iCloud Backup." Here, you should see the time and date of your latest backup. If you've opted for an iTunes backup, you can verify it by accessing iTunes preferences and selecting "Devices."
By taking the time to back up your data, you're ensuring that your cherished memories, important information, and personalized settings are preserved. This proactive approach sets the stage for a seamless transition as you proceed with the factory reset of your iPhone 14.
Sign Out of iCloud and iTunes
Before initiating a factory reset on your iPhone 14, it's imperative to sign out of iCloud and iTunes to ensure a smooth transition and prevent any potential complications during the reset process. Signing out of these services disassociates your device from your Apple ID, thereby safeguarding your data and privacy.
Why Sign Out?
Signing out of iCloud and iTunes is a crucial step as it disengages your device from these services, preventing any potential conflicts or data synchronization issues during the reset. By disconnecting your iPhone from iCloud, you ensure that your personal data, such as contacts, photos, and documents, remains secure and unaffected by the reset. Additionally, signing out of iTunes deauthorizes your device from accessing any content or services linked to your Apple ID, ensuring a clean slate for the reset.
How to Sign Out of iCloud
To sign out of iCloud on your iPhone 14, follow these steps:
- Open the "Settings" app.
- Tap on your name at the top of the screen to access your Apple ID settings.
- Scroll down and select "Sign Out."
- Enter your Apple ID password when prompted.
- Choose whether to keep a copy of your data on the device or delete it. This decision depends on whether you have already backed up your data and wish to retain it on the device after signing out of iCloud.
How to Sign Out of iTunes & App Store
To sign out of iTunes and the App Store on your iPhone 14, proceed as follows:
- Open the "Settings" app.
- Scroll down and select "iTunes & App Store."
- Tap on your Apple ID at the top of the screen.
- In the pop-up window, select "Sign Out."
Verifying Sign Out
After signing out of iCloud and iTunes, it's advisable to verify that the disassociation was successful. You can do this by navigating to the respective settings and ensuring that your Apple ID is no longer linked to the device. This verification step provides assurance that your iPhone is ready for the next phase of the reset process.
By meticulously signing out of iCloud and iTunes, you are taking proactive measures to protect your data and ensure a seamless factory reset experience for your iPhone 14. This essential step sets the stage for the subsequent actions, allowing you to proceed with confidence and peace of mind.
Turn Off Find My iPhone
Turning off the "Find My iPhone" feature is a critical step when preparing to reset your iPhone 14 to its factory settings. This feature, designed to help locate and secure your device in case of loss or theft, must be disabled to ensure a smooth and successful reset process.
Why Turn Off Find My iPhone?
The "Find My iPhone" feature is deeply integrated into the iOS ecosystem, providing a layer of security and peace of mind for users. However, when it comes to performing a factory reset, leaving this feature enabled can impede the process. Disabling "Find My iPhone" ensures that the device can be reset without encountering activation lock issues, which may arise if the feature is left active.
How to Turn Off Find My iPhone
To disable "Find My iPhone" on your iPhone 14, follow these steps:
-
Open Settings: Launch the "Settings" app on your device.
-
Tap Your Name: Scroll down and tap on your name at the top of the screen to access your Apple ID settings.
-
Select Find My: Tap on "Find My" to access the feature's settings.
-
Turn Off Find My iPhone: Toggle off the "Find My iPhone" option. You may be prompted to enter your Apple ID password to confirm the action.
Verifying Find My iPhone Status
After turning off "Find My iPhone," it's advisable to verify that the feature has been successfully disabled. You can do this by revisiting the "Find My" settings and ensuring that the "Find My iPhone" toggle is in the off position. This verification step provides assurance that the feature is no longer active on your device, setting the stage for the next phase of the reset process.
By diligently turning off "Find My iPhone," you are proactively preparing your device for the upcoming factory reset. This essential step ensures that the reset process can proceed seamlessly, without encountering any activation lock complications. With this crucial task completed, your iPhone 14 is now primed for the final steps of the reset process, allowing you to proceed with confidence and clarity.
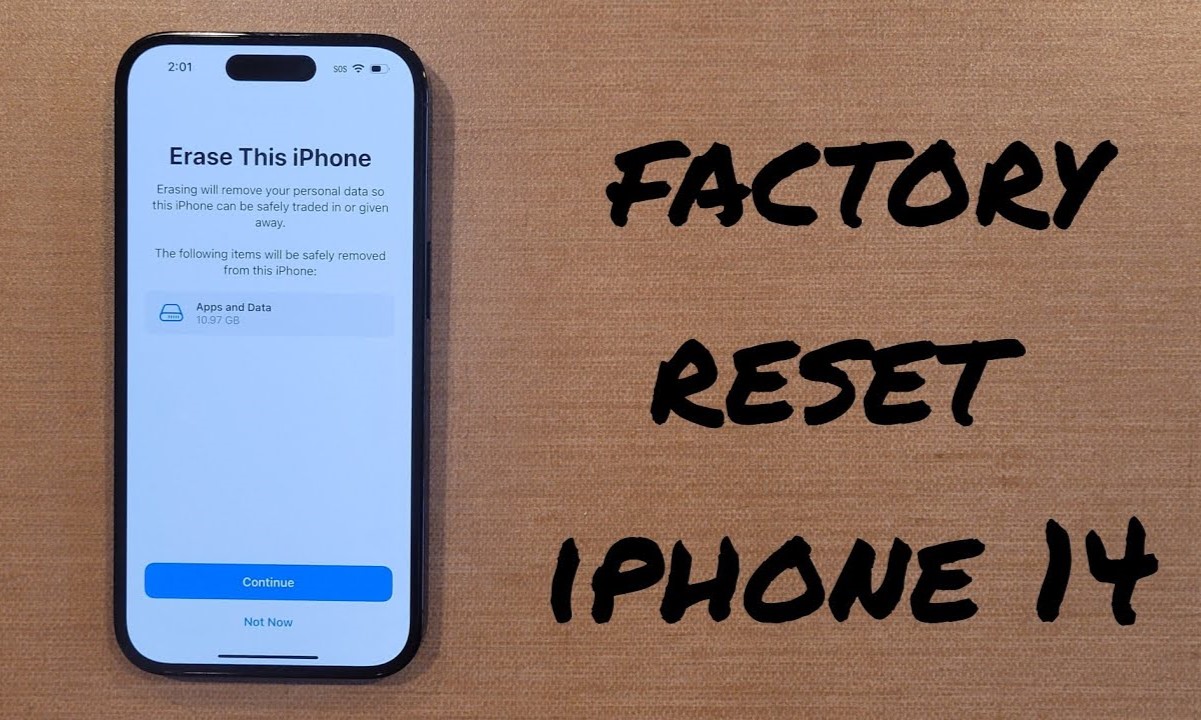
Erase All Content and Settings
The pivotal moment has arrived to initiate the final step in resetting your iPhone 14 to its factory settings. Erasing all content and settings is a decisive action that will effectively wipe the device clean, restoring it to its original state as if it were fresh out of the box. This process ensures that all personal data, settings, and customizations are removed, providing a clean slate for future use, troubleshooting, or device transfer.
Why Erase All Content and Settings?
Eradicating all content and settings from your iPhone 14 serves multiple purposes. Firstly, it is a fundamental step in addressing various issues such as persistent software glitches, performance slowdowns, or unresponsive behavior. By resetting the device to its factory state, you effectively eliminate any underlying software issues that may have accumulated over time.
Moreover, when preparing to sell or transfer ownership of your iPhone, erasing all content and settings is imperative to safeguard your privacy and ensure that the new owner receives a pristine device free from your personal data.
How to Erase All Content and Settings
To embark on the process of erasing all content and settings from your iPhone 14, follow these steps:
-
Open Settings: Launch the "Settings" app on your device.
-
Navigate to General: Scroll down and tap on "General" to access the general settings.
-
Select Reset: Tap on "Reset" to enter the reset options.
-
Choose Erase All Content and Settings: Select "Erase All Content and Settings" to initiate the process.
-
Confirm the Action: You may be prompted to enter your device passcode and Apple ID password to confirm the erasure.
The Reset Process
Once the erasure process is initiated, your iPhone 14 will undergo a comprehensive reset, erasing all data, settings, and customizations. This may take some time, depending on the amount of data stored on the device. It is crucial to ensure that your device remains connected to a power source and Wi-Fi network throughout this process to prevent any interruptions.
Verifying the Reset
After the reset is complete, your iPhone 14 will restart and present the initial setup screen, akin to when the device was first unboxed. This signifies the successful completion of the reset process, and your device is now ready to be set up as new.
By meticulously erasing all content and settings from your iPhone 14, you have effectively restored the device to its factory state, paving the way for a fresh start. This essential step ensures that your device is free from personal data and customizations, ready to serve you in its pristine form or to embark on a new journey with its next owner.
Set Up Your iPhone as New
After successfully resetting your iPhone 14 to its factory settings, the next phase involves setting it up as new. This pivotal step marks the beginning of a fresh journey with your device, presenting an opportunity to configure it according to your preferences, install essential apps, and personalize the settings to suit your needs.
The Initial Setup Process
Upon completing the factory reset, powering on your iPhone 14 will greet you with the familiar "Hello" screen, reminiscent of unboxing a brand-new device. This signifies that the device has been effectively wiped clean and is now ready for the initial setup.
Language and Region Selection
The initial setup prompts you to select your preferred language and region. This ensures that your device's interface and services are tailored to your linguistic and geographical preferences, setting the stage for a personalized user experience.
Connecting to Wi-Fi and Cellular Network
To proceed with the setup, connecting your iPhone 14 to a Wi-Fi network is essential. This enables the device to download the latest software updates and facilitates the seamless setup of various services and features. Additionally, if applicable, inserting a SIM card allows your device to connect to the cellular network, ensuring uninterrupted communication capabilities.
Setting Up Touch ID or Face ID
For enhanced security and convenience, setting up Touch ID or Face ID provides a seamless and secure method of unlocking your device and authenticating various actions. This biometric authentication feature adds an extra layer of protection to your device, safeguarding your data and privacy.
Restoring from Backup (Optional)
If you previously created a backup of your data, you have the option to restore your iPhone 14 from this backup during the setup process. This allows you to seamlessly retrieve your contacts, photos, apps, and settings, ensuring a smooth transition back to your personalized digital environment.
Apple ID and iCloud Configuration
Signing in with your Apple ID and configuring iCloud settings enables seamless access to Apple's ecosystem of services, including iCloud Drive, Photos, and iCloud Keychain. This integration ensures that your data remains synchronized across your Apple devices, providing a cohesive and interconnected user experience.
App Installation and Customization
As you progress through the setup, you have the opportunity to install essential apps from the App Store and customize your device's settings according to your preferences. This includes configuring notifications, display settings, privacy preferences, and more, tailoring the device to suit your individual needs.
Ready for a Fresh Start
Completing the setup process signifies that your iPhone 14 is now ready for a fresh start, tailored to your preferences and requirements. Whether you're embarking on a new chapter with your device or preparing it for a new user, the meticulous setup ensures that your iPhone is primed to deliver a seamless and personalized user experience.
By meticulously setting up your iPhone 14 as new, you have effectively tailored the device to suit your preferences, ensuring a seamless and personalized user experience. This essential step marks the beginning of a fresh journey with your device, setting the stage for a myriad of possibilities and personalized interactions.