
Checking SIM Card Compatibility
Before inserting a SIM card into your iPhone 13, it's crucial to ensure that the SIM card is compatible with the device. The iPhone 13 supports nano-SIM cards, which are the smallest type of SIM cards available. These SIM cards are widely used and are compatible with most modern smartphones, including the iPhone 13.
To check the compatibility of your SIM card, you can refer to the packaging or documentation that came with the SIM card. It should clearly indicate the type of SIM card it is, such as nano-SIM. If you no longer have the packaging, you can also check the SIM card itself. Nano-SIM cards have a distinct size and shape, making them easily identifiable.
Another way to verify compatibility is to contact your mobile service provider. They can confirm whether your SIM card is compatible with the iPhone 13 and provide any necessary assistance. Additionally, if you are obtaining a new SIM card, your service provider can ensure that you receive the correct type for your device.
It's important to note that the iPhone 13 also supports eSIM, a digital SIM technology that eliminates the need for a physical SIM card. If you prefer to use an eSIM, you can check with your service provider to see if they offer this option and guide you through the setup process.
Ensuring that your SIM card is compatible with your iPhone 13 will prevent any potential issues when inserting the SIM card and activating your device. By taking this initial step, you can proceed with confidence, knowing that your SIM card is ready to be inserted into your iPhone 13.
Locating the SIM Card Tray
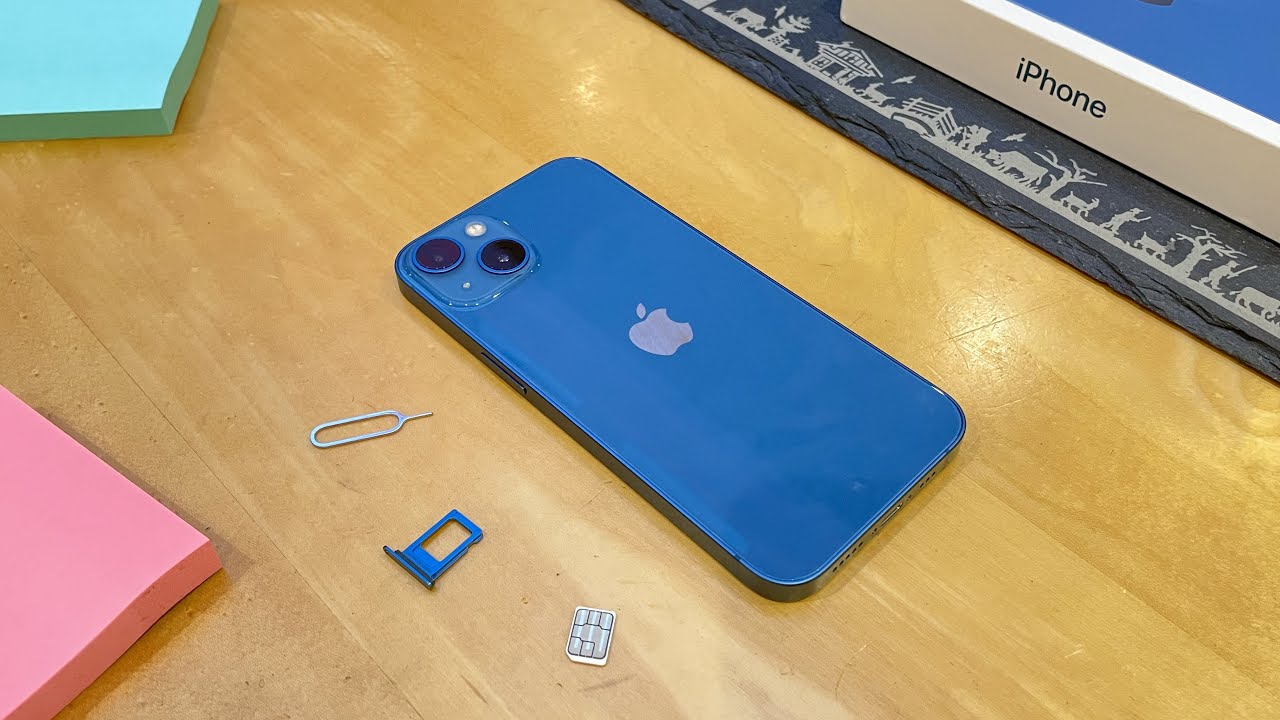
The SIM card tray in the iPhone 13 is a crucial component that facilitates the seamless insertion and removal of the SIM card. To locate the SIM card tray, you will need to identify the specific location on the device where it is situated. In the case of the iPhone 13, the SIM card tray is typically positioned on the side of the device.
To begin the process of locating the SIM card tray, hold your iPhone 13 securely and examine the sides. The SIM card tray is commonly located on the right-hand side of the device, although the exact placement may vary slightly depending on the model. It is important to handle the device with care during this process to avoid any accidental damage.
Once you have identified the side of the iPhone 13 where the SIM card tray is located, you will notice a small pinhole or slot adjacent to the tray. This pinhole serves as the entry point for the SIM eject tool, which is essential for accessing the SIM card tray. The presence of this pinhole is a key indicator of the SIM card tray's position and provides a visual cue for its precise location.
The SIM card tray on the iPhone 13 is designed to be easily accessible, allowing for straightforward insertion and removal of the SIM card. Its strategic placement on the side of the device ensures convenience and accessibility for users. By familiarizing yourself with the location of the SIM card tray, you can confidently proceed to the next steps of the SIM insertion process, knowing exactly where to access the tray when needed.
In summary, the SIM card tray in the iPhone 13 is situated on the side of the device, typically on the right-hand side. The presence of a small pinhole or slot adjacent to the tray serves as a visual indicator of its location and provides a convenient entry point for the SIM eject tool. By recognizing and understanding the positioning of the SIM card tray, you are well-prepared to proceed with the subsequent steps of inserting the SIM card into your iPhone 13.
Using the SIM Eject Tool
When it comes to inserting or replacing a SIM card in your iPhone 13, the SIM eject tool plays a pivotal role in facilitating this process. The SIM eject tool, a small and slender metal pin, is specifically designed to interact with the SIM card tray, enabling users to access and manipulate the tray with precision and ease.
To begin, locate the SIM eject tool that was included in the original packaging of your iPhone 13. The SIM eject tool is typically found within the accessories box, alongside the user manual and other essential items. It is distinguishable by its slender and elongated shape, making it easy to identify among the accessories.
Once you have retrieved the SIM eject tool, hold it securely between your fingers, taking care to grasp it near the pointed end. The opposite end of the tool usually features a small handle or grip, providing a comfortable and stable hold during use. The compact size of the SIM eject tool ensures that it can be maneuvered with precision, allowing for seamless interaction with the SIM card tray.
With the SIM eject tool in hand, approach your iPhone 13 and locate the small pinhole or slot adjacent to the SIM card tray. This pinhole serves as the entry point for the SIM eject tool and is strategically positioned to align with the internal mechanism of the SIM card tray. Gently insert the pointed end of the SIM eject tool into the pinhole, applying a slight amount of pressure to initiate the release mechanism.
As you insert the SIM eject tool into the pinhole, you will feel a subtle resistance, indicating that the tool has engaged with the internal mechanism of the SIM card tray. Continuing to exert gentle pressure, push the SIM eject tool firmly into the pinhole, prompting the SIM card tray to disengage and protrude slightly from the device. This action allows for easy access to the SIM card tray, preparing it for the subsequent step of inserting or replacing the SIM card.
The utilization of the SIM eject tool is a straightforward and essential aspect of the SIM insertion process for the iPhone 13. By following these steps and effectively employing the SIM eject tool, you can confidently proceed to the next stage of inserting the SIM card into your device, knowing that you have successfully accessed the SIM card tray with precision and ease.
Inserting the SIM Card
With the SIM card tray accessible, it's time to proceed with the crucial step of inserting the SIM card into your iPhone 13. Before beginning this process, it's important to handle the SIM card with care, ensuring that it remains free from any damage or debris. Here's a detailed guide on how to insert the SIM card into your iPhone 13:
-
Prepare the SIM Card: Prior to insertion, take a moment to inspect the SIM card. Ensure that it is clean, free from any visible damage, and properly oriented. The SIM card features a distinct shape with one corner angled or notched, which aligns with the corresponding orientation within the SIM card tray. This ensures that the SIM card is inserted in the correct position, preventing any potential issues.
-
Positioning the SIM Card: Hold the iPhone 13 securely and gently place the SIM card onto the SIM card tray. Align the notched corner of the SIM card with the designated area within the tray, ensuring a precise fit. The SIM card should rest comfortably within the tray, with the notched corner serving as a guide for proper alignment.
-
Inserting the SIM Card Tray: Once the SIM card is positioned correctly on the tray, carefully slide the tray back into the iPhone 13. Ensure that the tray moves smoothly and securely into place, maintaining alignment with the device. The SIM card tray should seamlessly integrate with the iPhone 13, with no resistance or obstruction during the insertion process.
-
Verifying the Connection: After inserting the SIM card tray, take a moment to confirm that the tray is fully seated within the device. Gently press on the tray to ensure that it is flush with the side of the iPhone 13, indicating a secure and stable connection. This step is essential for guaranteeing that the SIM card is properly inserted and ready for activation.
By following these detailed steps, you can confidently insert the SIM card into your iPhone 13, ensuring a seamless and secure connection. With the SIM card successfully inserted, you are now prepared to proceed with the final stage of replacing the SIM card tray and finalizing the SIM insertion process.
Replacing the SIM Card Tray
After successfully inserting the SIM card into your iPhone 13, the final step involves replacing the SIM card tray to secure the SIM card within the device. This process ensures that the SIM card remains firmly in place, maintaining a stable connection and preventing any potential dislodgment. Here's a detailed guide on how to replace the SIM card tray in your iPhone 13:
-
Aligning the SIM Card Tray: With the SIM card securely inserted, position the SIM card tray adjacent to the slot on the side of the iPhone 13. The tray should align seamlessly with the device, ensuring a precise fit that facilitates smooth insertion.
-
Careful Insertion: Gently guide the SIM card tray back into the designated slot on the side of the iPhone 13. Exercise caution to ensure that the tray slides smoothly and evenly into place, without any resistance or misalignment. The tray should seamlessly integrate with the device, indicating a secure and stable connection.
-
Verifying the Fit: Once the SIM card tray is inserted, take a moment to verify its fit within the device. Ensure that the tray is flush with the side of the iPhone 13, indicating that it is fully seated and securely in position. This step is essential for confirming that the SIM card is properly enclosed and protected within the device.
-
Final Checks: After replacing the SIM card tray, perform a final check to confirm that it is securely in place. Gently press on the tray to ensure that it remains stable and does not protrude from the device. This additional verification step reinforces the secure positioning of the SIM card tray, providing peace of mind regarding the integrity of the SIM card within the iPhone 13.
By following these detailed steps, you can effectively replace the SIM card tray in your iPhone 13, ensuring that the SIM card remains securely enclosed within the device. With the SIM card tray successfully replaced, your iPhone 13 is now fully prepared for activation and usage, with the SIM card seamlessly integrated and ready to facilitate your mobile connectivity needs.