
Checking for Compatibility
Before removing the SIM card from your iPhone 13, it's crucial to ensure that the new SIM card you intend to use is compatible with your device. The iPhone 13 is designed to work with nano-SIM cards, which are the smallest SIM card size available. To verify compatibility, you can refer to the documentation provided by your mobile service provider or check the SIM card itself for its size.
To locate the SIM card slot on your iPhone 13, you can refer to the user manual or visit the official Apple support website for detailed instructions. It's important to note that attempting to insert an incompatible SIM card into your device can lead to connectivity issues and may even damage the SIM card slot.
If you're unsure about the compatibility of the new SIM card, it's advisable to reach out to your mobile service provider for guidance. They can provide you with the necessary information and ensure that you have the correct SIM card for your iPhone 13.
Ensuring compatibility before proceeding with the SIM card removal process will help you avoid potential complications and ensure a smooth transition to the new SIM card. Once you've confirmed compatibility, you can proceed with confidence, knowing that your iPhone 13 is ready for the SIM card replacement process.
Power Off the iPhone 13
Powering off your iPhone 13 is the first step in the process of removing the SIM card. This ensures that the device is safely shut down, minimizing the risk of any potential damage during the SIM card removal and replacement. Here's how to power off your iPhone 13:
-
Locate the Side Button: The side button is located on the right side of the iPhone 13. It is used to power on, power off, and activate Siri on the device.
-
Press and Hold the Side Button: To initiate the power off sequence, press and hold the side button along with either volume button until the "slide to power off" slider appears on the screen.
-
Slide to Power Off: Once the "slide to power off" slider appears, simply swipe it from left to right to power off the device. This action prompts the iPhone 13 to begin the shutdown process.
-
Wait for the Device to Power Off: After swiping the slider, the iPhone 13 will start the shutdown process. It's important to wait until the device completely powers off before proceeding to the next step.
By following these steps, you can safely power off your iPhone 13 in preparation for the SIM card removal process. This ensures that the device is in a safe state for handling the SIM card tray and making the necessary adjustments. Once the iPhone 13 is powered off, you can proceed with confidence to the next step of locating the SIM card tray.
Powering off the device is a simple yet essential step that sets the stage for a smooth and trouble-free SIM card removal and replacement process. It's important to handle the iPhone 13 with care throughout this process to avoid any potential damage to the device or the SIM card. With the iPhone 13 powered off, you're now ready to move on to the next step of locating the SIM card tray and initiating the SIM card removal process.
Locate the SIM Card Tray
Locating the SIM card tray on your iPhone 13 is a crucial step in the process of removing the SIM card. The SIM card tray houses the SIM card and is designed to be easily accessible for removal and replacement. Here's how you can locate the SIM card tray on your iPhone 13:
-
Identify the SIM Card Tray Slot: The SIM card tray slot is typically located on the right side of the iPhone 13. It is important to handle the device gently and ensure that it is powered off before proceeding with the SIM card tray removal. The slot is designed to accommodate the SIM card tray, which can be ejected using a SIM eject tool or a paperclip.
-
Inspect the Right Side of the Device: With the iPhone 13 positioned so that the right side is facing you, look for a small pinhole or slot near the middle of the right edge. This is where the SIM card tray is located. The slot may be accompanied by a small icon depicting a SIM card, indicating its purpose and location.
-
Use Adequate Lighting if Necessary: In some environments, the SIM card tray slot may be less visible due to lighting conditions or the color of the device. If needed, ensure that you have adequate lighting to clearly identify the slot and avoid any potential damage to the device while attempting to locate the SIM card tray.
-
Refer to the User Manual: If you encounter difficulty locating the SIM card tray, you can refer to the user manual provided with your iPhone 13. The manual typically includes detailed illustrations and instructions for locating and accessing the SIM card tray, ensuring that you can proceed with confidence.
By carefully locating the SIM card tray, you set the stage for the subsequent steps of ejecting and removing the SIM card. This process requires attention to detail and a gentle touch to ensure that the device and the SIM card are handled with care. Once you have successfully located the SIM card tray, you can proceed to the next step of ejecting the tray and preparing to remove the SIM card from your iPhone 13.
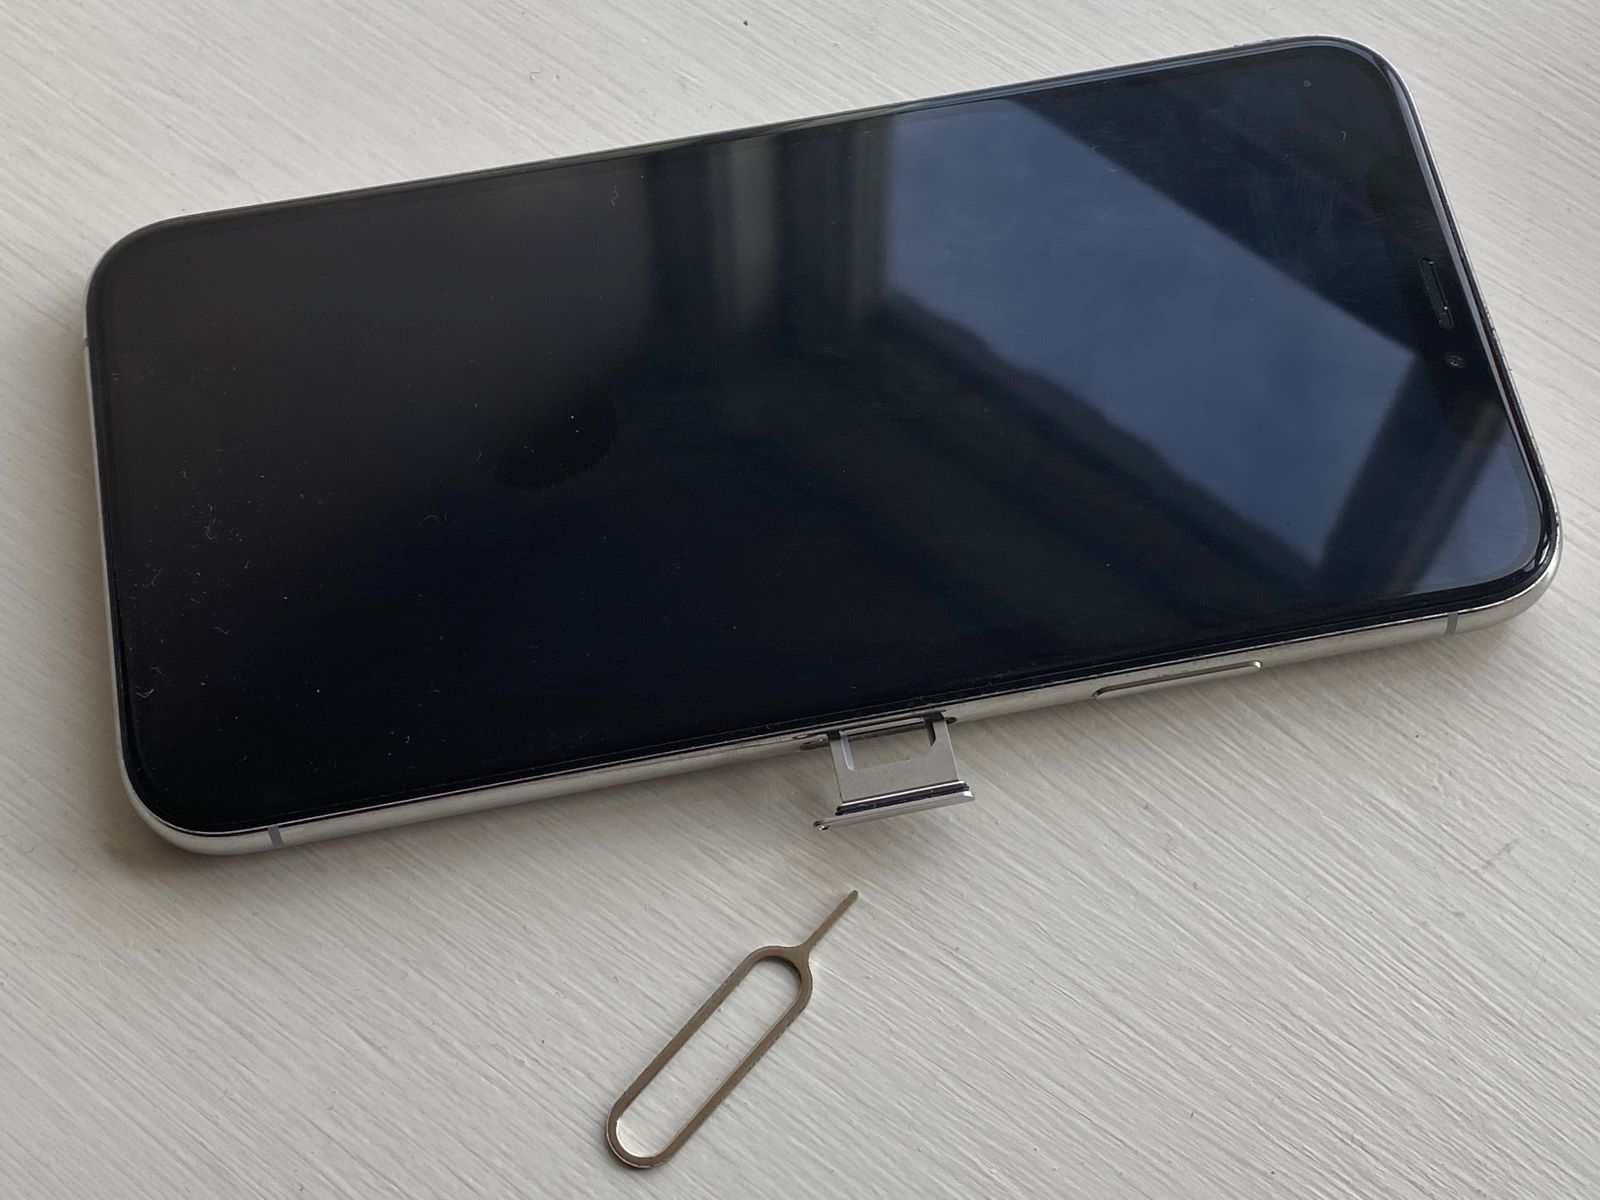
Ejecting the SIM Card Tray
Ejecting the SIM card tray from your iPhone 13 is a delicate yet straightforward process that allows you to access the SIM card for removal or replacement. Here's a detailed guide on how to eject the SIM card tray with precision and care:
-
Prepare the SIM Eject Tool: The SIM eject tool is a small, pointed instrument provided by Apple and is specifically designed for ejecting the SIM card tray. If you don't have the original SIM eject tool, a paperclip can be used as an alternative. Ensure that the tool is clean and free from any debris that could potentially interfere with the ejection process.
-
Locate the SIM Card Tray Slot: As mentioned earlier, the SIM card tray slot is typically situated on the right side of the iPhone 13. Once you've identified the slot, gently insert the SIM eject tool or unfolded paperclip into the small pinhole adjacent to the slot. Apply light pressure to engage the internal mechanism.
-
Apply Gentle Pressure: With the SIM eject tool or paperclip inserted into the pinhole, apply gentle and steady pressure in a straight line. You should feel a slight resistance as the tool engages with the internal mechanism of the SIM card tray.
-
Eject the SIM Card Tray: As you continue to apply pressure, the SIM card tray will gradually start to protrude from the device. Once the tray is partially ejected, carefully remove it from the iPhone 13, ensuring that you maintain a firm grip to prevent it from slipping back into the device.
-
Handle the SIM Card Tray with Care: Upon removing the SIM card tray, handle it with care to avoid any damage to the tray or the SIM card housed within it. Place the tray on a flat and stable surface, ensuring that it remains free from any potential hazards such as liquids or debris.
By following these steps, you can successfully eject the SIM card tray from your iPhone 13, granting you access to the SIM card for removal or replacement. It's important to exercise patience and precision throughout this process to avoid any potential damage to the device or the SIM card tray. With the SIM card tray ejected, you're now ready to proceed with the next step of removing the SIM card from your iPhone 13.
Removing the SIM Card
With the SIM card tray successfully ejected from your iPhone 13, the next step is to carefully remove the SIM card from the tray. This process requires attention to detail and a gentle touch to ensure that the SIM card and the tray remain undamaged throughout the removal process.
To remove the SIM card from the tray, follow these steps:
-
Inspect the SIM Card Tray: Before proceeding with the removal, take a moment to inspect the SIM card tray. Locate the slot within the tray where the SIM card is housed. The slot is designed to securely hold the SIM card in place, ensuring that it remains stable within the tray.
-
Gently Remove the SIM Card: Using your fingertips, carefully remove the SIM card from the tray by gently pushing it out from the slot. Exercise caution to avoid bending or damaging the SIM card during this process. If the SIM card is firmly seated within the tray, apply gentle pressure to ease it out without forcing it.
-
Handle the SIM Card with Care: Once the SIM card is removed from the tray, handle it with care to prevent any potential damage. Avoid touching the metal contacts on the SIM card, as these are essential for establishing a connection with the device and should remain free from fingerprints or debris.
-
Place the SIM Card in a Safe Location: After removing the SIM card from the tray, place it in a secure and clean location. A small, designated container or the original SIM card packaging can serve as a suitable temporary storage solution. This ensures that the SIM card remains free from damage and is readily accessible for the next step of the process.
By following these steps, you can successfully remove the SIM card from the tray without compromising its integrity. It's essential to handle the SIM card with care and attention to detail, as any damage to the card can impact its functionality and compatibility with your iPhone 13. With the SIM card safely removed, you're now prepared to proceed with the next phase of the process, which involves reinserting the SIM card tray into your device.
Reinserting the SIM Card Tray
After successfully removing the SIM card from your iPhone 13, the next crucial step is to reinsert the SIM card tray back into the device. This process ensures that the SIM card is securely placed within the iPhone 13, allowing for seamless connectivity and functionality. Here's a detailed guide on how to reinsert the SIM card tray with precision and care:
-
Inspect the SIM Card Tray: Before reinserting the SIM card tray, take a moment to inspect it for any debris or damage. Ensure that the tray is clean and free from any obstructions that could interfere with the reinsertion process. Additionally, verify that the SIM card slot within the tray is clear and free from any foreign objects.
-
Position the SIM Card in the Tray: If you removed the SIM card from the tray during the previous steps, carefully place it back into the designated slot within the tray. The SIM card should align with the slot and fit securely without any forceful manipulation. Ensure that the SIM card is oriented correctly, matching the shape of the slot to guarantee a proper fit.
-
Align the SIM Card Tray: With the SIM card securely placed within the tray, align the tray with the SIM card slot on the iPhone 13. The tray should fit smoothly into the slot, with minimal resistance. Avoid applying excessive force when reinserting the tray, as this could potentially damage the device or the tray itself.
-
Gently Insert the SIM Card Tray: Once aligned, gently insert the SIM card tray back into the SIM card slot on the iPhone 13. Use steady and even pressure to guide the tray into position, ensuring that it sits flush with the device's exterior. Take care to avoid any abrupt movements that could dislodge the tray or cause damage to the device.
-
Verify Secure Placement: After reinserting the SIM card tray, verify that it is securely positioned within the device. Gently press on the tray to ensure that it sits firmly in place without any wobbling or instability. This step confirms that the tray is properly inserted and that the SIM card is securely housed within the iPhone 13.
By following these steps, you can successfully reinsert the SIM card tray into your iPhone 13, ensuring that the SIM card is securely placed within the device. It's essential to handle the tray and the SIM card with care throughout this process to avoid any potential damage. With the SIM card tray securely reinserted, your iPhone 13 is now ready for the final step of powering on the device and establishing connectivity with the new or existing SIM card.
Powering On the iPhone 13
After successfully reinserting the SIM card tray into your iPhone 13, the final step in the SIM card removal and replacement process is to power on the device. This essential step ensures that the iPhone 13 initializes and establishes connectivity with the SIM card, allowing you to resume normal usage and enjoy uninterrupted mobile services. Here's a detailed guide on how to power on your iPhone 13 with precision and care:
-
Press and Hold the Side Button: To power on your iPhone 13, locate the side button on the right side of the device. Press and hold this button until the Apple logo appears on the screen. The side button serves as the primary control for powering on and off the device, as well as initiating Siri and accessing the Emergency SOS feature.
-
Wait for the Apple Logo: As you continue to hold the side button, the Apple logo will appear on the display, indicating that the iPhone 13 is powering on. It's important to maintain the button press until the logo becomes visible, signaling that the device is initializing and preparing for use.
-
Release the Side Button: Once the Apple logo appears, release the side button. The iPhone 13 will proceed with the boot-up process, initializing its operating system and establishing connectivity with the SIM card. It's essential to allow the device sufficient time to complete the startup sequence before proceeding to use it.
-
Enter the Passcode or Use Face ID/Touch ID: Depending on your device's security settings, you may be prompted to enter your passcode or utilize Face ID/Touch ID to unlock the iPhone 13. Follow the on-screen instructions to securely access your device and ensure that it is ready for use.
-
Verify Connectivity: After powering on the iPhone 13, verify that the device establishes connectivity with the new or existing SIM card. Check for the signal strength indicator and ensure that the device recognizes the SIM card, allowing you to make calls, send messages, and access mobile data as needed.
By following these steps, you can successfully power on your iPhone 13, completing the SIM card removal and replacement process. It's essential to handle the device with care and attention to detail throughout this process to ensure a seamless transition to the new SIM card. With the iPhone 13 powered on and connected, you can now enjoy the full functionality of your device with the reassurance that the SIM card replacement has been completed successfully.