
Why Share an Internet Connection in Windows?
Sharing an internet connection in Windows can be incredibly useful in various situations. Whether you’re on a limited mobile data plan, have a single wired connection, or simply want to provide internet access to multiple devices, sharing your internet connection can help you stay connected without the need for extra hardware or costly solutions. Let’s look at a few reasons why you might want to share your internet connection in Windows.
Multiple Devices: One of the primary reasons for sharing an internet connection is to provide internet access to multiple devices simultaneously. By setting up a shared network, you can connect smartphones, tablets, laptops, gaming consoles, and other smart devices to the internet through a single connection. This is particularly helpful when traveling or in situations where Wi-Fi access may be limited.
Economic Sense: Sharing your internet connection can also help save you money. Rather than investing in multiple internet connections or paying for additional data plans for each device, you can leverage the existing connection to provide internet access to multiple devices. This is especially beneficial for households with several family members or small businesses.
Flexibility: Sharing an internet connection gives you the flexibility to move around freely without losing connectivity. For example, if you have a wired internet connection in one room, you can create a shared network and access it from any device within range. This is particularly convenient for individuals who work from home or need to remain connected in different parts of their living spaces.
Emergency Situations: In times of emergencies or disasters where internet or cellular networks may be unstable or unavailable, sharing an internet connection can be a lifeline. By sharing your connection with others who may not have access, you can help keep everyone connected and informed during critical times.
In summary, sharing an internet connection in Windows can provide numerous benefits, including providing internet access to multiple devices, saving money, enhancing flexibility, and ensuring connectivity during emergencies. Whether you’re at home, on the go, or facing unexpected situations, sharing your internet connection is a practical solution to stay connected with ease.
Setting up an Ad Hoc Network
An ad hoc network is a wireless network that allows devices to directly connect to each other without the need for a central access point. By setting up an ad hoc network in Windows, you can quickly and easily share your internet connection with other devices. Here’s how to do it:
Step 1: Open Network and Sharing Center
Begin by clicking on the network icon in the system tray and selecting “Open Network and Sharing Center.” This will open a window with various options for managing your network connections.
Step 2: Set up a New Connection or Network
In the Network and Sharing Center window, click on the “Set up a new connection or network” link. This will launch the “Set Up a Connection or Network” wizard.
Step 3: Choose Ad Hoc Network
In the wizard, select the “Set up a wireless ad hoc (computer-to-computer) network” option and click “Next.”
Step 4: Customize Network Settings
Next, you’ll need to customize the network settings. Enter a Network Name (SSID), Security Type, and Passphrase. The security type can be either WEP or WPA2-Personal, depending on your preference. Make sure to choose a strong passphrase for added security.
Step 5: Start the Ad Hoc Network
Once you’ve entered the necessary settings, click on the “Next” button. Windows will now create the ad hoc network, and you’ll see a confirmation message once it’s done. You can also check the “Save this network” checkbox if you want Windows to remember the network for future use.
Step 6: Connect to the Ad Hoc Network
Now that the network is set up, other devices can connect to it. On the device you want to connect, open the Wi-Fi settings and look for the network name (SSID) you specified earlier. Select it and enter the passphrase when prompted. Once connected, the device will have access to the shared internet connection.
Setting up an ad hoc network in Windows allows you to quickly share your internet connection with other devices. Whether you’re at home, in a coffee shop, or any other location, creating an ad hoc network can be a convenient way to keep your devices connected and online.
Enabling Internet Sharing
Once you’ve set up an ad hoc network in Windows, the next step is to enable internet sharing. By doing so, you’ll allow other devices connected to your ad hoc network to access the internet through your computer’s internet connection. Follow these steps to enable internet sharing:
Step 1: Open Network and Sharing Center
Click on the network icon in the system tray and select “Open Network and Sharing Center.” This will bring up the Network and Sharing Center window.
Step 2: Select the Ad Hoc Network
In the Network and Sharing Center, click on the “Change adapter settings” option on the left-hand side. This will display the available network connections on your computer. Locate the ad hoc network connection that you created and right-click on it. Select “Properties” from the context menu.
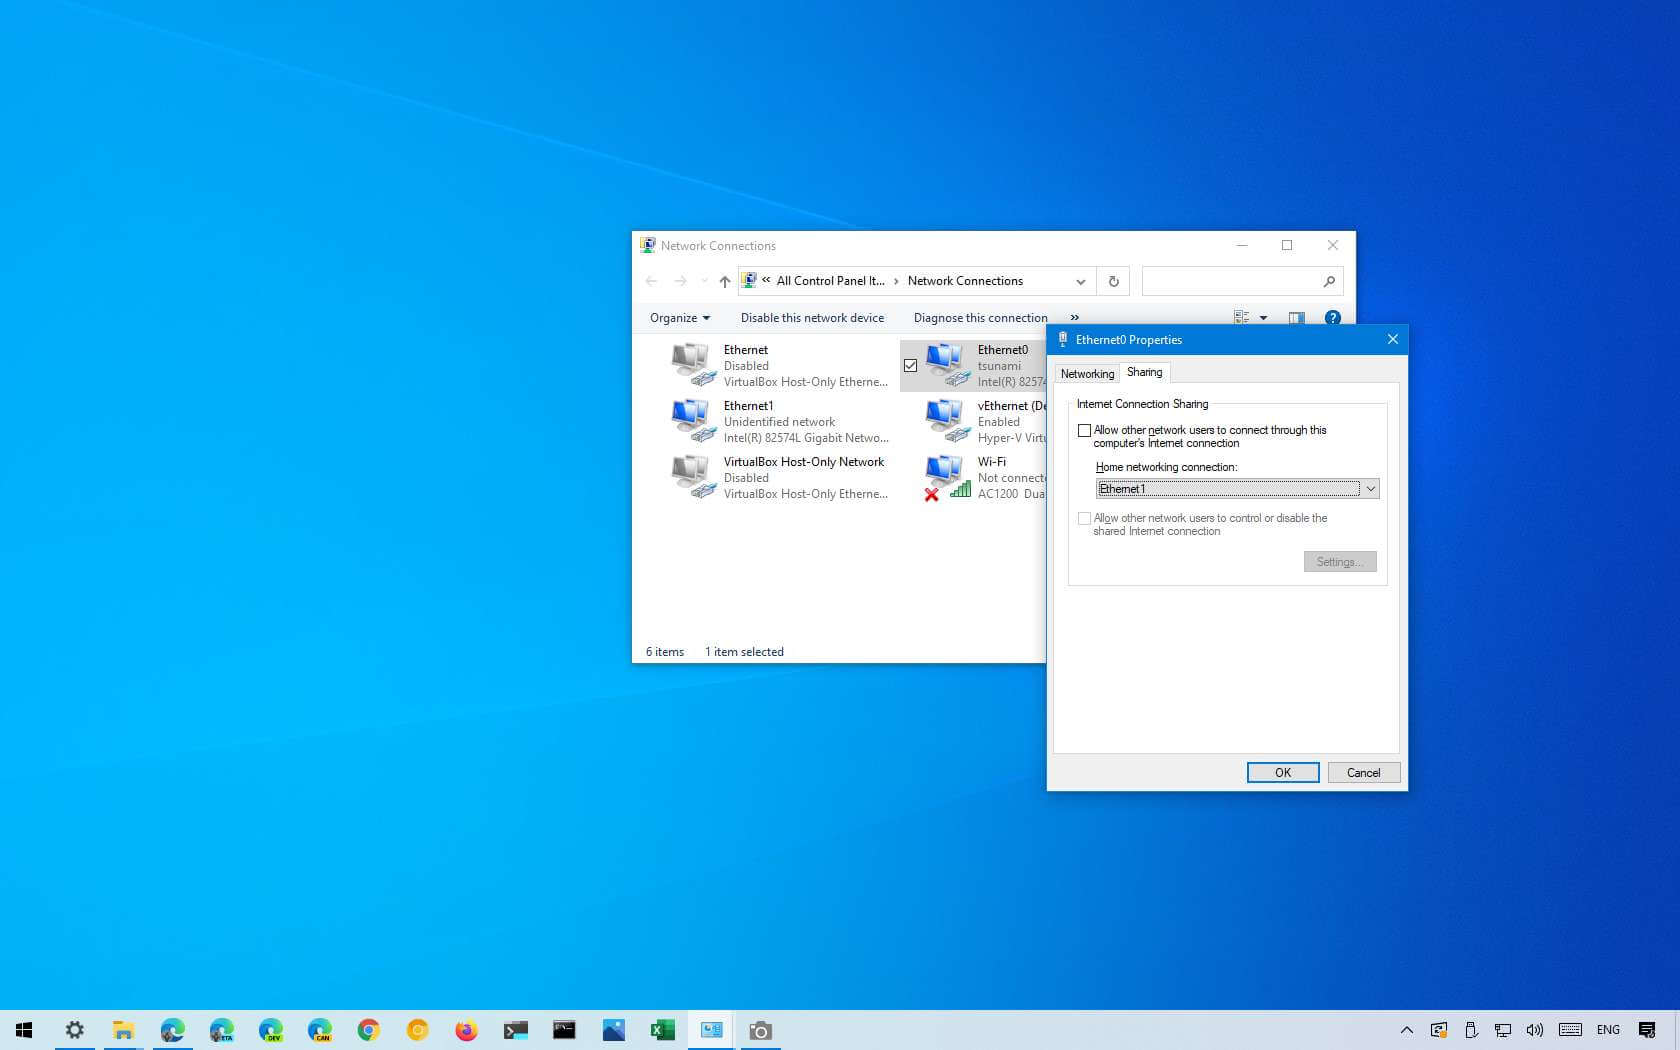
Step 3: Enable Internet Sharing
In the Properties window, go to the “Sharing” tab. Here, you’ll find the option to enable internet sharing. Check the box next to “Allow other network users to connect through this computer’s internet connection.”
Step 4: Select the Network Connection
After enabling internet sharing, you’ll need to select the network connection through which your computer is connected to the internet. In the “Home networking connection” drop-down menu, choose the appropriate network connection. This could be a wired Ethernet connection or a wireless connection.
Step 5: Apply Changes
Once you’ve selected the network connection, click on the “OK” button to apply the changes. Windows will now enable internet sharing on your ad hoc network.
After enabling internet sharing, other devices connected to your ad hoc network will be able to access the internet through your computer. This can be handy when you want to provide internet access to devices that don’t have their own internet connection or when you’re in a location with limited Wi-Fi availability.
Connecting Devices to the Shared Network
Once you’ve enabled internet sharing on your Windows computer, you can connect other devices to the shared network to access the internet. Follow these steps to connect devices to the shared network:
Step 1: Activate Wi-Fi or Ethernet
On the device you want to connect, ensure that the Wi-Fi or Ethernet is enabled and functioning properly. This will allow the device to detect and connect to the shared network.
Step 2: Scan for Available Networks
In the Wi-Fi settings of the device, scan for available networks. The shared network created by your Windows computer should appear in the list of available networks. Select the network to proceed with the connection.
Step 3: Enter Network Password
If you have set a password for your shared network during the ad hoc network setup, you will be prompted to enter it on the device you are connecting. Enter the correct password to establish the connection.
Step 4: Connect to the Shared Network
Once the password is entered, the device will attempt to connect to the shared network. If the connection is successful, the device will now have access to the internet through your Windows computer’s internet connection.
Repeat these steps for each device you want to connect to the shared network. Remember that the number of devices you can connect may depend on your computer’s hardware specifications and network capabilities.
Connecting devices to the shared network allows you to extend internet access to multiple devices without needing separate internet connections for each device. This can be especially handy when you’re traveling, in a remote location, or in situations where connecting to traditional Wi-Fi networks may not be possible.
Troubleshooting Common Issues
While sharing an internet connection in Windows is generally straightforward, you may encounter some common issues along the way. Here are a few troubleshooting tips to help you resolve these issues:
No internet access: If devices connected to the shared network are unable to access the internet, double-check that internet sharing is enabled on your Windows computer. Ensure that the correct network connection is selected for sharing in the “Home networking connection” setting. If the issue persists, try restarting both your computer and the connected devices.
Network connection drops frequently: If the shared network connection drops or becomes unstable, ensure that your computer’s wireless adapter or Ethernet connection is functioning properly. You can try updating the network adapter drivers to the latest version, either through Windows Update or from the manufacturer’s website. Additionally, keep the devices close to each other to maintain a strong and stable connection.
Slow internet speed: If you experience slower-than-usual internet speeds on devices connected to the shared network, check if any other programs or processes on your Windows computer are using a significant amount of bandwidth. Close any unnecessary applications or downloads to free up bandwidth for the connected devices. You can also try restarting your router or modem to improve overall network performance.
Incorrect network settings: If you’re unable to connect devices to the shared network, verify that you’ve entered the correct network name (SSID) and password on the devices. Ensure that the network settings, such as the Security Type and Passphrase, match the settings you specified during the ad hoc network setup. If necessary, recreate the ad hoc network with accurate settings and try connecting again.
Interference or signal strength issues: In some cases, the shared network’s signal strength may be affected by physical obstacles or interference from other electronic devices. To mitigate this, position your Windows computer and the connected devices closer to each other and away from potential sources of interference, such as microwaves, cordless phones, or other wireless devices.
By following these troubleshooting steps, you can overcome common issues when sharing an internet connection in Windows. Remember to always double-check the network settings, ensure proper hardware functionality, and optimize the network environment for the best possible connectivity.
Securing Your Shared Network
When sharing your internet connection in Windows, it is important to take steps to secure your shared network to prevent unauthorized access and protect your personal information. Here are some measures you can take to enhance the security of your shared network:
Change the default network name and password: During the ad hoc network setup, you were prompted to enter a Network Name (SSID) and a password. It is recommended to change the default values to unique and strong ones. Avoid using commonly known or easily guessable information to protect your network from unauthorized access.
Use a strong network security type: When setting up your shared network, choose WPA2-Personal as the security type. This is currently the most secure encryption method for wireless networks. WEP encryption, which is less secure, should be avoided if possible. Using WPA2-Personal ensures that your network traffic is encrypted, making it more difficult for unauthorized users to intercept your data.
Regularly update your computer and devices: Keeping your Windows computer and connected devices up to date with the latest security patches and firmware updates is crucial for network security. Enable automatic updates on your devices to ensure that you receive the latest security enhancements and bug fixes. Regular updates help protect against known vulnerabilities that can be exploited by hackers.
Enable a firewall: Enable the Windows Firewall on your computer to add an extra layer of defense against potential threats. The firewall monitors incoming and outgoing network traffic, blocking unauthorized access and protecting your shared network from malicious activities. Keep the firewall enabled at all times and only allow necessary network communication.
Disable network discovery: By default, Windows may enable network discovery and make your shared network visible to other devices in the vicinity. To enhance security, disable network discovery to prevent unwanted devices from identifying and connecting to your shared network. This can be done in the Network and Sharing Center settings in the “Change advanced sharing settings” section.
Regularly monitor network activity: Keep an eye on the devices connected to your shared network and monitor their activity. If you notice any suspicious or unauthorized devices connected, make sure to promptly disconnect them and investigate the issue further. Regular monitoring helps identify potential security breaches and allows you to take timely actions to protect your network.
By implementing these security measures, you can significantly enhance the security of your shared network in Windows. Taking proactive steps to secure your network helps safeguard your personal information and prevents unauthorized access to your internet connection.
Monitoring Network Usage
Monitoring your network usage when sharing an internet connection in Windows can provide valuable insights into the data consumption of connected devices and help you manage your network effectively. Here are some ways you can monitor network usage:
Windows Task Manager: The Windows Task Manager provides basic information about network usage on your computer. Open the Task Manager by right-clicking on the taskbar and selecting “Task Manager.” In the Task Manager, go to the “Performance” tab and click on “Ethernet” or “Wi-Fi” to view real-time network usage metrics such as network utilization, total bytes sent and received, and connection status.
Third-Party Network Monitoring Tools: There are various third-party network monitoring tools available that provide detailed insights into network usage. These tools can track bandwidth consumption, monitor individual device activity, and generate reports. Some popular network monitoring tools include NetWorx, GlassWire, and PRTG Network Monitor. Research and choose a tool that best suits your monitoring needs.
Router Interface: Most modern routers include a web-based interface that allows you to monitor network usage. Access your router’s interface by entering the router’s IP address in a web browser. Look for a section related to “Network Statistics,” “Traffic Monitoring,” or “Bandwidth Usage.” This interface will provide you with information on data usage by connected devices, allowing you to track and manage network usage.
Data Usage Apps: Several mobile apps are available for monitoring data usage on individual devices. Install a data usage monitoring app on your smartphone or tablet to keep track of the amount of data consumed by each device connected to your shared network. These apps typically provide real-time data usage information, set data limits, and provide alerts when a device reaches its set limit.
ISP Usage Reports: Check with your internet service provider (ISP) if they provide usage reports. Some ISPs offer online portals or apps where you can monitor data usage for your internet connection. These reports can give you a comprehensive overview of your overall data consumption and help you identify any excessive usage that may need attention.
Monitoring network usage allows you to keep track of data consumption, identify data-intensive applications or devices, and ensure fair and efficient utilization of your shared network. By actively monitoring network usage, you can manage bandwidth effectively, identify any unusual activity, and optimize network performance for a smooth internet experience.
Limitations of Sharing an Internet Connection in Windows
While sharing an internet connection in Windows can be convenient, it’s important to be aware of the limitations that come with this feature. Here are some key limitations to consider:
Performance: When sharing an internet connection, the overall performance of the network may be affected. The bandwidth available to each connected device decreases as the number of devices increases. This can result in slower internet speeds, especially if multiple devices are using bandwidth-intensive applications or services simultaneously.
Range: The range of a shared network created in Windows is typically limited compared to traditional Wi-Fi networks. The coverage area of an ad hoc network is generally shorter, making it suitable for small spaces. If you move farther away from the computer acting as the host, the signal strength may weaken, leading to reduced connection reliability and speed.
Device Compatibility: Not all devices may be compatible with connecting to an ad hoc network or may require additional configuration. Some older or specialized devices may not support ad hoc connections, preventing them from accessing the shared network. Additionally, certain devices may have limited functionality while connected to an ad hoc network, such as the inability to use some online gaming services or streaming platforms.
Security Risks: Sharing an internet connection through an ad hoc network can introduce security risks if not properly secured. Ad hoc networks may be more susceptible to unauthorized access and potential breaches compared to traditional Wi-Fi networks. It’s crucial to ensure that you set strong network passwords, use the latest security protocols, and regularly monitor and manage connected devices to mitigate these risks.
Dependence on Host Device: When sharing an internet connection, all devices connected to the shared network rely on the host device for internet access. This means that if the host device experiences issues or is turned off, all connected devices will lose internet connectivity. Additionally, if the host device becomes overloaded or experiences performance issues, it can impact the overall network performance for all connected devices.
Limited Configuration Options: Compared to more advanced network setups, ad hoc networks in Windows have limited configuration options. You may not have control over advanced network settings such as Quality of Service (QoS) or the ability to prioritize certain types of network traffic. This can make it challenging to optimize network performance or manage specific applications or services.
Understanding and being aware of these limitations can help you make informed decisions when sharing an internet connection in Windows. By considering these factors, you can determine if sharing an internet connection through an ad hoc network is suitable for your specific requirements and take necessary steps to address any limitations that may arise.