
Setting up a Wi-Fi hotspot on your Mac
Sharing your internet connection from your Mac via Wi-Fi can be incredibly useful, especially when you’re in a location where multiple devices need internet access. Luckily, macOS provides a built-in feature that allows you to turn your Mac into a Wi-Fi hotspot.
Here’s a step-by-step guide on how to set up a Wi-Fi hotspot on your Mac:
- Step 1: Check your internet connection
- Step 2: Open System Preferences
- Step 3: Go to Sharing settings
- Step 4: Select the Internet Sharing option
- Step 5: Configure the Share your connection from dropdown
- Step 6: Choose the Wi-Fi option as the To computers using
- Step 7: Configure the Wi-Fi network name and password
- Step 8: Click on the checkbox next to Internet Sharing to enable it
- Step 9: Confirm the changes by clicking Start
Before setting up a Wi-Fi hotspot, make sure you have an active and stable internet connection on your Mac. This can be either through an Ethernet cable or a cellular data connection.
Click on the Apple menu in the top-left corner of your Mac’s screen and select “System Preferences” from the drop-down menu.
In the System Preferences window, locate and click on the “Sharing” icon. This will open the Sharing settings.
In the Sharing settings window, you’ll see a list of services on the left-hand side. Check the box next to “Internet Sharing” to enable it.
From the “Share your connection from” dropdown menu, select the source of your internet connection. For example, if you’re using Ethernet, choose “Ethernet.” If you’re using a cellular data connection, select the appropriate option.
In the “To computers using” section, check the box next to “Wi-Fi.” This will enable your Mac to share the internet connection via Wi-Fi.
Click on the “Wi-Fi Options” button to set up the network name and password for your Wi-Fi hotspot. Enter a name for your network, also known as SSID (Service Set Identifier). Choose a password that is strong and secure.
After configuring the Wi-Fi options, check the box next to “Internet Sharing” on the left-hand side of the Sharing settings window. This will activate the Wi-Fi hotspot on your Mac.
A confirmation dialog will appear asking if you want to start the Internet Sharing service. Click on the “Start” button to confirm and activate the Wi-Fi hotspot.
Now, your Mac is set up as a Wi-Fi hotspot, ready to share its internet connection with other devices. In the next section, we’ll guide you on how to connect to this hotspot from another device.
Step 1: Check your internet connection
Before setting up a Wi-Fi hotspot on your Mac, it’s important to ensure that you have a stable internet connection. This step is crucial as the quality and speed of your internet connection will directly impact the performance of your hotspot.
Here’s how you can check your internet connection on your Mac:
- Connect to the internet:
- Test the internet speed:
- Check for any network issues:
- Ensure a reliable connection:
Make sure your Mac is connected to the internet. If you’re using an Ethernet cable, ensure that it is securely plugged into your Mac and the router or modem. If you’re using a cellular data connection, ensure that your Mac has a working SIM card and is connected to the mobile network.
Run a speed test to check the internet speed on your Mac. There are various online tools and websites such as Ookla’s Speedtest or Fast.com that can provide you with accurate speed measurements. Ideally, you should have a stable and high-speed internet connection for optimal performance of your Wi-Fi hotspot.
If you’re experiencing any issues with your internet connection, such as slow speeds or frequent disconnections, troubleshoot the problem. Check if there are any network outages in your area or if there are any hardware or software issues with your router or modem. Restarting your router or contacting your internet service provider might be necessary to resolve these issues.
For the best experience when setting up a Wi-Fi hotspot, it’s important to have a reliable and consistent internet connection. Avoid relying on a weak or intermittent connection, as it can cause frequent drops in the hotspot connection and make it unreliable for other devices.
By checking your internet connection before setting up the Wi-Fi hotspot on your Mac, you can ensure a smooth and stable experience for both your Mac and other devices that will connect to the hotspot. Now that you’ve confirmed your internet connection, you can proceed to the next step of setting up the Wi-Fi hotspot on your Mac.
Step 2: Open System Preferences
To start configuring your Mac’s Wi-Fi hotspot, you’ll need to access the System Preferences menu, where you can find the necessary settings to set up and customize your hotspot.
Here’s how you can open System Preferences on your Mac:
- Click on the Apple menu:
- Select System Preferences:
- Navigate the System Preferences window:
- Locate the Sharing settings:
In the top-left corner of your screen, you’ll find the Apple menu represented by the Apple logo. Click on this menu to reveal a drop-down list of options.
In the drop-down menu, look for the option labeled “System Preferences” and click on it. This will open the System Preferences window.
Once the System Preferences window opens, you’ll see a grid of icons representing various system settings. From here, you can access and customize different aspects of your Mac’s settings.
In the System Preferences window, search for the icon labeled “Sharing” and click on it. This will open the Sharing settings, where you can enable and configure the Wi-Fi hotspot feature.
Opening the System Preferences menu is the gateway to accessing and customizing various settings on your Mac. By following these steps, you can easily navigate to the Sharing settings, where you’ll be able to set up and configure your Wi-Fi hotspot. In the next step, we will guide you through the process of accessing the specific Sharing settings and enabling the Wi-Fi hotspot feature on your Mac.
Step 3: Go to Sharing settings
In order to set up a Wi-Fi hotspot on your Mac, you need to navigate to the Sharing settings, which houses the options to enable and configure the hotspot feature.
Here’s how you can access the Sharing settings on your Mac:
- Open System Preferences:
- Locate and click on Sharing:
- Explore the Sharing settings:
Click on the Apple menu in the top-left corner of your screen to open the drop-down menu. From the available options, select “System Preferences” to open the System Preferences window.
Once inside the System Preferences window, look for the icon labeled “Sharing” and click on it. This will take you to the Sharing settings menu.
Inside the Sharing settings, you will find a list of available services and features that can be shared or enabled on your Mac. This is where you will enable the Wi-Fi hotspot feature.
The Sharing settings menu provides you with control over various sharing options on your Mac, including the ability to share your internet connection via Wi-Fi. By accessing this menu, you’re one step closer to setting up your Wi-Fi hotspot and sharing your internet connection with other devices. In the upcoming steps, we will guide you through the process of enabling the Wi-Fi hotspot option and configuring its settings to suit your needs.
Step 4: Select the Internet Sharing option
In the Sharing settings on your Mac, you’ll find the “Internet Sharing” option, which allows you to share your internet connection with other devices via Wi-Fi. Enabling this option is crucial for setting up the Wi-Fi hotspot on your Mac.
Here’s how you can select the Internet Sharing option:
- Open System Preferences:
- Access the Sharing settings:
- Select Internet Sharing:
Click on the Apple menu in the top-left corner of your screen and select “System Preferences” from the drop-down menu. This will open the System Preferences window.
Once inside the System Preferences window, locate and click on the “Sharing” icon. This will take you to the Sharing settings menu.
Within the Sharing settings menu, look for the “Internet Sharing” option on the left-hand side. Check the box next to “Internet Sharing” to enable it.
Enabling the Internet Sharing option activates the Wi-Fi hotspot feature on your Mac, allowing it to share its internet connection with other devices. This option serves as the foundation for creating the Wi-Fi network that devices can connect to for internet access. In the following steps, we will guide you through the process of configuring the specific settings for your Wi-Fi hotspot, including selecting the source of your internet connection and defining the Wi-Fi network name and password.
Step 5: Configure the Share your connection from dropdown
Once you have enabled the Internet Sharing option in the Sharing settings on your Mac, the next step is to configure the source of your internet connection. This is done through the “Share your connection from” dropdown menu.
Here’s how you can configure the Share your connection from dropdown:
- Open System Preferences and access the Sharing settings:
- Select the Share your connection from dropdown:
- Choose the source of your internet connection:
Click on the Apple menu in the top-left corner of your screen and select “System Preferences”. In the System Preferences window, click on the “Sharing” icon to access the Sharing settings.
In the Sharing settings, you’ll see a list of available sharing options on the left-hand side. Locate the “Share your connection from” dropdown menu and click on it.
From the dropdown menu, select the source of your internet connection. This can be Ethernet, Wi-Fi, Bluetooth, or any other connection option available on your Mac. Choose the appropriate option based on how you are connected to the internet.
Configuring the Share your connection from dropdown is essential as it determines the internet source that will be shared with other devices through your Wi-Fi hotspot. By selecting the correct connection option, you ensure that the proper internet connection is being shared and distributed to devices connected to your Mac. In the upcoming steps, we will guide you through the process of choosing the Wi-Fi option as the To computers using and setting up the Wi-Fi network name and password for your hotspot.
Step 6: Choose the Wi-Fi option as the To computers using
After configuring the Share your connection from dropdown in the Sharing settings on your Mac, the next step is to select the Wi-Fi option as the “To computers using” connection method. This enables your Mac to share its internet connection with other devices over a Wi-Fi network.
Here’s how you can choose the Wi-Fi option as the To computers using:
- Open System Preferences and access the Sharing settings:
- Locate the To computers using section:
- Check the box next to Wi-Fi:
Click on the Apple menu in the top-left corner of your screen and select “System Preferences”. In the System Preferences window, click on the “Sharing” icon to access the Sharing settings.
In the Sharing settings, you will see a list of sharing options on the left-hand side. Look for the “To computers using” section.
In the To computers using section, check the box next to “Wi-Fi”. By selecting this option, your Mac will share its internet connection over a Wi-Fi network.
Choosing the Wi-Fi option as the To computers using ensures that your Mac acts as a Wi-Fi hotspot, allowing other devices to connect and access the shared internet connection. This step is crucial in establishing a wireless network that devices can connect to for internet access. In the following step, we will guide you in configuring the specific settings for your Wi-Fi network, including setting the Wi-Fi network name and password.
Step 7: Configure the Wi-Fi network name and password
Once you have chosen the Wi-Fi option as the “To computers using” method in the Sharing settings on your Mac, the next step is to configure the Wi-Fi network name and password. These settings will be used for your Wi-Fi hotspot, allowing other devices to connect securely.
Here’s how you can configure the Wi-Fi network name and password:
- Open System Preferences and access the Sharing settings:
- Click on the Wi-Fi Options button:
- Enter the network name (SSID):
- Set the network password:
- Click on the OK button:
Click on the Apple menu in the top-left corner of your screen and select “System Preferences”. In the System Preferences window, click on the “Sharing” icon to access the Sharing settings.
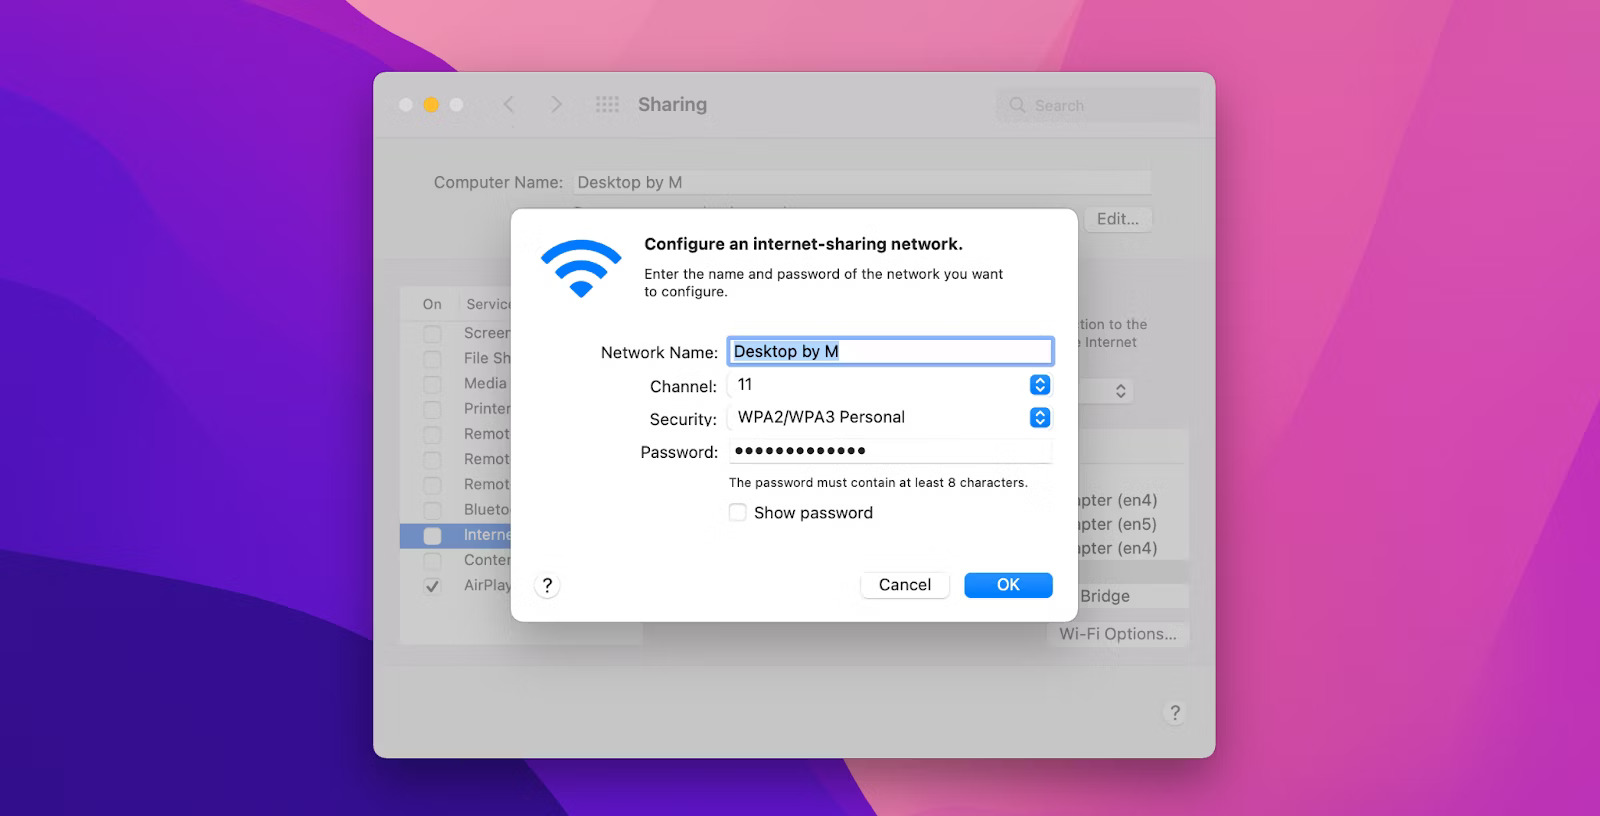
In the Sharing settings, look for the “Wi-Fi Options” button. Click on it to open the Wi-Fi network configuration window.
In the Wi-Fi network configuration window, enter the desired name for your Wi-Fi network in the “Network Name” or “SSID” field. This is the name that will be displayed to other devices when they search for available Wi-Fi networks.
In the same Wi-Fi network configuration window, enter a secure password in the “Password” or “Network Password” field. Choose a strong password that combines uppercase and lowercase letters, numbers, and special characters to ensure the security of your Wi-Fi network.
After entering the network name and password, click on the OK button to save the Wi-Fi network settings.
Configuring the Wi-Fi network name and password is essential for securing your Wi-Fi hotspot. The network name or SSID identifies your Wi-Fi network, while the password ensures that only authorized users can connect. By following these steps, you can create a protected and personalized Wi-Fi network on your Mac. In the upcoming steps, we will guide you through the process of enabling the internet sharing feature and connecting to the Wi-Fi hotspot on another device.
Step 8: Click on the checkbox next to Internet Sharing to enable it
After configuring the Wi-Fi network name and password for your Wi-Fi hotspot on your Mac, the next step is to enable the internet sharing feature. This allows your Mac to start broadcasting the Wi-Fi network and sharing its internet connection with other devices.
Here’s how you can enable the internet sharing feature:
- Open System Preferences and access the Sharing settings:
- Check the box next to Internet Sharing:
- Confirm the activation:
Click on the Apple menu in the top-left corner of your screen and select “System Preferences”. In the System Preferences window, click on the “Sharing” icon to access the Sharing settings.
In the Sharing settings, you will see a list of available sharing options on the left-hand side. Locate the option labeled “Internet Sharing” and check the box next to it. This will activate the internet sharing feature.
Upon checking the box next to Internet Sharing, a confirmation dialog will appear stating that other services may be disabled. Review the message and click on the “Start” or “Activate” button to confirm and enable internet sharing.
By clicking on the checkbox next to Internet Sharing, you activate the Wi-Fi hotspot on your Mac, allowing it to share its internet connection with other devices. This step is crucial in making your Wi-Fi network available for other devices to join and access the internet. In the next step, we will guide you on how to connect to the Wi-Fi hotspot from another device.
Step 9: Confirm the changes by clicking Start
After enabling the internet sharing feature in the Sharing settings on your Mac, the final step is to confirm the changes by clicking the “Start” button. This will activate the Wi-Fi hotspot and make it available for other devices to connect and use your Mac’s internet connection.
Here’s how you can confirm the changes and start the Wi-Fi hotspot:
- Open System Preferences and access the Sharing settings:
- Check the box next to Internet Sharing:
- Click on the Start or Activate button:
Click on the Apple menu in the top-left corner of your screen and select “System Preferences”. In the System Preferences window, click on the “Sharing” icon to access the Sharing settings.
In the Sharing settings, locate the “Internet Sharing” option and check the box next to it to enable the feature. A confirmation dialog will appear, stating that enabling internet sharing will modify network settings and other services. Read the message and ensure that you have selected the appropriate options.
After confirming the changes, click on the “Start” or “Activate” button to initiate the Wi-Fi hotspot. Your Mac will now start broadcasting the Wi-Fi network, allowing other devices to connect and use your internet connection.
By clicking the Start or Activate button, you confirm the changes and begin sharing your Mac’s internet connection through the Wi-Fi hotspot. Other devices can now search for and connect to your Wi-Fi network using the provided network name and password. Congratulations! Your Wi-Fi hotspot is now up and running, and you can enjoy internet connectivity on multiple devices simultaneously.
Connecting to the Wi-Fi hotspot on another device
Now that you have set up a Wi-Fi hotspot on your Mac, other devices can connect to it and enjoy access to your shared internet connection. Connecting to the Wi-Fi hotspot is a straightforward process that allows you to use the internet on your device seamlessly.
Here’s how you can connect to the Wi-Fi hotspot on another device:
- Enable Wi-Fi on the device:
- Find the Wi-Fi network name and password on your Mac:
- Search for and select the Wi-Fi network on your device:
- Enter the Wi-Fi network password when prompted:
Make sure that Wi-Fi is enabled on the device you want to connect to the Wi-Fi hotspot. Look for the Wi-Fi settings in the device’s system menu and activate it if it is turned off.
On your Mac, go to the Wi-Fi icon in the menu bar at the top-right corner of the screen. Click on it to reveal the list of available networks. Locate your Wi-Fi network name (SSID) in the list and note it down along with the password. These details will be required to connect the other device to the Wi-Fi hotspot.
On the device you want to connect, search for available Wi-Fi networks. Find your Wi-Fi network name (SSID) in the list and select it to initiate the connection process.
After selecting your Wi-Fi network, you will be prompted to enter the network password. Enter the password you set up for the Wi-Fi hotspot, ensuring that you type it correctly.
Once you have entered the correct password, your device will establish a connection to the Wi-Fi hotspot on your Mac. You can now enjoy using the internet on your device through the shared connection. Repeat the steps above for any additional devices you want to connect to the Wi-Fi hotspot.
Remember to keep your Wi-Fi network name and password secure to prevent unauthorized access to your hotspot. If you encounter any connectivity issues, go through the troubleshooting tips we have provided in the next section. Now that you are connected to the Wi-Fi hotspot, you can make the most of your Mac’s internet connection on multiple devices at once.
Step 1: Enable Wi-Fi on the device you want to connect
Before you can connect to the Wi-Fi hotspot on your Mac, you need to ensure that Wi-Fi is enabled on the device you want to connect. Enabling Wi-Fi allows your device to search for available Wi-Fi networks and establish a connection with them.
Here’s how you can enable Wi-Fi on your device:
- Access the device’s settings:
- Locate the Wi-Fi settings:
- Enable Wi-Fi:
Open the settings menu on your device. The location of this menu may vary depending on the device’s operating system. On most devices, you can find the settings app on the home screen or in the app drawer.
In the settings menu, look for the option labeled “Wi-Fi” or “Wireless & Networks”. Tap on it to access the Wi-Fi settings.
In the Wi-Fi settings, you will find a switch or button to enable or disable Wi-Fi. Toggle the switch to the “On” position to enable Wi-Fi on your device. The Wi-Fi icon should appear in the status bar or notification area, indicating that Wi-Fi is now enabled.
By enabling Wi-Fi on your device, you allow it to scan for available Wi-Fi networks, including the one created by your Mac’s Wi-Fi hotspot. Once Wi-Fi is enabled, you can proceed to connect to the Wi-Fi hotspot using the network name (SSID) and password. In the next step, we will guide you on how to find the Wi-Fi network name and password on your Mac.
Step 2: Find the Wi-Fi network name and password on your Mac
Before you can connect to the Wi-Fi hotspot on your Mac, you need to obtain the Wi-Fi network name (SSID) and password. These details are essential for identifying and authenticating the Wi-Fi connection on your device.
Here’s how you can find the Wi-Fi network name and password on your Mac:
- Locate the Wi-Fi icon:
- Click on the Wi-Fi icon:
- Identify your Wi-Fi network name (SSID):
- Display the Wi-Fi network password:
- Note down the Wi-Fi network name and password:
Look for the Wi-Fi icon in the menu bar at the top-right corner of your Mac’s screen. It looks like a series of concentric arcs.
Click on the Wi-Fi icon in the menu bar to display a dropdown menu showing the available Wi-Fi networks.
In the dropdown menu, look for your Wi-Fi network name (SSID). It should be listed among the available networks. Make a note of the exact name as you will need it to connect your device to the Wi-Fi hotspot.
While still in the dropdown menu, hover your cursor over your Wi-Fi network name (SSID) to display additional details, including the password. The password might be hidden, but you can click on the “Show password” option or a similar wording to reveal it.
Write down the exact network name (SSID) and password of your Wi-Fi hotspot. These details will be required to connect your device to the Wi-Fi network.
By finding and noting down the Wi-Fi network name and password on your Mac, you have the necessary information to connect your other devices to the Wi-Fi hotspot. In the next step, we will guide you on how to search for and select the Wi-Fi network on your device to initiate the connection process.
Step 3: Search for and select the Wi-Fi network on your device
After enabling Wi-Fi on your device and obtaining the Wi-Fi network name (SSID) and password from your Mac, the next step is to search for and select the Wi-Fi network on your device. This allows your device to establish a connection to the Wi-Fi hotspot created by your Mac.
Here’s how you can search for and select the Wi-Fi network on your device:
- Open the Wi-Fi settings:
- Scan for available Wi-Fi networks:
- Find and select the Wi-Fi network:
Access the settings menu on your device. Look for the “Wi-Fi” or “Wireless & Networks” option and tap on it to open the Wi-Fi settings.
In the Wi-Fi settings, tap on the “Scan” or “Refresh” button to search for available Wi-Fi networks. Your device will scan and display a list of detected Wi-Fi networks.
Look for your Wi-Fi network name (SSID) in the list of detected networks. The name should match the one you noted down from your Mac. Tap on your Wi-Fi network to select it.
By searching for and selecting the Wi-Fi network on your device, you indicate your intention to connect to the specific Wi-Fi hotspot created by your Mac. Make sure to choose the correct network name (SSID) from the available options. In the next step, we will guide you on how to enter the Wi-Fi network password to complete the connection process.
Step 4: Enter the Wi-Fi network password when prompted
After selecting the Wi-Fi network created by your Mac on your device, the next step is to enter the Wi-Fi network password. The password ensures that only authorized users can connect to your Wi-Fi hotspot and access the shared internet connection.
Here’s how you can enter the Wi-Fi network password when prompted:
- Access the Wi-Fi settings on your device:
- Select the Wi-Fi network:
- Enter the Wi-Fi network password:
- Connect to the Wi-Fi network:
Open the settings menu on your device and navigate to the Wi-Fi settings. Make sure you are in the Wi-Fi settings screen where you can see the list of available networks.
From the list of available networks, tap on the Wi-Fi network name (SSID) that matches the one you selected on your Mac.
When prompted, a dialog box or screen will appear, asking for the network password. Carefully enter the exact Wi-Fi network password that you noted down from your Mac. Double-check your input to ensure accuracy.
After entering the correct Wi-Fi network password, tap on the “Connect” or “Join” button to initiate the connection process. Your device will attempt to connect to the Wi-Fi hotspot created by your Mac.
By entering the Wi-Fi network password, you authenticate yourself as an authorized user and establish a secure connection to the Wi-Fi hotspot on your Mac. Make sure to input the correct password to ensure successful connection. Once connected, you can enjoy using the shared internet connection on your device. Repeat the steps above for any additional devices you want to connect to the Wi-Fi hotspot.
If you encounter any issues during the connection process, refer to the troubleshooting tips we have provided in the next section.
Troubleshooting tips for sharing your internet connection on a Mac
While setting up a Wi-Fi hotspot on your Mac is generally straightforward, you may encounter occasional challenges or connectivity issues. Here are some troubleshooting tips to help you resolve common problems and ensure a smooth experience:
1. Double-check your internet connection on your Mac:
Ensure that your Mac has a stable and reliable internet connection. Check if your Ethernet cable or cellular data connection is properly connected and functioning.
2. Restart your Mac if you encounter any issues:
If you are experiencing connectivity problems or if the Wi-Fi hotspot is not working as expected, try restarting your Mac. This can often resolve temporary glitches and restore the functionality of the Wi-Fi hotspot.
3. Ensure the Wi-Fi hotspot name and password are correct:
Verify that the Wi-Fi network name (SSID) and password you entered on your device match exactly with the ones set up on your Mac. Typing errors or incorrect information can prevent successful connection.
4. Reset the network settings on your device if necessary:
If you are still unable to connect to the Wi-Fi hotspot, you may need to reset the network settings on your device. This can be done by accessing the device’s network settings and selecting the option to reset or clear network settings. Note that this will remove any saved Wi-Fi passwords, so make sure you have them handy.
By following these troubleshooting tips, you can overcome common issues and ensure a successful connection to the Wi-Fi hotspot on your Mac. Remember to refer to the user manual or online resources specific to your device if you encounter persistent problems. Now, enjoy the seamless internet connectivity on all devices connected to your Mac’s Wi-Fi hotspot!
Tip 1: Double-check your internet connection on your Mac
When setting up a Wi-Fi hotspot on your Mac, it’s important to ensure that your Mac has a stable and reliable internet connection. Any issues with your internet connection can affect the performance and functionality of the Wi-Fi hotspot. Here are some steps you can take to double-check your internet connection on your Mac:
- Verify your connection type:
- Check your Ethernet connection:
- Confirm your cellular data connection:
- Run a speed test:
- Restart your modem and router:
Determine whether you are using an Ethernet cable or a cellular data connection as the source of your internet connection on your Mac. Make sure that your connection type is properly set up and functioning correctly.
If you are using an Ethernet cable, ensure that it is securely plugged into your Mac and the router or modem. Check for any loose connections or damaged cables that may be causing interruptions in your internet connection.
If you are using a cellular data connection, ensure that your Mac has a proper SIM card inserted (if applicable) and that you have a reliable cellular signal. Check for any network outages in your area that may be affecting your connection.
To assess the quality and speed of your internet connection, consider performing a speed test. There are various online tools and websites available that can provide accurate measurements of your internet speed. This information can help you identify any potential issues with your connection.
If you are experiencing connectivity issues, try restarting your router and modem. Simply unplug them from the power source, wait for a few seconds, and then plug them back in. This can refresh your connection and potentially resolve any temporary issues.
By double-checking your internet connection on your Mac, you can ensure that your Wi-Fi hotspot functions optimally. If you encounter any issues, troubleshoot your connection as outlined above. Addressing any internet connection related issues can help you enjoy seamless internet access on all devices connected to your Wi-Fi hotspot.
Tip 2: Restart your Mac if you encounter any issues
If you encounter any issues while setting up or using the Wi-Fi hotspot on your Mac, a simple but effective troubleshooting step is to restart your Mac. Restarting can help resolve temporary glitches, clear any system errors, and refresh network settings. Here’s how to restart your Mac:
- Click on the Apple menu:
- Select Restart:
- Wait for the restart to complete:
- Retry the Wi-Fi hotspot:
Click on the Apple logo in the top-left corner of your screen. A dropdown menu will appear.
In the dropdown menu, select “Restart” to initiate the restart process for your Mac.
Allow your Mac to shut down and turn back on. This process may take a few moments, so be patient and let it complete the restart.
Once your Mac restarts, try setting up or using the Wi-Fi hotspot again. Check if the issues you were encountering have been resolved.
Restarting your Mac can resolve various software-related issues that may be impacting the functionality of the Wi-Fi hotspot. It can help clear temporary system glitches, refresh network settings, and give your Mac a fresh start. If you encounter any problems, don’t hesitate to try this simple troubleshooting step before moving on to more advanced solutions.
Tip 3: Ensure the Wi-Fi hotspot name and password are correct
When using a Wi-Fi hotspot on your Mac, it is essential to ensure that the Wi-Fi network name (SSID) and password are correct. Incorrect input of these details can prevent devices from connecting to the hotspot. Consider the following steps to verify the accuracy of the Wi-Fi hotspot name and password:
- Check the Wi-Fi network name (SSID):
- Verify the Wi-Fi network password:
- Re-enter the Wi-Fi network password:
Double-check the name of the Wi-Fi network on your Mac. This is the network name other devices will see when searching for available Wi-Fi networks. Make sure it matches the network name you are trying to connect to.
Confirm that the Wi-Fi network password you are entering on your device is accurate and matches the password set on your Mac. Pay attention to uppercase and lowercase letters, as well as any special characters or numbers.
If you are certain that the network name and password are correct, but you still encounter issues, try re-entering the password. It is possible that a typing error occurred during the initial entry.
Ensuring that the Wi-Fi hotspot name and password are correct is crucial for successful connectivity. Even a small mistake or discrepancy can prevent devices from connecting to the hotspot. By verifying this information, you can troubleshoot and address any issues related to incorrect credentials, ensuring a smooth and seamless connection to the Wi-Fi hotspot.
Tip 4: Reset the network settings on your device if necessary
If you are experiencing persistent connection issues or are unable to connect to the Wi-Fi hotspot on your Mac, it may be necessary to reset the network settings on your device. Resetting the network settings can help resolve underlying issues or conflicts that may be preventing your device from connecting properly. Follow these steps to reset the network settings on your device:
- Access the device’s settings:
- Navigate to the network settings:
- Find the option to reset network settings:
- Tap on the option to reset network settings:
- Restart your device:
Open the settings menu on your device. The location of this menu may vary depending on the device’s operating system, but it is typically represented by a gear or settings icon.
Look for the “Network,” “Connections,” or “Wireless & Networks” option within the settings menu and tap on it. This will take you to the network settings screen.
Scroll through the network settings menu and look for an option to reset or clear network settings. The exact wording may vary depending on the device and operating system (e.g., “Reset Wi-Fi,” “Reset Network Settings,” etc.).
Once you locate the reset network settings option, tap on it to initiate the process. Note that resetting the network settings will remove any saved Wi-Fi passwords, so ensure you have them handy for future connections.
After resetting the network settings, restart your device. This will allow the changes to take effect and give your device a fresh start regarding network connections.
Resetting the network settings on your device can help resolve network-related issues or conflicts that may be interfering with the connection to the Wi-Fi hotspot. It essentially clears any saved settings or configurations that may be causing trouble. Remember to reconnect to the Wi-Fi hotspot after the reset and enter the correct network name (SSID) and password to establish a successful connection.