
Why Enable or Disable Network Connections?
Network connections play a vital role in our daily digital lives. Whether you’re using Wi-Fi, Ethernet, Bluetooth, or mobile hotspot connections, they enable us to browse the internet, access shared resources, and communicate with other devices seamlessly. However, there may be occasions when you need to enable or disable network connections on your Windows system. Understanding how to control these connections can be beneficial in several scenarios. Let’s explore why you might want to enable or disable network connections and how it can be done.
One common reason for enabling or disabling network connections is to troubleshoot network-related issues. If you’re experiencing slow internet speeds or intermittent connectivity problems, disabling and re-enabling the network connection might help resolve the issue. It allows the network adapter to reset, which can address any temporary glitches in the system.
Another reason is to enhance security. Disabling network connections when they are not in use helps protect your system from potential threats. For instance, if you are not using Wi-Fi or Bluetooth, disabling these connections prevents unauthorized devices from accessing your network or sending harmful data to your system.
Furthermore, enabling or disabling network connections can be useful when you want to control data usage. If you have limited internet data or want to conserve bandwidth, turning off certain connections, such as mobile hotspot or virtual network connections, can help in managing your data consumption effectively.
In addition, there may be instances where you need to prioritize certain network connections. For example, if you are in an office environment and prefer a wired Ethernet connection for faster and more stable internet access, disabling Wi-Fi connections can ensure your system always uses the preferred connection.
Finally, enabling or disabling network connections can be beneficial in scenarios where you want to limit or control access to specific networks or devices. It gives you the flexibility to choose which connections are available or accessible and improves the overall network management of your system.
Now that we understand why enabling or disabling network connections can be valuable, let’s explore various methods to accomplish this in Windows. Whether you want to enable or disable a specific network adapter, turn on or off Wi-Fi, Ethernet, Bluetooth, or other connections, or manage network connections for different users, there are multiple approaches you can take depending on your specific requirements.
How to Enable or Disable Network Connections through Control Panel?
If you prefer using the traditional Control Panel interface in Windows, you can easily enable or disable network connections through the following steps:
- Open the Control Panel by searching for it in the Windows search bar or accessing it through the Start menu.
- In the Control Panel window, select “Network and Internet”.
- Next, click on “Network and Sharing Center”.
- In the Network and Sharing Center, you will see a list of active network connections. Click on the connection that you want to enable or disable.
- On the next screen, click on “Disable” or “Enable” depending on the current status of the network connection.
- If you choose to disable the connection, a warning message may appear. Confirm the action by clicking “Yes” to disable the connection.
- If you wish to enable the connection, simply click on the “Enable” button.
This method allows you to easily manage individual network connections through the Control Panel. However, keep in mind that this approach requires multiple steps and may not be as streamlined as other methods.
It’s important to note that the Control Panel interface may vary slightly depending on your version of Windows. If you are using an older version of Windows, you may need to navigate through different options in the Control Panel to access the network settings.
Alternatively, if you prefer a quicker and more straightforward way to enable or disable network connections, there are other methods available, such as using the Network and Sharing Center or the Device Manager. These methods offer more direct access to network connections and provide additional options for managing and troubleshooting network-related issues.
Now that you know how to enable or disable network connections through the Control Panel, you can easily control and manage your network connections according to your specific needs.
How to Enable or Disable Network Connections through Network and Sharing Center?
Windows provides an intuitive interface called the Network and Sharing Center, which allows you to enable or disable network connections in just a few simple steps. Follow these instructions to enable or disable network connections through the Network and Sharing Center:
- To open the Network and Sharing Center, right-click on the network icon in the system tray located at the bottom right corner of your screen.
- Select “Open Network & Internet settings”. This will take you to the Network and Internet settings.
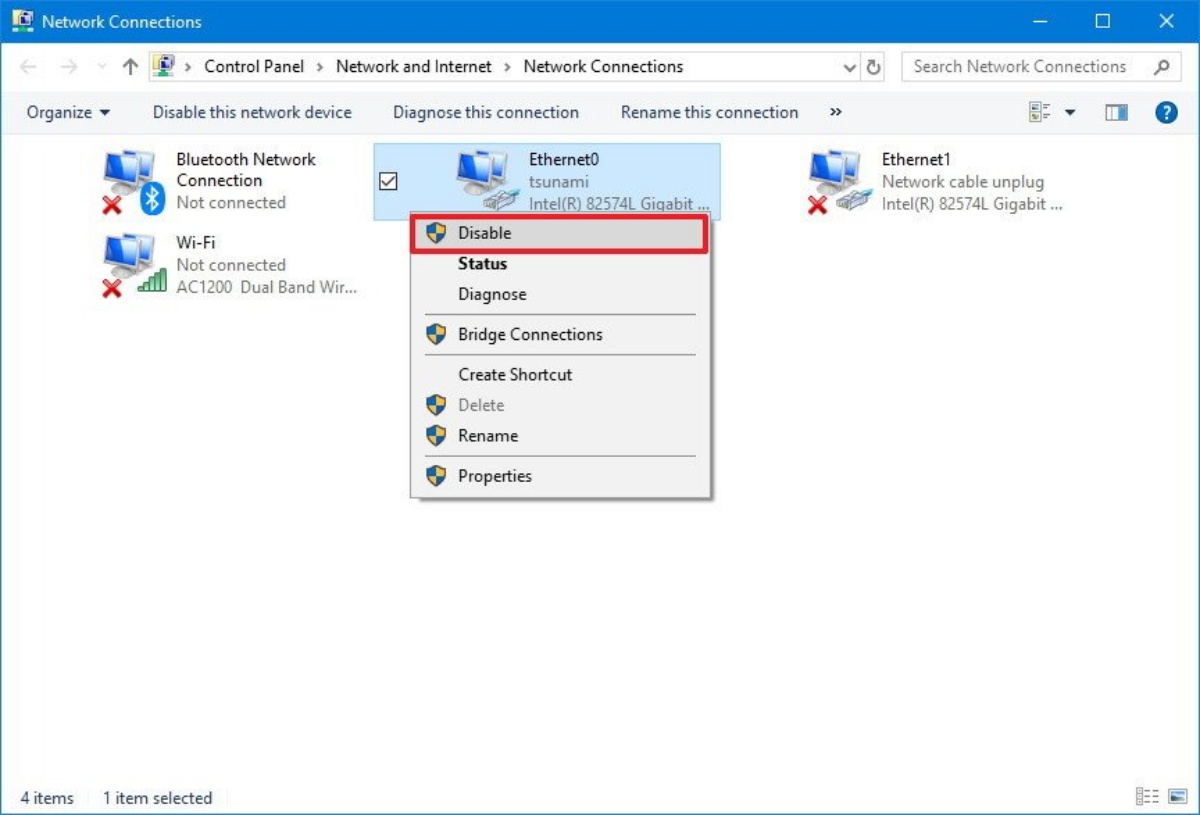
- In the Network and Internet settings, click on “Change adapter options”. This will open the Network Connections window, where you can view all the available network connections on your system.
- Right-click on the network connection that you want to enable or disable.
- From the context menu, select “Disable” to disable the connection or “Enable” to enable the connection.
- If prompted for confirmation, click “Yes” to proceed with the action.
This method offers a more streamlined approach compared to using the Control Panel. With just a few clicks, you can easily enable or disable network connections through the Network and Sharing Center.
The Network and Sharing Center also provides additional options for managing and troubleshooting network connections. For example, you can view network status, access network properties, diagnose and repair network issues, and change advanced sharing settings.
Using the Network and Sharing Center, you can conveniently enable or disable network connections based on your specific requirements. Whether you want to prioritize certain connections, troubleshoot network issues, or manage access to specific networks, this method provides an efficient way to control your network connections.
It is worth noting that the steps outlined above may vary slightly depending on your version of Windows. However, the overall process of enabling or disabling network connections through the Network and Sharing Center should remain similar.
Now that you are familiar with enabling or disabling network connections through the Network and Sharing Center, you can easily manage your network connections and tailor them to suit your needs.
How to Enable or Disable Network Connections through Device Manager?
The Device Manager in Windows provides a direct and efficient way to enable or disable network connections. By following these steps, you can easily manage your network connections through the Device Manager:
- To open the Device Manager, right-click on the Start menu and select “Device Manager” from the context menu. Alternatively, you can press the Windows key + X and choose “Device Manager” from the menu.
- In the Device Manager window, locate and expand the “Network adapters” category. This will display all the network adapters installed on your system.
- Right-click on the network adapter that you want to enable or disable.
- From the context menu, select “Disable” to disable the network adapter or “Enable” to enable it.
- If prompted for confirmation, click “Yes” to proceed with the action.
This method offers a straightforward approach and provides direct access to network adapters. Enabling or disabling network connections through the Device Manager can be beneficial, especially when troubleshooting network-related issues or managing specific network adapters.
The Device Manager also offers additional options for managing network adapters, such as updating drivers, uninstalling drivers, and viewing device properties. These options can be useful for ensuring that your network adapters are functioning properly and are up to date.
While using the Device Manager to enable or disable network connections is efficient, it is essential to exercise caution. Disabling network adapters can result in loss of network connectivity, so make sure to disable only the desired adapters and enable them when needed.
Please note that the steps mentioned above may vary slightly depending on your version of Windows. However, the overall process of enabling or disabling network connections through the Device Manager should remain similar.
Now that you are aware of how to enable or disable network connections through the Device Manager, you have a convenient method for managing your network adapters with ease.
How to Enable or Disable Network Connections through Command Prompt?
For users who prefer using the command line interface, Windows provides the Command Prompt as an alternative method to enable or disable network connections. Follow these steps to manage your network connections through the Command Prompt:
- Open the Command Prompt by searching for it in the Windows search bar or by pressing the Windows key + R and typing “cmd” in the Run dialog box.
- In the Command Prompt window, type the command
netsh interface show interfaceand press Enter. This command will display a list of all available network interfaces on your system. - Identify the interface you want to enable or disable from the list.
- To disable the interface, type the command
netsh interface set interface "InterfaceName" admin=disableand press Enter. Replace “InterfaceName” with the actual name of the interface. - To enable the interface, type the command
netsh interface set interface "InterfaceName" admin=enableand press Enter.
Using the Command Prompt to enable or disable network connections provides a quick and efficient method for managing your network interfaces. It allows for easy automation of network management tasks and can be particularly useful in batch operations.
Additionally, the Command Prompt offers various other commands and options to further customize and troubleshoot network connections. For instance, you can use commands like ipconfig to retrieve IP configuration details, ping to test network connectivity, and tracert to trace the route taken by network packets.
While this method may not be as user-friendly as other graphical interfaces, mastering the Command Prompt can provide advanced control and flexibility over your network connections.
It’s important to note that the commands mentioned above may vary slightly depending on your version of Windows. However, the basic syntax and functionality should remain consistent across Windows versions.
Now that you know how to enable or disable network connections through the Command Prompt, you can effectively manage your network interfaces using the power of the command line.
How to Enable or Disable Specific Network Adapters?
In Windows, you have the flexibility to enable or disable specific network adapters based on your needs. Whether you want to prioritize certain connections or troubleshoot issues with a particular adapter, here are the steps to enable or disable specific network adapters:
- Open the Control Panel by searching for it in the Windows search bar or accessing it through the Start menu.
- In the Control Panel window, select “Network and Internet”.
- Next, click on “Network and Sharing Center”.
- In the Network and Sharing Center, click on “Change adapter settings” in the left-hand navigation panel. This will open the Network Connections window.
- Identify the specific network adapter that you want to enable or disable.
- Right-click on the desired network adapter and select “Disable” or “Enable” from the context menu.
- If prompted for confirmation, click “Yes” to proceed with the action.
By following these steps, you can easily enable or disable specific network adapters on your Windows system. This method allows you to have granular control over your network connectivity, ensuring that you prioritize the connections that are most relevant to your needs.
Disabling specific network adapters can be particularly useful in scenarios where you want to troubleshoot connectivity issues or conserve power by turning off unused adapters. Additionally, enabling specific adapters ensures that you are utilizing the preferred network connection for better performance and stability.
Keep in mind that the steps provided above may vary slightly depending on your version of Windows. However, the overall process of enabling or disabling specific network adapters through the Control Panel should remain similar.
Now that you know how to enable or disable specific network adapters, you have the ability to fine-tune your network connectivity and ensure optimal performance based on your preferences and requirements.
How to Enable or Disable Wi-Fi Connections?
Wi-Fi connections are commonly used for wireless internet access on laptops, desktops, and mobile devices. Enabling or disabling Wi-Fi connections can be necessary for various reasons, such as conserving battery power, troubleshooting network issues, or prioritizing other types of connections. Here’s how you can enable or disable Wi-Fi connections on your Windows system:
- Click on the Wi-Fi icon located in the system tray in the bottom right corner of your screen. This will open the network flyout panel.
- In the network flyout panel, you will see a list of available Wi-Fi networks. Locate the Wi-Fi toggle switch.
- Click on the Wi-Fi toggle switch to enable or disable the Wi-Fi connection. If the switch is in the “On” position, the Wi-Fi connection is enabled, and if it’s in the “Off” position, the Wi-Fi connection is disabled.
Alternatively, you can also enable or disable Wi-Fi connections through the Network Connections window in the Control Panel. Follow these steps:
- Open the Control Panel by searching for it in the Windows search bar or accessing it through the Start menu.
- Select “Network and Internet” in the Control Panel window.
- Click on “Network and Sharing Center”.
- In the Network and Sharing Center, click on “Change adapter settings”. This will open the Network Connections window.
- Identify the Wi-Fi adapter and right-click on it.
- From the context menu, select “Disable” to disable Wi-Fi or “Enable” to enable it.
- If prompted for confirmation, click “Yes” to proceed with the action.
Disabling Wi-Fi connections can be beneficial when you want to save battery life on a device that primarily uses a wired Ethernet connection or when troubleshooting wireless connectivity issues. Enabling Wi-Fi connections allows you to access available wireless networks and connect to the internet without the need for wired connections.
Keep in mind that the steps outlined above may vary slightly depending on your version of Windows. However, the overall process of enabling or disabling Wi-Fi connections should remain similar.
Now that you know how to enable or disable Wi-Fi connections, you have the control to manage your wireless connectivity and tailor it based on your specific needs.
How to Enable or Disable Ethernet Connections?
Ethernet connections are widely used for wired internet access on computers and other devices. Enabling or disabling Ethernet connections can be useful in scenarios where you want to prioritize wired connections, troubleshoot network issues, or conserve power. Here’s how you can enable or disable Ethernet connections on your Windows system:
- Click on the network icon in the system tray located in the bottom right corner of your screen. This will open the network flyout panel.
- In the network flyout panel, click on the Ethernet option.
- Locate the Ethernet toggle switch and click on it to enable or disable the Ethernet connection. If the switch is in the “On” position, the Ethernet connection is enabled, and if it’s in the “Off” position, the Ethernet connection is disabled.
You can also enable or disable Ethernet connections through the Network Connections window in the Control Panel. Follow these steps:
- Open the Control Panel by searching for it in the Windows search bar or accessing it through the Start menu.
- Select “Network and Internet” in the Control Panel window.
- Click on “Network and Sharing Center”.
- In the Network and Sharing Center, click on “Change adapter settings”. This will open the Network Connections window.
- Identify the Ethernet adapter and right-click on it.
- From the context menu, select “Disable” to disable Ethernet or “Enable” to enable it.
- If prompted for confirmation, click “Yes” to proceed with the action.
Disabling Ethernet connections can be beneficial when you want to conserve power on a laptop or prioritize wireless connections. Enabling Ethernet connections allows you to take advantage of the faster and more stable wired connection for optimal internet experience.
It’s worth noting that the steps mentioned above may vary slightly depending on your version of Windows. However, the overall process of enabling or disabling Ethernet connections should remain similar.
Now that you know how to enable or disable Ethernet connections, you can easily manage your wired connectivity and customize it according to your specific requirements.
How to Enable or Disable Bluetooth Connections?
Bluetooth technology allows you to connect various devices wirelessly, such as headsets, speakers, keyboards, and more. Enabling or disabling Bluetooth connections can be helpful when you want to conserve device battery, troubleshoot connectivity issues, or control the devices paired with your system. Here’s how you can enable or disable Bluetooth connections on your Windows system:
- Click on the notification icon in the system tray located at the bottom right corner of your screen. This will open the Action Center.
- In the Action Center, click on the Bluetooth tile to enable or disable Bluetooth. If the tile is highlighted, Bluetooth is enabled, and if it’s grayed out, Bluetooth is disabled.
Alternatively, you can also enable or disable Bluetooth connections through the Settings menu. Follow these steps:
- Open the Start menu and click on the gear icon to access the Settings menu.
- In the Settings window, select “Devices”.
- In the Devices settings, click on the “Bluetooth & other devices” tab.
- Locate the “Bluetooth” section and toggle the switch to enable or disable Bluetooth connections.
Disabling Bluetooth connections can be beneficial when you want to conserve battery life on your device or troubleshoot Bluetooth-related issues. Enabling Bluetooth allows you to connect and use Bluetooth-enabled devices wirelessly, enhancing your overall productivity and convenience.
It’s important to note that the steps outlined above may vary slightly depending on your version of Windows. However, the overall process of enabling or disabling Bluetooth connections should remain similar.
Now that you know how to enable or disable Bluetooth connections, you have the ability to manage your wireless devices and control Bluetooth connectivity according to your needs.
How to Enable or Disable Mobile Hotspot Connections?
Mobile hotspot connections allow you to share your device’s internet connection with other devices, such as laptops, tablets, or smartphones. Enabling or disabling mobile hotspot connections can be useful when you want to control data usage, secure your network, or share internet access with other devices. Here’s how you can enable or disable mobile hotspot connections on your Windows system:
- Open the Start menu and click on the gear icon to access the Settings menu.
- In the Settings window, select “Network & Internet”.
- In the Network & Internet settings, click on the “Mobile hotspot” tab.
- To enable the mobile hotspot, toggle the switch to the “On” position.
- Configure the hotspot settings, such as the network name and password.
- To disable the mobile hotspot, toggle the switch to the “Off” position.
Enabling mobile hotspot connections allows you to share your internet connection with other devices. This can be particularly useful when you’re on the go and need to connect devices without access to a Wi-Fi network. By configuring the hotspot settings, you can secure your network and control who can access your mobile hotspot.
Keep in mind that the availability of mobile hotspot connections may depend on your device and mobile data plan. Ensure that your device has mobile hotspot capabilities and that you have an active mobile data plan that supports this feature.
The specific steps mentioned above may vary slightly depending on your version of Windows. However, the overall process of enabling or disabling mobile hotspot connections should remain similar.
Now that you know how to enable or disable mobile hotspot connections, you can easily share your device’s internet connection and connect other devices on the go.
How to Enable or Disable VPN Connections?
A Virtual Private Network (VPN) provides a secure and private connection between your device and the internet. Enabling or disabling VPN connections can be beneficial when you want to protect your online privacy, access region-restricted content, or improve security while browsing the internet. Here’s how you can enable or disable VPN connections on your Windows system:
- Open the Start menu and click on the gear icon to access the Settings menu.
- In the Settings window, select “Network & Internet”.
- In the Network & Internet settings, click on the “VPN” tab from the left-hand menu.
- Under the VPN section, you will see a list of configured VPN connections.
- To enable a VPN connection, click on the toggle switch next to the relevant VPN connection to set it to the “On” position.
- To disable a VPN connection, click on the toggle switch next to the relevant VPN connection to set it to the “Off” position.
Enabling a VPN connection establishes a secure tunnel between your device and the VPN server, encrypting your internet traffic and protecting your online activities. It can be particularly useful when connected to public Wi-Fi networks or when you want to bypass internet censorship or access geo-restricted content.
Disabling a VPN connection stops your device from using the VPN server for internet traffic. This allows you to browse the internet using your regular internet connection without the VPN’s encryption and routing.
Note that the availability of VPN connections may vary depending on your device and the VPN services you have installed. Ensure that you have a valid VPN subscription and that the necessary VPN client software is installed on your system.
The steps provided above may slightly differ depending on your version of Windows. However, the overall process of enabling or disabling VPN connections through the Settings menu should remain similar.
Now that you know how to enable or disable VPN connections, you can easily enhance your online security and access the internet with added privacy and freedom.
How to Enable or Disable Virtual Network Connections?
Virtual Network Connections, also known as virtual adapters or virtual network interfaces, allow you to create virtual networks and connect virtual machines or software-based networks. Enabling or disabling virtual network connections can be helpful when you want to manage virtual networks, troubleshoot network-related issues, or control network resources. Here’s how you can enable or disable virtual network connections on your Windows system:
- Open the Control Panel by searching for it in the Windows search bar or accessing it through the Start menu.
- Select “Network and Internet” in the Control Panel window.
- Click on “Network and Sharing Center”.
- In the Network and Sharing Center, click on “Change adapter settings”. This will open the Network Connections window.
- Identify the virtual network connection or adapter that you want to enable or disable.
- Right-click on the desired virtual network connection and select “Disable” to disable it or “Enable” to enable it from the context menu.
- If prompted for confirmation, click “Yes” to proceed with the action.
Disabling virtual network connections can be beneficial when you want to free up network resources or troubleshoot issues with virtual networks. Enabling virtual network connections allows you to create and utilize software-based networks, improving the flexibility and scalability of your IT infrastructure.
It’s worth noting that the steps provided above may vary slightly depending on your version of Windows. However, the overall process of enabling or disabling virtual network connections through the Control Panel should remain similar.
Now that you know how to enable or disable virtual network connections, you have the ability to manage and control virtual networks according to your specific needs and requirements.
How to Enable or Disable Network Connections for Specific Users?
Windows allows you to enable or disable network connections for specific users, giving you greater control over network access and usage. This can be useful in scenarios where you want to restrict certain users from accessing specific networks or when you need to manage network connectivity for different users on a shared device. Here’s how you can enable or disable network connections for specific users on your Windows system:
- Open the Control Panel by searching for it in the Windows search bar or accessing it through the Start menu.
- Select “Network and Internet” in the Control Panel window.
- Click on “Network and Sharing Center”.
- In the Network and Sharing Center, click on “Change adapter settings”. This will open the Network Connections window.
- Identify the network connection or adapter that you want to enable or disable for specific users.
- Right-click on the desired network connection and select “Properties” from the context menu.
- In the Properties window, go to the “Security” tab.
- Click on the “Advanced” button and then click on the “Edit” button to modify permissions.
- In the Permissions dialog box, you can add or remove user accounts and set their permissions for the selected network connection.
- To disable a network connection for a specific user, uncheck the “Allow” box next to their username.
- To enable a network connection for a specific user, check the “Allow” box next to their username.
- Click “OK” to save the changes.
By following these steps, you can enable or disable network connections specifically for certain users on your Windows system. This allows you to control network access and customize network connectivity based on individual user requirements or restrictions.
It’s important to note that the steps provided above may vary slightly depending on your version of Windows. However, the overall process of enabling or disabling network connections for specific users through the Control Panel should remain similar.
Now that you know how to enable or disable network connections for specific users, you can effectively manage network access and tailor network connectivity according to the needs of different users on your Windows system.
How to Enable or Disable Automatic Connection for a Network Adapter?
Windows allows you to enable or disable automatic connection for a network adapter, giving you control over how your system connects to networks. This can be useful when you want to manage network preferences, prioritize certain connections, or conserve network resources. Here’s how you can enable or disable automatic connection for a network adapter on your Windows system:
- Open the Control Panel by searching for it in the Windows search bar or accessing it through the Start menu.
- Select “Network and Internet” in the Control Panel window.
- Click on “Network and Sharing Center”.
- In the Network and Sharing Center, click on “Change adapter settings”. This will open the Network Connections window.
- Identify the network adapter for which you want to enable or disable automatic connection.
- Right-click on the desired network adapter and select “Properties” from the context menu.
- In the Properties window, go to the “Networking” tab.
- Click on the “Configure” button.
- In the adapter’s properties dialog box, go to the “Power Management” tab.
- Check the “Allow the computer to turn off this device to save power” box to enable automatic connection.
- Uncheck the “Allow the computer to turn off this device to save power” box to disable automatic connection.
- Click “OK” to save the changes.
By following these steps, you can enable or disable automatic connection for a network adapter on your Windows system. Enabling automatic connection allows your system to connect to networks as soon as they are available, providing seamless connectivity. Disabling automatic connection gives you more control over when and how your system connects to networks, allowing you to prioritize certain connections or conserve power.
It’s important to note that the steps provided above may vary slightly depending on your version of Windows. However, the overall process of enabling or disabling automatic connection for a network adapter through the Control Panel should remain similar.
Now that you know how to enable or disable automatic connection for a network adapter, you can effectively manage network preferences and customize your system’s network connectivity based on your specific requirements.
How to Enable or Disable Network Connections on Startup?
Windows provides the option to enable or disable network connections on startup, allowing you to control which network connections are automatically established when your system boots up. This can be helpful when you want to prioritize certain connections, manage network resources, or troubleshoot startup network issues. Here’s how you can enable or disable network connections on startup:
- Open the Control Panel by searching for it in the Windows search bar or accessing it through the Start menu.
- Select “Network and Internet” in the Control Panel window.
- Click on “Network and Sharing Center”.
- In the Network and Sharing Center, click on “Change adapter settings”. This will open the Network Connections window.
- Identify the network connection you want to enable or disable on startup.
- Right-click on the desired network connection and select “Properties” from the context menu.
- In the Properties window, go to the “Networking” tab.
- Click on the “Configure” button.
- In the adapter’s properties dialog box, go to the “Advanced” tab.
- Under the Property column, locate “NetworkAddress” or “Network Address” and select it.
- Set the value for “NetworkAddress” to either “0” (zero) to enable the network connection on startup or leave it blank to disable the network connection on startup.
- Click “OK” to save the changes.
By following these steps, you can enable or disable network connections on startup. Enabling a network connection on startup ensures that it is automatically established when your system boots up, providing immediate connectivity. Disabling a network connection on startup prevents it from automatically connecting, allowing you to manage network resources or troubleshoot network-related startup issues.
It’s worth noting that the steps provided above may vary slightly depending on your version of Windows. However, the overall process of enabling or disabling network connections on startup through the Control Panel should remain similar.
Now that you know how to enable or disable network connections on startup, you can customize your system’s network behavior according to your specific requirements and preferences.
How to Enable or Disable Network Connections in Windows Safe Mode?
In certain situations, you may need to enable or disable network connections in Windows Safe Mode to troubleshoot network-related issues or perform specific tasks. Here’s how you can enable or disable network connections in Windows Safe Mode:
- Restart your computer.
- As the computer boots up, press the F8 key repeatedly until the Advanced Boot Options menu appears.
- Using the arrow keys, select “Safe Mode with Networking” and press Enter. This will boot your computer into Safe Mode with the necessary network drivers loaded.
- After Windows Safe Mode is loaded, open the Control Panel by searching for it in the Windows search bar or accessing it through the Start menu.
- Select “Network and Internet” in the Control Panel window.
- Click on “Network and Sharing Center”.
- In the Network and Sharing Center, click on “Change adapter settings”. This will open the Network Connections window.
- Identify the network connection you want to enable or disable.
- Right-click on the desired network connection and select “Disable” to disable the network connection or “Enable” to enable it.
- If prompted for confirmation, click “Yes” to proceed with the action.
By following these steps, you can enable or disable network connections in Windows Safe Mode. This can be useful when troubleshooting network issues, testing network-related tasks, or performing specific actions that require network connectivity while in Safe Mode.
Keep in mind that Windows Safe Mode is a diagnostic startup mode with limited functionality. Some network-related features, such as managing advanced network settings, may not be available or fully functional in Safe Mode.
The steps provided above are applicable to most versions of Windows. However, the specific process may vary slightly depending on your version of Windows.
Now that you know how to enable or disable network connections in Windows Safe Mode, you can effectively troubleshoot network issues or perform necessary tasks while in this specialized startup mode.
How to Enable or Disable Network Connections in Windows 10?
Windows 10 provides various methods to enable or disable network connections, allowing you to have control over your network connectivity. Here are a few ways to accomplish this:
1. Using the Network & Internet Settings:
- Open the Start menu and click on the gear icon to access the Settings menu.
- In the Settings window, select “Network & Internet”.
- Click on “Change adapter options” under the “Advanced network settings” section.
- In the Network Connections window, right-click on the network connection you want to enable or disable.
- From the context menu, select “Disable” to disable the network connection or “Enable” to enable it.
2. Using the Network Icon in the System Tray:
- Click on the network icon located in the system tray in the bottom-right corner of your screen.
- In the network flyout panel, right-click on the network connection you want to enable or disable.
- Select “Disable” to disable the connection or “Enable” to enable it.
3. Using the Network Connections in the Control Panel:
- Open the Control Panel by searching for it in the Windows search bar or accessing it through the Start menu.
- Select “Network and Internet” in the Control Panel window.
- Click on “Network and Sharing Center”.
- Click on “Change adapter settings”. This will open the Network Connections window.
- Right-click on the network connection you want to enable or disable.
- Select “Disable” to disable the connection or “Enable” to enable it.
These methods provide different ways to enable or disable network connections in Windows 10. Whether you prefer using the Settings menu, the network icon in the system tray, or the Network Connections in the Control Panel, you can easily manage your network connectivity based on your specific requirements.
It’s worth noting that the steps provided above may vary slightly depending on your version of Windows 10. However, the overall process of enabling or disabling network connections should remain similar.
Now that you know how to enable or disable network connections in Windows 10, you can conveniently manage your network connectivity and tailor it to suit your needs.