
Common Causes of ‘Connected With Limited Access’ Errors
Experiencing ‘Connected With Limited Access’ errors on your Windows computer can be frustrating, especially when you need a stable and functional internet connection. These errors occur when your computer is connected to a network but cannot access the internet. Understanding the common causes of these errors can help you troubleshoot and resolve the issue effectively. Here are some common causes to be aware of:
1. DHCP Issues: Dynamic Host Configuration Protocol (DHCP) is responsible for assigning IP addresses to devices on a network. If there are issues with DHCP, such as an incorrect IP address lease, it can result in limited network connectivity.
2. Network Adapter Problems: Outdated or incompatible network adapter drivers can cause connectivity problems. If the drivers are malfunctioning, your computer may not establish a full connection with the network.
3. Signal Interference: Sometimes, external factors like nearby electronic devices, physical obstacles, or even other wireless networks can interfere with the signal strength, leading to limited access to the network.
4. Network Configuration Issues: Misconfigured network settings, such as incorrect subnet masks or gateway addresses, can prevent your computer from connecting to the internet properly.
5. IP Address Conflict: When two devices on the same network are assigned the same IP address, it can result in limited access. This commonly happens when DHCP fails to assign unique IP addresses.
6. DNS Problems: Domain Name System (DNS) translates domain names into IP addresses. If there are issues with DNS settings, your computer may not be able to resolve the IP addresses of websites, resulting in limited internet access.
7. Router Configuration: Improperly configured router settings, such as firmware issues or incompatible security settings, can cause limited access errors on connected devices.
8. Software or Firewall Interference: Sometimes, antivirus software or firewalls can mistakenly block network access, leading to limited connectivity issues.
9. Network Infrastructure Problems: Faulty network cables, damaged Ethernet ports, or router/modem problems can all contribute to limited network access.
By understanding these common causes, you can begin to troubleshoot the ‘Connected With Limited Access’ errors effectively. In the following section, we will explore some troubleshooting tips to help you resolve these issues and regain full internet access on your Windows computer.
Troubleshooting Tips for ‘Connected With Limited Access’ Errors
Encountering ‘Connected With Limited Access’ errors can be challenging, but there are several troubleshooting tips you can try to resolve the issue and restore full internet connectivity on your Windows computer. Follow these steps to troubleshoot and fix the problem:
- Restart Your Router and Modem: Begin by rebooting your router and modem. Simply unplugging them from the power source, waiting for a few seconds, and then plugging them back in can often resolve temporary network glitches.
- Check Your Network Cables: Ensure that all network cables connected to your router and computer are securely plugged in. Faulty or loose cables can result in limited access errors.
- Update Your Network Adapter Drivers: Visit the manufacturer’s website for your network adapter and download the latest drivers. Outdated or incompatible drivers can cause connectivity issues.
- Disable and Re-enable Your Network Adapter: Open the Device Manager, locate your network adapter, right-click on it, and choose “Disable.” After a few seconds, right-click on it again and select “Enable” to refresh the network connection.
- Reset TCP/IP Stack: Open the Command Prompt as an administrator and type the following command:
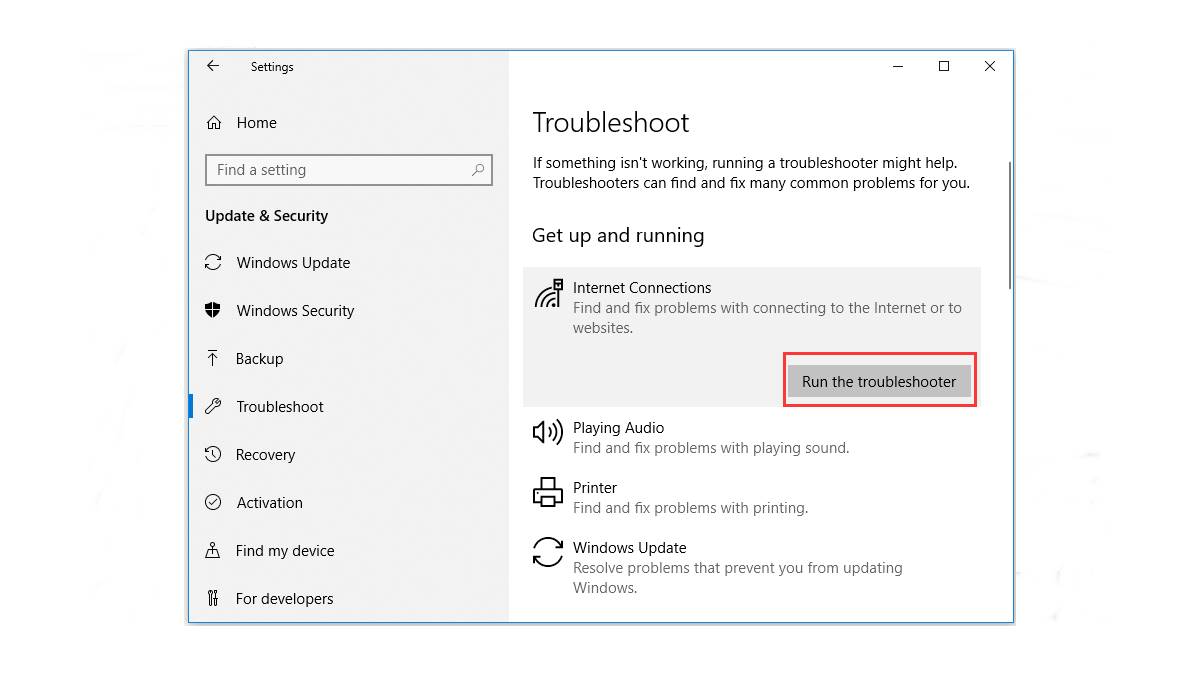
netsh int ip reset. Press Enter and restart your computer. This will reset the TCP/IP stack and can help fix network-related issues. - Run Network Troubleshooter: Windows has a built-in network troubleshooter that can diagnose and fix common network problems. Go to Settings > Network & Internet > Status. Click on “Network troubleshooter” and follow the prompts to fix any issues found.
- Check for Signal Interference: Move your computer closer to the router and ensure there are no physical objects or other devices causing signal interference. Additionally, try changing the wireless channel on your router to reduce potential interference.
- Disable Power Saving Mode for Your Network Adapter: Open the Device Manager, locate your network adapter, right-click on it, and choose “Properties.” In the Power Management tab, uncheck the option that allows the computer to turn off the device to save power.
- Disable Antivirus or Firewall Temporarily: Disable your antivirus software or firewall temporarily to check if they are blocking the network connection. If the connection works without them, adjust the settings accordingly or switch to a different security solution.
- Reset DNS Settings: Open the Command Prompt as an administrator and type the following command:
ipconfig /flushdns. Press Enter to flush the DNS cache and reset the DNS settings. - Check for IP Address Conflict: In the Command Prompt, type
ipconfigand press Enter. Check the IP address of your computer and ensure it is unique within your network. If there is a conflict, assign a static IP address that is not being used by any other device. - Disable Proxy Settings: Go to Settings > Network & Internet > Proxy. Ensure that the “Use a proxy server” option is turned off.
- Flush DNS Cache: Open the Command Prompt as an administrator and type the following command:
ipconfig /flushdns. Press Enter to clear the DNS cache. - Reset Winsock: Open the Command Prompt as an administrator and type the following command:
netsh winsock reset. Press Enter to reset the Winsock catalogue and restart your computer. - Check Router Settings: Access your router’s administration panel and ensure that the firmware is up to date. Verify that the security settings, such as WEP, WPA, or WPA2, are correctly configured.
- Perform a Clean Boot: Temporarily disable all startup programs and non-Microsoft services to eliminate any software conflicts. Open the Run dialog (Windows key + R), type
msconfig, and press Enter. In the System Configuration window, go to the “Services” and “Startup” tabs to make the necessary changes. - Perform a System Restore: If all else fails and the issue started recently, you can try reverting your computer back to a previous state using System Restore.
- Contact Your Internet Service Provider: If none of the troubleshooting steps resolve the ‘Connected With Limited Access’ errors, it’s recommended to contact your internet service provider for further assistance. They can help identify any network issues related to your specific connection.
By following these troubleshooting tips, you should be able to diagnose and resolve the ‘Connected With Limited Access’ errors on your Windows computer, ensuring a stable and uninterrupted internet connection.
Restart Your Router and Modem
One of the simplest and most effective troubleshooting steps for resolving ‘Connected With Limited Access’ errors is to restart your router and modem. This process helps refresh the network connection and clears any temporary glitches that might be causing the limited access issue. Follow these steps to restart your router and modem:
- Power off your router and modem: Locate the power buttons on your router and modem and switch them off. If your devices don’t have power buttons, simply unplug them from the power source.
- Disconnect any other devices: If you have any other devices connected to the router, such as switches or access points, disconnect them for the time being. This ensures that only the router and modem are being restarted.
- Wait for a few seconds: Give your router and modem a few seconds to completely power down. This allows any residual charge to dissipate.
- Power on your router and modem: Plug your router and modem back into the power source and switch them on. Wait for them to fully boot up, which usually takes a couple of minutes. You can monitor the status lights on the devices to confirm when they are ready.
- Reconnect your devices: Once your router and modem are up and running, reconnect any other devices that were disconnected in step 2. This includes wired and wireless devices.
- Check your internet connection: After restarting your router and modem, check if the ‘Connected With Limited Access’ error is resolved. Test your internet connection and see if you now have full access.
If restarting your router and modem doesn’t resolve the limited access issue, proceed to the next troubleshooting step to further troubleshoot and fix the problem.
Restarting your router and modem is a common initial step in resolving internet connectivity issues. It helps clear any temporary network glitches and can often restore full access to the internet. Keep in mind that if the limited access error persists, there may be other factors causing the problem, and it’s important to proceed with the remaining troubleshooting tips to find a resolution.
Check Your Network Cables
When encountering ‘Connected With Limited Access’ errors, it’s essential to inspect your network cables for any faults or loose connections. Faulty or improperly connected cables can lead to intermittent or limited connectivity. Follow these steps to check your network cables:
- Inspect the Ethernet cables: If your computer is connected to the router using an Ethernet cable, examine the cable for any visible damage, such as cuts, fraying, or bent connectors. Replace any cables that appear damaged.
- Check the cable connections: Make sure the Ethernet cable is securely plugged into the Ethernet port on both your computer and the router. Ensure there is a firm connection, and the cable is not loose or partially disconnected.
- Try a different Ethernet port: If you suspect a faulty Ethernet port, try plugging the cable into a different port on your router. This can help determine if the limited access issue is due to a specific port problem.
- Verify wireless connections: If you are connected to the network wirelessly, check for any loose or disconnected antennas on your router. Also, ensure that you are within range of the wireless signal and that there are no physical obstructions affecting the signal strength.
- Restart your modem and router: Even if the network cables appear fine, it’s worth restarting your modem and router as described in the previous troubleshooting step. This can help reset the network connection and resolve any underlying issues.
- Test the connection: After checking your network cables, test your internet connection to see if the ‘Connected With Limited Access’ error is resolved. If not, move on to the next troubleshooting step to continue resolving the issue.
Properly functioning network cables are vital for establishing a stable and reliable internet connection. By checking for any physical damage, ensuring secure connections, and trying different ports if necessary, you can eliminate faulty cables as a potential cause of the limited access error. If the issue persists, it’s important to proceed with the following troubleshooting tips to further diagnose and resolve the problem.
Update Your Network Adapter Drivers
Outdated or incompatible network adapter drivers can often be the cause of ‘Connected With Limited Access’ errors. Updating your network adapter drivers can help ensure compatibility with your operating system and resolve any bugs or glitches that may be affecting your internet connection. Follow these steps to update your network adapter drivers:
- Identify your network adapter: To update your network adapter drivers, you need to know the make and model of your network adapter. This information can be found in the Device Manager.
- Open Device Manager: Press the Windows key + X on your keyboard and select “Device Manager” from the menu that appears. Alternatively, you can search for “Device Manager” in the Start menu or Control Panel.
- Expand the “Network adapters” section: In the Device Manager window, locate and expand the “Network adapters” category. This will display a list of network adapters installed on your computer.
- Right-click and select “Update driver”: Right-click on your network adapter and choose “Update driver” from the context menu. This will initiate the driver update process.
- Automatic driver update: Select the option to automatically search and download the latest driver software. Windows will search for the updated driver online and install it if available.
- Manual driver update: If Windows is unable to find a suitable driver automatically, you can visit the manufacturer’s website for your network adapter. Download the latest driver software from their support page and follow the instructions provided to manually install the update.
- Restart your computer: After updating the network adapter driver, it’s essential to restart your computer for changes to take effect. Restarting will allow your computer to recognize and utilize the updated driver.
- Test your internet connection: Once your computer has restarted, test your internet connection to see if the ‘Connected With Limited Access’ error is resolved. If not, move on to the next troubleshooting step.
Keeping your network adapter drivers up to date is crucial for optimal network performance. By following these steps to update your drivers, you can ensure compatibility with your operating system and potentially resolve any compatibility issues causing limited access errors. If the issue persists, proceed to the next troubleshooting tip to further diagnose and fix the problem.
Disable and Re-enable Your Network Adapter
If you’re experiencing ‘Connected With Limited Access’ errors on your Windows computer, disabling and re-enabling your network adapter can often help refresh the network connection and resolve connectivity issues. Follow these steps to disable and re-enable your network adapter:
- Open Device Manager: Press the Windows key + X on your keyboard and select “Device Manager” from the menu that appears. Alternatively, you can search for “Device Manager” in the Start menu or Control Panel.
- Expand the “Network adapters” section: In the Device Manager window, locate and expand the “Network adapters” category. This will display a list of network adapters installed on your computer.
- Right-click and select “Disable”: Right-click on your network adapter and choose “Disable” from the context menu. This will disable the network adapter, cutting off the connection.
- Wait for a few seconds: Give it a few seconds to allow the network adapter to fully disable. You will notice that the network connection icon in the taskbar will indicate that you are not connected.
- Right-click and select “Enable”: Right-click on the same network adapter again and choose “Enable” from the context menu. This will re-enable the network adapter, allowing it to reconnect to the network.
- Check your internet connection: After re-enabling the network adapter, check if the ‘Connected With Limited Access’ error is resolved. Test your internet connection to ensure you have full access.
Disabling and re-enabling your network adapter can help clear any temporary network configuration issues that may be causing limited access errors. By following these steps and giving your network adapter a fresh start, you might successfully reconnect to the network and regain full internet access. If the issue persists, continue troubleshooting by trying the next troubleshooting tip.
Reset TCP/IP Stack
Resetting the TCP/IP stack can be a useful troubleshooting step when encountering ‘Connected With Limited Access’ errors on your Windows computer. The TCP/IP stack is responsible for handling network communications, and resetting it can help resolve connectivity issues. Follow these steps to reset the TCP/IP stack:
- Open Command Prompt as administrator: Press the Windows key + X on your keyboard and select “Command Prompt (Admin)” from the menu that appears. This will open the Command Prompt with administrative privileges.
- Type the command: In the Command Prompt window, type the following command and press Enter:
netsh int ip reset - Wait for the process to complete: The command will reset the TCP/IP stack settings to their default configuration. Allow the process to complete, which may take a few moments.
- Restart your computer: After the resetting process is completed, restart your computer to apply the changes.
- Check your internet connection: Once your computer has restarted, test your internet connection to see if the ‘Connected With Limited Access’ error is resolved. If not, proceed to the next troubleshooting step.
Resetting the TCP/IP stack can help resolve network-related issues by refreshing the configuration settings. By following these steps and resetting the TCP/IP stack, you can potentially fix limited access errors and restore a stable internet connection. If the issue persists, continue with the next troubleshooting tip to further diagnose and resolve the problem.
Run Network Troubleshooter
When faced with ‘Connected With Limited Access’ errors on your Windows computer, running the built-in network troubleshooter can help diagnose and fix common network problems. The network troubleshooter is designed to automatically identify and resolve connectivity issues. Follow these steps to run the network troubleshooter:
- Open the Network Troubleshooter: Go to Settings > Network & Internet > Status. Under the “Change your network settings” section, click on “Network troubleshooter.”
- Start the troubleshooter: Click on “Network troubleshooter,” and Windows will start diagnosing your network connection.
- Follow the prompts: The network troubleshooter will ask you a series of questions and guide you through the troubleshooting process. Follow the prompts and provide any requested information.
- Implement recommended fixes: After diagnosing the issue, the network troubleshooter will provide a report with any detected problems and suggested solutions. Implement the recommended fixes to resolve the limited access error.
- Test the connection: Once you have implemented the recommended fixes, test your internet connection to see if the ‘Connected With Limited Access’ error is resolved. Check if you now have full access to the internet.
The network troubleshooter is a valuable tool for resolving network connectivity issues. By running the troubleshooter and following its recommendations, you can identify and fix common problems that may be causing the limited access error. If the issue still persists, continue troubleshooting using the next troubleshooting tip to further diagnose and resolve the problem.
Check for Signal Interference
Signal interference can often be a culprit behind ‘Connected With Limited Access’ errors on your Windows computer. External factors such as nearby electronic devices, physical obstacles, or even other wireless networks can cause signal interference, leading to a weak or unstable connection. To troubleshoot signal interference, follow these steps:
- Move closer to the router: If you are experiencing limited access errors, try moving your computer closer to the router. This can help improve the signal strength and minimize potential interference.
- Remove physical obstacles: Ensure that there are no physical obstacles, such as walls, furniture, or appliances, obstructing the path between your computer and the router. These obstacles can weaken the wireless signal and cause connectivity issues.
- Check for interfering devices: Nearby electronic devices, such as cordless phones, baby monitors, microwave ovens, and Bluetooth devices, can interfere with the wireless signal. Move your computer away from these devices or power them off temporarily to see if it improves the connection.
- Switch Wi-Fi channels: If there are other wireless networks in your vicinity using the same channel, it can lead to signal interference. Access your router’s administration panel and switch to a less congested channel to minimize interference.
- Use a Wi-Fi analyzer: Utilize a Wi-Fi analyzer tool to scan your area for nearby wireless networks and the channels they are using. This can help you identify the least crowded channel and adjust your router settings accordingly.
- Test the connection: After implementing the above steps, test your internet connection to see if the ‘Connected With Limited Access’ error is resolved. Check if you now have a stable and uninterrupted internet connection.
By checking for signal interference and minimizing environmental factors that can impact your wireless connection, you can improve the signal strength and reduce the chances of experiencing limited access errors. If the issue persists, continue troubleshooting using the next troubleshooting tip to further diagnose and resolve the problem.
Disable Power Saving Mode for Your Network Adapter
Power-saving modes on your network adapter can sometimes cause ‘Connected With Limited Access’ errors on your Windows computer. These power-saving features are designed to conserve energy but may interfere with the network connection. By disabling power-saving mode for your network adapter, you can ensure a consistent and uninterrupted internet connection. Follow these steps to disable power-saving mode:
- Open Device Manager: Press the Windows key + X on your keyboard and select “Device Manager” from the menu that appears. Alternatively, you can search for “Device Manager” in the Start menu or Control Panel.
- Expand the “Network adapters” section: In the Device Manager window, locate and expand the “Network adapters” category. This will display a list of network adapters installed on your computer.
- Right-click on your network adapter: Right-click on your network adapter and select “Properties” from the context menu. This will open the Properties window for your network adapter.
- Go to the Power Management tab: In the Properties window, navigate to the Power Management tab. This tab contains the power-saving options for your network adapter.
- Disable the power-saving feature: Uncheck the option that allows the computer to turn off the device to save power. This option may be labeled differently depending on your network adapter, but it typically includes phrases like “Allow the computer to turn off this device to save power” or “Power-saving mode.”
- Apply the changes: Click on “OK” or “Apply” to save the changes and exit the Properties window.
- Restart your computer: After disabling power-saving mode for your network adapter, restart your computer to ensure the changes take effect.
- Test your internet connection: Once your computer has restarted, test your internet connection to see if the ‘Connected With Limited Access’ error is resolved. Check if you now have a stable and uninterrupted internet connection.
By disabling power-saving mode for your network adapter, you can prevent potential interruptions in the network connection and eliminate power-related issues that may be causing limited access errors. If the issue persists, continue troubleshooting using the next troubleshooting tip to further diagnose and resolve the problem.
Disable Antivirus or Firewall Temporarily
Antivirus software and firewalls are essential for protecting your computer against threats, but they can sometimes interfere with the network connection and result in ‘Connected With Limited Access’ errors. Temporarily disabling your antivirus or firewall can help determine if they are the cause of the limited access issue. Follow these steps to disable your antivirus or firewall temporarily:
- Disable your antivirus software: Locate the antivirus software icon in the system tray or notification area of your taskbar. Right-click on the icon and look for an option like “Disable,” “Turn off,” or “Pause protection.” Select the appropriate option to disable your antivirus software temporarily.
- Disable your firewall: Press the Windows key + R on your keyboard to open the Run dialog box. Type “control” and press Enter to open the Control Panel. In the Control Panel, search for “Windows Defender Firewall” or “Firewall” and open it. In the Firewall settings, select “Turn Windows Defender Firewall on or off.” Choose the option to turn off the firewall for both private and public networks. Click “OK” to save the changes.
- Check your internet connection: After disabling your antivirus or firewall, test your internet connection to see if the ‘Connected With Limited Access’ error is resolved. If the error disappears and you regain full access to the internet, it may indicate that your antivirus or firewall settings were blocking the network connection.
- Enable your antivirus or firewall: Once you have determined whether the antivirus or firewall was causing the limited access error, re-enable them to ensure your computer remains protected. Follow the same steps mentioned above but choose “Enable” or “Turn on” instead of disabling the software.
Disabling your antivirus or firewall temporarily allows you to pinpoint if they are the root cause of the limited access error. It is important to re-enable them after the troubleshooting steps to maintain the security of your computer. If the issue persists, continue with the next troubleshooting tip to further diagnose and resolve the problem.
Reset DNS Settings
Issues with Domain Name System (DNS) settings can contribute to ‘Connected With Limited Access’ errors on your Windows computer. DNS translates domain names into IP addresses, allowing your computer to connect to websites. Resetting the DNS settings can help resolve any misconfigurations or cached DNS data that may be causing limited access. Follow these steps to reset DNS settings:
- Open Command Prompt as administrator: Press the Windows key + X on your keyboard and select “Command Prompt (Admin)” from the menu that appears. This will open the Command Prompt with administrative privileges.
- Type the commands: In the Command Prompt window, type the following commands one by one, pressing Enter after each command:
- Wait for the commands to execute: After running the commands, wait for them to execute and complete the process. This may take a few moments.
- Restart your computer: Once the commands have run successfully, restart your computer to ensure the changes take effect.
- Test your internet connection: After your computer has restarted, test your internet connection to see if the ‘Connected With Limited Access’ error is resolved. Check if you now have full access to the internet.
ipconfig /flushdns
ipconfig /registerdns
ipconfig /release
ipconfig /renew
Resetting the DNS settings can help clear any misconfigurations or cached data that may be causing limited access errors. By following these steps and resetting the DNS settings, you can ensure your computer has the correct DNS information and potentially restore a stable internet connection. If the issue persists, continue troubleshooting using the next troubleshooting tip to further diagnose and resolve the problem.
Check for IP Address Conflict
IP address conflicts can lead to ‘Connected With Limited Access’ errors on your Windows computer. When two devices on the same network are assigned the same IP address, it can cause network connectivity issues. Checking for IP address conflicts and resolving them can help eliminate limited access errors. Follow these steps to check for IP address conflicts:
- Open Command Prompt: Press the Windows key + R on your keyboard to open the Run dialog box. Type “cmd” and press Enter to open the Command Prompt.
- Type the command: In the Command Prompt window, type the following command and press Enter:
ipconfig. - Identify your IP address: Look for the “IPv4 Address” or “IP Address” entry and note down the IP address assigned to your computer.
- Scan for conflicting IP addresses: On the same network, check other devices to ensure that they are assigned unique IP addresses. If you find any other devices with the same IP address, it indicates an IP address conflict.
- Resolve the IP address conflict: To resolve the conflict, you can assign a static IP address to one of the conflicting devices. Access the network settings of the device with the conflicting IP address and assign a different IP address within the range specified by your router. Alternatively, you can also enable DHCP on that device to let the router automatically assign a unique IP address.
- Test your internet connection: After resolving the IP address conflict, test your internet connection to see if the ‘Connected With Limited Access’ error is resolved. Check if you now have full access to the internet.
Checking for IP address conflicts is crucial in troubleshooting limited access errors. By ensuring that each device on your network has a unique IP address, you can prevent network connectivity issues and restore stable internet access. If the issue persists, continue troubleshooting using the next troubleshooting tip to further diagnose and resolve the problem.
Disable Proxy Settings
Proxy settings can sometimes interfere with your network connection and cause ‘Connected With Limited Access’ errors on your Windows computer. Disabling proxy settings can help resolve these issues and restore normal connectivity. Follow these steps to disable proxy settings:
- Open the Settings: Press the Windows key + I on your keyboard to open the Windows Settings.
- Go to Network & Internet: In the Windows Settings window, click on “Network & Internet” to access the network settings.
- Select Proxy: In the left sidebar, select “Proxy.” This will open the Proxy settings page on the right side of the window.
- Disable the proxy: Under the “Manual proxy setup” section, toggle off the switch for “Use a proxy server.” This will disable the proxy settings on your computer.
- Check your internet connection: After disabling the proxy settings, test your internet connection to see if the ‘Connected With Limited Access’ error is resolved. Check if you now have full access to the internet.
Disabling proxy settings can eliminate potential conflicts and allow your computer to establish a direct connection with the internet. By following these steps and disabling the proxy settings, you can troubleshoot and resolve limited access errors. If the issue persists, continue troubleshooting using the next troubleshooting tip to further diagnose and resolve the problem.
Flush DNS Cache
Flushing the Domain Name System (DNS) cache can help resolve ‘Connected With Limited Access’ errors on your Windows computer. The DNS cache stores information about websites you visit, and outdated or corrupted entries in the cache can lead to connectivity issues. Flushing the DNS cache clears out these entries and allows your computer to fetch fresh DNS information. Follow these steps to flush the DNS cache:
- Open Command Prompt as administrator: Press the Windows key + X on your keyboard and select “Command Prompt (Admin)” from the menu that appears. This will open the Command Prompt with administrative privileges.
- Type the command: In the Command Prompt window, type the following command and press Enter:
ipconfig /flushdns. - Wait for the process to complete: The command will flush the DNS cache, and you will see a confirmation message once it’s done. This typically takes just a few seconds.
- Restart your computer: After flushing the DNS cache, restart your computer to ensure the changes take effect.
- Test your internet connection: Once your computer has restarted, test your internet connection to see if the ‘Connected With Limited Access’ error is resolved. Check if you now have full access to the internet.
Flushing the DNS cache can help resolve limited access errors caused by outdated or corrupted DNS entries. By following these steps and flushing the DNS cache, you can ensure your computer has the most up-to-date DNS information and potentially restore a stable internet connection. If the issue persists, continue troubleshooting using the next troubleshooting tip to further diagnose and resolve the problem.
Reset Winsock
Resetting the Windows Sockets (Winsock) can help resolve ‘Connected With Limited Access’ errors on your Windows computer. The Winsock provides the necessary communication between your computer and the network. If it becomes corrupted or misconfigured, it can lead to connectivity issues. Resetting the Winsock can restore its default settings and fix network-related problems. Follow these steps to reset the Winsock:
- Open Command Prompt as administrator: Press the Windows key + X on your keyboard and select “Command Prompt (Admin)” from the menu that appears. This will open the Command Prompt with administrative privileges.
- Type the command: In the Command Prompt window, type the following command and press Enter:
netsh winsock reset. - Wait for the command to execute: The command will reset the Winsock catalog to its default state. This process may take a few seconds to complete.
- Restart your computer: Once the command has successfully executed, restart your computer to ensure the changes take effect.
- Test your internet connection: After your computer has restarted, test your internet connection to see if the ‘Connected With Limited Access’ error is resolved. Check if you now have full access to the internet.
Resetting the Winsock can fix network-related issues that may be causing limited access errors. By following these steps and resetting the Winsock, you can restore the proper communication between your computer and the network. If the issue persists, continue troubleshooting using the next troubleshooting tip to further diagnose and resolve the problem.
Check Router Settings
Improperly configured router settings can contribute to ‘Connected With Limited Access’ errors on your Windows computer. It’s important to ensure that the router settings are correctly configured to establish a stable and secure network connection. Follow these steps to check your router settings:
- Access your router’s administration panel: Open a web browser on your computer and enter the router’s IP address in the address bar. The IP address is typically printed on the router or mentioned in the documentation provided by the manufacturer.
- Log in to the router: Enter the username and password to log in to the router’s administration panel. If you’re unsure, consult the documentation or check the manufacturer’s website for the default login credentials.
- Check the firmware version: Navigate to the firmware or software section of the router’s settings. Verify if the router’s firmware is up-to-date. If an update is available, follow the manufacturer’s instructions to download and install the latest firmware version.
- Review wireless settings: Check the wireless settings, including the network name (SSID) and the security type (WEP, WPA, or WPA2). Ensure that the settings match the ones you intend to use for your network.
- Adjust security settings: Review the security settings on your router to ensure they are properly configured. Use strong encryption (preferably WPA2) and a unique network password to secure your wireless network.
- Restart your router: After verifying and adjusting the router settings, restart your router to apply any changes you made. This can help ensure that the updated settings take effect.
- Test your internet connection: Once your router has restarted, test your internet connection to see if the ‘Connected With Limited Access’ error is resolved. Check if you now have full access to the internet.
Checking your router settings is essential to establish a stable and secure network connection. By reviewing and properly configuring the settings, you can prevent connectivity issues and restore full internet access. If the issue persists, continue troubleshooting using the next troubleshooting tip to further diagnose and resolve the problem.
Perform a Clean Boot
A clean boot allows you to start your Windows computer with only essential services and programs running, which can help identify if any third-party software is causing ‘Connected With Limited Access’ errors. By performing a clean boot, you can isolate the issue and determine if it is related to conflicting software. Follow these steps to perform a clean boot:
- Open the System Configuration tool: Press the Windows key + R on your keyboard to open the Run dialog box. Type “msconfig” and press Enter.
- Access the Services tab: In the System Configuration window, click on the “Services” tab.
- Hide all Microsoft services: Check the box that says “Hide all Microsoft services” to ensure you don’t disable any essential Windows services.
- Disable all remaining services: Click on the “Disable all” button to disable all non-Microsoft services.
- Access the Startup tab: Go to the “Startup” tab in the System Configuration window.
- Disable startup items: Click on the “Open Task Manager” link, which will open the Task Manager with the “Startup” tab displayed. Disable all the startup items by right-clicking on each item and selecting “Disable.”
- Apply changes and restart your computer: Close the Task Manager and the System Configuration window and restart your computer to perform a clean boot.
- Test your internet connection: Once your computer has restarted, test your internet connection to see if the ‘Connected With Limited Access’ error is resolved. Check if you now have full access to the internet.
A clean boot helps identify if any third-party software is causing limited access errors by eliminating potential conflicts. By following these steps and performing a clean boot, you can narrow down the source of the issue and work towards a resolution. If the issue persists, continue troubleshooting using the next troubleshooting tip to further diagnose and resolve the problem.
Perform a System Restore
If you’re unable to resolve ‘Connected With Limited Access’ errors on your Windows computer using other troubleshooting methods, performing a system restore can help revert your computer back to a previous state when it was functioning properly. This can be particularly useful if the issue started after a recent change or update. Follow these steps to perform a system restore:
- Open the System Restore tool: Press the Windows key + R on your keyboard to open the Run dialog box. Type “rstrui” and press Enter to open the System Restore tool.
- Select a restore point: In the System Restore window, select a restore point that predates the occurrence of the ‘Connected With Limited Access’ errors. Choose a date when your computer was functioning without any connectivity issues.
- Start the system restore: Follow the on-screen instructions to start the system restore process. This may take some time, and your computer will restart during the process.
- Wait for the restoration to complete: Allow the system restore process to complete. Your computer will restart again, and the changes will be applied.
- Test your internet connection: Once your computer has restarted, test your internet connection to see if the ‘Connected With Limited Access’ error is resolved. Check if you now have full access to the internet.
A system restore allows you to revert your computer back to a previous state, undoing any changes that may have caused limited access errors. By following these steps and performing a system restore, you can potentially eliminate the issue and regain a stable internet connection. Keep in mind that a system restore will revert other system changes as well, so it’s recommended to back up your important files before proceeding. If the issue persists, continue troubleshooting using the next troubleshooting tip to further diagnose and resolve the problem.
Contact Your Internet Service Provider
If you’ve exhausted all troubleshooting steps and are still experiencing ‘Connected With Limited Access’ errors on your Windows computer, it may be time to contact your Internet Service Provider (ISP) for further assistance. Your ISP can help identify and resolve network-related issues that may be causing the limited access problem. Follow these steps to contact your ISP:
- Collect necessary information: Before reaching out to your ISP, gather relevant information about the issue. This may include details about the error message, steps you’ve taken to troubleshoot the problem, and any specific patterns or timeframes you’ve noticed with the limited access errors.
- Locate contact information: Check your ISP’s website, the documentation they provided, or any emails you’ve received for their contact information. Look for a customer support number, email address, or online chat option.
- Reach out to customer support: Contact your ISP’s customer support using the provided contact information. Explain the ‘Connected With Limited Access’ errors you’re experiencing and provide the relevant information you collected.
- Follow their instructions: The customer support representative will guide you through further troubleshooting steps or escalate the issue if necessary. Follow their instructions and provide any additional information they may need.
- Work with your ISP to resolve the issue: Cooperate with your ISP’s customer support team and provide any requested information or access to your computer if needed. They may need to perform remote diagnostics or send a technician to your location to resolve the limited access errors.
- Test your internet connection: After working with your ISP to resolve the issue, test your internet connection to see if the ‘Connected With Limited Access’ error is resolved. Check if you now have full access to the internet.
If all troubleshooting steps have been exhausted, contacting your ISP is the next logical step. They have the expertise and resources to diagnose and resolve network-related issues. By following these steps and working with your ISP, you increase the chances of resolving the ‘Connected With Limited Access’ errors and restoring a stable internet connection.