
Understanding Screen Recording
Screen recording is a powerful feature that allows you to capture and save the activity on your iPhone 10's screen as a video file. Whether you want to create tutorials, demonstrate app functionalities, or capture memorable moments from your favorite apps, screen recording provides a convenient way to preserve and share these experiences.
By utilizing the screen recording feature, you can visually communicate with others, showcase your expertise, or simply keep a record of important information. This functionality has become increasingly popular due to its versatility and ease of use.
When you initiate a screen recording on your iPhone 10, it captures everything that happens on the screen, including app interactions, gestures, and any audio that is playing. This makes it an invaluable tool for a wide range of purposes, such as creating instructional videos, documenting software bugs, or preserving video calls and gameplay sessions.
Furthermore, screen recording can be an effective method for troubleshooting technical issues, as it allows you to visually demonstrate the problem to support personnel or colleagues. This can streamline the communication process and lead to quicker resolutions.
In essence, screen recording empowers users to capture and share their digital experiences in a dynamic and engaging format. It serves as a bridge between the virtual world of mobile devices and the realm of visual storytelling, enabling individuals to convey information, entertain, and educate with ease.
Understanding the capabilities and potential applications of screen recording sets the stage for harnessing this feature to its fullest extent. As we delve deeper into the specifics of enabling, customizing, and utilizing screen recording on the iPhone 10, you will gain a comprehensive understanding of how to leverage this functionality for various personal and professional endeavors.
Enabling Screen Recording on iPhone 10
Enabling the screen recording feature on your iPhone 10 is a straightforward process that grants you access to a powerful tool for capturing and sharing your device's activities. To initiate screen recording, you must first ensure that the feature is readily accessible from the Control Center. Here's a step-by-step guide to enabling screen recording on your iPhone 10:
-
Access Settings: Begin by navigating to the "Settings" app on your iPhone 10. This is where you can customize various aspects of your device's functionality.
-
Select Control Center: Within the Settings menu, locate and tap on "Control Center." This section allows you to manage the shortcuts and controls available in the Control Center interface.
-
Customize Controls: Upon entering the Control Center settings, you will find an option to "Customize Controls." Tap on this to view the list of available controls that can be added to the Control Center.
-
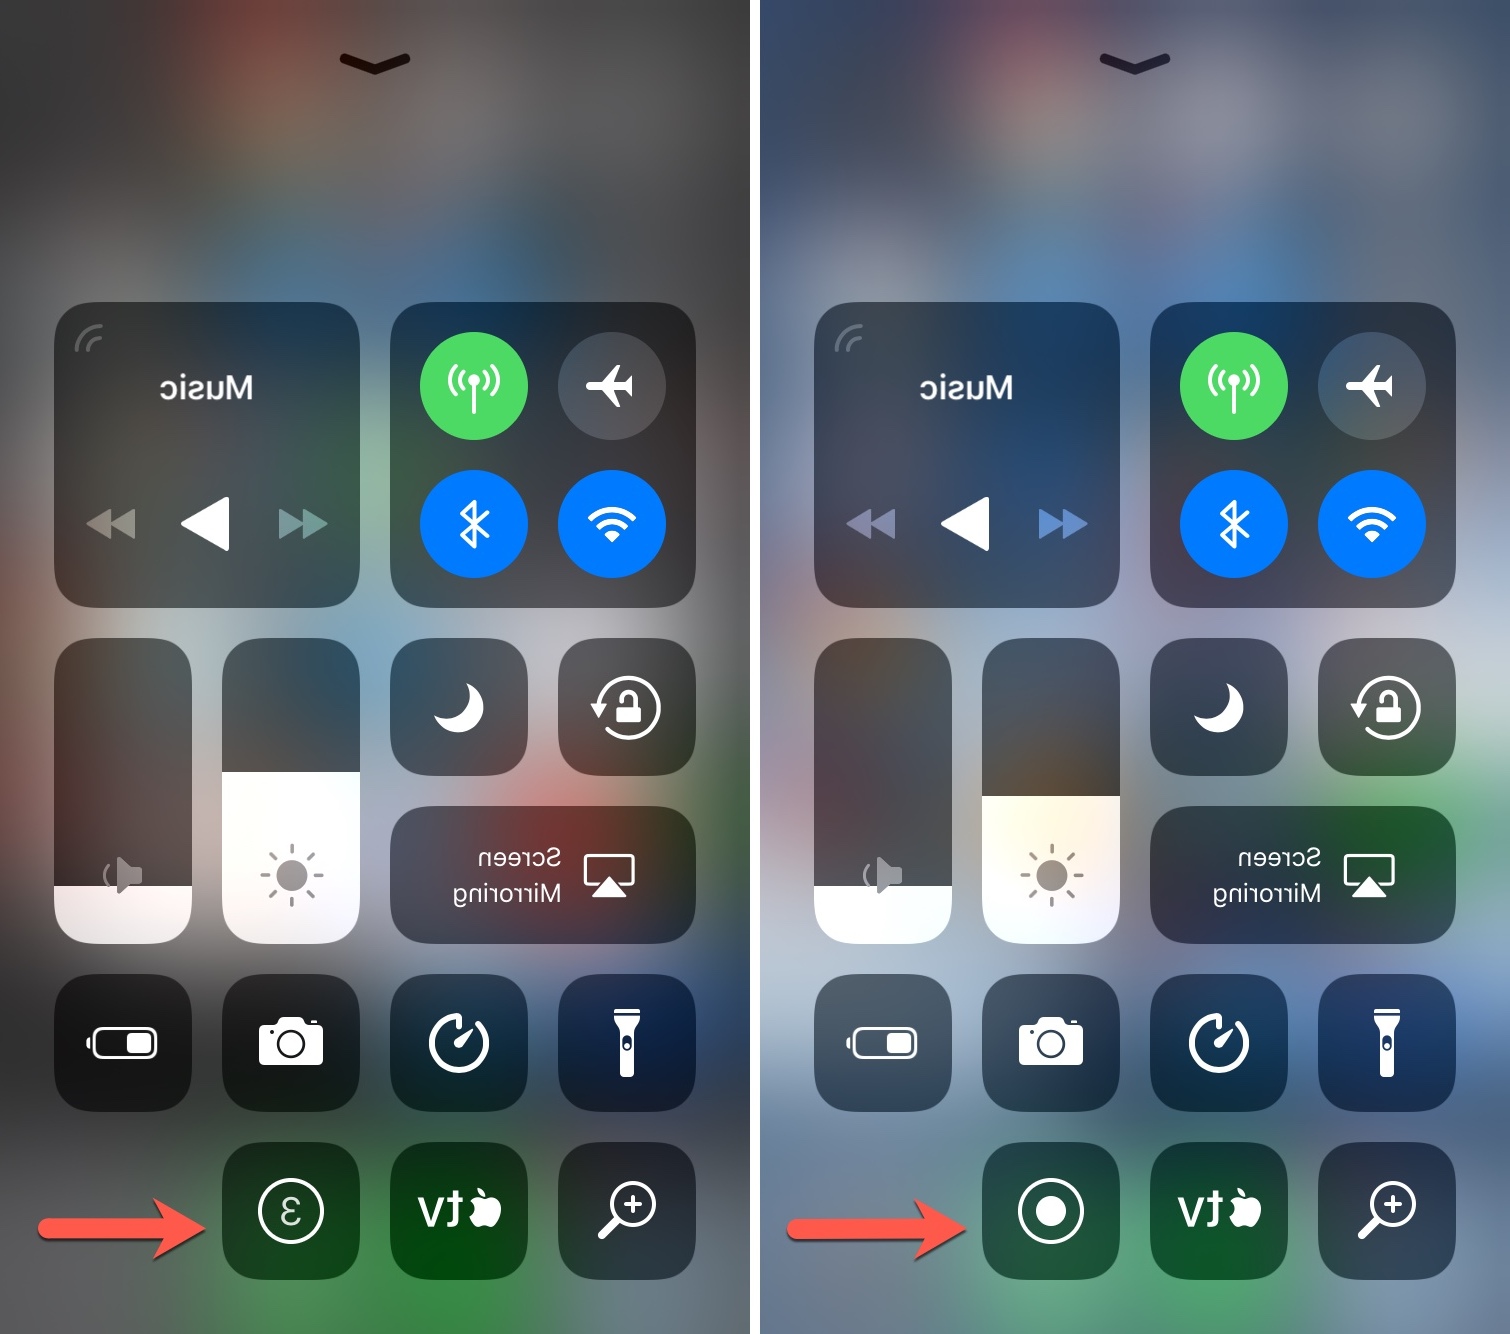
Add Screen Recording: Scroll through the list of controls until you find "Screen Recording." Tap the green plus icon next to it to add the screen recording feature to the Control Center. This action ensures that screen recording becomes easily accessible whenever you open the Control Center.
-
Access Control Center: To access the Control Center, swipe down from the top-right corner of the screen (or swipe up from the bottom of the screen, depending on your device's settings). This action reveals the Control Center interface, which now includes the screen recording button.
-
Initiate Screen Recording: Once the screen recording button is visible in the Control Center, you can start a recording by tapping the icon. A three-second countdown will appear, signaling the commencement of the recording process.
By following these steps, you have successfully enabled the screen recording feature on your iPhone 10. This allows you to effortlessly capture and save the activities on your device's screen, opening up a world of possibilities for creating engaging content, sharing experiences, and troubleshooting technical issues.
Enabling screen recording on your iPhone 10 is the first step towards harnessing the full potential of this feature. With the capability to capture high-quality videos of your device's screen, you are now equipped to explore the myriad applications and benefits that screen recording offers.
Using Control Center for Screen Recording
Utilizing the Control Center for screen recording on your iPhone 10 provides a seamless and efficient way to capture the activities on your device's screen. Once you have enabled the screen recording feature and added it to the Control Center, initiating a recording is just a swipe and a tap away. Here's a detailed guide on how to use the Control Center for screen recording:
-
Accessing the Control Center: To access the Control Center, simply swipe down from the top-right corner of the screen. Alternatively, depending on your device's settings, you can swipe up from the bottom of the screen. This action reveals the Control Center interface, where you will find a variety of shortcuts and controls.
-
Locating the Screen Recording Button: Upon opening the Control Center, you will notice the screen recording button, represented by a circular icon with a solid white dot in the center. This icon serves as the gateway to initiating screen recordings on your iPhone 10.
-
Initiating a Screen Recording: To start a screen recording, simply tap the screen recording button in the Control Center. Upon tapping the button, a three-second countdown will appear, signaling the commencement of the recording process. This countdown provides a brief window to prepare the screen for recording, ensuring that you capture the desired content seamlessly.
-
Recording Indicator: Once the screen recording begins, the status bar at the top of the screen will display a red recording indicator. This indicator serves as a visual cue, clearly indicating that the screen recording is in progress. It ensures that you are aware of the ongoing recording and can manage your device's activities accordingly.
-
Pausing and Resuming: During a screen recording, you have the option to pause and resume the recording as needed. This functionality allows you to seamlessly manage interruptions or transitions within the content you are capturing. To pause the recording, simply tap the red status bar at the top of the screen and select the "Pause" option. When you are ready to resume, tap the "Resume" option to continue the recording.
-
Ending the Recording: Once you have captured the desired content, ending the screen recording is a straightforward process. To stop the recording, tap the red status bar at the top of the screen and select the "Stop" option. Alternatively, you can return to the Control Center and tap the screen recording button again to end the recording.
By leveraging the Control Center for screen recording, you can effortlessly capture and preserve the activities on your iPhone 10's screen. This intuitive and accessible approach empowers you to create high-quality video content, share experiences, and communicate visually with ease. Whether you are documenting app interactions, creating tutorials, or troubleshooting technical issues, the Control Center serves as a convenient gateway to the dynamic world of screen recording on your iPhone 10.
Customizing Screen Recording Settings
Customizing the screen recording settings on your iPhone 10 allows you to tailor the recording experience to suit your specific needs and preferences. By delving into the settings related to screen recording, you can optimize the quality of your recordings, manage audio inputs, and streamline the overall recording process. Here's a comprehensive exploration of the various settings that can be customized to enhance your screen recording endeavors.
Adjusting Video Quality
The ability to adjust the video quality of screen recordings empowers you to strike a balance between file size and visual clarity. Within the screen recording settings, you can choose between different video resolutions and frame rates, allowing you to optimize the recording quality based on the intended use of the captured content. Whether you prioritize crisp visuals for instructional videos or seek to conserve storage space for casual recordings, the option to adjust video quality provides flexibility and control.
Managing Microphone Audio
In addition to capturing the activities on your device's screen, screen recording on the iPhone 10 allows you to include audio from the device's microphone. This feature is particularly valuable for creating narrated tutorials, providing commentary during gameplay recordings, or capturing ambient sounds during screen interactions. Within the screen recording settings, you can manage the inclusion of microphone audio, enabling you to seamlessly integrate voiceovers or ambient sounds into your recordings.
Enabling Touches Visualization
The option to visualize touches during screen recordings enhances the clarity and instructional value of the captured content. By enabling this setting, your screen recordings will display visual cues, such as highlighted taps and gestures, making it easier for viewers to follow along with on-screen interactions. This feature is especially beneficial for creating tutorials, app demonstrations, and user experience showcases, as it provides a clear visual representation of touch inputs and interactions.
Accessing Additional Settings
Beyond the core settings for video quality, audio management, and touch visualization, the screen recording settings on the iPhone 10 offer additional customization options. These may include the ability to designate a specific app for audio recording, manage external audio sources, or configure advanced recording controls. Exploring these additional settings allows you to fine-tune the screen recording process, ensuring that it aligns with your specific requirements and creative vision.
By customizing the screen recording settings on your iPhone 10, you can elevate the quality, clarity, and impact of your recorded content. This level of customization empowers you to create engaging and informative screen recordings that effectively convey your message, showcase app functionalities, and capture memorable experiences with precision and flair.
Recording the Screen with Audio
Recording the screen with audio on your iPhone 10 adds a layer of depth and richness to your captured content, enabling you to create immersive and engaging recordings that effectively convey your message. The ability to include audio in your screen recordings opens up a myriad of possibilities, from narrated tutorials and instructional videos to gameplay commentary and app demonstrations.
When initiating a screen recording on your iPhone 10, you have the option to include audio from the device's microphone, allowing you to capture your voice, ambient sounds, and external audio sources. This feature is particularly valuable for scenarios where audio commentary or environmental sounds enhance the context and clarity of the recorded content.
To record the screen with audio, simply follow these steps:
-
Access Control Center: Swipe down from the top-right corner of the screen to access the Control Center. Alternatively, depending on your device's settings, you can swipe up from the bottom of the screen.
-
Enable Microphone Audio: Before initiating the screen recording, ensure that the microphone audio is enabled. This can be done by pressing and holding the screen recording button in the Control Center. A menu will appear, allowing you to toggle the microphone audio on or off. When the microphone audio is enabled, the icon will turn red, indicating that audio will be captured during the screen recording.
-
Initiate Screen Recording: Once the microphone audio is enabled, tap the screen recording button to start the recording process. A three-second countdown will appear, signaling the commencement of the recording. During this countdown, ensure that the audio sources you intend to capture are active and properly positioned for optimal recording quality.
-
Manage Audio Inputs: As the screen recording progresses, monitor the audio inputs to ensure that the desired sounds are being captured effectively. Whether you are providing commentary, capturing ambient sounds, or integrating external audio sources, maintaining awareness of the audio inputs allows you to create cohesive and impactful recordings.
-
End the Recording: When you have captured the desired content, end the screen recording by tapping the red status bar at the top of the screen and selecting the "Stop" option. Alternatively, return to the Control Center and tap the screen recording button again to conclude the recording process.
By recording the screen with audio, you can create compelling and informative content that resonates with your audience, effectively communicates your message, and elevates the overall viewing experience. Whether you are sharing knowledge, showcasing app functionalities, or documenting memorable moments, the inclusion of audio in your screen recordings adds a dynamic dimension that captivates and engages viewers.
Editing and Sharing Screen Recordings
Editing and sharing screen recordings on your iPhone 10 allows you to refine and distribute your captured content with precision and impact. Whether you aim to trim recordings, enhance visual clarity, or share your creations with others, the editing and sharing capabilities empower you to curate and disseminate compelling screen recordings seamlessly.
Editing Screen Recordings
Upon capturing a screen recording, you may find the need to refine the content by removing unwanted segments, adjusting the length, or enhancing visual elements. The iPhone 10 offers built-in editing tools that enable you to tailor your screen recordings to align with your creative vision.
To edit a screen recording, navigate to the Photos app and locate the recorded video in your camera roll. Tap on the video to open it, then select the "Edit" option. This grants you access to a range of editing features, including the ability to trim the recording, add annotations, and apply visual enhancements. By leveraging these editing tools, you can craft polished and impactful screen recordings that effectively convey your message and captivate your audience.
Sharing Screen Recordings
Once you have refined your screen recording, sharing it with others is a straightforward process that facilitates seamless distribution and collaboration. The iPhone 10 offers multiple avenues for sharing screen recordings, allowing you to disseminate your content across various platforms and communication channels.
After editing your screen recording, tap the "Share" button within the Photos app to access a range of sharing options. From here, you can choose to share the recording via messaging apps, social media platforms, email, or cloud storage services. Additionally, the iPhone 10 enables you to directly upload screen recordings to video hosting platforms or share them with AirDrop for instant transfer to nearby devices.
By leveraging the sharing capabilities of the iPhone 10, you can amplify the reach and impact of your screen recordings, fostering engagement, collaboration, and knowledge dissemination. Whether you are showcasing your expertise, communicating ideas, or collaborating with peers, the ability to effortlessly share your screen recordings empowers you to connect with your audience and extend the influence of your visual storytelling.
In summary, the editing and sharing features of the iPhone 10 provide a seamless and intuitive workflow for refining and distributing your screen recordings. By harnessing these capabilities, you can elevate the quality, reach, and impact of your visual content, effectively communicating your message and engaging with your audience.