
What are bookmarks in Microsoft Word?
When working with lengthy documents in Microsoft Word, it can sometimes be challenging to navigate to specific sections or important information quickly. This is where bookmarks come in handy. Bookmarks are virtual placeholders that allow you to mark specific locations within your Word document, making it easier to revisit those sections later.
Think of bookmarks as signposts that help you find your way through a complex document. They enable you to create a reference point for important paragraphs, headings, or even tables. By inserting bookmarks strategically, you can streamline your workflow and save valuable time when accessing specific content.
Bookmarks are especially beneficial when working with lengthy reports, research papers, or training manuals. Instead of scrolling through pages of text or using the Find function to locate specific sections, you can simply navigate to the bookmarked locations with just a few clicks.
It’s worth noting that bookmarks are not visible in the printed version of your document. They are solely for internal use, allowing you to mark and organize key sections without disrupting the final layout or appearance of your document.
In addition, bookmarks can be used in conjunction with hyperlinks, enabling you to create links that jump to specific bookmarked locations within your Word document. This is particularly useful when you want to direct readers to a specific section or provide easy navigation through a long document.
Overall, bookmarks in Microsoft Word offer a convenient way to mark and access important sections in your document. Whether you’re working on a lengthy report, a thesis, or an instructional manual, utilizing bookmarks can significantly enhance your productivity and improve the overall user experience.
How to insert a bookmark in your Word document
Inserting a bookmark in your Word document is a straightforward process that can be done in a few simple steps:
- First, open your Word document and navigate to the specific location where you want to insert the bookmark.
- Select the text, heading, or location that you want to bookmark. You can also place your cursor at the desired location without selecting any text.
- With the desired text or location selected, go to the “Insert” tab in the ribbon at the top of the Word window.
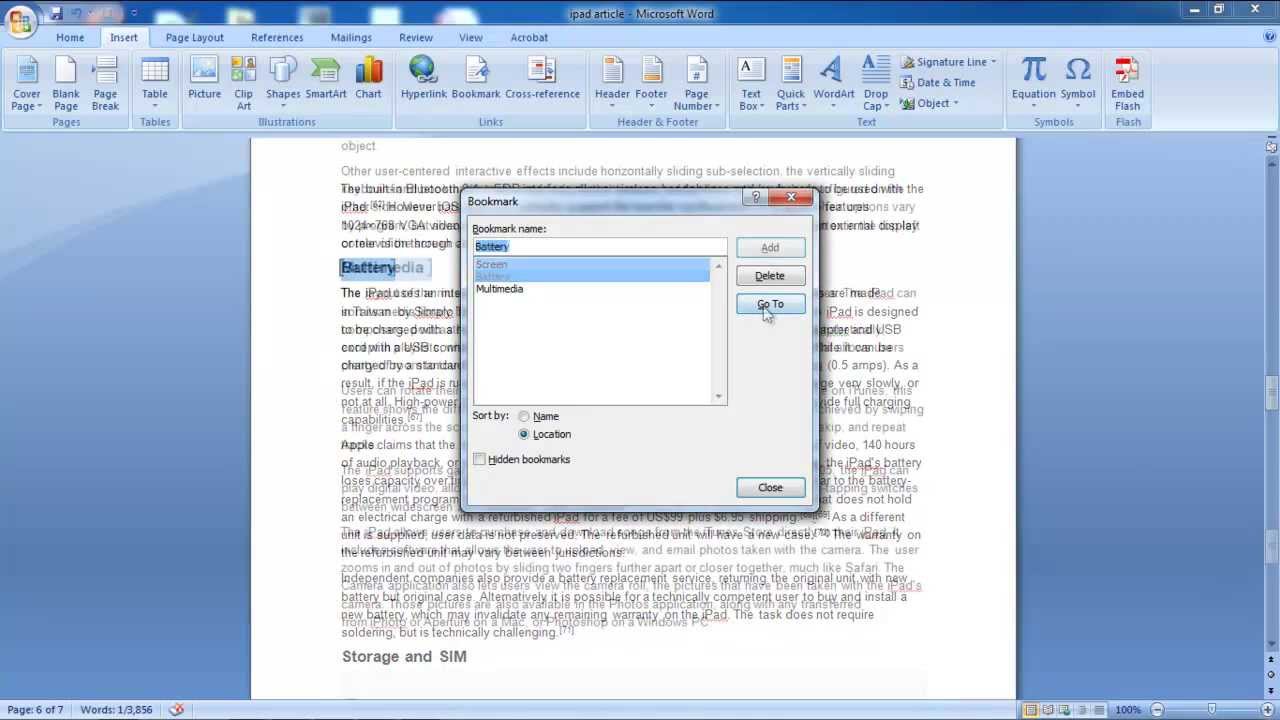
- In the “Links” group, you’ll find the “Bookmark” button. Click on it to open the Bookmark dialog box.
- In the “Bookmark name” field, enter a descriptive name for your bookmark. Make sure to choose a name that is easy to remember and relevant to the content or location you’re bookmarking.
- Click the “Add” button to insert the bookmark at the selected location.
Once you’ve inserted a bookmark, you can easily identify it by the blue highlighted box that appears around the bookmarked text or location. To view all the bookmarks in your document, you can use the “Bookmark” option under the “Links” group on the “Insert” tab. This will display a list of all the bookmarks in your document, allowing you to quickly navigate to a specific bookmark if needed.
It’s important to note that bookmarks are not updated automatically if you make changes to the text or layout of your document. If you move or delete a bookmarked section, the bookmark will become invalid. To avoid issues, always double-check your bookmarks and update them if necessary after making significant changes to your document.
By using bookmarks effectively, you can create a more organized and efficient document that is easier to navigate and reference. Whether you’re working on a long report, a complex document, or simply want to mark important sections, inserting bookmarks can save time and improve your overall productivity in Microsoft Word.
Navigating to a bookmark in your Word document
Once you have inserted bookmarks in your Word document, you can easily navigate to those specific locations. This can be particularly helpful when you’re working with lengthy documents or need to access important sections quickly. Here’s how you can navigate to a bookmark:
- Open your Word document and go to the “View” tab in the ribbon at the top of the screen.
- In the “Show” group, check the “Navigation Pane” box to display the Navigation Pane on the left side of the document window. Alternatively, you can use the keyboard shortcut “Ctrl+F” to open the Navigation Pane.
- In the Navigation Pane, click on the “Bookmarks” tab. This will display a list of all the bookmarks in your document.
- Select the bookmark you want to navigate to from the list. You can click on the bookmark name to instantly jump to that location in your document.
Alternatively, you can use the “Next” and “Previous” buttons in the Navigation Pane to cycle through the bookmarks in your document. This allows for easy navigation between multiple bookmarks without having to go back to the list each time.
If you prefer to use the keyboard, you can use the “Ctrl+G” shortcut to open the “Go To” dialog box. From there, you can select the bookmark you want to navigate to from the “Go to what” drop-down list and click “Go To” to jump to that bookmarked location.
Having the ability to navigate to specific bookmarks helps you save time and easily find the information you need within your Word document. Whether you’re reviewing a document, making edits, or referencing specific sections, the navigation tools provided by bookmarks streamline your workflow and enhance productivity.
Deleting a bookmark in your Word document
If you no longer need a bookmark in your Word document, or if you want to remove it to make way for a new bookmark, you can easily delete it. Here’s how you can delete a bookmark:
- Open your Word document and go to the specific location where the bookmark is located.
- Go to the “Insert” tab in the ribbon at the top of the Word window.
- In the “Links” group, click on the “Bookmark” button to open the Bookmark dialog box.
- In the Bookmark dialog box, you’ll see a list of all the bookmarks that exist in your document.
- Select the bookmark that you want to delete from the list.
- Click the “Delete” button to remove the selected bookmark. The bookmark will be instantly deleted, and the text or location will no longer be highlighted as bookmarked.
Alternatively, you can use the “Navigation Pane” to delete a bookmark. Open the Navigation Pane, click on the “Bookmarks” tab, and select the bookmark you want to delete from the list. Right-click on the selected bookmark and choose “Delete” from the context menu.
It’s important to note that deleting a bookmark does not delete or modify the associated text or location in your document. It simply removes the bookmark reference. If you accidentally delete a bookmark, you can always recreate it by following the steps to insert a new bookmark at the desired location.
Regularly reviewing and managing bookmarks in your Word document can help keep your document organized and prevent clutter. By removing unnecessary bookmarks, you can ensure that your document remains focused and easy to navigate for yourself and others who may need to access the information.
Renaming a bookmark in your Word document
If you want to give your bookmarks more descriptive or meaningful names, or if you simply need to update the name of a bookmark, you can easily rename it in your Word document. Here’s how you can rename a bookmark:
- Open your Word document and go to the specific location where the bookmark is located.
- Go to the “Insert” tab in the ribbon at the top of the Word window.
- In the “Links” group, click on the “Bookmark” button to open the Bookmark dialog box.
- In the Bookmark dialog box, you’ll see a list of all the bookmarks that exist in your document.
- Select the bookmark that you want to rename from the list.
- Click the “Rename” button, or double-click on the bookmark name directly in the list. This will make the bookmark name editable.
- Edit the bookmark name as desired. Make sure to choose a name that accurately reflects the content or location associated with the bookmark.
- Press Enter or click outside the bookmark name field to save the new name. The bookmark will now be renamed with the updated name.
Renaming bookmarks can be particularly useful when you want to make it easier to identify and understand the purpose of each bookmark in your document. This can also make it more convenient for others who may be collaborating on or reviewing your document.
Remember, renaming a bookmark does not affect the associated text or location in your document. It solely updates the name of the bookmark reference. This means you can change the name of a bookmark without impacting the content or layout of your document.
By taking the time to give your bookmarks meaningful and descriptive names, you can enhance your document’s organization and make it simpler to navigate to specific sections or information.
Using bookmarks to create links within your Word document
Bookmarks in Microsoft Word offer a powerful feature that allows you to create links within your document. By using bookmarks in conjunction with hyperlinks, you can quickly navigate to specific sections or provide easy access to important information for readers. Here’s how you can use bookmarks to create links in your Word document:
- Insert a bookmark at the desired location within your document, following the steps outlined in the previous section.
- Select the text, image, or object that you want to serve as the hyperlink anchor.
- Go to the “Insert” tab in the Word ribbon and click on the “Hyperlink” button in the “Links” group. Alternatively, you can right-click on the selected text and choose “Hyperlink” from the context menu.
- In the Insert Hyperlink dialog box, select “Place in This Document” in the left pane.
- In the right pane, you will see a list of all the bookmarks that currently exist in your document. Select the desired bookmark from the list.
- Click “OK” to create the hyperlink with the bookmarked location.
Now, when readers click on the hyperlink within your Word document, they will be automatically taken to the bookmarked section. This provides a seamless and convenient way to navigate to specific content or reference key information within your document.
Using bookmarks as links can be particularly helpful when creating table of contents, internal references, or cross-referencing within a document. It allows you to create a dynamic and interconnected structure, making it easier for readers to move between related sections and find the information they need.
It’s important to note that when you create a bookmark link, it will retain its functionality even if you move or edit the bookmarked section. This ensures that your hyperlinks remain accurate and continue to direct readers to the correct locations within your document.
By utilizing bookmarks as links, you can enhance the accessibility and user experience of your Word documents, making it easier for readers to navigate and interact with the content.
Updating bookmarks in your Word document
As you make changes to your Word document, you may need to update existing bookmarks to ensure they accurately reflect the content or location they are associated with. Updating bookmarks is a simple process and can be done in a few easy steps:
- Open your Word document and go to the specific location where the bookmark is located.
- Identify the bookmark that needs to be updated. You can use the Navigation Pane or go to the “Insert” tab and click on the “Bookmark” button to open the Bookmark dialog box.
- Select the bookmark from the list.
- Make the necessary changes to the text, heading, or location associated with the bookmark.
- Once you have made the updates, go back to the “Bookmark” dialog box, select the bookmark from the list, and click the “Update” button.
By updating a bookmark, you ensure that it accurately reflects the current state of your document. This is particularly important if you have moved or edited the section associated with the bookmark or if you have made changes to the text contained within the bookmarked section.
It’s important to note that updating the bookmark doesn’t modify the name of the bookmark itself. If you need to update the name of the bookmark, refer to the section on renaming bookmarks explained earlier.
Regularly checking and updating bookmarks as you make changes to your document can help maintain the integrity and accuracy of your bookmarks. This ensures that your bookmarks continue to serve as reliable markers for important sections or information within your Word document.
Remember that bookmarks are not automatically updated when changes are made to the document. Therefore, it’s essential to manually update the bookmarks to reflect the current state of your document and avoid any inconsistencies.
By keeping your bookmarks up to date, you can confidently navigate your document, provide accurate references, and maintain an organized and efficient workflow in Microsoft Word.
Tips and best practices for using bookmarks in your Word document
While bookmarks in Microsoft Word provide a useful way to mark and navigate specific locations within your document, incorporating the following tips and best practices can help you utilize bookmarks more effectively and efficiently:
- Use descriptive names: When creating bookmarks, choose names that are descriptive and easy to understand. This will make it simpler to identify the purpose of each bookmark, especially when working with multiple bookmarks in a document.
- Organize bookmarks: If your document contains numerous bookmarks, consider organizing them into logical groups. You can use a consistent naming convention or use a table of contents with bookmark links to enhance navigation.
- Update bookmarks regularly: As you make changes to your document or reorganize sections, ensure that your bookmarks accurately reflect the updated content or locations. This will prevent any confusion or errors when navigating through your document.
- Combine bookmarks with headings: Bookmarks can work seamlessly with headings in your document, providing an easy way to navigate between sections. Use bookmarks alongside your heading structure to create a comprehensive navigation system.
- Be mindful of document layout and formatting: While bookmarks themselves are not visible in the printed version of your document, ensure that inserting or deleting bookmarks doesn’t disrupt the overall layout or formatting of your content. Preview your print layout or PDF version to ensure the bookmarks do not interfere with the final document appearance.
- Collaborate effectively: If you’re collaborating with others on the document, clearly communicate and provide instructions on the purpose and location of bookmarks. This will ensure that everyone understands their significance and can benefit from using them.
- Keep a backup: If your document contains crucial bookmarks, consider keeping a backup copy of your file to safeguard against accidental deletion or loss of bookmarks. This will help you avoid the hassle of recreating them if anything goes wrong.
By following these tips and best practices, you can optimize the usage of bookmarks in your Word document, improve document navigation, and enhance collaboration and productivity.