
Reasons to Insert a Document in Word
Microsoft Word is a versatile and widely used word processing program that allows users to create, edit, and format various types of documents. One of the handy features of Word is the ability to insert other documents into the current document. Here are some compelling reasons why you may want to insert a document in Word:
- Combining multiple documents: If you have different parts of a project or report saved as separate files, you can insert them into a single Word document for better organization and easy access.
- Creating a master document: When working on a complex document that involves collaboration, inserting separate sections or chapters into a master document allows multiple contributors to work on different parts simultaneously.
- Referencing external sources: If you need to cite or refer to content from another document, you can insert it into your Word document, ensuring that all the necessary information is available in one place.
- Preserving formatting: By inserting a document, you can retain the original formatting, such as fonts, colors, and styles, saving you time and effort in reformatting the content.
- Creating templates or forms: You can insert frequently used documents, such as templates, forms, or standard paragraphs, into your Word document, enabling you to reuse them without recreating them from scratch.
By inserting documents into Word, you can streamline your workflow, improve collaboration, and create more comprehensive and organized documents. Whether you need to combine multiple files, reference external content, or preserve formatting, Word’s document insertion feature has got you covered.
How to Insert a Blank Document
Inserting a blank document into your Microsoft Word project is a simple process that can be done in a few easy steps. Here’s how:
- Open your Word document and place the cursor at the desired location where you want to insert the blank document.
- Go to the “Insert” tab in the Word toolbar at the top of the screen.
- Click on the “Blank Document” option in the “Text” group. This will insert a new blank document into your current Word document.
- You can now start typing or adding content to the blank document. It will be saved as part of your main document.
- If you want to make further modifications or edits to the blank document, double-click on it to open it in a separate window.
Inserting a blank document allows you to add additional pages or sections to your Word document without disrupting the existing content. This feature is particularly useful when creating long documents, such as reports or manuscripts, where you may need to insert additional pages later in the editing process.
Remember to save your main document regularly to ensure that any modifications made to the blank document are also saved. Inserting a blank document is a convenient way to expand your Word document and tailor it to your needs without having to start from scratch.
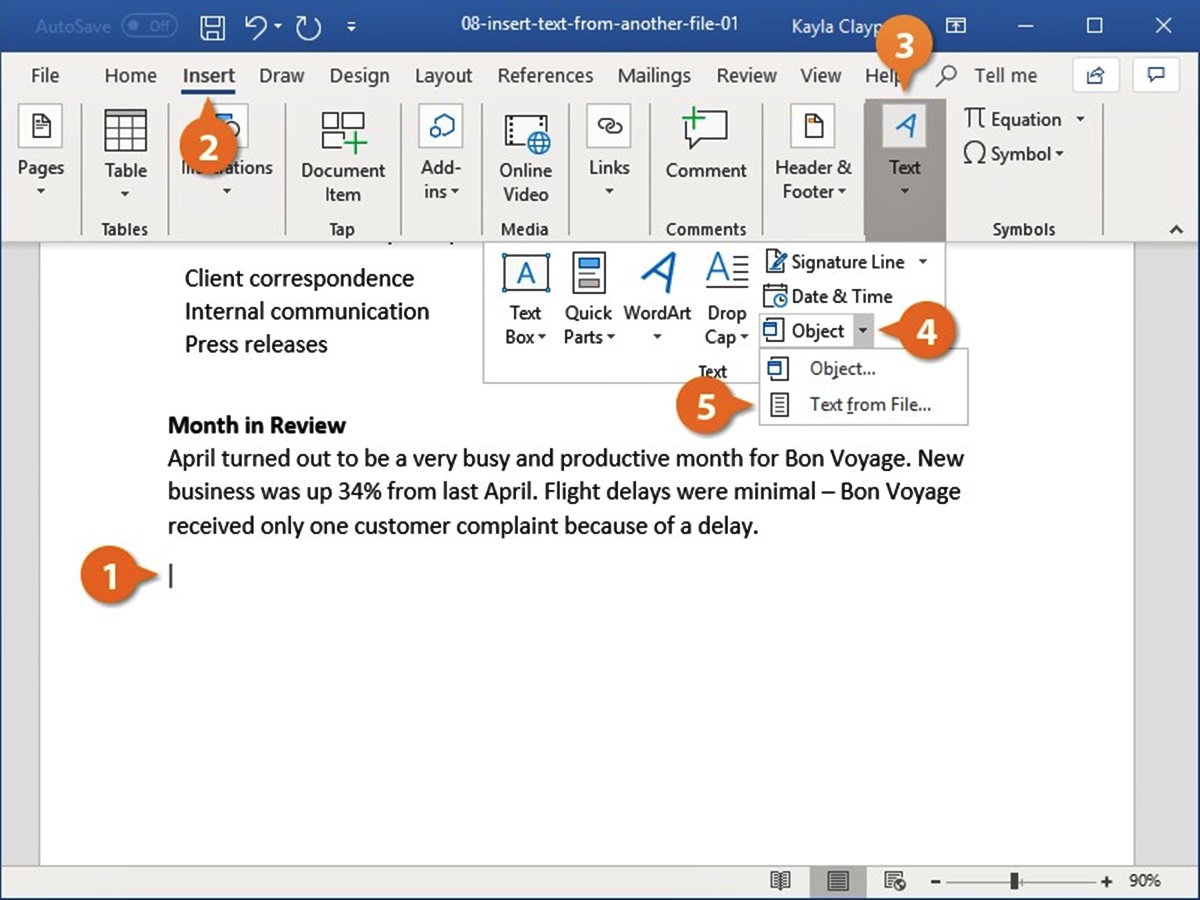
How to Insert an Existing Document in Word
If you have a separate document that you want to insert into your Microsoft Word project, the process is straightforward. Follow these steps to insert an existing document into your Word document:
- Open the Word document where you want to insert the existing document.
- Place the cursor at the desired location in the document.
- Go to the “Insert” tab in the Word toolbar at the top of the screen.
- Click on the “Object” button in the “Text” group.
- In the Object dialog box, switch to the “Create from File” tab.
- Click on the “Browse” button and navigate to the location where the existing document is saved.
- Select the document file and click on the “Insert” button.
- Ensure that the “Display as icon” option is selected if you want the inserted document to appear as an icon.
- Click “OK” to insert the document into your Word document.
The existing document will now be inserted as an object in your Word document. You can double-click on the object to open and edit the inserted document. Any changes made to the inserted document will be reflected in the main Word document.
Inserting existing documents in Word is useful when you want to include content from other files, such as spreadsheets, presentations, or reports, as part of your Word document. It allows you to consolidate information from various sources while maintaining the original formatting and structure.
Remember to save your Word document after inserting the existing document to ensure that all the changes are saved and preserved. Inserting existing documents in Word gives you the flexibility to combine information from different sources into a cohesive and comprehensive document.
How to Insert a PDF in Word
Inserting a PDF file into a Microsoft Word document enables you to combine different types of content and create a more comprehensive document. Follow these steps to insert a PDF in Word:
- Open your Word document and position the cursor at the desired location where you want to insert the PDF.
- Navigate to the “Insert” tab in the Word toolbar at the top of the screen.
- Click on the “Object” button in the “Text” group.
- In the Object dialog box, switch to the “Create from File” tab.
- Click on the “Browse” button and locate the PDF file you want to insert.
- Select the PDF file and click on the “Insert” button.
- Ensure that the “Display as icon” option is selected if you prefer to insert the PDF as an icon.
- Click “OK” to insert the PDF file into your Word document.
Once you have inserted the PDF file, it becomes part of your Word document. You can double-click on the PDF object to open and view it. Any changes made to the inserted PDF file will not be reflected in the Word document.
Inserting a PDF in Word allows you to incorporate information from external sources, such as research papers, articles, or legal documents, without having to copy and paste the content manually. It’s a convenient way to combine different file formats and create unified documents.
Note that while you can insert a PDF file into a Word document, you cannot directly edit the contents of the PDF within Word. If you need to make changes to the PDF itself, you will have to use a dedicated PDF editing software.
Remember to save your Word document after inserting the PDF file to ensure that all the changes are saved and preserved. Inserting a PDF in Word gives you the flexibility to enhance your document with additional content and create a more compelling and comprehensive final product.
How to Insert a Word Document as an Object
If you have a separate Word document that you want to insert into another Word document, you can do so by inserting it as an object. This allows you to maintain the original formatting and content of the inserted document within the main document. Follow these steps to insert a Word document as an object:
- Open the Word document where you want to insert the other Word document.
- Place the cursor at the desired location in the document.
- Go to the “Insert” tab in the Word toolbar at the top of the screen.
- Click on the “Object” button in the “Text” group.
- In the Object dialog box, switch to the “Create from File” tab.
- Click on the “Browse” button and navigate to the location where the Word document you want to insert is saved.
- Select the Word document file and click on the “Insert” button.
- Ensure that the “Display as icon” option is selected if you prefer to insert the Word document as an icon.
- Click “OK” to insert the Word document as an object in your current document.
The inserted Word document will now appear as an object within your main document. You can double-click on the object to open and edit the inserted Word document. Any changes made to the inserted document will be reflected in the main Word document as well.
Inserting a Word document as an object is useful when you want to include an entire document within another document while preserving its original formatting. This feature is particularly handy when combining multiple documents or creating a master document that incorporates various sections.
Remember to save your Word document after inserting the Word document as an object to ensure that all changes are saved. Inserting a Word document as an object allows you to seamlessly integrate multiple documents into a single cohesive file, enhancing organization and ease of navigation.
How to Insert a Scanned Document in Word
If you have a physical document that you want to include in a Microsoft Word document, you can do so by scanning it and inserting it as an image. Scanning and inserting a document into Word allows you to preserve the original content while making it easily accessible within your digital document. Here’s how to insert a scanned document in Word:
- Scan the physical document using a scanner or a scanning app on your mobile device. Save the scanned document as an image file (e.g., JPEG, PNG, or TIFF).
- Open your Word document and place the cursor at the desired location where you want to insert the scanned document.
- Go to the “Insert” tab in the Word toolbar at the top of the screen.
- Click on the “Pictures” button in the “Illustrations” group.
- In the file selection dialog, browse and locate the scanned document image file you saved.
- Select the image file and click on the “Insert” button.
The scanned document will be inserted as an image in your Word document. You can then resize or reposition the image as needed.
Inserting a scanned document in Word allows you to digitize and include physical documents, such as signed contracts, handwritten notes, or printed reports, within your digital documents. It provides a convenient way to consolidate information and keep all related content in one place.
It’s important to note that inserting a scanned document as an image doesn’t allow you to edit the document’s text directly within Word. However, you can add annotations or comments around the scanned document to provide context or additional information.
Remember to save your Word document after inserting the scanned document to ensure that all changes are saved. Inserting a scanned document in Word brings the advantages of digitization to your document organization and workflow, making it easier to manage and share your information.
How to Insert a Document Link in Word
If you want to insert a link to an external document or file in your Microsoft Word document, you can do so by adding a document link. A document link allows readers to easily access and open the linked document with a click. Here’s how to insert a document link in Word:
- Open your Word document and place the cursor at the desired location where you want to insert the document link.
- Select the text or image that you want to use as the clickable link.
- Go to the “Insert” tab in the Word toolbar at the top of the screen.
- Click on the “Hyperlink” button in the “Links” group.
- In the “Insert Hyperlink” dialog box, navigate to the location where the document you want to link is saved.
- Select the document file and click on the “OK” button.
The selected text or image will now be converted into a clickable document link. When readers click on the link, the linked document will open in the associated application or program.
Inserting a document link in Word is handy when you want to provide easy access to additional information or related documents. It eliminates the need to manually search for and open separate files and streamlines the reading experience.
Ensure that the linked document is accessible to the readers of your Word document. If the linked document is stored on a shared network drive or an online storage platform like Google Drive or Dropbox, make sure that the readers have permission to access the document.
Remember to test the document link after inserting it into your Word document to ensure that it is functioning correctly. Updating or moving the linked document may require you to update the link address in your Word document.
Inserting document links in Word enhances the accessibility and usability of your document, allowing readers to explore related content effortlessly while maintaining a seamless reading experience.
Tips for Organizing Inserted Documents in Word
When inserting multiple documents into a Microsoft Word document, it’s important to maintain proper organization and structure for ease of navigation and readability. Here are some tips to help you organize inserted documents effectively:
- Use headings and subheadings: Create clear headings and subheadings for each inserted document to provide a visual hierarchy and make it easier for readers to navigate through the content.
- Insert page breaks: If your inserted documents span multiple pages, consider inserting page breaks to keep each document on a separate page, making it easier to locate and reference specific documents.
- Label and give descriptions: Add labels or descriptions to the inserted documents to provide context and help readers understand the purpose or content of each document at a glance.
- Insert a Table of Contents: If you have a significant number of inserted documents, create a table of contents at the beginning of your Word document to provide a quick overview of the inserted documents and their corresponding page numbers.
- Use bookmarks: Insert bookmarks within your Word document to create references to specific points within the inserted documents. This allows readers to jump directly to relevant sections without scrolling through the entire document.
- Create hyperlinks: Instead of inserting the entire document, consider creating hyperlinks to the external or separate documents. This keeps your main Word document file size smaller and allows readers to access the full document with a single click.
- Add headers and footers: Utilize headers and footers to provide consistent information, such as document titles, page numbers, or dates, across all inserted documents to maintain a unified look and feel.
- Use formatting styles: Apply consistent formatting styles to the inserted documents, such as fonts, colors, and paragraph styles, to create a cohesive visual presentation.
By following these tips, you can ensure that your inserted documents are organized in a logical and coherent manner, allowing readers to easily navigate and understand the content within your Microsoft Word document. Organizational strategies like headings, labels, bookmarks, and hyperlinks help maintain clarity and readability, making your document efficient to navigate and visually appealing.
Troubleshooting: Common Issues when Inserting Documents in Word
While inserting documents into Microsoft Word can provide a seamless integration of content, there are some common issues that you may encounter. Here are a few troubleshooting tips to overcome these issues:
- Unsupported file formats: Make sure that the document you are attempting to insert is in a compatible file format such as .docx, .pdf, .txt, or image formats like .jpeg or .png.
- Corrupted or damaged documents: If you are unable to insert a document due to errors or if the document appears distorted, try opening the document in its respective software to check for any corruption issues. You can also consider converting the document to a different format before inserting it.
- Large file size: Inserting large documents can affect the performance of your Word document, especially if it contains complex formatting or embedded media. Consider compressing or optimizing the document before inserting it to avoid performance issues.
- Formatting inconsistencies: When inserting documents with different formatting styles, fonts, or layouts, make sure to adjust the formatting accordingly to maintain consistency throughout your Word document. This may involve reformatting headings, bullet points, or adjusting margins and spacing.
- Updating or moving linked documents: If you have inserted document links and later update or move the linked documents to a different location, ensure that you update the link addresses in your Word document to avoid broken links.
- Conflicting document versions: If you are collaborating on a Word document that contains inserted documents, ensure that everyone is using the same version of Microsoft Word or compatible software to avoid compatibility issues and formatting inconsistencies.
- Insufficient permissions: If you are inserting a document located on a shared network drive or an online storage platform, ensure that you have the necessary permissions to access the document. Contact your network administrator or the document owner for assistance if needed.
By being aware of these common issues and employing the troubleshooting tips mentioned above, you can overcome any potential challenges that may arise when inserting documents into your Word document. Ensuring compatibility, resolving formatting inconsistencies, and updating linked documents are key steps in successfully integrating external content into your Word document.