
Why Use Flashcards
Flashcards have been used as a powerful learning tool for many years, and for good reason. They offer a simple and effective way to reinforce your knowledge and improve retention. Whether you are a student studying for exams, a professional wanting to enhance your skills, or simply looking to expand your general knowledge, flashcards can be a valuable addition to your learning arsenal. Let’s explore why you should consider using flashcards:
- Active Learning: Flashcards promote active learning, requiring you to actively recall information rather than passively reviewing it. This engages your brain, making the learning process more effective and efficient.
- Effective Memorization: Research has shown that regular use of flashcards can significantly improve your memory retention. The act of repeatedly reviewing and recalling information helps to reinforce neural connections, making it easier to retrieve the information when needed.
- Portable and Convenient: Flashcards are compact and easy to carry around, allowing you to study anytime and anywhere. Whether you’re on a long commute or waiting in line, you can use those spare moments to review your flashcards.
- Adaptable to Individual Learning Styles: Flashcards can be personalized to cater to your specific learning style. You can create them with visual cues, mnemonics, or color-coded categories to suit your preferences and optimize your learning experience.
- Focus on Problem Areas: Flashcards enable you to identify and focus on your weaker areas. By targeting specific concepts or vocabulary that you find challenging, you can dedicate more study time to those areas, providing you with a more efficient and focused learning experience.
- Active Engagement: Flashcards can make the learning process more interactive and engaging. You can use them to quiz yourself or even turn studying into a game with friends or study groups, further enhancing your understanding and retention of the material.
By incorporating flashcards into your study routine, you can benefit from their versatility, convenience, and effectiveness. Whether you prefer traditional paper flashcards or digital alternatives, the key is to find a method that works best for you. Embrace the power of flashcards and unlock your full learning potential.
Using Microsoft Word for Flashcards
Microsoft Word may be known primarily as a word processing tool, but it can also be a handy tool for creating flashcards. With its array of formatting options and user-friendly interface, Microsoft Word provides a convenient platform for designing and printing flashcards. Follow these steps to use Microsoft Word for creating your own flashcards:
- Open a new document: Launch Microsoft Word and create a new blank document.
- Set the document size: Determine the size of your flashcards. Typically, a standard size of 3×5 or 4×6 inches works well. You can adjust the size of your Word document accordingly using the Page Setup option.
- Format your flashcards: Design the layout of your flashcards by formatting the page. You can choose to have one flashcard per page or multiple flashcards per page, depending on your preference. Use the ruler and alignment tools to align your text and images precisely.
- Add text and images: Enter the content you want to include on your flashcards. This could be vocabulary words, definitions, equations, or any other information you want to learn. You can format the text by adjusting the font, size, and color. Additionally, you can insert images or diagrams to enhance the visual appeal and aid your understanding.
- Customize the design: Personalize the appearance of your flashcards by applying different font styles, colors, and backgrounds. Experiment with bold, italics, or underline for emphasis. You can also use Word’s built-in shapes and graphics to create visually appealing elements.
- Add definitions or notes: To test your knowledge or provide additional information, consider adding definitions or notes to the reverse side of your flashcards. This way, you can check your understanding or refer to explanations for more complex concepts.
- Organize your flashcards: Arrange your flashcards in logical order or categorize them based on themes or topics. You can use tables or sections to create a structured layout that facilitates easy navigation.
- Print your flashcards: Once you are satisfied with the design and content of your flashcards, it’s time to print them. Ensure you have the correct paper size and orientation selected in the Print settings. Use quality cardstock or thick paper for durability.
- Cut and review: After printing, carefully cut out each flashcard along the designated lines. Review and study your flashcards regularly, using them as a valuable tool for learning and memorization.
Microsoft Word provides a versatile platform for creating and customizing your own flashcards. Utilize its features and formatting options to design flashcards that suit your learning needs, making the process both effective and enjoyable.
Creating a New Document
When using Microsoft Word for creating flashcards, the first step is to create a new document. Follow these steps to create a new document for your flashcards:
- Open Microsoft Word: Launch the Microsoft Word application on your computer. If you don’t have it installed, you can download it from the official Microsoft website or use an online version if available.
- Select “New Blank Document”: In the Word application, click on the “File” tab at the top left corner of the screen. From the dropdown menu, select “New Blank Document.” This will open a new blank document ready for you to start creating your flashcards.
- Choose your document size: The next step is to determine the size of your flashcards. In the Word application, go to the “Page Layout” tab and click on the “Size” button. From the dropdown menu, you can choose the standard flashcard sizes like 3×5 inches or 4×6 inches. If you have a custom size in mind, you can select the “More Paper Sizes” option and input the dimensions according to your preferences.
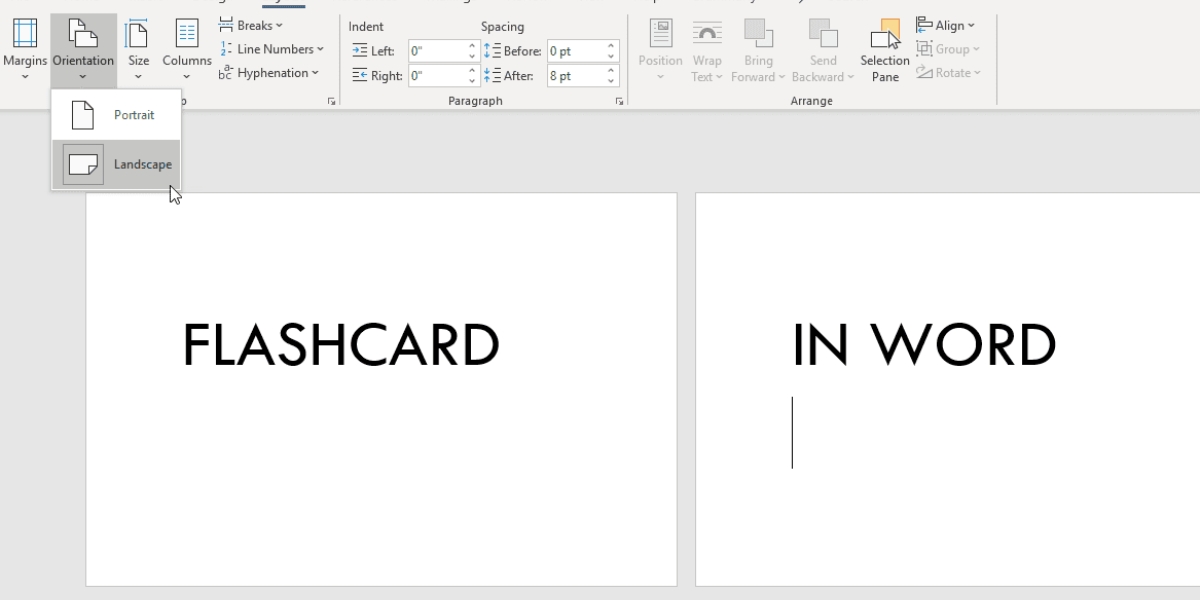
- Set the page orientation: Depending on your flashcard design, you may want to adjust the page orientation. Go to the “Page Layout” tab and click on the “Orientation” button. Choose between portrait (vertical) or landscape (horizontal) orientation based on how you want your flashcards to appear.
- Saving your document: To avoid losing your work, it’s important to save your document frequently. Click on the “File” tab and select “Save” or use the keyboard shortcut Ctrl + S (Windows) or Command + S (Mac). Choose a location on your computer or cloud storage where you want to save the document and give it a descriptive name.
By following these steps, you can easily create a new document in Microsoft Word, set the appropriate size and orientation, and save it for your flashcard project. Creating a separate document for your flashcards helps you stay organized and focused on creating and formatting the content effectively.
Formatting Your Flashcards
Formatting your flashcards in Microsoft Word is essential to ensure they are visually appealing and easy to read. Here are some key steps to help you format your flashcards effectively:
- Font and size: Select a clear and legible font for your flashcards. Common options include Arial, Calibri, or Times New Roman. Choose a font size that is large enough to read comfortably but not too big to fit your content within the defined flashcard size. Generally, a font size between 12 and 16 points works well.
- Text alignment: Use the alignment options in Word to align your text. Typically, center-aligning the text horizontally works best for flashcards, as it provides a balanced layout. To adjust the alignment, select the text and click on the alignment buttons located in the “Home” tab of Word’s ribbon menu.
- Bold and italics: Utilize bold and italics to emphasize key words or phrases on your flashcards. This can help focus attention on important information. Use these formatting options sparingly to avoid overwhelming the overall design.
- Color and highlights: Consider using color strategically to enhance the visual appeal of your flashcards. You can use colored text, background colors, or highlights to differentiate between different sections or categories of information. However, make sure the colors you choose do not hinder readability.
- Consistent formatting: Maintain consistent formatting throughout your flashcards. This includes using the same font, font size, and text alignment for all the cards. Consistency helps create a cohesive and professional look, making it easier for you to navigate and study your flashcards.
- Spacing and margins: Ensure proper spacing between lines and paragraphs to make your flashcards visually appealing and easy to read. Adjust the line spacing and margins according to your preference. You can make these adjustments in the “Paragraph” section of the “Home” tab.
- Use lists and tables: For flashcards that require lists or tabular information, utilize Word’s built-in list and table features. Bullet points or numbered lists can help present information in a structured and organized manner, while tables can be used for more complex layouts.
- Add borders or shapes: To make your flashcards stand out, consider adding borders or shapes. Word provides various border styles and shapes that you can apply to your flashcards. Borders can define the boundaries of each flashcard, while shapes can be used to add visual elements or separators.
By following these formatting guidelines, you can create visually appealing and well-organized flashcards in Microsoft Word. Remember to balance aesthetics with readability, ensuring that your flashcards are clear and easy to comprehend.
Adding Text and Images
Adding text and images to your flashcards can enhance their effectiveness and engage your visual memory. With Microsoft Word, you have the flexibility to incorporate both text and images into your flashcards. Follow these steps to add text and images to your flashcards:
- Inserting text: To add text to your flashcards, simply click on the desired location and start typing. You can enter vocabulary words, definitions, equations, or any other information you want to learn. Use a legible font and appropriate font size for easy readability.
- Formatting the text: With Word’s formatting options, you can customize the appearance of the text on your flashcards. Adjust the font style, size, color, and other formatting attributes to make the text stand out. Consider using bold or italics to highlight important keywords or concepts.
- Inserting images: To add images to your flashcards, go to the “Insert” tab in Microsoft Word’s ribbon menu. Click on the “Pictures” or “Online Pictures” option to insert images from your computer or search for images online. Select the desired image and click “Insert” or “OK” to add it to your flashcard.
- Resizing and adjusting images: After inserting an image, you can resize and position it according to your preference. Click on the image and use the resizing handles to adjust its size. You can also use the alignment options to align the image within the flashcard, ensuring it fits appropriately.
- Captioning images: If you want to provide a caption or additional information for an image, right-click on the image and select “Add Caption” from the context menu. This allows you to add a caption underneath the image, providing further context or explanation.
- Aligning text and images: To create a visually appealing layout, ensure that the text and images are aligned and positioned properly. Use Word’s alignment options to align text and images horizontally or vertically. This helps maintain a clean and organized appearance on your flashcards.
- Grouping text and images: If you have multiple text or image elements that you want to keep together as a single unit, you can group them in Word. Select the elements, right-click, and choose the “Group” option from the context menu. This allows you to move and manipulate the grouped elements together.
By incorporating relevant text and images on your flashcards, you can cater to both visual and textual learners, making your flashcards more engaging and memorable. Experiment with different combinations of text and images to find a balance that best suits your learning needs.
Customizing the Design
Customizing the design of your flashcards in Microsoft Word allows you to personalize their appearance and create a visually appealing and engaging learning tool. Here are some tips to help you customize the design of your flashcards:
- Choose a suitable theme: Microsoft Word provides a range of built-in themes that can set the overall look and feel of your flashcards. Select a theme that aligns with the subject matter or your personal preference. You can access themes in the “Design” tab of Word’s ribbon menu.
- Apply colors: Experiment with different color combinations to make your flashcards visually appealing. You can change the text color, background color, or use highlights to draw attention to important information. However, ensure that the chosen colors do not hinder readability.
- Use font styles: Enhance the design of your flashcards by using different font styles. Word offers a variety of fonts that can create a unique and eye-catching look. Find a font style that matches the tone and purpose of your flashcards, and use it consistently across all the cards.
- Add shapes and graphics: Incorporating shapes and graphics can make your flashcards more visually appealing and interactive. Word provides a collection of predefined shapes and icons that you can easily insert into your flashcards. Use them to create separators, visual cues, or to illustrate concepts.
- Experiment with borders: Applying borders to your flashcards can give them a polished and cohesive look. You can choose from a variety of border styles available in Word, such as solid lines, dashed lines, or custom patterns. Borders can define the boundaries of each flashcard, adding a professional touch.
- Utilize tables: If your flashcards require a structured layout or tabular information, consider using Word’s table feature. Tables can help you present information in an organized manner, making it easier to digest. You can create tables in the “Insert” tab and customize them according to your needs.
- Emphasize important elements: Use formatting techniques such as bold, italics, or underlining to emphasize key words or phrases on your flashcards. Applying these formatting styles selectively draws attention to important information, aiding in memorization and recall.
- Consistency is key: Maintain consistency throughout all your flashcards. Use the same font, font size, and formatting styles for headers, subheadings, and body text. Consistency creates a professional and unified look, making it easier to navigate and study your flashcards.
By customizing the design of your flashcards in Microsoft Word, you can create a visually appealing and engaging learning experience. Don’t be afraid to experiment with different design elements and find a style that suits your preferences and enhances your learning process.
Adding Definitions or Notes
Adding definitions or notes to your flashcards can provide additional context and clarification, making them more informative and effective as a study tool. With Microsoft Word, you have the flexibility to include definitions or notes on your flashcards. Here’s how you can do it:
- Decide on the format: Determine how you want to present the definitions or notes on your flashcards. You can choose to include them on the reverse side of the flashcards or incorporate them within the front side by using a different formatting style or color.
- Designate the reverse side: If you prefer to keep the definitions or notes separate from the front side of the flashcards, ensure that you have designated the reverse side for this purpose. You can choose to use the same document and have different content on each side, or maintain a consistent layout across separate Word documents.
- Add definitions or notes: Start by considering the key concepts or terms that require additional explanation. On the reverse side of the flashcards or within the same document, add the definitions or notes either as a bullet-pointed list or in paragraph form. Word’s bullet-point and numbering features can help you structure and organize the information.
- Format the definitions or notes: Use formatting styles such as bold or italics to distinguish the definitions or notes from the rest of the content. You can also experiment with different font colors or background colors to visually separate this information from the main text on the flashcard.
- Consider mnemonic devices: If there are complex definitions or important facts, you may include mnemonic devices to aid memory recall. Word supports special characters, symbols, and even equations, which can be used creatively to support your learning process.
- Review and revise: Once you have added definitions or notes to your flashcards, review them carefully for accuracy and clarity. Ensure that the additional information enhances your understanding of the main content without overwhelming or distracting you.
- Print and test: When you’re ready to use your flashcards, print them out and test your knowledge. Flip the cards to check the definitions or notes and verify your understanding. Through repeated practice, you will reinforce your learning and improve retention.
By adding definitions or notes to your flashcards in Microsoft Word, you can deepen your understanding of the concepts you are studying. Focus on important definitions, key points, or additional explanations that will strengthen your knowledge and enable effective reviewing.
Organizing Your Flashcards
Organizing your flashcards is crucial to ensure that you can efficiently study and review the material. With Microsoft Word, you have several options for structuring and organizing your flashcards effectively. Here are some tips to help you organize your flashcards:
- Categorize by subject or topic: If you have a large set of flashcards covering various subjects or topics, consider organizing them into categories. Use Word’s formatting options, such as headings or bold text, to create clear divisions between different categories. This allows you to focus on specific areas of study at a time.
- Use tables or columns: To create a systematic layout for your flashcards, utilize Word’s table or column features. You can create a table with two or more columns to group related flashcards together. Alternatively, you can create separate sections or columns within the Word document to organize the flashcards accordingly.
- Number or label your flashcards: Assigning numbers or labels to your flashcards can help you keep track of the order or sequence. This is especially useful if you plan to study the flashcards in a specific order or if you want to easily identify and locate a particular flashcard.
- Arrange in alphabetical or chronological order: If your flashcards involve vocabulary, terms, or concepts that can be alphabetized or arranged chronologically, consider organizing them in this manner. This can make it easier to review specific terms or follow a progression of events.
- Create a separate document for each topic: If you have a large number of flashcards or multiple subjects to study, it may be helpful to create separate Word documents for each topic. This way, you can focus on one subject at a time and easily navigate between different sets of flashcards.
- Utilize bookmarks or hyperlinks: For digital flashcards, you can take advantage of Word’s bookmark or hyperlink features to create navigation within the document. You can set bookmarks at the beginning of each flashcard section or create hyperlinks for easy jumping between different flashcards or categories.
- Create a table of contents: If you have multiple sections or categories within the document, consider including a table of contents at the beginning. This allows you to have a quick overview of the flashcard organization and facilitates easy navigation within the document.
- Regularly review and update: As you continue to use your flashcards, it’s important to regularly review and update them. Remove any flashcards that you have mastered or no longer find relevant, and add new ones as needed. This ensures that your flashcards stay organized and aligned with your learning goals.
By organizing your flashcards effectively in Microsoft Word, you can streamline your studying process and optimize your learning experience. Experiment with different organizational methods and find the one that works best for your study style and preferences.
Printing Your Flashcards
Once you have designed and organized your flashcards in Microsoft Word, it’s time to print them so you can start using them for studying. Follow these steps to ensure successful printing of your flashcards:
- Check printer settings: Before you start printing, make sure your printer settings are configured correctly. Check the paper size to match the dimensions of your flashcards, such as 3×5 inches or 4×6 inches. Ensure that the orientation is set to match your flashcard layout, whether it’s portrait or landscape.
- Choose quality paper: Select a high-quality paper or cardstock to print your flashcards. A thicker paper weight (around 80 lb or higher) is recommended to ensure durability and longevity. Choose a matte or semi-gloss finish that allows for easy writing or highlighting on the flashcards if needed.
- Print a test page: Before printing the entire set of flashcards, it’s wise to print a test page to check for any formatting or layout issues. Verify that the text is legible, images are crisp, and the overall design appears as intended. Make adjustments if necessary before proceeding to print the full set.
- Print multiple flashcards per page: If you want to save paper and make the most out of a single sheet, consider printing multiple flashcards per page. You can adjust the layout and formatting in Word to fit two or more flashcards on a single page. Be mindful of the font size and readability of the flashcards when reducing their size.
- Use print settings: Use the print settings available in Microsoft Word or the printer dialog box to select the desired range of pages or specific flashcards you want to print. This allows you to print only the necessary flashcards, especially when you have a large set organized into categories or topics.
- Consider double-sided printing: If you have definitions or additional information on the reverse side of your flashcards, you may want to set up your printer for double-sided printing. This way, you can print the front and back of each flashcard on a single page, creating a more compact and convenient study tool.
- Check alignment and margins: Ensure that the text and images on your flashcards are positioned correctly within the printable area. Adjust the margins in the page setup if needed to avoid cutting off any content when printing. Double-check the alignment and make necessary adjustments before proceeding with printing.
- Print and review: Once you have verified all the settings, send the print job to your printer. Allow the printer to complete the printing process, and then carefully remove the printed flashcards. Review the printed flashcards for quality, readability, and accuracy, ensuring that all the information appears as intended.
By following these steps, you can print your flashcards from Microsoft Word with confidence. Take the time to ensure proper printer settings, choose quality materials, and perform test prints to achieve the best results. With your printed flashcards in hand, you are ready to engage in effective and focused studying.
Tips and Tricks
Creating and using flashcards in Microsoft Word can be made even more effective and efficient with these handy tips and tricks:
- Review regularly: Set aside dedicated study time to review your flashcards regularly. Consistent and frequent review helps reinforce your learning and improves retention.
- Utilize mobile apps: Consider using flashcard mobile apps that sync with your Microsoft Word documents. This allows you to access your flashcards on the go, making it convenient for studying anytime, anywhere.
- Alternate colors or fonts: To break the monotony and aid memory recall, alternate the use of colors or font styles on your flashcards. This can be particularly useful when memorizing vocabulary words or sets of information.
- Include visuals: If possible, include relevant images or diagrams to further enhance your understanding of the content. Visuals can make your flashcards more engaging and help you grasp complex concepts.
- Maximize white space: Leave enough white space on your flashcards to avoid clutter. White space helps focus attention on the essential information and makes the flashcards visually appealing.
- Randomize the order: Shuffle the order of your flashcards occasionally to prevent relying on a specific sequence. This challenges your memory and ensures a more thorough understanding of the material.
- Engage in self-quizzing: Instead of simply reading the flashcards, actively quiz yourself by covering the answers and attempting to recall the information. This reinforces your learning and improves recall during exams or real-life situations.
- Exchange flashcards with peers: Collaborate with classmates or study groups and exchange flashcards. This allows you to benefit from different perspectives and gain exposure to a wider range of information.
- Track your progress: Keep a record of your progress by marking the flashcards you have mastered or need further review. This helps you focus on the areas that require more attention and track your improvement over time.
- Personalize with mnemonic devices: Use mnemonic techniques, such as acronyms, rhyming phrases, or mental images, to aid memorization. Mnemonic devices can effectively help you recall information quickly and easily.
- Stay organized: Keep your flashcards and related documents organized in folders or binders. Label them appropriately to easily locate specific sets of flashcards when needed.
By incorporating these tips and tricks into your flashcard creation and study routine, you can optimize your learning process and make the most out of your Microsoft Word flashcards. Experiment with different techniques and find what works best for your unique learning style.