
Why Use Your iPhone’s Internet on Your iPad?
Having access to the internet is essential in today’s world, and both smartphones and tablets offer convenient ways to get online. However, there may be situations where your iPad doesn’t have an available Wi-Fi connection, or you simply want to conserve your iPad’s data plan. In such cases, using your iPhone’s internet on your iPad can be a great solution.
By using your iPhone as a personal hotspot and connecting your iPad to it, you can enjoy the internet on your iPad, utilizing your iPhone’s cellular data connection. This not only allows you to browse the web, send emails, and stream videos, but it also offers a seamless internet experience across your Apple devices.
One of the main advantages of using your iPhone’s internet on your iPad is the convenience it provides. Instead of purchasing a separate data plan for your iPad or relying on public Wi-Fi, you can simply turn on the personal hotspot feature on your iPhone and connect your iPad to it. This means you can get online wherever you have cellular coverage, making it ideal for traveling or when you’re in a location with limited Wi-Fi options.
Furthermore, using your iPhone’s internet on your iPad helps you save on data costs. Many mobile carriers offer shared data plans, allowing you to use the same data pool for both your devices. By leveraging your iPhone’s data connection, you can avoid exceeding your iPad’s data limit and potentially incurring additional charges.
In addition to cost savings, using your iPhone’s internet on your iPad also eliminates the hassle of needing to remember multiple network names and passwords. Once you’ve connected your iPad to your iPhone’s personal hotspot, it will automatically connect whenever the hotspot is available. This streamlines the process and ensures a seamless and continuous internet connection.
Overall, using your iPhone’s internet on your iPad offers flexibility, convenience, and cost savings. It allows you to stay connected on your iPad, even when Wi-Fi options are limited or when you want to conserve your iPad’s data plan. With just a few simple steps to connect your devices, you can enjoy the internet on your iPad using your iPhone’s reliable and fast cellular data connection.
How to Set Up Personal Hotspot on Your iPhone
Your iPhone has a built-in feature called Personal Hotspot that allows you to share your cellular data connection with other devices, such as your iPad. Setting up Personal Hotspot is easy, and here’s how you can do it:
- Open the Settings app: Tap on the Settings app on your iPhone’s home screen to open it.
- Select Personal Hotspot: Scroll down and look for the “Personal Hotspot” option. Tap on it to access the Personal Hotspot settings.
- Enable Personal Hotspot: On the Personal Hotspot page, toggle the switch to turn on Personal Hotspot. You may be prompted to enable Wi-Fi and Bluetooth if they are not already enabled.
- Set up Wi-Fi password or use USB or Bluetooth: Depending on your preference, you can either set up a Wi-Fi password for your Personal Hotspot or use the USB or Bluetooth options to connect your devices.
- Connect your iPad: On your iPad, open the Settings app and go to the Wi-Fi section. Look for your iPhone’s name under “Personal Hotspot” and tap on it to connect. Enter the network password if necessary.
Once connected, your iPad will be able to access the internet using your iPhone’s cellular data connection through the Personal Hotspot feature. You can now browse the web, download apps, stream videos, and perform any other internet-related activities on your iPad using your iPhone’s internet.
It’s important to note that while using your iPhone as a personal hotspot, your cellular data usage may increase. Therefore, it’s advisable to monitor your data usage and ensure you have an adequate data plan to avoid any additional charges.
Now that you know how to set up Personal Hotspot on your iPhone, you can easily share your internet connection with your iPad or any other Wi-Fi-enabled device whenever you need it. Enjoy the seamless connectivity and stay connected on the go!
Connecting Your iPad to Your iPhone’s Personal Hotspot
Connecting your iPad to your iPhone’s Personal Hotspot allows you to utilize your iPhone’s cellular data connection to access the internet on your iPad. Here are the steps to connect your iPad to your iPhone’s Personal Hotspot:
- Unlock your iPad: Power on your iPad and unlock it by entering your passcode or using Face ID/Touch ID.
- Open the Settings app: Tap on the Settings app on your iPad’s home screen to access the device’s settings.
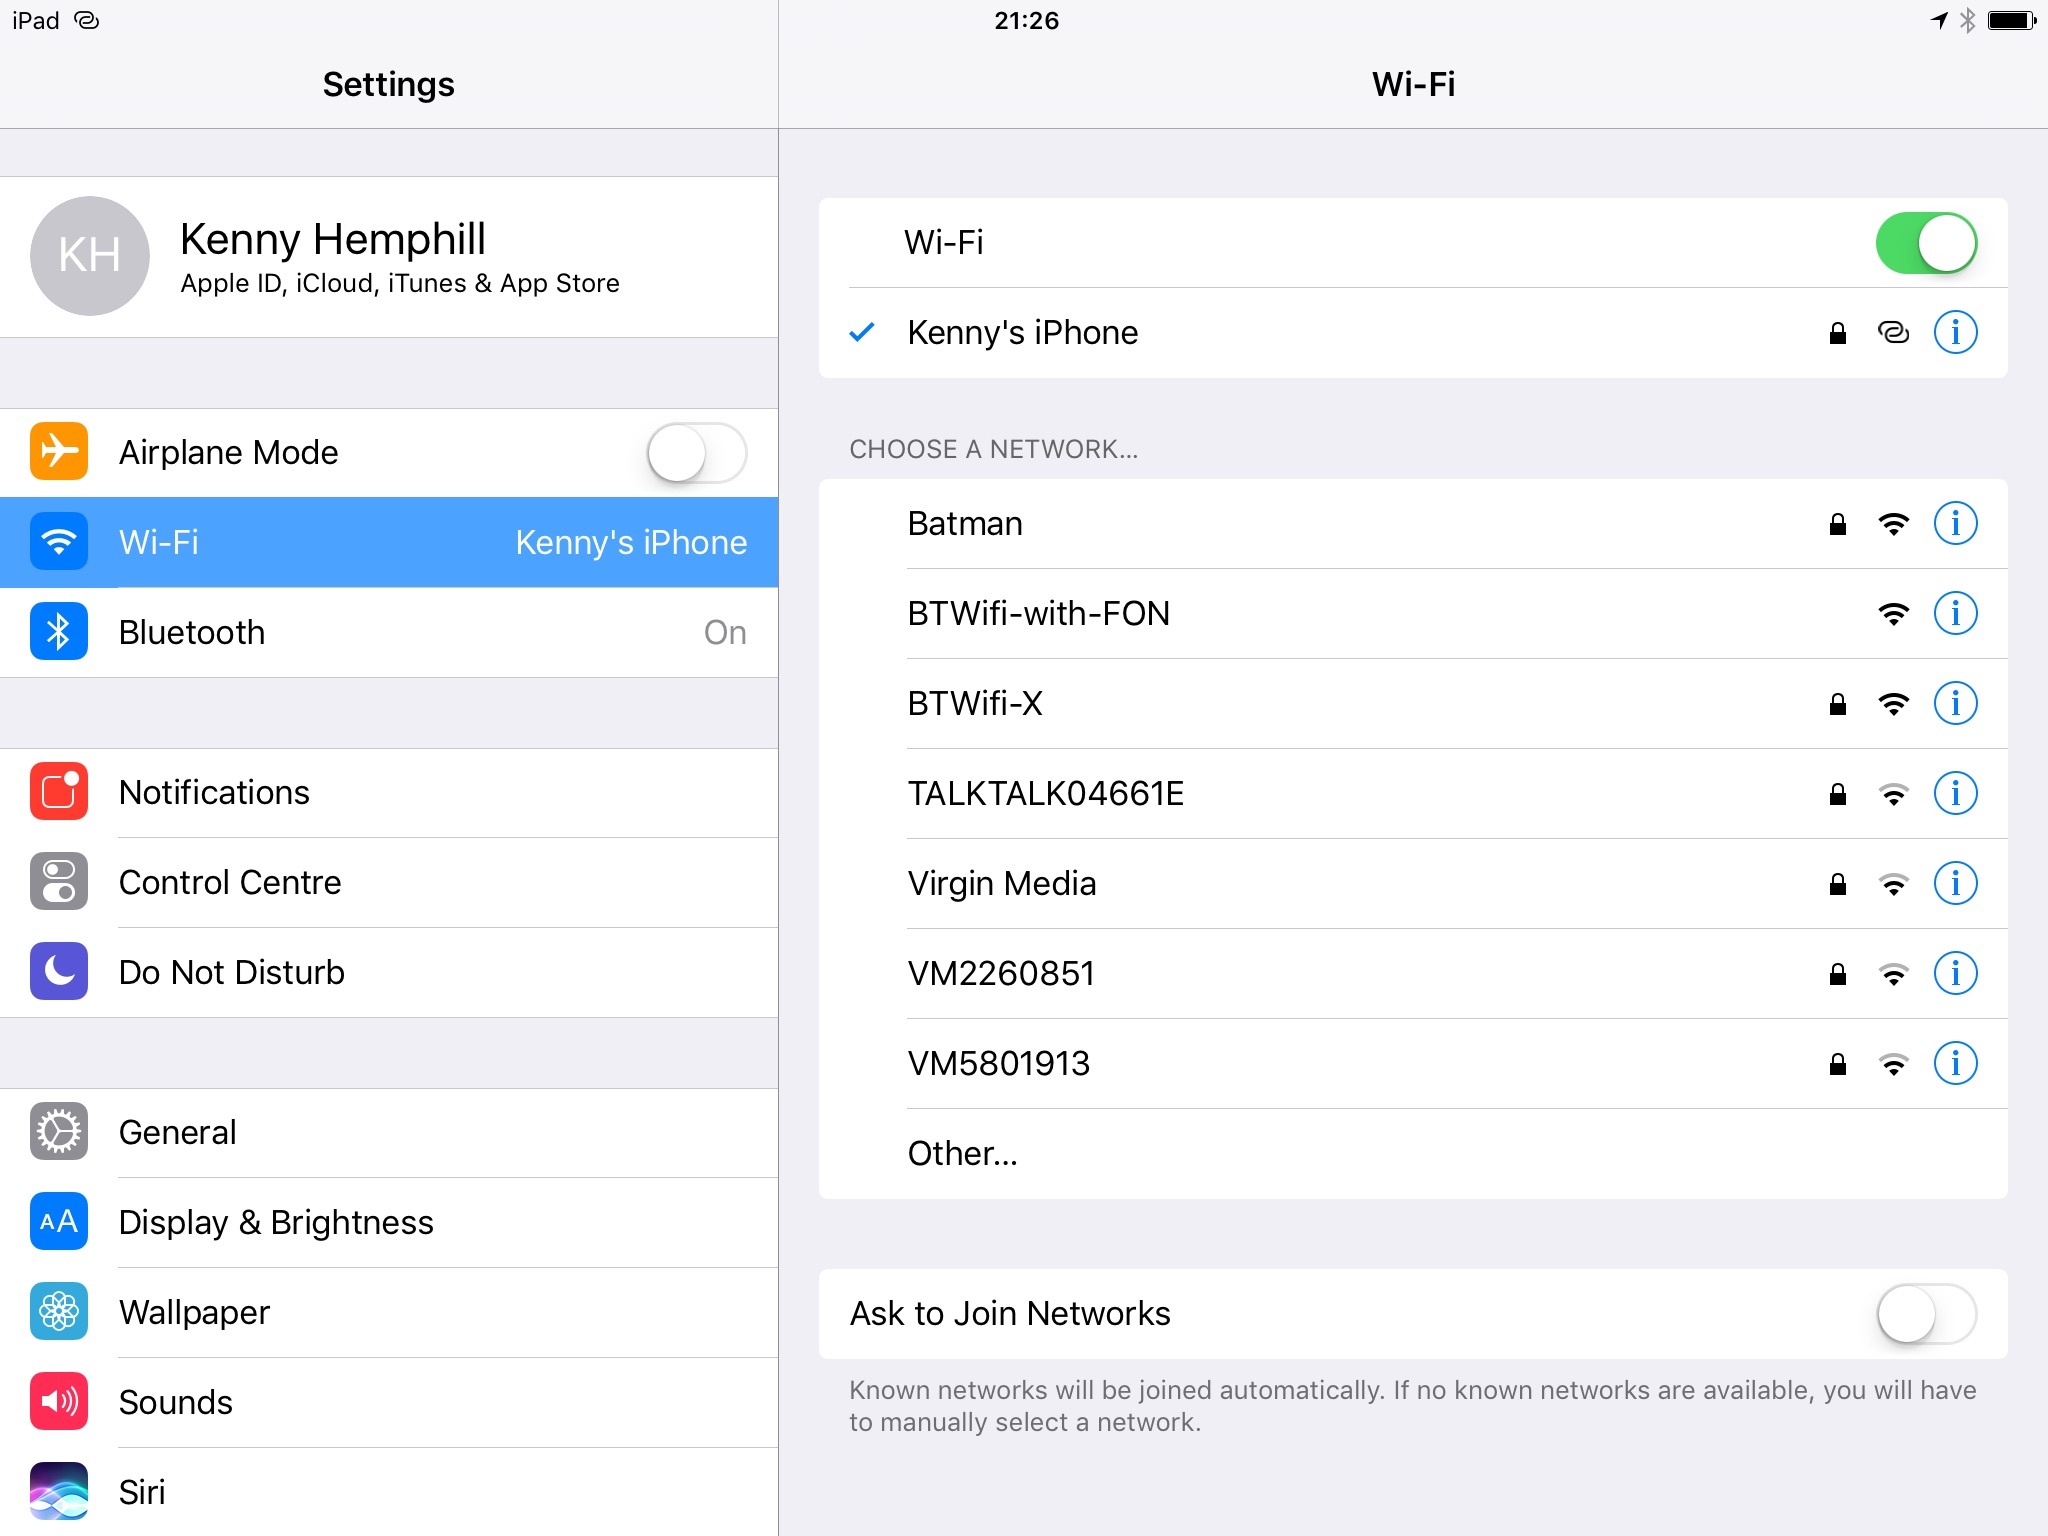
- Select Wi-Fi: In the Settings app, tap on “Wi-Fi” to access the Wi-Fi settings on your iPad.
- Find your iPhone’s Personal Hotspot: Look for your iPhone’s name under the “Personal Hotspot” section in the list of available Wi-Fi networks. It should be listed with the name you’ve given your iPhone.
- Connect to your iPhone’s Personal Hotspot: Tap on your iPhone’s name to connect your iPad to the Personal Hotspot. If you have set up a Wi-Fi password, you will be prompted to enter it.
Once the connection is established, your iPad will be connected to your iPhone’s Personal Hotspot, utilizing its cellular data connection for internet access. You will be able to browse the web, use your favorite apps, and stay connected on your iPad, just as you would with a regular Wi-Fi connection.
It’s important to note that the Personal Hotspot feature on your iPhone may have a limit on the number of devices that can connect simultaneously. If you have multiple devices already connected, you may need to disconnect one of them before your iPad can connect to the Personal Hotspot.
Additionally, connecting your iPad to your iPhone’s Personal Hotspot may consume cellular data. It’s recommended to keep an eye on your data usage and make sure you have an adequate data plan to avoid exceeding your data allowance.
With your iPad connected to your iPhone’s Personal Hotspot, you can enjoy a seamless and convenient internet connection wherever you have cellular coverage, making it an excellent solution for when Wi-Fi options are limited or unavailable.
Using Your iPhone’s Internet on Your iPad via Bluetooth
If you prefer to connect your iPad to your iPhone’s internet using Bluetooth instead of Wi-Fi, you can easily do so. Here’s how to use your iPhone’s internet on your iPad via Bluetooth:
- Enable Personal Hotspot: On your iPhone, open the Settings app, select “Personal Hotspot,” and toggle the switch to turn it on. Make sure that Bluetooth is enabled on your iPhone as well.
- Pair your devices: On your iPad, open the Settings app and go to the Bluetooth section. Enable Bluetooth if it’s not already turned on. Your iPad will then scan for available devices. Find your iPhone in the list of devices and tap on it to pair the devices.
- Connect to Personal Hotspot: After pairing, your iPad will automatically connect to your iPhone’s Personal Hotspot via Bluetooth. The Bluetooth icon should appear in the status bar on your iPad, indicating a successful connection.
- Verify internet connectivity: Open a web browser or any app that requires an internet connection on your iPad to ensure that you can browse the internet and access online services.
Using Bluetooth to connect your iPad to your iPhone’s internet has its advantages. Bluetooth connections typically consume less power compared to Wi-Fi connections, which can help conserve battery life on both devices. It can also be a more secure option, as the Bluetooth connection is encrypted.
However, it’s important to note that Bluetooth connections may be slower than Wi-Fi connections, which can impact internet browsing speed on your iPad. Additionally, the range of Bluetooth connectivity is typically shorter compared to Wi-Fi, so ensure that your iPhone and iPad are within close proximity for a stable connection.
Remember to monitor your data usage when using your iPhone’s internet on your iPad via Bluetooth, as it will still utilize your iPhone’s cellular data connection. Having a sufficient data plan is crucial to avoid incurring additional charges or exceeding your data limit.
Overall, using your iPhone’s internet on your iPad via Bluetooth can be a convenient and power-efficient way to stay connected on your iPad. Whether you’re in areas with limited Wi-Fi access, or you prefer a more secure connection, this method offers a viable alternative to using Wi-Fi for accessing the internet on your iPad.
Using Your iPhone’s Internet on Your iPad via USB
If you prefer a more stable and high-speed connection, you can use your iPhone’s internet on your iPad by connecting the devices via USB. This method allows you to share your iPhone’s cellular data connection with your iPad. Here’s how to do it:
- Connect your devices: Use the Lightning or USB-C cable that came with your iPhone to connect it to your iPad. Plug the cable into the respective ports on both devices.
- Unlock your iPhone: Power on your iPhone and unlock it by entering your passcode or using Face ID/Touch ID.
- Trust the connected device: When prompted on your iPhone, tap “Trust” to establish a secure USB connection between your iPhone and iPad.
- Enable Personal Hotspot: On your iPhone, open the Settings app, select “Personal Hotspot,” and toggle the switch to turn it on. Your iPhone will then start broadcasting a network for your iPad to connect to.
- Connect your iPad: On your iPad, you should see a pop-up notification asking if you want to “Trust This Computer.” Tap “Trust” to establish the connection.
Once connected, your iPad will start using your iPhone’s cellular data connection. You can now access the internet, use online services, and perform any other online activities on your iPad.
The advantage of using a USB connection is that it offers a faster and more stable internet connection compared to Wi-Fi or Bluetooth. This is especially useful when you need a reliable connection for activities such as video streaming, large file downloads, or online gaming.
It’s important to note that using your iPhone’s internet on your iPad via USB may drain the battery of both devices more quickly, especially if they are not connected to a power source. Consider connecting your devices to a power outlet or a portable power bank to ensure uninterrupted usage.
Additionally, keep an eye on your data usage when using your iPhone’s internet on your iPad via USB. Although the connection is more reliable and faster, it still utilizes your iPhone’s cellular data connection, which may result in increased data usage.
Overall, using your iPhone’s internet on your iPad via USB provides a fast and reliable connection for your iPad. Whether you need a stable connection for work, entertainment, or any other online activities, this method allows you to make the most of your iPhone’s internet connection on your iPad.
Tips for Optimizing Internet Connection Speed on Your iPad
Having a fast and reliable internet connection on your iPad is crucial for a seamless online experience. Here are some tips to optimize your internet connection speed on your iPad:
- Position your iPad closer to the Wi-Fi router: Ensure that your iPad is within a reasonable distance from your Wi-Fi router. Physical obstacles such as walls or furniture can weaken the Wi-Fi signal, so positioning your iPad closer to the router can improve the signal strength and increase connection speed.
- Reduce interference: Other electronic devices such as cordless phones, microwave ovens, and baby monitors can interfere with your Wi-Fi signal. Keep your iPad away from these devices to minimize interference and improve connection speed.
- Restart your Wi-Fi router: Sometimes, simply restarting your Wi-Fi router can resolve connectivity issues and boost internet speed. Power off your router, wait for a few seconds, and then power it back on.
- Update your iPad’s software: Keeping your iPad’s software up to date ensures that you have the latest bug fixes and performance improvements, which can enhance your internet connection speed.
- Close unnecessary background apps: Background apps that are actively using internet resources can slow down your connection speed. Close any unnecessary apps running in the background to free up resources for your internet connection.
- Clear cache and cookies: Clearing the cache and cookies on your iPad can improve its browsing speed. Go to the Settings app, select Safari, and tap on “Clear History and Website Data” to remove the accumulated browsing data.
- Enable Wi-Fi Assist: Wi-Fi Assist is a feature on your iPad that automatically switches to your cellular data connection if the Wi-Fi signal is weak. This can provide a more stable internet connection and prevent slowdowns caused by a weak Wi-Fi signal.
- Check for Wi-Fi network congestion: In crowded areas with many Wi-Fi networks, there may be network congestion that impacts your connection speed. Use apps or websites that show Wi-Fi networks in your area to find a less congested Wi-Fi channel for your router.
- Reset network settings: If you’re experiencing persistent slow internet speeds, resetting your network settings can often resolve connectivity issues. Go to the Settings app, select General, Reset, and tap on “Reset Network Settings.” Note that this will remove saved Wi-Fi passwords, so make sure to have them handy.
By implementing these tips, you can optimize your iPad’s internet connection speed and enjoy faster browsing, smoother streaming, and better overall online performance.
Troubleshooting Common Issues when Sharing Internet from iPhone to iPad
While sharing your iPhone’s internet with your iPad is usually a straightforward process, you may encounter some common issues that can affect the connection. Here are some troubleshooting steps to help you resolve these issues:
- Ensure Personal Hotspot is enabled: Check that the Personal Hotspot feature is turned on in the Settings app on your iPhone. If it’s not enabled, toggle the switch to activate it.
- Confirm Bluetooth or USB connection: Double-check that your iPad is correctly connected to your iPhone through either Bluetooth or USB, depending on the method you’re using to share the internet connection.
- Restart your devices: Restart both your iPhone and iPad to refresh their settings and establish a fresh connection.
- Check for updated software: Ensure that both your iPhone and iPad are running the latest software versions. If not, update them to the latest available versions, as outdated software can cause compatibility issues.
- Reset network settings: If you’re experiencing persistent connection issues, you can try resetting the network settings on both your iPhone and iPad. Go to the Settings app, select General, Reset, and tap on “Reset Network Settings.”
- Verify cellular data and Wi-Fi: Make sure that your iPhone has a working cellular data connection and that your iPad is not connected to a Wi-Fi network. You cannot share Wi-Fi connectivity from the iPhone to the iPad through Personal Hotspot.
- Check data plan and hotspot limitations: Confirm that your iPhone’s data plan supports Personal Hotspot and that you have enough data available. Additionally, some carriers may have limitations on the number of devices that can connect or the amount of data that can be used through Personal Hotspot – check with your carrier for any restrictions.
- Reset Wi-Fi settings on your iPad: If you’re connecting via Wi-Fi, you can try resetting the Wi-Fi settings on your iPad. Go to the Settings app, select General, Reset, and tap on “Reset Wi-Fi Settings.”
- Contact your carrier or Apple Support: If you’ve tried all the troubleshooting steps and are still experiencing issues, it may be helpful to contact your mobile carrier or Apple Support for further assistance.
By following these troubleshooting steps, you can address common issues that may arise when sharing your iPhone’s internet with your iPad. With a stable and consistent connection, you can enjoy seamless internet access on your iPad, enhancing your productivity and online experiences.