
Check for Updates
If you want to ensure that your Microsoft Edge browser is running the latest version, it is essential to regularly check for updates. Updating your browser not only provides you with the latest features and improvements but also ensures better security and optimal performance. Follow the steps below to check for updates in Microsoft Edge:
- Launch Microsoft Edge: Open the Microsoft Edge browser on your computer.
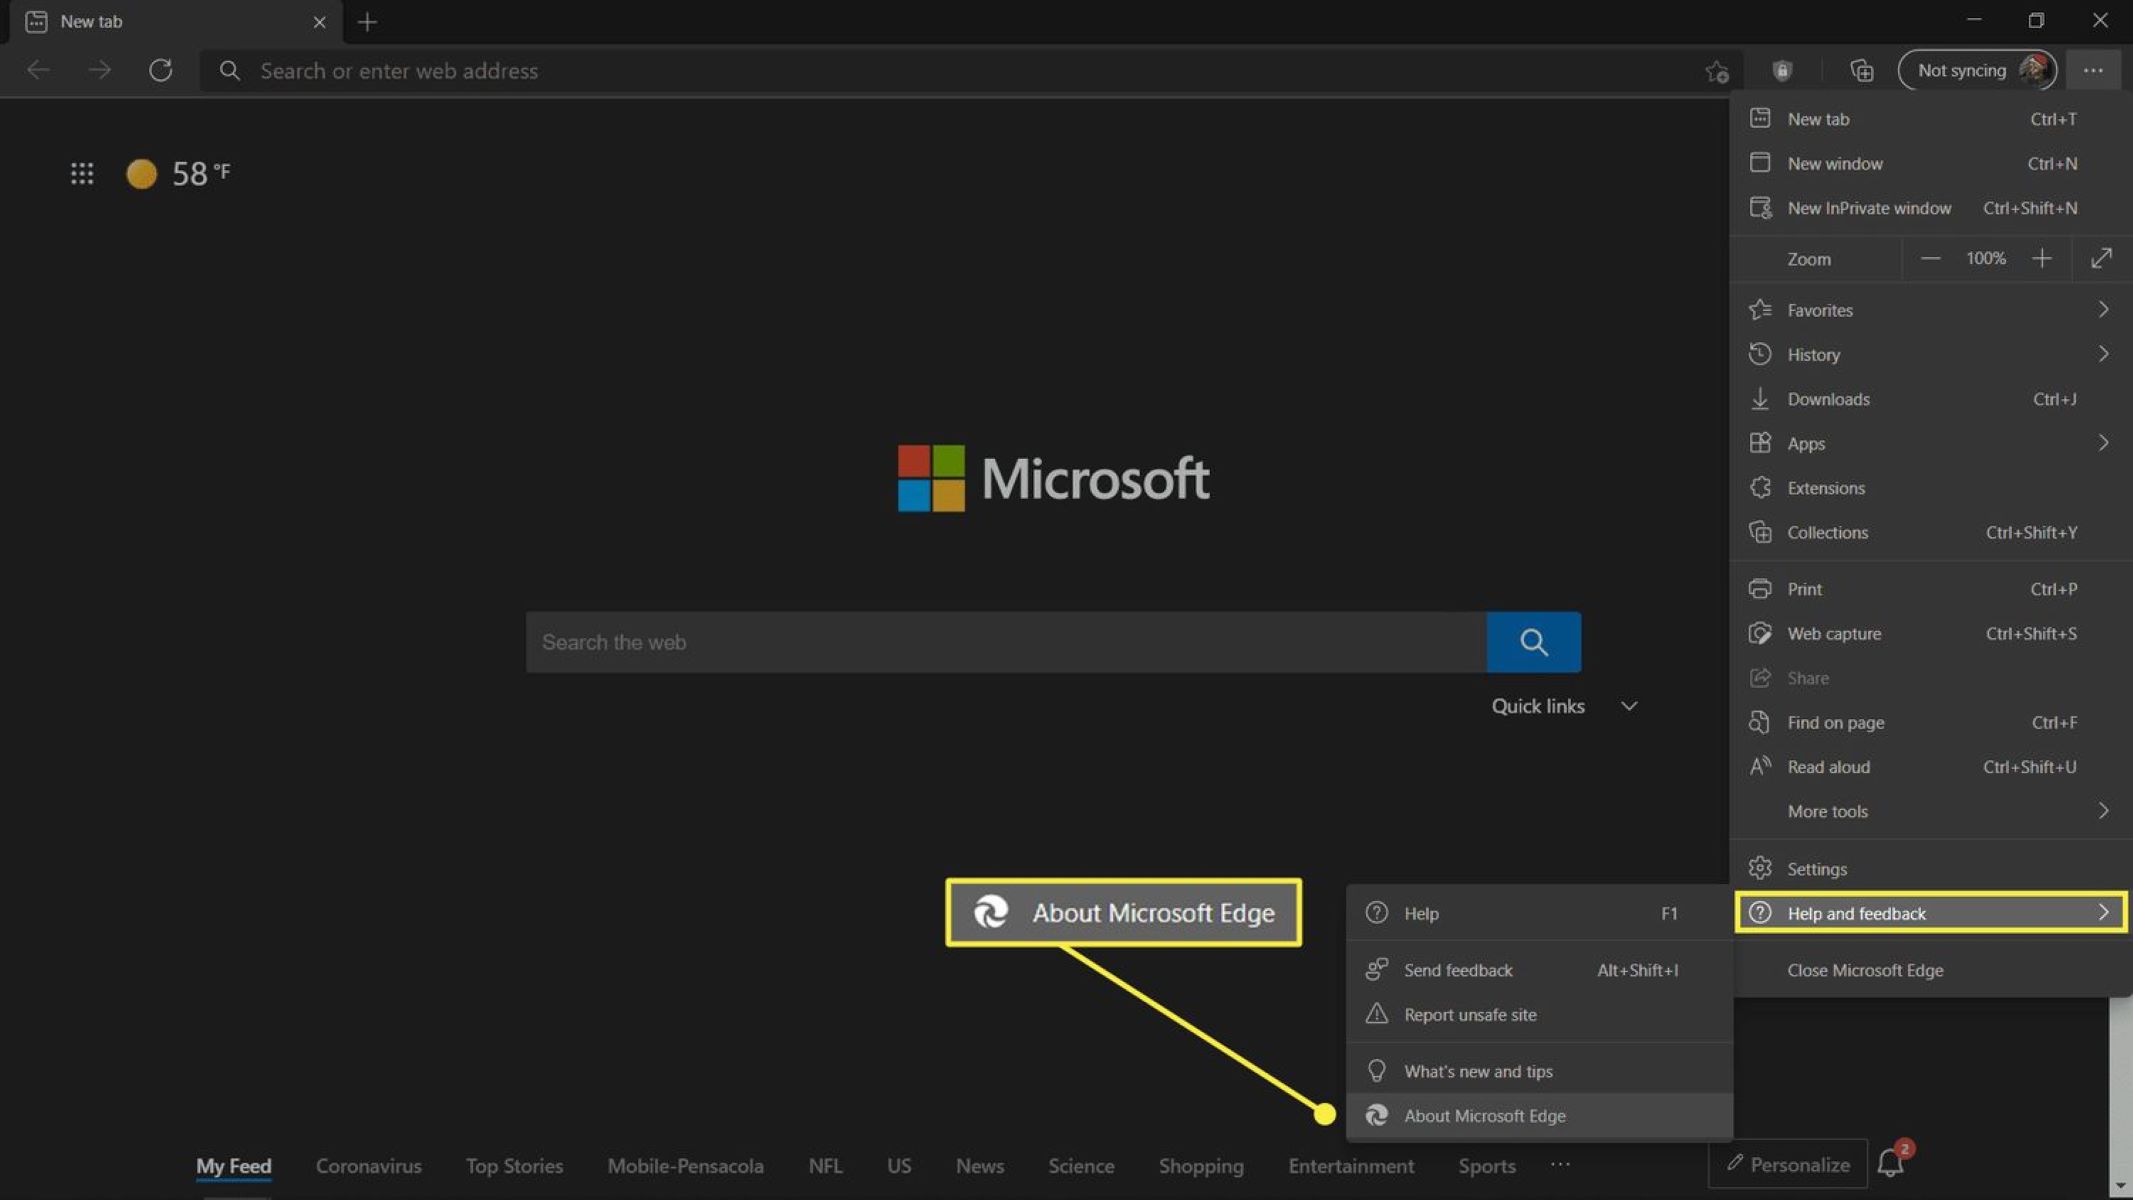
- Access Settings: Click on the three-dot menu icon located in the top-right corner of the browser window. From the dropdown menu, select “Settings.”
- Open About Microsoft Edge: In the Settings menu, scroll down and click on the “About Microsoft Edge” option.
- Check for Updates: The browser will automatically check for updates and display the current version of Microsoft Edge. If an update is available, it will begin downloading automatically.
- Restart Microsoft Edge: Once the update is downloaded, you will be prompted to restart the browser to apply the changes. Click on the “Restart” button to complete the update installation.
By following these simple steps, you can check for updates in Microsoft Edge and keep your browser up to date. It is recommended to perform this check regularly to ensure you have the latest features, security enhancements, and bug fixes.
Remember, staying updated not only enhances your browsing experience but also helps protect your computer from potential security risks. So, make it a habit to check for updates in Microsoft Edge and enjoy the best browsing performance.
Automatic Updates
Keeping your Microsoft Edge browser up to date can be effortless by enabling automatic updates. When automatic updates are turned on, the browser will regularly check for the latest updates and install them automatically. This ensures that you always have the most recent version of Microsoft Edge without having to manually check for updates. Follow the steps below to enable automatic updates:
- Launch Microsoft Edge: Open the Microsoft Edge browser on your computer.
- Access Settings: Click on the three-dot menu icon located in the top-right corner of the browser window. From the dropdown menu, select “Settings.”
- Open About Microsoft Edge: In the Settings menu, scroll down and click on the “About Microsoft Edge” option.
- Enable Automatic Updates: Look for the “Update options” section and toggle the switch next to “Update Microsoft Edge automatically” to turn it on.
Once you have enabled automatic updates, Microsoft Edge will now check for new updates in the background and install them automatically. This ensures that you always have the latest features, bug fixes, and security enhancements without any manual intervention.
It is important to note that automatic updates require a stable internet connection, as the browser needs to download and install the updates. Additionally, it may take some time for the updates to be installed, depending on your internet speed and the size of the update.
By enabling automatic updates in Microsoft Edge, you can effortlessly stay up to date with the latest improvements and ensure an optimal browsing experience. It is a convenient way to keep your browser secure and enjoy new features as they become available.
Manual Updates
If you prefer to have more control over the update process or if automatic updates are not enabled on your Microsoft Edge browser, you can manually check for updates and install them. Follow the steps below to perform a manual update:
- Launch Microsoft Edge: Open the Microsoft Edge browser on your computer.
- Access Settings: Click on the three-dot menu icon located in the top-right corner of the browser window. From the dropdown menu, select “Settings.”
- Open About Microsoft Edge: In the Settings menu, scroll down and click on the “About Microsoft Edge” option.
- Check for Updates: Click on the “Check for updates” button. Microsoft Edge will now check for any available updates.
- Download and Install Updates: If an update is available, click on the “Download and install” button to initiate the update process.
- Restart Microsoft Edge: Once the update is downloaded and installed, you will be prompted to restart the browser. Click on the “Restart” button to complete the update process.
By following these steps, you can manually check for updates in Microsoft Edge and keep your browser up to date. It is recommended to perform manual updates regularly, especially if you have disabled automatic updates.
Note that manual updates require an active internet connection as the browser needs to download the updates from Microsoft servers. The time required to download and install updates may vary depending on your internet speed and the size of the update.
Manually updating your Microsoft Edge browser ensures that you have the latest features, security enhancements, and bug fixes. It allows you to stay in control of the update process and ensures that your browsing experience is optimized.
Downloading the Latest Version
If you want to download the latest version of Microsoft Edge manually, it is possible to do so from the official Microsoft website. By downloading the latest version, you can ensure that you have the most up-to-date features and improvements. Follow the steps below to download the latest version of Microsoft Edge:
- Open a Web Browser: Launch any web browser, such as Google Chrome or Mozilla Firefox, on your computer.
- Go to the Microsoft Edge Website: In the address bar of your web browser, enter “https://www.microsoft.com/en-us/edge” and press Enter. You will be redirected to the official Microsoft Edge website.
- Click on “Download”: On the Microsoft Edge website, click on the “Download” button. The website will automatically detect your operating system and provide you with the appropriate download link for your device.
- Choose the Installation File: Select the installation file that matches your operating system and click on the “Download” button next to it. The download process will begin.
- Wait for the Download to Complete: The download time may vary depending on your internet speed. Please wait until the download is finished.
- Run the Installation File: Once the download is complete, locate the installation file in your computer’s Downloads folder or the specified destination folder. Double-click on the file to run the installation.
- Follow the Installation Wizard: During the installation process, follow the instructions provided by the installation wizard. It may include accepting terms and conditions, choosing installation options, and selecting the installation directory.
- Wait for the Installation to Complete: The installation process may take a few minutes. Please be patient and do not interrupt it.
Once the installation is complete, you will have the latest version of Microsoft Edge installed on your device. You can now open the browser and enjoy its updated features, improved performance, and enhanced security.
Downloading the latest version of Microsoft Edge ensures that you have access to the newest features and optimizations. It is recommended to periodically check for updates and download the latest version to stay up to date.
Installation Process
Installing Microsoft Edge is a straightforward process that allows you to take advantage of all the features and benefits of the browser. Follow the steps below to install Microsoft Edge on your device:
- Download the Installation File: Visit the official Microsoft Edge website or any trusted source to download the installation file for your operating system.
- Locate the Installation File: Once the download is complete, locate the installation file on your computer. It is usually found in the Downloads folder or the specified destination folder.
- Run the Installation File: Double-click on the installation file to initiate the setup process. If prompted, grant the necessary permissions for the installation to proceed.
- Accept the Terms and Conditions: Read and accept the terms and conditions presented during the installation process. You may need to click on the “Agree” or “Accept” button to proceed.
- Choose Installation Options: The installation wizard may provide additional options such as choosing the installation directory, selecting shortcuts, or customizing preferences. Make your desired selections and proceed.
- Start the Installation: Once you have made your selections, click on the “Install” or “Next” button to start the actual installation process.
- Wait for the Installation to Complete: The installation progress will be displayed on the screen. The time taken for the installation may vary depending on your system’s specifications.
- Installation Successful Message: Once the installation is complete, you will see a message indicating that the installation was successful. Click on the “Finish” button to close the installation wizard.
After completing these steps, Microsoft Edge will be successfully installed on your device. You can now launch the browser and start exploring all the features and functionalities it has to offer.
It is important to note that during the installation process, your computer may need to restart to finalize the installation. Ensure that you save any ongoing work and close any open applications before proceeding with the installation.
By following these simple steps, you can easily install Microsoft Edge and begin enjoying its fast and secure browsing experience.
Restarting Microsoft Edge
Restarting Microsoft Edge can resolve various issues, refresh the browser settings, and ensure that any recent updates or changes take effect. If you encounter any performance issues or notice unexpected behavior in Microsoft Edge, restarting the browser is typically the first troubleshooting step to try. Follow the steps below to restart Microsoft Edge:
- Close Microsoft Edge: If Microsoft Edge is currently open, close all browser windows and tabs.
- Exit Edge completely: Right-click on the Microsoft Edge icon in the taskbar and select “Close window”. Alternatively, you can use the keyboard shortcut Alt + F4 to close the active window.
- Relaunch Microsoft Edge: Double-click on the Microsoft Edge icon on your desktop or taskbar to relaunch the browser.
After restarting Microsoft Edge, the browser will start with a clean slate, and any temporary issues or glitches may be resolved. It is important to note that restarting the browser will not affect your bookmarks, passwords, or browsing history. However, any unsaved data in web forms or online applications may be lost. Therefore, it is advisable to save your work before restarting the browser.
If you are still experiencing problems after restarting Microsoft Edge, you may consider performing additional troubleshooting steps such as clearing browsing data, disabling extensions, or even reinstalling the browser. Remember to always keep your browser updated to the latest version to ensure optimal performance.
By following these steps, you can easily restart Microsoft Edge and potentially resolve any issues or improve its performance. It is a simple yet effective troubleshooting method that can help you enjoy a smooth browsing experience.
Troubleshooting Updates
If you encounter any issues with updating Microsoft Edge, it can be frustrating. However, there are several troubleshooting steps you can take to resolve common update problems. Follow these troubleshooting methods below to fix update issues in Microsoft Edge:
- Check Internet Connection: Ensure that your internet connection is stable and working properly. A poor or intermittent connection can hinder the update process. Try restarting your router or connecting to a different network to see if it resolves the issue.
- Clear Temporary Files: Temporary files or cache buildup can sometimes interfere with updates. Clearing your browser cache and temporary files can help resolve update problems. To do this, go to the Microsoft Edge settings, navigate to “Privacy, search, and services,” and click on “Choose what to clear” under the “Clear browsing data” section.
- Disable Extensions: Extensions can sometimes conflict with the update process. Temporarily disable any installed extensions and try updating Microsoft Edge again.
- Run Windows Update: Ensure that your Windows operating system is up to date. Running Windows Update can address any underlying system issues that may be affecting the update process. Go to your computer’s settings, navigate to “Update & security,” and click on “Check for updates.”
- Restart your Computer: Sometimes, a simple restart of your computer can resolve update issues. Save any ongoing work, close all applications, and restart your computer before attempting to update Microsoft Edge again.
- Reset Microsoft Edge: If the above steps do not resolve the issue, you can try resetting Microsoft Edge to its default settings. Open the browser’s settings, go to “Reset settings,” and click on the “Restore settings to their default values” option.
- Contact Microsoft Support: If none of the troubleshooting steps resolve the update issue, consider reaching out to Microsoft support for further assistance. They can provide specific guidance tailored to your situation.
By following these troubleshooting methods, you can overcome common update problems in Microsoft Edge. Remember to always keep your browser and operating system updated to ensure the best browsing experience with the latest features and security enhancements.
If the issue persists, it is advisable to seek professional help or explore online forums and communities where users share their experiences and potential solutions for update problems in Microsoft Edge.
Uninstalling Edge Updates
If you encounter issues after updating Microsoft Edge or prefer to revert to a previous version, you can uninstall the recent updates. Uninstalling updates allows you to restore the previous version of Microsoft Edge on your computer. Here’s how you can uninstall Edge updates:
- Open the Settings App: Press the Windows key + I on your keyboard to open the Settings app.
- Select “Apps”: In the Settings app, click on the “Apps” option.
- Go to the “Apps & features” Section: From the left sidebar, select “Apps & features.”
- Search for Microsoft Edge: In the Apps & features section, scroll down or use the search bar to find Microsoft Edge.
- Click on Microsoft Edge: Once you find Microsoft Edge, click on it to expand the options.
- Click the “Advanced options” link: Under Microsoft Edge, click the “Advanced options” link.
- Uninstall Updates: In the Advanced options section, you will find an option to “Uninstall updates.” Click on it to proceed.
- Choose the Updates to Uninstall: A list of recent updates will appear. Select the updates you want to uninstall by clicking on them.
- Click on “Uninstall”: After selecting the updates, click on the “Uninstall” button to initiate the uninstallation process.
- Follow the Prompts: Follow the prompts and instructions provided by the uninstaller to complete the process. It may take a few moments for the updates to be fully removed from your system.
Once the uninstallation process is complete, the recent updates for Microsoft Edge will be removed from your computer. You will have the previous version of Microsoft Edge restored. It is important to note that uninstalling updates may result in known security vulnerabilities or missing features that were introduced in the updated version.
If you encounter any issues or need to reinstall a specific update, you may visit the Microsoft website or use Windows Update to download and install the desired version of Microsoft Edge again.
By following these steps, you can easily uninstall updates for Microsoft Edge and revert to a previous version. However, it is recommended to keep your browser and system updated to ensure the best performance, security, and access to the latest features provided by Microsoft Edge.
Viewing Update History
If you are curious about the updates installed on your Microsoft Edge browser or want to track the changes made with each update, you can view the update history. Microsoft Edge keeps a record of the updates that have been installed, allowing you to review the update details. Follow the steps below to view the update history in Microsoft Edge:
- Launch Microsoft Edge: Open the Microsoft Edge browser on your computer.
- Access Settings: Click on the three-dot menu icon located in the top-right corner of the browser window. From the dropdown menu, select “Settings.”
- Open About Microsoft Edge: In the Settings menu, scroll down and click on the “About Microsoft Edge” option.
- View Update History: On the “About Microsoft Edge” page, you will find the “Update history” section. Click on it to view the update history for Microsoft Edge.
In the update history section, you will see a list of updates that have been installed on your Microsoft Edge browser. Each entry typically includes information such as update version, release date, and a brief summary of the changes or improvements introduced in that particular update.
By reviewing the update history, you can get insights into the updates that have been applied to Microsoft Edge on your device. This information can be beneficial for troubleshooting, understanding changes in functionality, or keeping track of security updates.
It is important to note that Microsoft Edge may occasionally clear or overwrite the update history once older updates are deemed irrelevant. Therefore, it is a good practice to periodically review and make note of any critical updates or changes, especially if you want to refer back to a specific update in the future.
The ability to view the update history in Microsoft Edge allows you to stay informed and aware of the changes made to your browser over time. By reviewing the update history, you can better understand the evolution of Microsoft Edge and make informed decisions regarding its usage.