
Why Clearing Cache in Microsoft Edge is Important
Clearing the cache in Microsoft Edge is crucial for various reasons. The cache is essentially a temporary storage location where the browser saves copies of webpages, images, scripts, and other online content that you have visited. While the cache helps to enhance the browsing experience by speeding up page loading times, it can also lead to issues if it becomes bloated or contains outdated information.
Here are a few reasons why clearing the cache in Microsoft Edge is important:
- Improved Performance: Over time, the cache can accumulate a large amount of data, including cookies and temporary files. This can slow down the browser and affect its responsiveness. By regularly clearing the cache, you can ensure that Edge continues to run smoothly and efficiently.
- Updated Content: Websites frequently update their content, including design changes, updates to images or videos, and even bug fixes. If your browser cache contains outdated versions of these elements, you may not see the latest changes when visiting a website. Clearing the cache ensures that you are always viewing the most recent and accurate version of a webpage.
- Privacy Protection: The cache stores not only webpage data but also information such as login credentials, forms you have filled out, and browsing history. Clearing the cache regularly helps protect your privacy by removing these traces of your online activities.
- Troubleshooting Issues: If you encounter problems with a specific website, such as pages not loading correctly or errors appearing, clearing the cache can be an effective troubleshooting step. It can resolve issues related to corrupted or outdated cache files that may be causing conflicts with the website’s code.
By understanding the importance of clearing the cache in Microsoft Edge, you can ensure a smoother browsing experience while enjoying the latest updates and improved performance. Let’s explore how to clear the cache in Microsoft Edge in the next section.
How to Clear Cache in Microsoft Edge
Clearing the cache in Microsoft Edge is a simple process that can be done in just a few steps. Here’s a step-by-step guide on how to clear the cache:
-
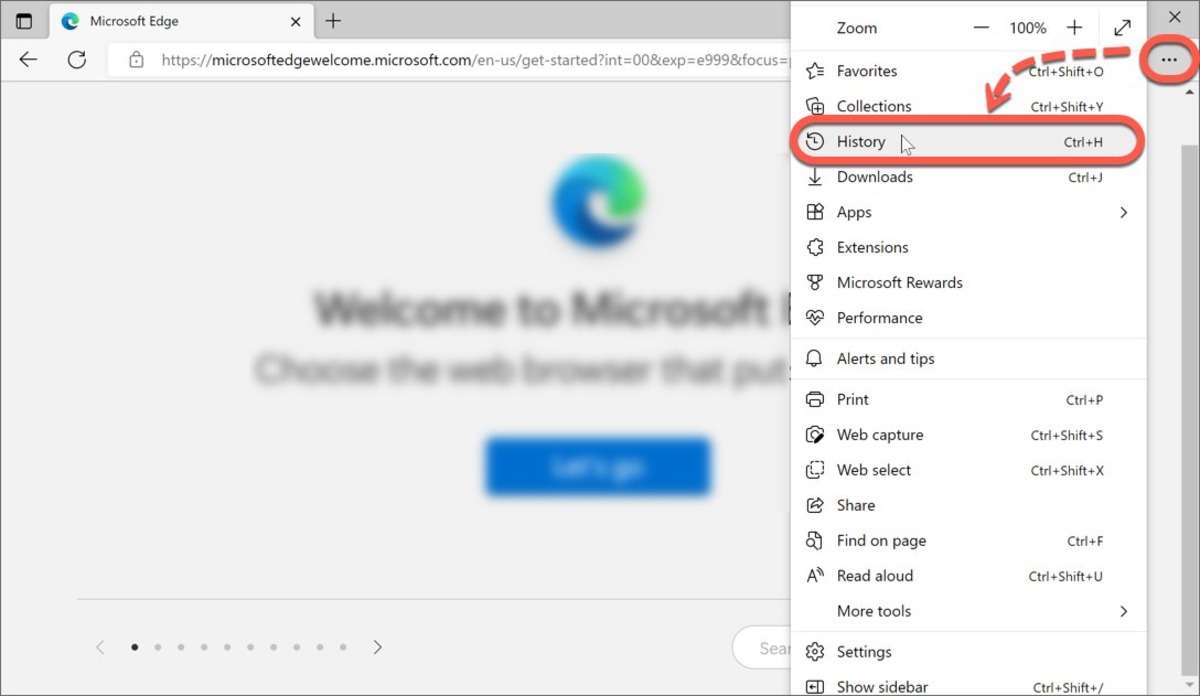
Step 1: Open Microsoft Edge Settings
Launch Microsoft Edge on your computer and click on the three-dot menu icon located at the top-right corner of the browser window. From the dropdown menu, select “Settings.” -
Step 2: Clear Browsing Data
In the Settings menu, scroll down and click on “Privacy, search, and services” in the left-hand sidebar. Then, under the “Clear browsing data” section, click on the “Choose what to clear” button. -
Step 3: Choose what to Clear
A new window will appear with various options for clearing browsing data. To clear only the cache, make sure the box next to “Cached data and files” is checked. You can also choose to clear other types of data, such as browsing history and cookies, by selecting the respective checkboxes. -
Step 4: Clear Cache
Once you have selected the desired options, click on the “Clear” button at the bottom of the window. Microsoft Edge will begin clearing the selected data, including the cache. -
Step 5: Confirm and Clear
After clicking “Clear,” a confirmation prompt will appear asking if you want to proceed with clearing the selected data. Review the options to ensure you are clearing the desired data, and then click on “Clear” to complete the process. Microsoft Edge will then remove the cache and any other selected data.
Alternatively, you can also use a keyboard shortcut to quickly clear the cache in Microsoft Edge. Press “Ctrl + Shift + Delete” on your keyboard to open the “Clear browsing data” window directly and follow the same steps as mentioned above.
If you want to clear the cache for a specific website or webpage, you can do so by accessing the Developer Tools in Microsoft Edge. Right-click on the problematic webpage, select “Inspect,” and then click on the “Network” tab in the Developer Tools panel. Finally, right-click on the refresh icon and choose “Empty cache and hard reload” to clear the cache for that specific page.
By following these simple steps, you can easily clear the cache in Microsoft Edge and enjoy a faster, more up-to-date browsing experience.
Step 1: Open Microsoft Edge Settings
The first step to clearing the cache in Microsoft Edge is to open the browser’s settings. Here’s how you can do it:
- Launch Microsoft Edge on your computer by double-clicking on the browser icon. The icon is usually located on your desktop or in the taskbar at the bottom of the screen.
- Once Microsoft Edge is open, you can access the settings menu by clicking on the three-dot icon located in the top-right corner of the browser window. This icon represents the menu for additional options and features.
- When you click on the three-dot icon, a dropdown menu will appear. From this menu, select the “Settings” option. It is usually located towards the bottom of the menu, but the exact position may vary based on the version of Microsoft Edge you are using.
- After clicking on “Settings,” a new tab will open in Microsoft Edge with all the available settings options. Here, you can customize various aspects of the browser such as appearance, privacy, security, and more.
By following these steps, you will be able to open the settings menu in Microsoft Edge. This will allow you to access the necessary options for clearing the cache as well as other browser settings.
Please note that the steps mentioned above are based on the current version of Microsoft Edge at the time of writing this article. The user interface and menu options may change in future updates, so it’s always a good idea to refer to the official Microsoft documentation for the most accurate and up-to-date instructions.
Step 2: Clear Browsing Data
Once you have accessed the settings menu in Microsoft Edge, the next step in clearing the cache is to navigate to the “Clear browsing data” section. Here’s how you can do it:
- After opening Microsoft Edge’s settings, you will see a sidebar on the left-hand side of the browser window. Scroll down in the sidebar until you find the section labeled “Privacy, search, and services.”
- Click on “Privacy, search, and services” to expand the section and reveal the available options.
- Within the “Privacy, search, and services” section, you will see various settings related to your browsing data, privacy preferences, and more. Look for the option labeled “Clear browsing data” and click on it.
- Clicking on “Clear browsing data” will open a new window with different options for clearing your browsing data, including the cache.
By following these steps, you will be able to reach the “Clear browsing data” section in Microsoft Edge’s settings. This is where you can select the specific data you want to delete, including the cache.
It’s worth noting that in addition to clearing the cache, you can also choose to delete other types of browsing data, such as cookies, browsing history, download history, and more. You have the flexibility to select the data you wish to delete based on your preferences and needs.
Now that you’ve reached the “Clear browsing data” section, you’re ready for the next step—choosing what data to clear. Stay tuned for Step 3!
Step 3: Choose what to Clear
Once you have reached the “Clear browsing data” section in Microsoft Edge’s settings, it’s time to decide what specific data you want to clear, including the cache. Here’s how you can choose what to clear:
- In the “Clear browsing data” window, you will see a list of options for the types of data that can be cleared. The available options may differ slightly depending on the version of Microsoft Edge you are using, but generally, you should see options such as browsing history, cookies and other site data, cached images and files, and more.
- To clear the cache, make sure that the checkbox next to “Cached images and files” is selected. This option specifically targets the browser cache for deletion.
- If you want to clear other types of data as well, such as browsing history or cookies, you can select the respective checkboxes for those options as well. This allows you to customize which data gets cleared based on your preferences.
- Additionally, you may notice an option that allows you to select a time range for the data to be cleared. By default, Microsoft Edge clears data from the past hour, but you can choose a different time range if desired.
By following these steps, you can choose exactly what data you want to clear in Microsoft Edge, including the cache. This flexibility allows you to personalize the clearing process based on your needs.
Once you have chosen the desired options for clearing the cache and other data, you’re almost ready to complete the process. The next step, Step 4, will guide you through the final steps of clearing the cache in Microsoft Edge. Stay tuned!
Step 4: Clear Cache
After choosing the specific data you want to clear in Microsoft Edge, including the cache, it’s time to proceed with actually clearing the cache. Here’s how you can do it in Step 4:
- In the “Clear browsing data” window, once you have selected the desired options for clearing, you will see a button near the bottom labeled “Clear.” Click on this button to initiate the clearing process.
- After clicking on “Clear,” Microsoft Edge will start removing the selected data, including the cache. Depending on the amount of data being cleared and the performance of your computer, the process may take a few seconds to complete.
- During the clearing process, you will see a progress indicator or loading bar that shows the status of the cache clearing. This provides visibility into the progress and lets you know that the browser is actively working on removing the cached images and files.
It’s worth noting that clearing the cache does not delete other important browser data, such as bookmarks, saved passwords, or autofill data. It only removes temporary files and cached content that can potentially impact browser performance or display outdated information.
Once the cache has been successfully cleared, you can proceed to the next step, Step 5, to confirm and complete the process. Ensure that you follow along to finalize the cache clearing in Microsoft Edge.
Step 5: Confirm and Clear
After initiating the cache clearing process in Microsoft Edge, you’ll need to confirm and complete the clearing process. Here’s how you can confirm and clear the cache in Step 5:
- Once the cache clearing process is underway, Microsoft Edge will display a confirmation prompt. This prompt will provide a summary of the data that will be cleared, including the cache. Take a moment to review this information to ensure that you are clearing the desired data.
- In the confirmation prompt, you will typically see checkboxes next to the various data types that will be cleared. Make sure that the checkbox for “Cached images and files” is selected. If you have chosen to clear other data types as well, such as cookies or browsing history, ensure that those checkboxes are also selected.
- After reviewing the confirmation prompt and ensuring that the appropriate data is selected for clearing, click on the “Clear” or “Clear data” button. This action will finalize the process and Microsoft Edge will proceed to remove the selected data from the browser.
- Depending on the amount of data being cleared and the performance of your computer, the clearing process may take a few moments to complete. Microsoft Edge will display a progress indicator or loading bar to show the status of the clearing operation.
- Once the clearing process is finished, Microsoft Edge will confirm that the data has been successfully cleared. You may see a notification or confirmation message indicating that the cache and other selected data types have been removed from the browser.
Congratulations! You have successfully confirmed and cleared the cache in Microsoft Edge. By regularly clearing the cache, you can ensure optimal browser performance, up-to-date content, and improved privacy. Enjoy your refreshed browsing experience!
Alternative Method: Using Keyboard Shortcut
In addition to the steps outlined earlier, there is an alternative method to clear the cache in Microsoft Edge using a simple keyboard shortcut. This method provides a quick and convenient way to clear the cache without navigating through the settings menu. Here’s how you can use the keyboard shortcut:
- Open Microsoft Edge on your computer by double-clicking on the browser icon.
- Once Microsoft Edge is open, press the following keyboard shortcut: Ctrl + Shift + Delete.
- This keyboard shortcut will directly open the “Clear browsing data” window, bypassing the need to navigate through the settings menu manually.
- In the “Clear browsing data” window, you can follow the same steps as mentioned earlier to choose the data you want to clear, including the cache. Select the appropriate checkboxes and set the desired time range if needed.
- Finally, click on the “Clear” button to initiate the cache clearing process. Microsoft Edge will remove the selected data, including the cache, based on your chosen preferences.
The keyboard shortcut method provides a quick and efficient way to clear the cache in Microsoft Edge, especially for users who prefer using keyboard shortcuts rather than navigating through menus. It eliminates the need to go through multiple steps, making the cache clearing process faster and more convenient.
It’s important to note that the specific keyboard shortcut mentioned here may vary slightly depending on your operating system or keyboard layout. If the provided shortcut doesn’t work, you can try alternative combinations or consult the official documentation for your specific system.
By utilizing this keyboard shortcut method, you can easily keep your cache clean and enjoy a smooth browsing experience in Microsoft Edge.
Alternative Method: Clearing Specific Site Cache
In some cases, you may encounter issues with a specific website, such as loading errors or outdated content. In such situations, clearing the cache for that specific site can help resolve the problem. Here’s how you can clear the cache for a specific site in Microsoft Edge:
- Open Microsoft Edge on your computer and navigate to the website for which you want to clear the cache.
- Once you are on the problematic webpage, right-click anywhere on the page. This will open a context menu with various options.
- In the context menu, select “Inspect” or “Inspect element.” This will open the Developer Tools panel, which provides in-depth information about the webpage’s structure and code.
- Within the Developer Tools panel, you will see a horizontal menu at the top. Click on the “Network” tab to switch to the network-related features.
- After switching to the “Network” tab, you will notice a refresh icon at the top-left corner of the Developer Tools panel. Right-click on this refresh icon.
- In the right-click menu, select the option that says “Empty cache and hard reload” or a similar option. This will clear the cache for that specific webpage.
- Once you have selected the option, Microsoft Edge will refresh the webpage and load it again without using any cached content.
By following these steps, you can specifically clear the cache for a particular website in Microsoft Edge. This can be helpful if you are experiencing issues with a specific webpage or if you want to ensure you are viewing the most up-to-date version of that site.
It’s worth noting that clearing the cache for a specific site will only affect that particular website. The cache for other websites will remain intact, allowing you to clear the cache selectively based on your needs.
By using this alternative method, you have more control over individual website cache, ensuring a smoother browsing experience for problematic sites in Microsoft Edge.
Benefits of Clearing Cache in Microsoft Edge
Clearing the cache in Microsoft Edge offers several benefits that can greatly enhance your browsing experience. Here are some of the advantages of regularly clearing the cache:
- Improved Performance: One of the primary benefits of clearing the cache is improved browser performance. Over time, the cache can become filled with a large amount of data, including temporary files and outdated content. Clearing the cache helps free up storage space and allows Microsoft Edge to run faster and more efficiently.
- Up-to-Date Content: Websites frequently update their content, such as images, scripts, and style sheets. If your browser cache contains outdated versions of these elements, you may not see the latest changes when visiting a website. By clearing the cache, you ensure that you are loading the most recent and accurate content, providing a more accurate browsing experience.
- Fixing Display Issues: In some cases, an outdated or corrupted cache can cause display issues on websites. Clearing the cache can resolve these issues by forcing the browser to load fresh and uncorrupted content from the server. This can help eliminate rendering problems, misplaced images, or broken layouts.
- Enhanced Privacy: The cache stores various types of data, including browsing history, cookies, and site preferences. Clearing the cache regularly helps protect your privacy by removing these traces of your online activities. It ensures that sensitive information, such as login credentials or form data, is not stored on your device.
- Troubleshooting: Clearing the cache can be a helpful troubleshooting step when you encounter issues on websites. If a website is not loading correctly or displaying errors, clearing the cache can resolve conflicts between outdated cache files and the website’s code. It allows you to start with a clean slate and often helps in resolving compatibility issues or temporary glitches.
By regularly clearing the cache in Microsoft Edge, you can enjoy a faster browsing experience, access up-to-date content, protect your privacy, and troubleshoot website issues more effectively.
It’s important to note that clearing the cache is a temporary measure, and the cache will start building up again as you browse the web. Therefore, it’s recommended to include cache clearing as a regular maintenance task to maximize the benefits it offers.
Clearing Cache on Mobile Devices
In addition to desktop computers, Microsoft Edge is also available on mobile devices. Clearing the cache on mobile devices is just as important as it is on desktops to ensure optimal performance and browsing experience. Here’s how you can clear the cache in Microsoft Edge on mobile devices:
Android Devices:
- Open Microsoft Edge on your Android device by tapping on the app icon on your home screen or app drawer.
- Tap on the three-dot menu icon located in the bottom-right corner of the browser window to open the browser’s menu.
- From the menu, select “Settings” to access the browser settings.
- Scroll down in the settings menu and tap on “Privacy.”
- Tap on “Clear browsing data” to open the data clearing options.
- Select the data you want to clear, such as cache, cookies, or browsing history, by checking the respective checkboxes.
- Tap on the “Clear” button to initiate the clearing process.
iOS Devices:
- Open Microsoft Edge on your iOS device by tapping on the app icon from your home screen.
- Tap on the three-dot menu icon located in the bottom-right corner of the browser window to open the menu.
- Select “Settings” from the menu to access the browser settings.
- Scroll down and tap on “Privacy & Security.”
- Tap on “Choose what to clear” to open the clearing options.
- Select the data you want to clear, such as cache, cookies, or browsing history, by checking the respective checkboxes.
- Tap on the “Clear” button to initiate the clearing process.
Clearing the cache on your mobile devices can help improve performance, free up storage space, and ensure you are viewing the most up-to-date content while browsing with Microsoft Edge. It’s recommended to clear the cache periodically to maintain optimal performance on your mobile devices.
While the steps mentioned here are based on the current versions of Microsoft Edge for Android and iOS devices, there may be slight differences depending on the specific device or operating system version. It’s always a good idea to refer to the official documentation or Microsoft Edge’s support resources for the most accurate instructions tailored to your particular device.