
Internet Cache: What is it and why should you clear it?
When you browse the internet, your web browser—like Google Chrome, Mozilla Firefox, or Safari—stores temporary files, images, and other data from websites that you visit. This collection of stored data is commonly referred to as the internet cache. The purpose of the cache is to speed up your browsing experience by storing frequently accessed information locally, so that it can be quickly retrieved without having to download it again.
While the internet cache serves a valuable purpose in improving website loading times, it can also become a double-edged sword. Over time, the cache can accumulate a significant amount of data, taking up valuable storage space on your device. Additionally, outdated or corrupted cache files can cause issues when trying to load websites, resulting in slow page loading times, broken images, or other display problems.
This is why it is important to periodically clear your internet cache. By clearing the cache, you can free up storage space on your device and ensure that you are accessing the most up-to-date version of a website, without any potential issues arising from outdated or corrupted cache files.
When you clear your internet cache, keep in mind that it will remove all stored data, including your browsing history, cookies, and login information. Therefore, it is recommended to clear the cache when necessary, but also consider the potential impact on your browsing experience and whether you need to retain any specific data or settings.
In the following sections, we will guide you through the process of clearing the internet cache in different browsers. Whether you are using Google Chrome, Mozilla Firefox, Microsoft Edge, Safari, or other major browsers, we’ve got you covered with step-by-step instructions to help you clear your cache and optimize your browsing experience.
Clearing Internet Cache in Google Chrome
Google Chrome is one of the most popular web browsers, known for its speed and user-friendly interface. If you are using Chrome and want to clear your internet cache, here’s how:
- Open Google Chrome on your computer.
- Click on the three-dot menu icon located at the top-right corner of the browser window.
- From the drop-down menu, hover over “More tools” and then click on “Clear browsing data.”
- A new tab will open with the “Clear browsing data” window. You can also access this directly by pressing “Ctrl + Shift + Delete” on your keyboard.
- In the “Clear browsing data” window, you can choose the time range for which you want to clear the cache. You can select “Last hour,” “Last 24 hours,” “Last 7 days,” “Last 4 weeks,” or “All time” to clear the cache for the desired period.
- Make sure the checkmark is next to “Cached images and files” to clear the cache. You can also choose to clear other types of data like browsing history, cookies, and more.
- Once you have selected the desired options, click on the “Clear data” button.
- Google Chrome will now start clearing the cache. The time it takes will depend on the amount of data stored.
- Once the cache is cleared, a confirmation message will appear.
That’s it! Your internet cache in Google Chrome has been successfully cleared. You can now enjoy a faster and more optimized browsing experience. Remember that clearing the cache will remove all stored data, so be aware of the potential impact on your browsing history and login information.
Clearing Internet Cache in Mozilla Firefox
Mozilla Firefox is a popular web browser known for its flexibility and customization options. If you are using Firefox and want to clear your internet cache, follow these steps:
- Open Mozilla Firefox on your computer.
- Click on the three-line menu icon located at the top-right corner of the browser window.
- From the drop-down menu, click on “Options.”
- In the “Options” tab, select the “Privacy & Security” menu on the left sidebar.
- Scroll down to the “Cookies and Site Data” section.
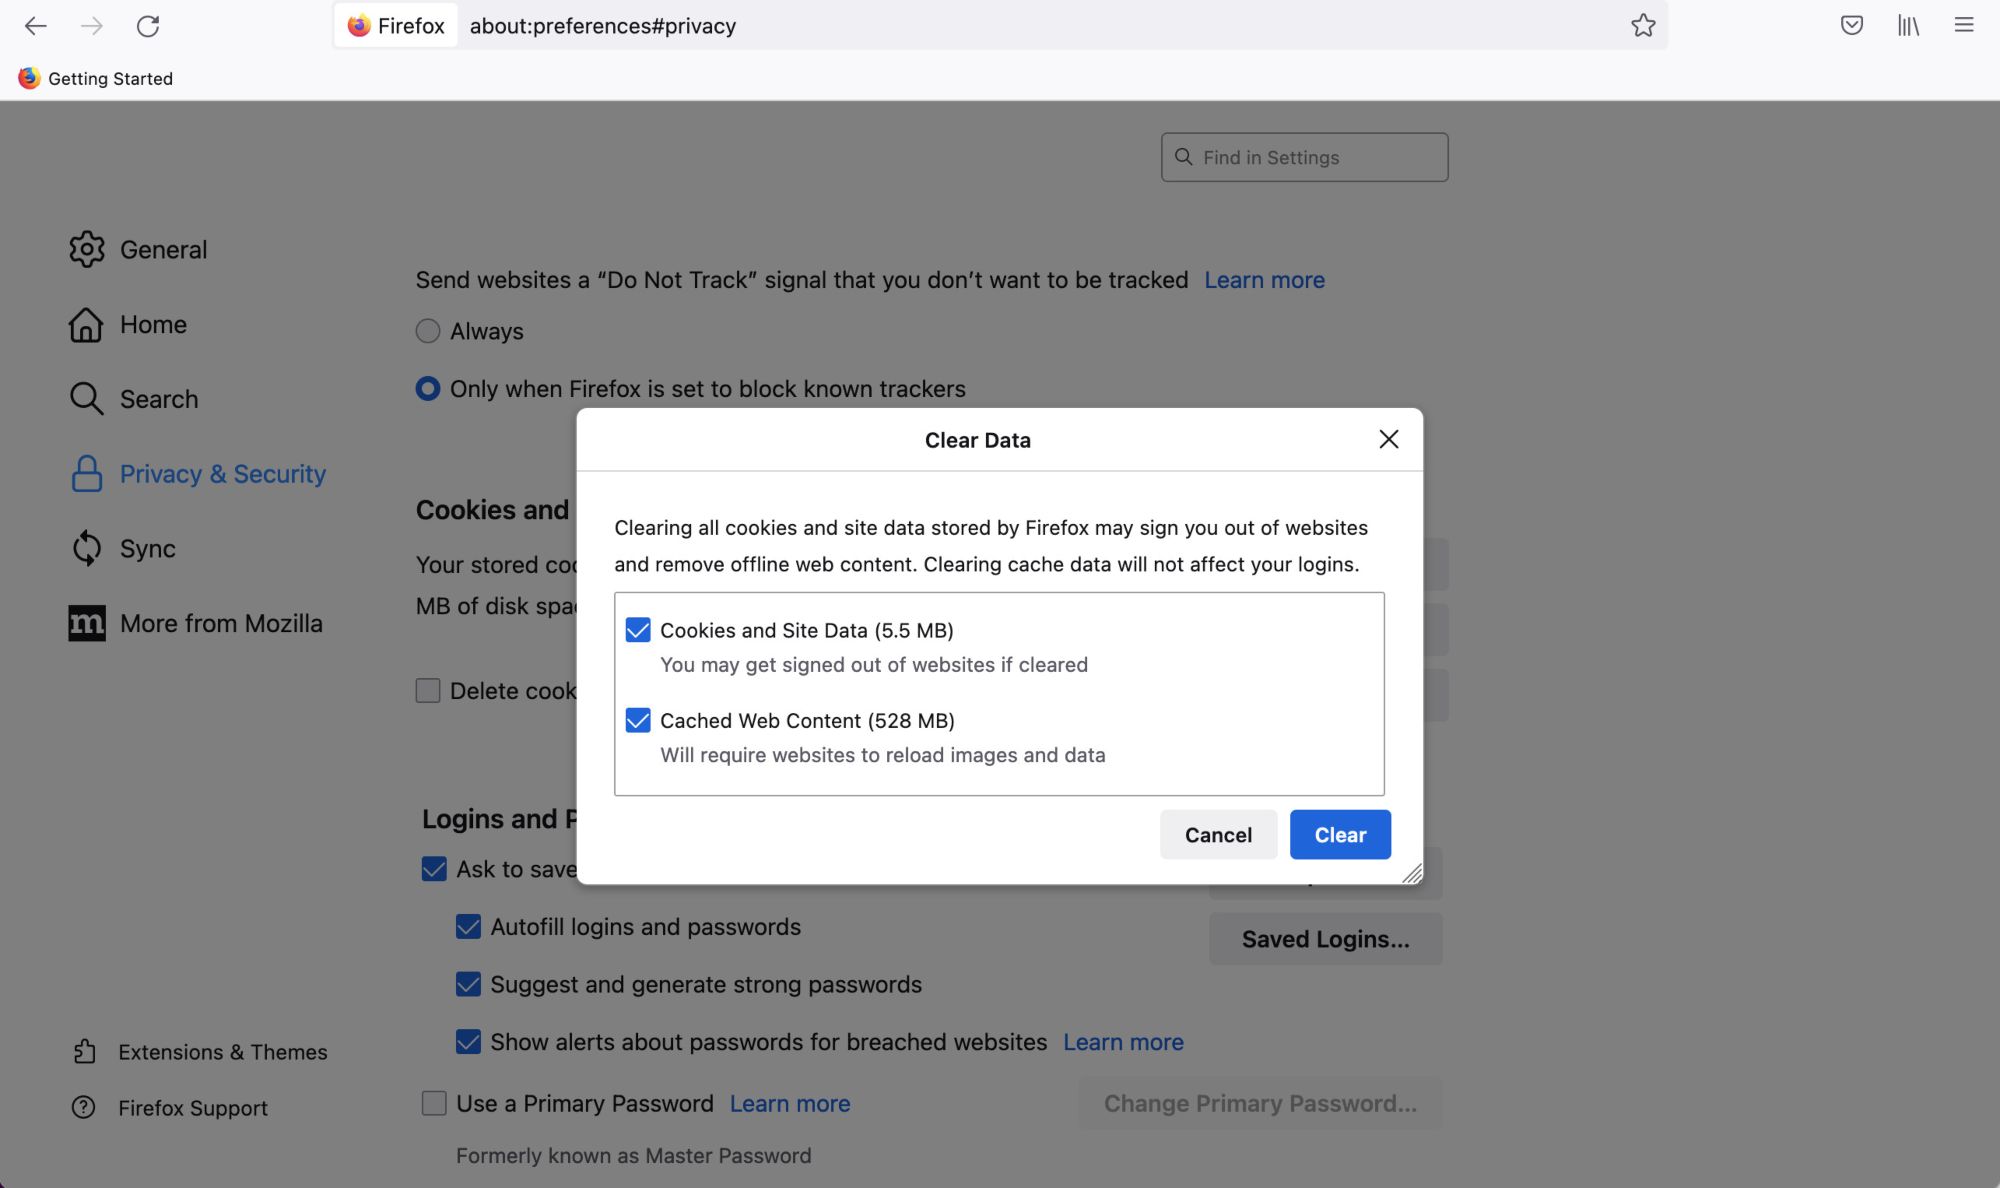
- Click on the “Clear Data” button.
- A new window will appear with the option to clear the cache, cookies, and site data.
- Ensure the checkbox next to “Cached Web Content” is selected to clear the internet cache.
- You may choose to clear other data as well, such as cookies and offline website data, depending on your preference.
- Click on the “Clear” button to start the cache clearing process.
- Firefox will now clear the cache. The time it takes will vary depending on the amount of stored data.
- Once the process is complete, you will see a confirmation message.
That’s it! You have successfully cleared the internet cache in Mozilla Firefox. Your browsing experience should now be optimized, with up-to-date website data loading faster. Keep in mind that clearing the cache will remove any stored data, so consider the impact on your browsing history and login information.
Clearing Internet Cache in Microsoft Edge
Microsoft Edge has become a popular choice for many users, offering a seamless browsing experience with its modern interface. If you are using Microsoft Edge and want to clear your internet cache, here’s how:
- Open Microsoft Edge on your computer.
- Click on the three-dot menu icon located at the top-right corner of the browser window.
- From the drop-down menu, hover over “History” and then click on “History” again.
- A new tab will open with your browsing history.
- On the left sidebar, click on “Clear browsing data.”
- A new window will appear, giving you options for what you want to clear.
- Ensure the checkbox next to “Cached images and files” is selected to clear the internet cache.
- You can also choose to clear other types of data, such as browsing history, cookies, and more.
- Click on the “Clear” button to start the cache clearing process.
- Microsoft Edge will now clear the cache. The time it takes will depend on the amount of data stored.
- Once the cache is cleared, a confirmation message will appear.
That’s it! Your internet cache in Microsoft Edge has been successfully cleared. You can now enjoy a faster and more optimized browsing experience. Remember that clearing the cache will remove all stored data, so be aware of the potential impact on your browsing history and login information.
Clearing Internet Cache in Safari
Safari is the default web browser on Apple devices, known for its sleek design and seamless integration with macOS and iOS. If you are using Safari and want to clear your internet cache, follow these steps:
- Open Safari on your Mac computer or iOS device.
- Click on “Safari” in the menu bar at the top of the screen.
- In the drop-down menu, click on “Preferences.”
- A new window will appear with various options. Click on the “Advanced” tab.
- In the “Advanced” tab, check the box next to “Show Develop menu in menu bar.”
- Close the preferences window.
- Click on “Develop” in the menu bar at the top of the screen.
- In the drop-down menu, click on “Empty Caches.”
- Safari will now clear the cache. The time it takes will depend on the amount of data stored.
- Once the cache is cleared, you will not receive a confirmation message, but the cache will be emptied.
That’s it! You have successfully cleared the internet cache in Safari. Now you can experience a smoother and optimized browsing experience. Remember that clearing the cache will remove all stored data, so consider the impact on your browsing history and login information.
Clearing Internet Cache in Opera
Opera is a popular web browser known for its speed and range of features. If you are using Opera and want to clear your internet cache, follow these steps:
- Open Opera on your computer.
- Click on the “Opera” logo in the top-left corner of the browser window.
- In the drop-down menu, click on “Settings” or “Preferences.”
- A new tab or window will open with the settings menu.
- In the left sidebar, click on “Advanced” and then on “Privacy & Security.”
- Scroll down to find the “Clear browsing data” section.
- Click on the “Choose what to clear” button.
- A new window will appear, giving you options for what you want to clear.
- Ensure the checkbox next to “Cached images and files” is selected to clear the internet cache.
- You can also choose to clear other types of data, such as browsing history, cookies, and more.
- Click on the “Clear” button to start the cache clearing process.
- Opera will now clear the cache. The time it takes will depend on the amount of data stored.
- Once the cache is cleared, a confirmation message will appear.
That’s it! Your internet cache in Opera has been successfully cleared. You can now enjoy a faster and more optimized browsing experience. Remember that clearing the cache will remove all stored data, so be aware of the potential impact on your browsing history and login information.
Clearing Internet Cache in Internet Explorer
Internet Explorer, although less commonly used today, is still utilized by some users. If you are using Internet Explorer and want to clear your internet cache, here’s how:
- Open Internet Explorer on your computer.
- Click on the gear icon located at the top-right corner of the browser window.
- In the drop-down menu, hover over “Safety” and then click on “Delete browsing history.”
- A new window will appear with various options for what you want to delete.
- Ensure the checkbox next to “Temporary Internet files and website files” or “Cache” is selected to clear the internet cache. You can also choose to clear other types of data, such as browsing history, cookies, and more.
- Click on the “Delete” button to start the cache clearing process.
- Internet Explorer will now clear the cache. The time it takes will depend on the amount of data stored.
- Once the cache is cleared, a confirmation message will appear.
That’s it! You have successfully cleared the internet cache in Internet Explorer. Your browsing experience should now be optimized, with up-to-date website data loading faster. Keep in mind that clearing the cache will remove any stored data, so consider the impact on your browsing history and login information.
Clearing Internet Cache in Microsoft Edge Chromium
Microsoft Edge Chromium is the updated version of Microsoft Edge, built on the Chromium engine and offering a more modern and feature-rich browsing experience. If you are using Microsoft Edge Chromium and want to clear your internet cache, here’s how:
- Open Microsoft Edge Chromium on your computer.
- Click on the three-dot menu icon located at the top-right corner of the browser window.
- From the drop-down menu, hover over “History” and then click on “History” again.
- A new tab will open with your browsing history.
- On the left sidebar, click on “Clear browsing data.”
- A new window will appear, giving you options for what you want to clear.
- Ensure the checkbox next to “Cached images and files” is selected to clear the internet cache.
- You can also choose to clear other types of data, such as browsing history, cookies, and more.
- Click on the “Clear” button to start the cache clearing process.
- Microsoft Edge Chromium will now clear the cache. The time it takes will depend on the amount of data stored.
- Once the cache is cleared, a confirmation message will appear.
That’s it! Your internet cache in Microsoft Edge Chromium has been successfully cleared. You can now enjoy a faster and more optimized browsing experience. Remember that clearing the cache will remove all stored data, so be aware of the potential impact on your browsing history and login information.
Clearing Internet Cache in Brave Browser
Brave Browser is a privacy-focused web browser that offers enhanced security features and built-in ad-blocking. If you are using Brave Browser and want to clear your internet cache, follow these steps:
- Open Brave Browser on your computer.
- Click on the three-line menu icon located at the top-right corner of the browser window.
- In the drop-down menu, hover over “History” and then click on “Clear browsing data.”
- A new window will appear with various options for what you want to clear.
- Ensure the checkbox next to “Cached images and files” is selected to clear the internet cache. You can also choose to clear other types of data, such as browsing history, cookies, and more.
- Choose the time range for which you want to clear the cache. You can select “Last hour,” “Last 24 hours,” “Last 7 days,” “Last 4 weeks,” or “All time.”
- Click on the “Clear data” button to start the cache clearing process.
- Brave Browser will now clear the cache. The time it takes will depend on the amount of data stored.
- Once the cache is cleared, a confirmation message will appear.
That’s it! You have successfully cleared the internet cache in Brave Browser. Your browsing experience should now be optimized, with up-to-date website data loading faster. Keep in mind that clearing the cache will remove any stored data, so consider the impact on your browsing history and login information.
Clearing Internet Cache in Vivaldi Browser
Vivaldi Browser is a feature-rich web browser that offers extensive customization options and advanced functionality. If you are using Vivaldi Browser and want to clear your internet cache, follow these steps:
- Open Vivaldi Browser on your computer.
- Click on the Vivaldi logo at the top-left corner of the browser window.
- In the drop-down menu, click on “Tools” and then on “Settings.”
- A new tab will open with the settings menu.
- In the left sidebar, click on “Privacy.”
- Scroll down to find the “Clear browsing data” section.
- Click on the “Clear browsing data” button.
- A new window will appear, giving you options for what you want to clear.
- Ensure the checkbox next to “Cached images and files” is selected to clear the internet cache.
- You can also choose to clear other types of data, such as browsing history, cookies, and more.
- Choose the time range for which you want to clear the cache. You can select “Last hour,” “Last 24 hours,” “Last 7 days,” “Last 4 weeks,” or “All time.”
- Click on the “Clear browsing data” button to start the cache clearing process.
- Vivaldi Browser will now clear the cache. The time it takes will depend on the amount of data stored.
- Once the cache is cleared, a confirmation message will appear.
That’s it! You have successfully cleared the internet cache in Vivaldi Browser. Your browsing experience should now be optimized, with up-to-date website data loading faster. Keep in mind that clearing the cache will remove any stored data, so consider the impact on your browsing history and login information.
Clearing Internet Cache in Safari (iOS)
If you are using Safari on your iOS device and want to clear your internet cache, follow these steps:
- Open the “Settings” app on your iOS device.
- Scroll down and tap on “Safari.”
- In the Safari settings, scroll down to find the “Clear History and Website Data” option.
- Tapping on this option will prompt a confirmation message. Tap “Clear History and Data” to proceed.
- Safari will now clear the cache and browsing history. The time it takes will depend on the amount of data stored.
- Once the cache is cleared, you will not receive a confirmation message, but the cache will be cleared.
That’s it! You have successfully cleared the internet cache in Safari on your iOS device. Your browsing experience should now be optimized, with up-to-date website data loading faster. Keep in mind that clearing the cache will remove any stored data, so consider the impact on your browsing history and login information.
Clearing Internet Cache in Chrome (Android)
If you are using Chrome on your Android device and want to clear your internet cache, follow these steps:
- Open the Chrome app on your Android device.
- Tap on the three-dot menu icon located at the top-right corner of the browser window.
- In the drop-down menu, tap on “Settings.”
- In the settings menu, scroll down and tap on “Privacy.”
- Under the “Privacy” section, tap on “Clear browsing data.”
- A new window will appear, giving you options for what you want to clear.
- Ensure the checkbox next to “Cached images and files” is selected to clear the internet cache.
- You can also choose to clear other types of data, such as browsing history, cookies, and more.
- Select the time range for which you want to clear the cache. You can choose from “Last hour,” “Last 24 hours,” “Last 7 days,” “Last 4 weeks,” or “All time.”
- Tap on the “Clear data” button to start the cache clearing process.
- Chrome will now clear the cache. The time it takes will depend on the amount of data stored.
- Once the cache is cleared, a confirmation message will appear.
That’s it! You have successfully cleared the internet cache in Chrome on your Android device. Your browsing experience should now be optimized, with up-to-date website data loading faster. Keep in mind that clearing the cache will remove any stored data, so consider the impact on your browsing history and login information.
Clearing Internet Cache in Firefox (Android)
If you are using Firefox on your Android device and want to clear your internet cache, follow these steps:
- Open the Firefox app on your Android device.
- Tap on the three-dot menu icon located at the top-right corner of the browser window.
- In the drop-down menu, tap on “Settings.”
- In the settings menu, scroll down and tap on “Clear Private Data.”
- A new window will appear, giving you options for what you want to clear.
- Ensure the checkbox next to “Cache” is selected to clear the internet cache.
- You can also choose to clear other types of data, such as browsing history, cookies, and more.
- Select the time range for which you want to clear the cache. You can choose from “Last hour,” “Last 2 hours,” “Last 4 hours,” “Today,” or “Everything.”
- Tap on the “Clear Data” button to start the cache clearing process.
- Firefox will now clear the cache. The time it takes will depend on the amount of data stored.
- Once the cache is cleared, a confirmation message will appear.
That’s it! You have successfully cleared the internet cache in Firefox on your Android device. Your browsing experience should now be optimized, with up-to-date website data loading faster. Keep in mind that clearing the cache will remove any stored data, so consider the impact on your browsing history and login information.
Clearing Internet Cache in Samsung Internet Browser
If you are using the Samsung Internet Browser on your Android device and want to clear your internet cache, follow these steps:
- Open the Samsung Internet Browser app on your Android device.
- Tap on the three-dot menu icon located at the bottom-right corner of the browser window.
- In the pop-up menu, tap on “Settings.”
- In the settings menu, scroll down and tap on “Privacy and security.”
- Scroll down to find the “Privacy” section.
- Tap on “Delete browsing data.”
- A new window will appear, giving you options for what you want to clear.
- Ensure the checkbox next to “Cache” is selected to clear the internet cache.
- You can also choose to clear other types of data, such as browsing history, cookies, and more.
- Tap on the “Delete” button to start the cache clearing process.
- The Samsung Internet Browser will now clear the cache. The time it takes will depend on the amount of data stored.
- Once the cache is cleared, a confirmation message will appear.
That’s it! You have successfully cleared the internet cache in the Samsung Internet Browser on your Android device. Your browsing experience should now be optimized, with up-to-date website data loading faster. Keep in mind that clearing the cache will remove any stored data, so consider the impact on your browsing history and login information.
Clearing Internet Cache in UC Browser
If you are using UC Browser on your Android device and want to clear your internet cache, follow these steps:
- Open the UC Browser app on your Android device.
- Tap on the three-horizontal lines icon located at the bottom-right corner of the browser window.
- In the pop-up menu, tap on “Tools.”
- In the Tools menu, tap on “Clear Records.”
- A new window will appear, giving you options for what you want to clear.
- Ensure the checkbox next to “Cache” is selected to clear the internet cache.
- You can also choose to clear other types of data, such as browsing history, cookies, and more.
- Tap on the “Clear” button at the bottom to start the cache clearing process.
- UC Browser will now clear the cache. The time it takes will depend on the amount of data stored.
- Once the cache is cleared, a confirmation message will appear.
That’s it! You have successfully cleared the internet cache in UC Browser on your Android device. Your browsing experience should now be optimized, with up-to-date website data loading faster. Keep in mind that clearing the cache will remove any stored data, so consider the impact on your browsing history and login information.