
What is DNS Cache?
DNS stands for Domain Name System, which is essentially the phone book of the internet. When you enter a website URL into your browser, such as www.example.com, your device needs to translate that human-readable name into a machine-readable IP address to establish a connection.
In order to improve efficiency and speed up the browsing experience, DNS caching is used. DNS caching involves storing previously accessed domain names and their corresponding IP addresses on your computer or network router for a certain amount of time. This means that when you revisit a website, your device doesn’t have to perform a fresh DNS lookup; instead, it can retrieve the information from the cache.
The DNS cache works as a temporary storage facility, storing the IP address for faster retrieval in the future. It allows your computer to remember the IP addresses of websites you have recently visited without having to request them again from the DNS server. This caching mechanism helps to reduce network traffic and decrease the time it takes to load web pages, making your browsing experience more efficient.
The DNS cache exists at multiple levels. From the local computer level to the internet service provider (ISP) level, different systems and devices maintain their own caches. This allows for quicker access to frequently visited websites and reduces the load on DNS servers.
However, there are situations where it becomes necessary to flush or clear the DNS cache. This is especially true when there are DNS-related issues, such as incorrect or outdated IP address information for a particular website. Clearing the DNS cache can help to resolve these issues and ensure that your device retrieves the most up-to-date information from the DNS server when accessing websites.
Now that you have a basic understanding of DNS cache, let’s explore how to flush and clear the DNS cache in Windows.
Why Clear DNS Cache?
Clearing the DNS cache on your Windows computer can be beneficial in a number of situations. Let’s take a look at a few reasons why you might want to clear your DNS cache:
- Resolving DNS-related issues: Sometimes, you may encounter problems accessing certain websites or experiencing slow internet speeds. In these cases, clearing the DNS cache can help resolve DNS-related issues. By flushing the cache and obtaining fresh DNS records, you can eliminate any potential conflicts or errors that might be causing the problem.
- Updating DNS information: DNS cache stores IP addresses and domain name mappings. If a website’s IP address has changed recently, your computer may still be holding onto the old information. By clearing the DNS cache, you force your computer to fetch the latest DNS records, ensuring that you are accessing the most up-to-date version of the website.
- Fixing website loading errors: At times, you may encounter errors like “DNS_PROBE_FINISHED_NXDOMAIN” or “ERR_CONNECTION_REFUSED” when trying to visit a website. These errors can be caused by outdated or corrupted DNS cache entries. Clearing the DNS cache can help in resolving such errors by refreshing the cache and fetching the correct IP address information for the website.
- Securing your online activities: DNS cache poisoning or DNS spoofing attacks can compromise your online security by redirecting your requests to malicious websites. By regularly clearing the DNS cache, you minimize the risk of falling victim to such attacks, as your computer will fetch fresh DNS records from reputable servers.
- Troubleshooting network connectivity: If you are experiencing network connectivity issues, clearing the DNS cache can be a useful troubleshooting step. It allows your computer to establish fresh connections with DNS servers, helping to eliminate potential conflicts or misconfigurations that might be causing the problem.
Overall, clearing the DNS cache can help ensure a smoother and more reliable internet browsing experience. It allows your computer to fetch the latest DNS information and resolves DNS-related issues that may be impacting your online activities.
How to Flush DNS Cache in Windows?
Flushing the DNS cache in Windows can be done using various methods. Here are three common methods to flush the DNS cache:
- Method 1: Using Command Prompt
- Method 2: Using Windows PowerShell
- Method 3: Using Windows Network Adapter Settings
1. Press the Windows key + R to open the Run dialog box.
2. Type cmd and press Enter to open the Command Prompt.
3. In the Command Prompt, type ipconfig /flushdns and press Enter.
4. Wait for the command to execute successfully, and you’ll see a confirmation message.
1. Press the Windows key + X and select Windows PowerShell (Admin) to open PowerShell with administrative rights.
2. In the PowerShell window, type Clear-DnsClientCache and press Enter.
3. Wait for the command to complete, and you’ll see a confirmation message.
1. Right-click on the Start button and select Network Connections.
2. In the Network Connections window, right-click on your active network adapter and select Properties.
3. Scroll down and select Internet Protocol Version 4 (TCP/IPv4).
4. Click on the Properties button.
5. In the IPv4 Properties window, click on Advanced.
6. Go to the DNS tab and click on Clear to clear the DNS cache.
7. Click OK on all open windows to save the changes.
Choose the method that suits you best and flush the DNS cache to ensure that your computer obtains fresh DNS records for improved browsing performance and to resolve any DNS-related issues that you may be experiencing.
Method 1: Using Command Prompt
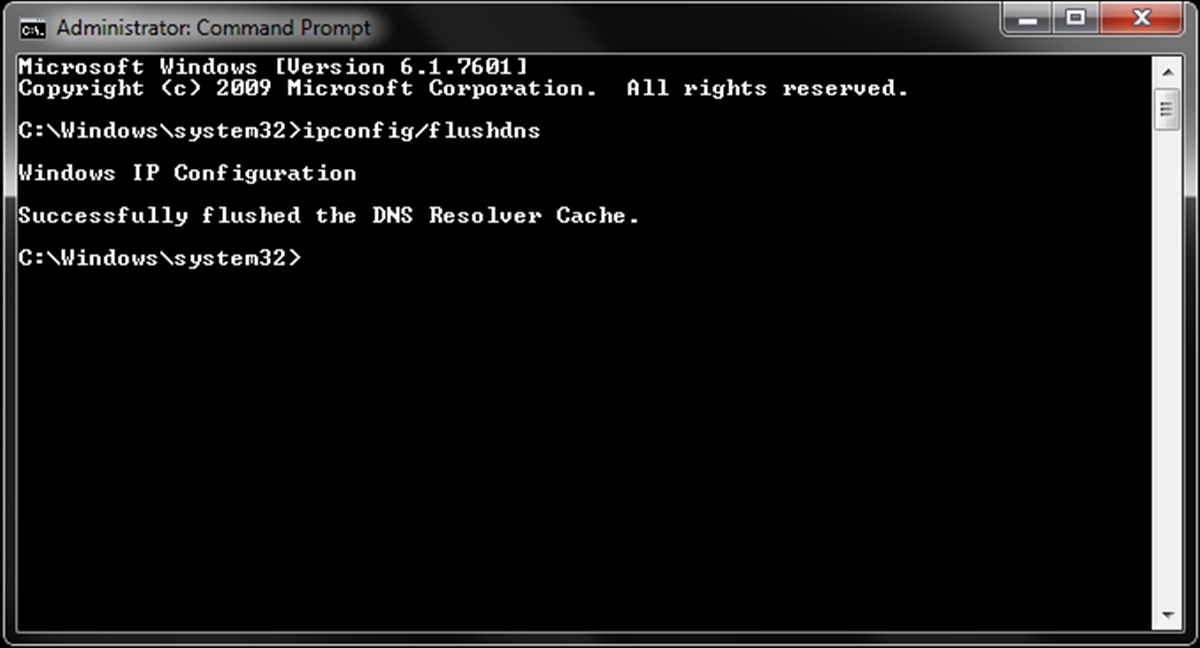
One of the simplest and quickest ways to flush the DNS cache in Windows is by using the Command Prompt. Here’s a step-by-step guide:
- Press the Windows key + R to open the Run dialog box.
- Type cmd and press Enter to open the Command Prompt.
- In the Command Prompt window, type the following command:
ipconfig /flushdns
- Press Enter to execute the command.
- Wait for the command to complete the flushing process. Once completed, you will see a confirmation message that the DNS Resolver Cache has been successfully flushed.
The “ipconfig /flushdns” command instructs your computer to clear the DNS cache, effectively removing any stored DNS records. By doing this, your computer will start with a fresh cache and fetch the latest DNS information when accessing websites.
Keep in mind that flushing the DNS cache does not permanently disable caching. The cache will start accumulating new DNS records as you visit websites. This process helps improve browsing speed by reducing the time taken to resolve domain names to IP addresses.
Flushing the DNS cache using the Command Prompt is a simple yet powerful method to fix issues related to outdated or incorrect DNS information. It can help in resolving DNS-related problems such as slow browsing, difficulty accessing certain websites, or being unable to connect to the internet.
Now that you know how to flush the DNS cache using the Command Prompt, you can easily refresh the DNS records on your Windows computer and enjoy a faster and more reliable browsing experience.
Method 2: Using Windows PowerShell
Another effective method to flush the DNS cache in Windows is by using Windows PowerShell. Here’s a step-by-step guide:
- Press the Windows key + X on your keyboard.
- From the menu that appears, select Windows PowerShell (Admin). This will open PowerShell with administrative privileges.
- In the PowerShell window, type the following command:
Clear-DnsClientCache
- Press Enter to execute the command.
- Wait for the command to complete the process of clearing the DNS cache. Once finished, you will see a confirmation message that the DNS client cache has been successfully cleared.
The “Clear-DnsClientCache” command instructs Windows PowerShell to clear the DNS client cache, effectively removing any cached DNS records. By doing this, your computer will fetch fresh DNS records from the DNS server when accessing websites, ensuring that you are using the most up-to-date information.
Windows PowerShell offers a powerful command-line interface that can be used to perform various administrative tasks. Flushing the DNS cache using PowerShell is particularly useful for those who prefer working with command-line tools or need to automate the process.
Flushing the DNS cache using Windows PowerShell can help resolve DNS-related issues such as slow browsing, connectivity problems, or difficulty accessing certain websites. It ensures that your computer obtains the most recent and accurate DNS information, providing a smoother and more reliable browsing experience.
Now that you know how to flush the DNS cache using Windows PowerShell, you can easily refresh the DNS records on your Windows computer and resolve any DNS-related issues you may encounter.
Method 3: Using Windows Network Adapter Settings
Another method to flush the DNS cache in Windows is by using the Network Adapter Settings. Here’s how you can do it:
- Right-click on the Start button and select Network Connections.
- In the Network Connections window, locate and right-click on your active network adapter (e.g., Wi-Fi or Ethernet), then select Properties.
- In the Properties window, scroll down and find Internet Protocol Version 4 (TCP/IPv4). Select it and click on the Properties button below.
- In the Internet Protocol Version 4 (TCP/IPv4) Properties window, click on the Advanced button.
- Switch to the DNS tab.
- In the DNS tab, you will find the DNS server addresses that your computer is currently using. Click on the Clear button to clear the DNS cache.
- Click OK on all open windows to save the changes.
By following these steps, you can clear the DNS cache by manually removing the DNS server addresses stored in the network adapter settings. This ensures that your computer fetches fresh DNS records from the DNS server when accessing websites, leading to accurate and up-to-date information.
Clearing the DNS cache using Windows Network Adapter Settings is a straightforward process and can be useful in situations where you want to refresh the DNS information without using the command-line interface.
This method allows you to selectively clear the DNS cache for a specific network adapter, making it suitable for situations where you have multiple network connections on your computer.
Remember to perform this procedure on the active network adapter that you are currently using to connect to the internet. If you have multiple network adapters or network connections, you may need to repeat these steps for each one.
Now that you know how to flush the DNS cache using Windows Network Adapter Settings, you can easily clear the DNS cache and ensure that your computer retrieves fresh DNS records for optimal browsing performance.
How to Clear DNS Cache in Windows?
In addition to flushing the DNS cache, there may be instances where you need to clear the DNS cache for specific web browsers. Here are methods to clear the DNS cache in popular web browsers:
- Method 1: Clearing DNS Cache in Internet Explorer
- Method 2: Clearing DNS Cache in Chrome
- Method 3: Clearing DNS Cache in Mozilla Firefox
- Method 4: Clearing DNS Cache in Microsoft Edge
- Method 5: Clearing DNS Cache in Safari
- Method 6: Clearing DNS Cache in Opera
1. Open Internet Explorer.
2. Click on the Tools icon (gear icon) in the top-right corner of the browser.
3. Select Internet Options from the drop-down menu.
4. In the Internet Options window, go to the General tab.
5. Under the Browsing history section, click on the Delete… button.
6. Check the box next to Temporary Internet files and website files.
7. Click on the Delete button to clear the DNS cache.
1. Open Google Chrome.
2. Click on the three-dot menu icon in the top-right corner of the browser.
3. Select Settings from the drop-down menu.
4. Scroll down and click on Advanced to expand the settings.
5. Under the Privacy and security section, click on Clear browsing data.
6. Choose the time range for which you want to clear the data (e.g., past hour, past day, all time).
7. Check the box next to Cached images and files.
8. Click on the Clear data button to clear the DNS cache.
1. Open Mozilla Firefox.
2. Click on the three-line menu icon in the top-right corner of the browser.
3. Select Options.
4. In the left-hand menu, click on Privacy & Security.
5. Under the Cookies and Site Data section, click on the Clear Data… button.
6. Check the box next to Cached Web Content.
7. Click on the Clear button to clear the DNS cache.
1. Open Microsoft Edge.
2. Click on the three-dot menu icon in the top-right corner of the browser.
3. Select Settings from the drop-down menu.
4. Under the Clear browsing data section, click on Choose what to clear.
5. Check the box next to Cookies and saved website data and Cached data and files.
6. Click on the Clear button to clear the DNS cache.
1. Open Safari.
2. In the top menu, click on Safari.
3. Select Preferences from the drop-down menu.
4. Go to the Advanced tab.
5. Check the box next to Show Develop menu in menu bar.
6. In the top menu, click on the Develop option.
7. Select Empty Caches to clear the DNS cache.
1. Open Opera.
2. Click on the three-line menu icon in the top-left corner of the browser.
3. Select Settings from the drop-down menu.
4. In the left-hand menu, click on Advanced.
5. Under the Privacy and security section, click on Clear browsing data.
6. Choose the time range for which you want to clear the data (e.g., past hour, past day, all time).
7. Check the box next to Cached images and files.
8. Click on the Clear data button to clear the DNS cache.
By following these methods, you can clear the DNS cache in popular web browsers such as Internet Explorer, Chrome, Firefox, Microsoft Edge, Safari, and Opera. Clearing the DNS cache for web browsers ensures that your computer retrieves fresh DNS records when accessing websites, resolving any potential caching-related issues.
Now that you know how to clear the DNS cache on your Windows computer and in different web browsers, you can ensure a smoother and more reliable browsing experience by eliminating any outdated or incorrect DNS information.
Method 1: Clearing DNS Cache in Internet Explorer
If you are using Internet Explorer as your web browser, you can easily clear the DNS cache by following these steps:
- Open Internet Explorer.
- Click on the Tools icon (gear icon) located in the top-right corner of the browser window.
- From the drop-down menu, select Internet Options.
- In the Internet Options window, navigate to the General tab.
- Under the Browsing history section, click on the Delete… button.
- A new window will appear, displaying multiple options for clearing browsing data. Check the box next to Temporary Internet files and website files.
- If desired, you can select other options as well, such as clearing cookies or history.
- Click on the Delete button to initiate the clearing process.
- Wait for the process to complete. Once finished, you will receive a confirmation message indicating that the DNS cache has been successfully cleared.
By following these steps, you effectively clear the DNS cache in Internet Explorer. Clearing the cache removes any stored DNS records, ensuring that your computer fetches fresh DNS information when accessing websites.
Clearing the DNS cache in Internet Explorer can be helpful if you are experiencing issues like incorrect or outdated IP addresses for specific websites, slow browsing speeds, or difficulties accessing certain webpages. Clearing the cache allows your computer to obtain the most up-to-date DNS records, helping to resolve these problems.
Keep in mind that clearing the DNS cache in Internet Explorer only affects the cache of that specific browser. Other browsers and applications may still have their own DNS cache, requiring separate clearing procedures if needed.
Now that you know how to clear the DNS cache in Internet Explorer, you can easily ensure that your browser fetches the latest DNS information, resulting in a smoother and more efficient browsing experience.
Method 2: Clearing DNS Cache in Chrome
If you are using Google Chrome as your web browser, clearing the DNS cache is a simple process. Follow these steps to clear the DNS cache in Chrome:
- Open Google Chrome on your computer.
- Click on the three-dot menu icon located in the top-right corner of the browser window.
- From the drop-down menu, select Settings.
- Scroll down and click on Advanced to expand the settings options.
- Under the Privacy and security section, click on Clear browsing data.
- A window will appear with various options for clearing browsing data. Choose the time range for which you want to clear the data, such as the past hour, day, week, or all time.
- Check the box next to Cached images and files. You can also select other options if desired.
- Click on the Clear data button to initiate the clearing process.
- Wait for the process to complete. Once finished, you will receive a confirmation message indicating that the DNS cache has been successfully cleared.
By following these steps, you will successfully clear the DNS cache in Chrome. The clearing process removes any cached DNS records, ensuring that when you access websites, your computer fetches fresh DNS information.
Clearing the DNS cache in Chrome can be beneficial in various situations. If you encounter issues like slow browsing speeds, difficulties accessing certain websites, or incorrect IP addresses for specific pages, clearing the DNS cache can help resolve these problems. It allows Chrome to obtain the most up-to-date DNS records, resolving any caching-related issues.
Remember that clearing the DNS cache in Chrome only affects the cache of that particular browser. Other browsers and applications may have their own separate DNS caches that require individual clearing procedures, if needed.
Now that you know how to clear the DNS cache in Chrome, you can easily ensure that your browser retrieves the latest DNS information, improving your browsing experience and resolving any potential DNS-related issues.
Method 3: Clearing DNS Cache in Mozilla Firefox
If you are using Mozilla Firefox as your web browser, you can easily clear the DNS cache within the browser settings. Follow these steps to clear the DNS cache in Firefox:
- Open Mozilla Firefox on your computer.
- Click on the three-line menu icon located in the top-right corner of the browser window.
- From the drop-down menu, select Options.
- In the left-hand menu, click on Privacy & Security.
- Under the Cookies and Site Data section, click on the Clear Data… button.
- A window will appear, displaying the types of data that can be cleared. Check the box next to Cached Web Content.
- If desired, you can select other options as well, such as clearing cookies or history.
- Click on the Clear button to initiate the clearing process.
- Wait for the process to complete. Once finished, you will receive a confirmation message indicating that the DNS cache has been successfully cleared.
By following these steps, you can effectively clear the DNS cache in Mozilla Firefox. Clearing the cache removes any stored DNS records, ensuring that your computer fetches fresh DNS information when accessing websites.
Clearing the DNS cache in Mozilla Firefox can be useful if you encounter issues like slow browsing speeds, difficulties accessing certain websites, or incorrect IP addresses for specific pages. Clearing the cache allows Firefox to obtain the most up-to-date DNS records, resolving any caching-related problems.
Keep in mind that clearing the DNS cache in Firefox only affects the cache of that specific browser. Other browsers and applications may still have their own DNS caches, requiring separate clearing procedures if needed.
Now that you know how to clear the DNS cache in Mozilla Firefox, you can easily ensure that your browser fetches the latest DNS information, resulting in a smoother and more efficient browsing experience.
Method 4: Clearing DNS Cache in Microsoft Edge
If you are using Microsoft Edge as your web browser, you can easily clear the DNS cache within the browser settings. Follow these steps to clear the DNS cache in Microsoft Edge:
- Open Microsoft Edge on your computer.
- Click on the three-dot menu icon located in the top-right corner of the browser window.
- From the drop-down menu, select Settings.
- Scroll down and under the Clear browsing data section, click on Choose what to clear.
- Check the box next to Cookies and saved website data and Cached data and files.
- You can also select other options to clear, such as browsing history or form data, if desired.
- Click on the Clear button to initiate the clearing process.
- Wait for the process to complete. Once finished, you will receive a confirmation message indicating that the DNS cache has been successfully cleared.
By following these steps, you can effectively clear the DNS cache in Microsoft Edge. Clearing the cache removes any stored DNS records, ensuring that your computer fetches fresh DNS information when accessing websites.
Clearing the DNS cache in Microsoft Edge can be beneficial if you encounter issues like slow browsing speeds, difficulties accessing certain websites, or incorrect IP addresses for specific pages. Clearing the cache allows Edge to obtain the most up-to-date DNS records, resolving any caching-related problems.
Remember that clearing the DNS cache in Microsoft Edge only affects the cache of that specific browser. Other browsers and applications may still have their own DNS caches, requiring separate clearing procedures if needed.
Now that you know how to clear the DNS cache in Microsoft Edge, you can easily ensure that your browser fetches the latest DNS information, resulting in a smoother and more efficient browsing experience.
Method 5: Clearing DNS Cache in Safari
If you are using Safari as your web browser on macOS, clearing the DNS cache is a straightforward process. Follow these steps to clear the DNS cache in Safari:
- Open Safari on your Mac.
- In the top menu, click on Safari.
- Select Preferences from the drop-down menu.
- A new window will appear. Go to the Advanced tab.
- Check the box next to Show Develop menu in menu bar.
- In the top menu, click on the Develop option.
- From the drop-down menu, select Empty Caches.
By following these steps, you can successfully clear the DNS cache in Safari. The process of emptying the caches removes any stored DNS records, ensuring that when you access websites, your computer fetches fresh DNS information.
Clearing the DNS cache in Safari can be beneficial if you are experiencing issues like slow browsing speeds, difficulties accessing certain websites, or encountering incorrect IP addresses for specific pages. Clearing the cache allows Safari to obtain the most up-to-date DNS records, resolving any caching-related problems.
It’s important to note that clearing the DNS cache in Safari only affects the cache of that specific browser. Other browsers and applications may have their own separate DNS caches that require individual clearing procedures, if needed.
Now that you know how to clear the DNS cache in Safari, you can easily ensure that your browser retrieves the latest DNS information, improving your browsing experience and resolving any potential DNS-related issues.
Method 6: Clearing DNS Cache in Opera
If you are using Opera as your web browser, you can easily clear the DNS cache within the browser settings. Follow these steps to clear the DNS cache in Opera:
- Open Opera on your computer.
- Click on the three-line menu icon located in the top-left corner of the browser window.
- From the drop-down menu, select Settings.
- In the left-hand menu, click on Advanced.
- Under the Privacy and security section, click on Clear browsing data.
- A window will appear, offering various options for clearing browsing data. Choose the time range for which you want to clear the data, such as the past hour, day, week, or all time.
- Check the box next to Cached images and files. You can also select other options if desired.
- Click on the Clear data button to initiate the clearing process.
- Wait for the process to complete. Once finished, you will receive a confirmation message indicating that the DNS cache has been successfully cleared.
By following these steps, you can effectively clear the DNS cache in Opera. Clearing the cache removes any stored DNS records, ensuring that your computer fetches fresh DNS information when accessing websites.
Clearing the DNS cache in Opera can be beneficial if you encounter issues like slow browsing speeds, difficulties accessing certain websites, or incorrect IP addresses for specific pages. Clearing the cache allows Opera to obtain the most up-to-date DNS records, resolving any caching-related problems.
Remember that clearing the DNS cache in Opera only affects the cache of that specific browser. Other browsers and applications may still have their own DNS caches, requiring separate clearing procedures if needed.
Now that you know how to clear the DNS cache in Opera, you can easily ensure that your browser fetches the latest DNS information, resulting in a smoother and more efficient browsing experience.