
Reasons to Uninstall Malwarebytes
Malwarebytes is a popular antivirus program known for its powerful malware detection and removal capabilities. However, there are several reasons why you may consider uninstalling Malwarebytes from your computer.
Firstly, conflicting antivirus software can cause system instability. If you have another antivirus program installed on your computer, running Malwarebytes alongside it could lead to conflicts. These conflicts can result in system slowdowns, crashes, or other issues that can hinder your computer’s performance.
Secondly, Malwarebytes can consume system resources. While it performs regular scans and real-time protection, it may use a significant amount of CPU and memory resources, especially on older machines. If you notice that Malwarebytes is slowing down your computer or causing high CPU usage, you may want to uninstall it to free up system resources.
Thirdly, you may have found an alternative antivirus solution that better suits your needs. There are a plethora of antivirus programs available, each with its unique features and levels of protection. If you decide to switch to a different antivirus software that you find more effective or user-friendly, uninstalling Malwarebytes may be necessary.
Furthermore, if you have encountered any compatibility issues with Malwarebytes and other software on your computer, it might be necessary to uninstall it. Some programs may not work correctly or may conflict with Malwarebytes, resulting in errors or crashes. In such cases, removing Malwarebytes can help resolve the compatibility issues.
Lastly, if you no longer require the advanced features provided by Malwarebytes or if you simply prefer a different security software, uninstalling it can save you valuable disk space and reduce clutter on your computer.
It is important to note that these reasons to uninstall Malwarebytes may not apply to every user. If you are satisfied with Malwarebytes’ performance and it meets all your requirements, there may be no need to remove it. However, if you do decide to uninstall Malwarebytes, the following sections will guide you through the uninstallation process on different operating systems.
How to Uninstall Malwarebytes on Windows
If you’re using Malwarebytes on a Windows computer and you no longer need the program or want to switch to a different antivirus software, you can easily uninstall Malwarebytes using the following steps:
Step 1: Close Malwarebytes and Disable Protection
Before uninstalling Malwarebytes, make sure to close the program and disable its real-time protection. Right-click on the Malwarebytes icon in the system tray and select “Quit Malwarebytes.”
Step 2: Uninstall Malwarebytes from the Control Panel
Next, open the Control Panel by searching for it in the Start menu or using the Windows key + X shortcut and selecting “Control Panel.” In the Control Panel, go to “Programs” or “Programs and Features” (depending on your version of Windows) and locate “Malwarebytes” in the list of installed programs. Right-click on it and select “Uninstall” or “Uninstall/Change.”
Step 3: Remove Malwarebytes Folder and Registry Entries
After the uninstallation process is complete, it’s recommended to manually remove any remaining Malwarebytes files and registry entries to ensure a clean uninstall. There are two methods to do this:
Method 1: Using the Malwarebytes Support Tool
Malwarebytes provides a support tool that can help remove any leftover files or registry entries. You can download the tool from the official Malwarebytes website and run it after the regular uninstallation process.
Method 2: Manual Removal of Malwarebytes Files and Folders
If you prefer to remove the files and folders manually, navigate to the following locations (depending on your Windows version) and delete any Malwarebytes-related files or folders:
- C:\Program Files\Malwarebytes
- C:\ProgramData\Malwarebytes
- C:\Users\YourUsername\AppData\Local\Malwarebytes
Additionally, you can search the Windows Registry for any Malwarebytes entries and remove them. Be cautious when modifying the Windows Registry, as any incorrect changes can cause system issues.
Step 4: Clean Up Malwarebytes from Browser Extensions
If you have installed the Malwarebytes browser extension, it’s recommended to remove it from your web browsers. Open each of your installed browsers, go to the extensions or add-ons settings, and disable or remove the Malwarebytes extension.
Step 5: Restart Your Computer
Once you have completed the uninstallation and cleanup processes, restart your computer to ensure all changes take effect.
By following these steps, you should be able to successfully uninstall Malwarebytes from your Windows computer. Remember to install another antivirus program or enable Windows Defender to ensure ongoing protection against malware.
Step 1: Close Malwarebytes and Disable Protection
Before uninstalling Malwarebytes from your Windows computer, it’s important to ensure that the program is closed and its real-time protection is disabled. This step will prevent any conflicts or interruptions during the uninstallation process.
Follow these simple steps to close Malwarebytes and disable its protection:
- Locate the Malwarebytes icon in the system tray at the bottom-right corner of your screen. The icon is in the shape of a white “M” on a blue background.
- Right-click on the Malwarebytes icon to open a context menu.
- In the context menu, select the “Quit Malwarebytes” option. This will close the program and stop it from running in the background.
Once you have successfully closed Malwarebytes, you need to disable its real-time protection. Follow these additional steps:
- Right-click on the Malwarebytes icon once again.
- In the context menu, hover over the “Protection” option.
- In the expanded submenu, click on the “Enable Protection” toggle to disable it. When the toggle shows as grayed out, it means that the real-time protection is turned off.
By closing Malwarebytes and disabling its protection, you ensure that the program is not actively scanning or protecting your system during the uninstallation process. It also prevents any potential conflicts with other antivirus or security software that might be installed on your computer.
Remember that disabling Malwarebytes’ protection is a temporary measure and should only be done when uninstalling the program. It’s important to have reliable antivirus software or Windows Defender enabled to ensure continued protection against malware and other threats.
Now that you’ve successfully closed Malwarebytes and disabled its protection, you can proceed to the next step of the uninstallation process.
Step 2: Uninstall Malwarebytes from the Control Panel
After closing Malwarebytes and disabling its protection, you can proceed with uninstalling the program from the Control Panel. The Control Panel is a built-in Windows tool that allows you to manage installed programs on your computer.
Follow these steps to uninstall Malwarebytes from the Control Panel:
- Click on the Start button on your Windows taskbar or press the Windows key on your keyboard to open the Start menu.
- Type “Control Panel” in the search bar and select the Control Panel app from the search results. Alternatively, you can press the Windows key + X on your keyboard and choose “Control Panel” from the menu.
- In the Control Panel window, click on the “Programs” category. If you are using the classic view, skip this step.
- Click on the “Uninstall a program” link or “Programs and Features” option, depending on your Windows version. This will open a list of installed programs on your computer.
- Scroll through the list of installed programs and locate “Malwarebytes.”
- Right-click on “Malwarebytes” and select “Uninstall” or “Uninstall/Change.” Alternatively, you can click on “Malwarebytes” and then click on the “Uninstall” button at the top of the list.
- Follow the on-screen prompts to complete the uninstallation process. You may be asked for confirmation or additional information during the process.
Once the uninstallation process is complete, Malwarebytes will be removed from your computer. It’s important to note that the uninstallation process may take a few moments, depending on your system’s speed and the size of the program.
If you encounter any issues during the uninstallation process, such as an error or incomplete removal, you can try a few troubleshooting steps. Firstly, you can restart your computer and attempt the uninstallation process again. Additionally, you can try using the official Malwarebytes Support Tool, which is designed to resolve common issues with the program’s installation and removal.
Now that you’ve successfully uninstalled Malwarebytes from the Control Panel, you can proceed to the next step of the uninstallation process, which involves removing any remaining Malwarebytes files and registry entries.
Step 3: Remove Malwarebytes Folder and Registry Entries
After uninstalling Malwarebytes from the Control Panel, it is recommended to manually remove any remaining Malwarebytes files and registry entries. This step ensures a clean uninstallation and helps eliminate any potential remnants or conflicts that may interfere with your computer’s performance.
There are two methods you can use to remove the Malwarebytes folder and registry entries: using the Malwarebytes Support Tool or performing a manual removal.
Method 1: Using the Malwarebytes Support Tool
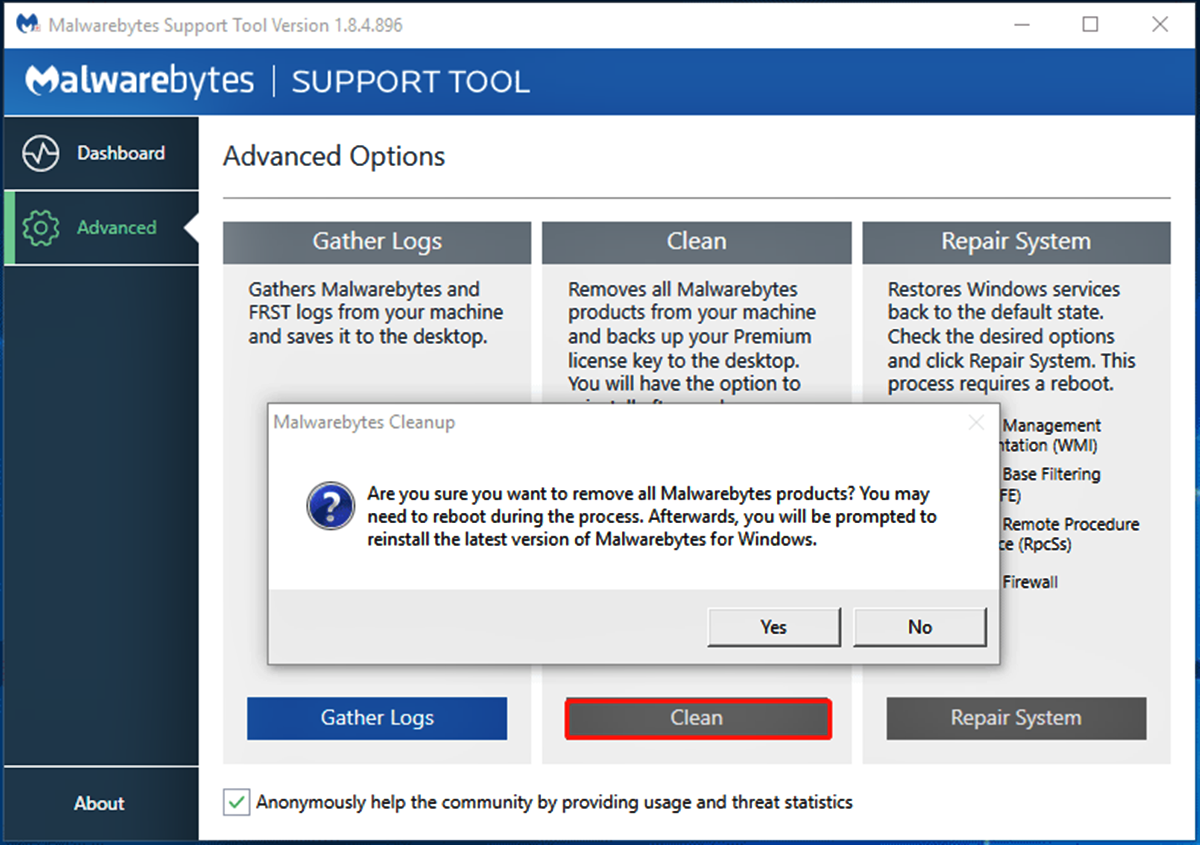
The Malwarebytes Support Tool is a dedicated utility provided by Malwarebytes to handle common issues with the program, including the complete removal of the software. Here are the steps to remove the Malwarebytes folder and registry entries using this tool:
- Visit the official Malwarebytes website and download the Support Tool.
- Once downloaded, run the Support Tool executable file.
- The Support Tool will open, and you will be presented with several options.
- Click on the “Advanced” tab.
- Under the “Cleanup” section, click on the “Clean” button.
- The Support Tool will initiate the cleanup process, removing any remaining Malwarebytes files and registry entries.
- Once the cleanup process is complete, you can close the Support Tool.
Method 2: Manual Removal of Malwarebytes Files and Folders
If you prefer to manually remove the Malwarebytes files and folders, follow these steps:
- Open File Explorer by pressing the Windows key + E.
- Navigate to the following locations depending on your Windows version:
- C:\Program Files\Malwarebytes
- C:\ProgramData\Malwarebytes
- C:\Users\YourUsername\AppData\Local\Malwarebytes
- Delete any remaining Malwarebytes files and folders in these locations.
- Be cautious when modifying the Windows Registry: Deleting the wrong entries can cause system instability. Proceed with caution and make sure to back up your registry before making any changes.
- Press the Windows key + R, type “regedit” in the Run dialogue, and press Enter to open the Windows Registry Editor.
- Navigate to the following registry key: HKEY_CURRENT_USER\Software
- Delete the “Malwarebytes” folder if it exists.
- Navigate to the following registry key: HKEY_LOCAL_MACHINE\Software
- Delete the “Malwarebytes” folder if it exists.
- Close the Windows Registry Editor.
By removing any remaining Malwarebytes files and registry entries, you ensure a thorough uninstallation of the program. This step helps maintain system stability and prevents any potential conflicts with other software or future Malwarebytes installations.
Now that you have successfully removed the Malwarebytes folder and registry entries, you can proceed to clean up any Malwarebytes browser extensions in the next step.
Method 1: Using the Malwarebytes Support Tool
If you have uninstalled Malwarebytes from your computer but still notice leftover files or registry entries, you can use the Malwarebytes Support Tool to ensure a thorough removal. The Support Tool is a dedicated utility provided by Malwarebytes to handle common issues, including the complete cleanup of the software.
Follow these steps to use the Malwarebytes Support Tool:
- Visit the official Malwarebytes website and navigate to the Support section.
- Download the Malwarebytes Support Tool from the website. Make sure to download the latest version compatible with your operating system.
- Once the file is downloaded, locate it on your computer and double-click to run the Support Tool executable.
- The Support Tool will launch and display the End User License Agreement (EULA). Read through the agreement and click on the “Agree and Continue” button to proceed.
- In the next window, the Support Tool will present you with several options. Ensure that the box next to “Cleanup” is checked. This option allows the tool to remove any remaining files and registry entries associated with Malwarebytes.
- Click on the “Next” button to initiate the cleanup process. The Support Tool will begin scanning your system for any traces of Malwarebytes.
- Once the scanning process is complete, the Support Tool will display a summary of the detected items. Review the summary to ensure that it includes the files and registry entries you want to remove. If everything looks accurate, click on the “Next” button to proceed.
- The Support Tool will now start removing the leftover files and registry entries from Malwarebytes. This may take some time, depending on the size of the files and the speed of your computer.
- Once the cleanup process is finished, you will see a confirmation message indicating that the cleanup was successful. Click on the “Finish” button to exit the Support Tool.
Using the Malwarebytes Support Tool ensures a comprehensive removal of any remaining files and registry entries associated with Malwarebytes. This method is recommended if you want to ensure a clean uninstallation and avoid any potential conflicts or issues that might arise from partial removal.
After using the Malwarebytes Support Tool, it is advisable to restart your computer to allow the changes to take effect. Once you have restarted, you can proceed with other antivirus software or install a different security solution to continue protecting your computer against threats.
Now that you’ve successfully used the Malwarebytes Support Tool to remove any leftover traces of the software, you can consider the uninstallation process complete.
Method 2: Manual Removal of Malwarebytes Files and Folders
If you prefer to remove the remaining Malwarebytes files and folders manually, you can follow these steps to ensure a thorough uninstallation:
- Open File Explorer by pressing the Windows key + E on your keyboard.
- Navigate to the following locations depending on your Windows version:
C:\Program Files\MalwarebytesC:\ProgramData\MalwarebytesC:\Users\YourUsername\AppData\Local\Malwarebytes
- In each location, look for any folders or files that are related to Malwarebytes.
- Select the files and folders you want to remove by either right-clicking on them and choosing “Delete” or by pressing the “Delete” key on your keyboard.
- If prompted for confirmation, click “Yes” to confirm the removal of the selected files and folders.
Be cautious when removing files and folders, as deleting the wrong items could impact the functionality of other programs or your operating system.
In addition to removing files and folders, it’s also recommended to check the Windows Registry for any remaining Malwarebytes entries and remove them as well. However, it’s crucial to exercise caution when modifying the Windows Registry, as any incorrect changes can lead to system instability. Here’s how to proceed:
- Press the Windows key + R on your keyboard to open the Run dialog box.
- Type
regeditin the Run dialog and press Enter. - The Windows Registry Editor will open. Before making any changes, it’s advisable to back up your registry. To do this, click on “File” in the menu bar and select “Export.” Choose a location to save the backup file and give it a descriptive name.
- In the Registry Editor, navigate to the following key:
HKEY_CURRENT_USER\Software - Look for a folder named “Malwarebytes.” If you find it, right-click on it and select “Delete” to remove it from the registry.
- Navigate to the following key:
HKEY_LOCAL_MACHINE\Software - Search for the “Malwarebytes” folder and delete it if it’s present.
- After removing any relevant entries, close the Registry Editor.
It’s important to note that editing the Windows Registry is a sensitive operation. If you are unsure about making manual changes or have concerns about impacting other applications, it’s advisable to seek assistance from an experienced professional.
By following these steps to manually remove Malwarebytes files, folders, and registry entries, you can ensure a thorough uninstallation of the program. Once completed, you can proceed with installing another antivirus software or continue using an alternative security solution to protect your computer against threats.
With the manual removal process accomplished, the uninstallation of Malwarebytes is complete.
Step 4: Clean Up Malwarebytes from Browser Extensions
After uninstalling Malwarebytes from your computer, it’s important to clean up any browser extensions associated with the program. Malwarebytes may have installed browser extensions to provide additional security features or enhance browsing protection. Removing these extensions ensures a complete removal of Malwarebytes from your web browsers.
Follow these steps to clean up Malwarebytes from your browser extensions:
- Open each of your installed web browsers (e.g., Google Chrome, Mozilla Firefox, Microsoft Edge).
- In the browser’s menu, look for the “Extensions” or “Add-ons” option. It is usually located in the settings or preferences menu.
- Click on the “Extensions” or “Add-ons” option to access the list of installed extensions.
- Scroll through the list and look for any Malwarebytes-related extensions. They may be named “Malwarebytes,” “MBAM,” or something similar.
- To remove an extension, click on the “Remove” or “Trash” icon next to the extension’s name.
- Confirm the removal by clicking “Remove” or “Uninstall” on the confirmation prompt, if prompted.
- Repeat these steps for each web browser you have installed on your computer.
Removing Malwarebytes browser extensions ensures that no traces of the program remain in your web browsers. This step is essential to avoid any potential conflicts or compatibility issues with other security extensions or future installations of Malwarebytes.
It’s worth noting that the exact steps to remove extensions may vary slightly depending on the web browser you are using. If you encounter any difficulties in finding or removing the Malwarebytes extension, refer to your browser’s documentation or support resources for specific instructions.
Once you have successfully cleaned up Malwarebytes from your browser extensions, you can proceed to the final step of the uninstallation process, which is to restart your computer.
Restarting your computer allows all the changes and removals to take effect, ensuring a clean and fresh start without any remnants of Malwarebytes.
Step 5: Restart Your Computer
After completing the uninstallation and cleanup processes for Malwarebytes, it is recommended to restart your computer. Restarting allows all the changes made during the uninstallation process to take effect, ensuring a clean and smooth system without any remnants or conflicts from Malwarebytes.
To restart your computer, follow these simple steps:
- Close any open programs or files you have on your computer.
- Click on the “Start” button in the bottom-left corner of your screen or press the Windows key on your keyboard.
- In the Start menu, click on the “Power” button.
- From the power options menu, select “Restart.”
Your computer will now begin the restart process. It may take a few moments for the system to shut down and then boot back up. Once the computer has restarted, the changes made during the uninstallation process will be fully implemented.
Restarting your computer is an essential step after uninstalling Malwarebytes, as it ensures that any remaining processes associated with the program are terminated. Additionally, it allows your computer to start fresh without any potential conflicts or remnants from Malwarebytes.
After the restart, you can proceed with using another antivirus program, enabling Windows Defender, or installing a different security solution to continue protecting your computer against malware and other threats.
By following all the steps outlined in this uninstallation guide and restarting your computer, you have successfully completed the process of uninstalling Malwarebytes from your system.
How to Uninstall Malwarebytes on Mac
If you’re using Malwarebytes on your Mac and you decide to uninstall the program for any reason, you can follow these steps to ensure a complete removal:
Step 1: Quit Malwarebytes and Disable Protection
Before uninstalling Malwarebytes, make sure to close the program and disable its real-time protection. To do this, click on the Malwarebytes icon in the menu bar at the top-right corner of your screen, and select “Quit Malwarebytes.”
Step 2: Uninstall Malwarebytes from the Applications Folder
- Open a new Finder window by clicking on the Finder icon in the dock or pressing Command + N on your keyboard.
- In the Finder sidebar, click on “Applications” to navigate to the Applications folder.
- Locate the Malwarebytes application in the Applications folder. You can identify it by its icon and name.
- Drag the Malwarebytes application to the Trash icon in your dock. Alternatively, you can right-click on the application and select “Move to Trash.”
Step 3: Remove Malwarebytes Files and Preferences
- While still in the Finder window, click on “Go” in the menu bar.
- Hold down the Option key on your keyboard to reveal the Library option.
- Click on “Library” to open the Library folder.
- In the Library folder, navigate to the following locations and delete any Malwarebytes-related files or folders:
~/Library/Application Support/Malwarebytes~/Library/Caches/com.malwarebytes.Malwarebytes~/Library/Preferences/com.malwarebytes.Malwarebytes.plist~/Library/Saved Application State/com.malwarebytes.Malwarebytes.savedState
Step 4: Restart Your Mac
After deleting all the necessary files and preferences, it is recommended to restart your Mac. Restarting allows all the changes to take effect and ensures a clean system without any remaining traces of Malwarebytes.
Once your Mac has restarted, you have successfully uninstalled Malwarebytes from your computer. You can now consider installing a different antivirus program or sticking with the built-in security features provided by macOS.
It’s worth mentioning that the steps described here apply to the current version of Malwarebytes at the time of writing. If you are using an older version, the steps might vary slightly. Ensure that you reference the official Malwarebytes documentation or support resources for specific instructions related to your version of the software.
Step 1: Quit Malwarebytes and Disable Protection
Before proceeding with the uninstallation of Malwarebytes on your Mac, it is important to quit the program and disable its real-time protection. This step ensures that Malwarebytes is fully stopped and not actively running during the removal process.
To quit Malwarebytes and disable its protection, follow these steps:
- Locate the Malwarebytes icon in the menu bar at the top-right corner of your screen. The icon is a small “M” inside a black circle.
- Click on the Malwarebytes icon to open the drop-down menu.
- In the drop-down menu, select the “Quit Malwarebytes” option. This will close the program and terminate its processes.
Once you have successfully quit Malwarebytes, you need to disable its real-time protection. Follow these additional steps:
- Click on the Malwarebytes icon once again to open the drop-down menu.
- In the menu, hover your cursor over the “Real-Time Protection” option.
- Click on the “Disable Protection” option in the expanded submenu. This will turn off real-time protection for Malwarebytes.
Disabling real-time protection is a temporary measure and should only be done during the uninstallation process. It is important to have reliable antivirus software or utilize other security features to ensure continued protection against malware on your Mac.
By quitting Malwarebytes and disabling its real-time protection, you ensure that the program is fully stopped and not interfering with the uninstallation process. This step helps prevent any potential conflicts or errors that may arise during the removal of Malwarebytes from your Mac.
Now that you have successfully quit Malwarebytes and disabled its protection, you can proceed to the next step of the uninstallation process, which involves removing the Malwarebytes application from the Applications folder.
Step 2: Uninstall Malwarebytes from Applications Folder
Once you have quit Malwarebytes and disabled its protection, you can proceed with uninstalling the program from the Applications folder on your Mac. The Applications folder contains all the installed applications on your system, and removing Malwarebytes from this location ensures a complete removal of the software.
Follow these steps to uninstall Malwarebytes from the Applications folder:
- Open a new Finder window by clicking on the Finder icon in the dock or pressing Command + N on your keyboard.
- In the Finder sidebar, click on “Applications.” This will navigate you to the Applications folder.
- Scroll through the list of applications and locate “Malwarebytes.”
- Click on the Malwarebytes application to select it.
- Drag the Malwarebytes application to the Trash icon in your dock. Alternatively, you can right-click on the Malwarebytes application and select “Move to Trash” from the context menu.
- If prompted, enter your administrator password to confirm the move to the Trash. This is required as uninstalling applications requires administrator privileges.
By moving Malwarebytes to the Trash, you have successfully uninstalled the application from your Mac. However, this step alone does not remove all associated files and preferences.
Next, you will proceed to the next step to remove any remaining Malwarebytes files and preferences from your system.
It’s important to note that uninstalling Malwarebytes from the Applications folder removes the main application but may not eliminate all associated files and folders. To ensure a thorough uninstallation, you need to remove additional files and preferences in the subsequent steps.
Now that you have uninstalled Malwarebytes from the Applications folder, you can move on to Step 3, which involves removing any remaining Malwarebytes files and preferences from your Mac.
Step 3: Remove Malwarebytes Files and Preferences
After uninstalling Malwarebytes from the Applications folder, you should proceed with removing any remaining files and preferences associated with the program. Although you have deleted the main application, there might still be certain files and preferences scattered across your Mac. Eliminating these remnants ensures a clean and thorough removal of Malwarebytes.
To remove Malwarebytes files and preferences, follow these steps:
- Open a Finder window by clicking on the Finder icon in the dock or pressing Command + N on your keyboard.
- Click on the “Go” menu in the menu bar at the top of the screen.
- While in the Go menu, hold down the Option (⌥) key on your keyboard to reveal the “Library” option.
- Click on “Library” to access the Library folder. Note that this Library folder is distinct from the user’s personal Library folder.
- In the Library folder, navigate to and delete the following Malwarebytes-related files and folders:
~/Library/Application Support/Malwarebytes~/Library/Caches/com.malwarebytes.Malwarebytes~/Library/Preferences/com.malwarebytes.Malwarebytes.plist~/Library/Saved Application State/com.malwarebytes.Malwarebytes.savedState
Deleting these files and folders ensures that any remaining remnants of Malwarebytes are completely removed from your Mac.
It’s important to note that the tilde (~) symbol represents your home directory. By adding “/Library” to the path after the tilde, you will navigate to the specific Library folder for your user account.
By removing the Malwarebytes files and preferences from your Mac, you ensure a clean uninstallation of the program. Now, you can proceed with Step 4, which involves cleaning up any Malwarebytes browser extensions.
How to Uninstall Malwarebytes on Android
If you have Malwarebytes installed on your Android device and you want to uninstall it, you can follow these steps to remove the app:
Step 1: Open Settings and Navigate to Apps & Notifications
- Open the Settings app on your Android device. You can usually find it by tapping on the gear-shaped icon in the app drawer or by swiping down from the top of the screen and tapping on the gear icon in the notification panel.
- In the Settings menu, scroll down and find the “Apps” or “Apps & Notifications” option. The naming may vary depending on your device.
- Tap on “Apps” or “Apps & Notifications” to proceed.
Step 2: Find Malwarebytes in the List of Installed Apps
- In the Apps or Apps & Notifications menu, you will see a list of all the apps installed on your Android device.
- Scroll through the list and search for “Malwarebytes.”
Step 3: Uninstall Malwarebytes from Your Android Device
- Tap on “Malwarebytes” to open the app’s settings.
- In the app settings, you will see options such as “Open,” “Force Stop,” and “Uninstall.”
- Tap on the “Uninstall” button to uninstall Malwarebytes from your Android device.
- You may be prompted to confirm the uninstallation. Tap “OK” or “Uninstall” to proceed.
Step 4: Restart Your Android Device
After uninstalling Malwarebytes, it is recommended to restart your Android device. Restarting ensures that any residual files or processes related to Malwarebytes are fully cleared from your device’s memory.
Once your Android device has restarted, you have successfully uninstalled Malwarebytes. You can consider installing an alternative antivirus or security app if desired.
If you wish to re-install Malwarebytes or if you encounter any issues during the uninstallation process, you can visit the Google Play Store and search for “Malwarebytes.” From there, you can reinstall the app if needed.
It’s important to note that the steps provided here are general instructions and may vary slightly depending on your Android device’s version and manufacturer’s custom interface. Ensure that you adapt the steps accordingly based on your device’s specific settings and options.
Step 1: Open Settings and Navigate to Apps & Notifications
To uninstall Malwarebytes from your Android device, you need to navigate to the Apps & Notifications settings. This allows you to manage and uninstall applications on your device. Follow these steps to access the necessary settings:
- Unlock your Android device and tap on the App Drawer icon, typically located on the home screen or at the bottom of the screen.
- Scroll through the list of apps until you find the “Settings” app, which is represented by a gear-shaped icon.
- Tap on the “Settings” app to open the system settings of your Android device.
- In the Settings menu, scroll down to find the “Apps” or “Apps & Notifications” option. The exact wording may vary depending on your Android version or device manufacturer.
- Tap on “Apps” or “Apps & Notifications” to enter the application management section.
By following these steps, you will have successfully opened the Settings menu and accessed the Apps & Notifications section on your Android device.
Please note that the appearance and layout of the Settings menu may vary slightly depending on your Android device’s manufacturer and operating system version. If you cannot find the “Apps” or “Apps & Notifications” option in the main Settings menu, look for other related options like “Applications” or “Application Manager” instead.
Now that you have reached the Apps & Notifications settings, you can proceed to the next step of finding the Malwarebytes app in the list of installed applications.
Step 2: Find Malwarebytes in the List of Installed Apps
Once you have accessed the Apps & Notifications settings on your Android device, the next step is to locate Malwarebytes in the list of installed apps. This allows you to access the specific settings and options for Malwarebytes, including the uninstallation option. Follow these steps to find Malwarebytes:
- In the Apps & Notifications settings, you will see a list of all the apps installed on your Android device.
- Scroll through the list to find “Malwarebytes.”
Depending on the length of the list and the alphabetical order of the apps, you may need to scroll up or down to locate Malwarebytes. Alternatively, you can use the search bar at the top of the screen to quickly search for “Malwarebytes.”
If you are having trouble finding Malwarebytes, you can look for its icon, which typically features the Malwarebytes logo. Keep in mind that the appearance and layout of the list of installed apps may vary depending on your Android device’s manufacturer and operating system version.
Once you have located Malwarebytes in the list of installed apps, you are ready to proceed to the next step, which involves uninstalling the app from your Android device.
It’s important to note that uninstalling Malwarebytes will remove the app and its associated data from your device. If you intend to reinstall it or use an alternative antivirus app, make sure to have a reliable replacement option prepared.
Now that you have successfully found Malwarebytes in the list of installed apps, continue to Step 3, where you will learn how to uninstall it from your Android device.
Step 3: Uninstall Malwarebytes from Your Android Device
Once you have located Malwarebytes in the list of installed apps on your Android device, the next step is to uninstall the application. Follow these steps to remove Malwarebytes from your device:
- Tap on the Malwarebytes app to open its settings.
- Within the app settings, you will see several options such as “Open,” “Force Stop,” and “Uninstall.”
- Tap on the “Uninstall” button to initiate the uninstallation process.
- You may be prompted to confirm the uninstallation. Tap “OK” or “Uninstall” to proceed.
Android will then begin the uninstallation process, removing Malwarebytes from your device. The time it takes to complete the uninstallation may vary depending on your device’s performance and the size of the application.
After the process is complete, you will receive a confirmation message indicating that Malwarebytes has been successfully uninstalled from your Android device.
It’s important to note that the availability and functionality of the uninstallation process may vary depending on your specific device and Android version. If the above steps do not uninstall Malwarebytes as expected, consult your device’s user manual or the manufacturer’s support resources for further guidance.
Now that you have successfully uninstalled Malwarebytes from your Android device, you can proceed to the next step: restarting your device.
Restarting your Android device provides a clean start without any residual settings or processes from Malwarebytes. It ensures that any remaining traces of the app are cleared from your device’s memory.
Please note that uninstalling Malwarebytes permanently removes the app and its associated data from your Android device. If you intend to reinstall it or use a different antivirus app, make sure to have an alternative solution ready.
Now that you have completed the uninstallation process, you can move on to Step 4, which involves restarting your Android device.
Step 4: Restart Your Android Device
After successfully uninstalling Malwarebytes from your Android device, it is recommended to restart your device. Restarting your Android device ensures that any remaining background processes or system configurations related to Malwarebytes are fully cleared, providing a clean and refreshed state for your device.
To restart your Android device, follow these simple steps:
- Ensure that you have closed all open apps and saved any important work.
- Press and hold the power button on your device until a menu appears.
- In the menu, tap on the “Restart” or “Reboot” option. The exact wording may vary depending on your device model and Android version.
- Confirm the restart by tapping “OK” or “Restart” when prompted.
Your Android device will then initiate the restart process. The time it takes for the restart to complete may vary depending on your device’s performance.
Once your device has restarted, it will boot up with a fresh system state, free from any residual effects of the Malwarebytes app.
Restarting your Android device after uninstalling Malwarebytes ensures that any lingering background processes or cached data related to the app are cleared. It also helps to optimize the performance of your device and ensures a clean slate for the next set of apps and tasks you engage in.
Upon the completion of the restart, you can proceed to use your Android device as usual, or explore alternative antivirus solutions if desired.
It’s important to note that restarting your Android device is not mandatory, but it is recommended to ensure a clean and smooth experience after uninstalling Malwarebytes.
With the completion of Step 4, the process of uninstalling Malwarebytes from your Android device is now finalized.
How to Uninstall Malwarebytes on iPhone or iPad
If you have Malwarebytes installed on your iPhone or iPad and you wish to uninstall it, you can follow these steps to remove the application:
Step 1: Tap and Hold on the Malwarebytes App Icon
- Locate the Malwarebytes app icon on your iPhone or iPad’s home screen.
- Tap and hold your finger on the Malwarebytes app icon. After a moment, the icons on your screen will start to wiggle, and an “X” will appear in the top-left corner of the app icon.
Step 2: Tap on the “X” that Appears on the Top Left Corner
- Tap on the “X” icon that appears in the top-left corner of the Malwarebytes app icon. This will prompt a confirmation dialog.
- If prompted, read the information provided in the dialog to understand the consequences of uninstalling the app. Keep in mind that all data associated with the app will be deleted.
- Tap on the “Delete” or “Remove” option to confirm the uninstallation of Malwarebytes.
Step 3: Confirm the Uninstallation on the Popup
After confirming the uninstallation, another popup may appear asking for your confirmation to delete the app and its data. Tap on “Delete App” or “Delete from My iPhone/iPad” to finalize the removal of Malwarebytes.
Step 4: Restart Your iPhone or iPad
After the uninstallation process is complete, it is recommended to restart your iPhone or iPad. Restarting ensures that any lingering app-related processes are terminated, providing a clean start for your device.
Once your device has restarted, Malwarebytes will be completely uninstalled from your iPhone or iPad.
Please note that, unlike on Android devices, iOS does not store residual data after uninstalling an app. As a result, there is no need to manually remove any remaining files or preferences.
Now that you have successfully uninstalled Malwarebytes from your iPhone or iPad, you can consider installing an alternative antivirus or security app if desired.
It’s worth noting that the steps outlined here are general instructions that are compatible with most iPhone and iPad models. However, slight variations in the user interface and settings may exist depending on your specific device model and iOS version.
Step 1: Tap and Hold on the Malwarebytes App Icon
If you have decided to uninstall Malwarebytes from your iPhone or iPad, the first step is to tap and hold on the app icon to enter the uninstallation mode. Follow these steps to proceed:
- Locate the Malwarebytes app icon on your iPhone or iPad’s home screen. The icon might be located on the main screen or within a folder.
- Tap and hold your finger on the Malwarebytes app icon. After a moment, all the app icons on your screen will start to wiggle, and small “X” icons will appear on the top-left corner of each app.
- Continue holding your finger on the Malwarebytes app icon until you see the “X” appear.
Tapping and holding on the app icon triggers the removal mode, allowing you to uninstall the app from your device.
Please note that the exact appearance and behavior of the icons may vary depending on your iOS version and device model. The steps outlined here apply to most iPhone and iPad models, but there may be slight variations.
With the completion of Step 1, you can continue to Step 2, where you will learn how to proceed with the uninstallation process by tapping on the “X” icon that appears on the top-left corner of the Malwarebytes app icon.
Step 2: Tap on the “X” that Appears on the Top Left Corner
After initiating the uninstallation mode by tapping and holding on the Malwarebytes app icon, the next step is to tap on the “X” icon that appears on the top left corner of the app. Follow these steps to proceed with the uninstallation:
- While the app icons are still wiggling on your home screen, locate the Malwarebytes app icon.
- Find the small “X” icon that appears on the upper-left corner of the Malwarebytes app icon.
- Tap on the “X” icon to trigger the uninstallation confirmation dialog.
By tapping on the “X” icon, you will prompt a confirmation dialog that verifies your intent to uninstall the Malwarebytes app from your device.
It’s worth noting that the appearance of the “X” icon and the layout of the uninstallation dialog may vary slightly depending on your device’s iOS version and settings.
Once you tap on the “X” icon, you can proceed to Step 3, where you will confirm the uninstallation on the popup dialog that appears.
Please note that uninstalling the Malwarebytes app will permanently remove it from your iPhone or iPad, along with any associated data. Make sure to back up any important information before proceeding.
Step 3: Confirm the Uninstallation on the Popup
After tapping on the “X” icon to initiate the uninstallation of Malwarebytes from your iPhone or iPad, a popup dialog will appear to confirm your intent to uninstall the app. Follow these steps to proceed with the confirmation:
- On the confirmation popup dialog, read the information provided to understand the consequences of uninstalling the app. This includes a reminder that all app data associated with Malwarebytes will be deleted.
- Confirm your decision to uninstall Malwarebytes by tapping on the “Delete App” or “Delete from My iPhone/iPad” option.
The wording on the dialog may differ slightly depending on your device’s iOS version and the specific layout of the uninstallation confirmation dialog.
Tapping on the “Delete App” or “Delete from My iPhone/iPad” button will finalize the uninstallation process of Malwarebytes from your device. The app will be removed, along with any associated data, and you will no longer see it on your home screen or in the app library.
After confirming the uninstallation, iOS will start removing the app and its data from your device, which may take a few moments depending on the app’s size and the performance of your device.
Now that you have successfully confirmed the uninstallation on the popup dialog, you can proceed to Step 4, which involves restarting your iPhone or iPad.
Please note that the uninstallation process permanently removes Malwarebytes from your device, including all data associated with the app. If you wish to reinstall it or use an alternative antivirus solution, make sure to have a suitable replacement ready.
Step 4: Restart Your iPhone or iPad
After successfully uninstalling Malwarebytes from your iPhone or iPad, it is recommended to restart your device. Restarting allows your device’s operating system to refresh, ensuring that any residual processes or configurations related to Malwarebytes are completely cleared.
Follow these steps to restart your iPhone or iPad:
- Press and hold the power button located on the top or side of your device.
- After a few seconds, an on-screen slider will appear, prompting you to turn off your device.
- Drag the slider from left to right to power off your iPhone or iPad.
- Wait for a few seconds until the screen goes completely dark, indicating that your device is turned off.
- Press and hold the power button again until the Apple logo appears on the screen.
- Release the power button and wait for your device to restart.
Once your iPhone or iPad has restarted, any remaining processes associated with Malwarebytes will be terminated, providing a clean start for your device.
Restarting your device is not mandatory but recommended to ensure that your iPhone or iPad starts with a fresh state, free from any lingering effects of the Malwarebytes app. It also helps optimize the performance of your device and ensures smooth operation as you continue to use it.
With the completion of Step 4, you have successfully restarted your iPhone or iPad after uninstalling Malwarebytes. Your device is now ready for regular use or for installing an alternative antivirus or security solution if needed.