
Enable Private Browsing in Safari for iOS
Private browsing is a useful feature in Safari for iOS that allows you to browse the web without your browsing history or cookies being saved. It is particularly helpful when you want to keep your online activities private or share your device with someone else without leaving any traces. In this guide, we will walk you through the steps to enable private browsing in Safari for iOS.
Step 1: Open Safari
To begin, locate the Safari app on your iOS device’s home screen and tap to open it. Safari is the default web browser on iPhone, iPad, and iPod Touch.
Step 2: Tap on the Tab Switcher Icon
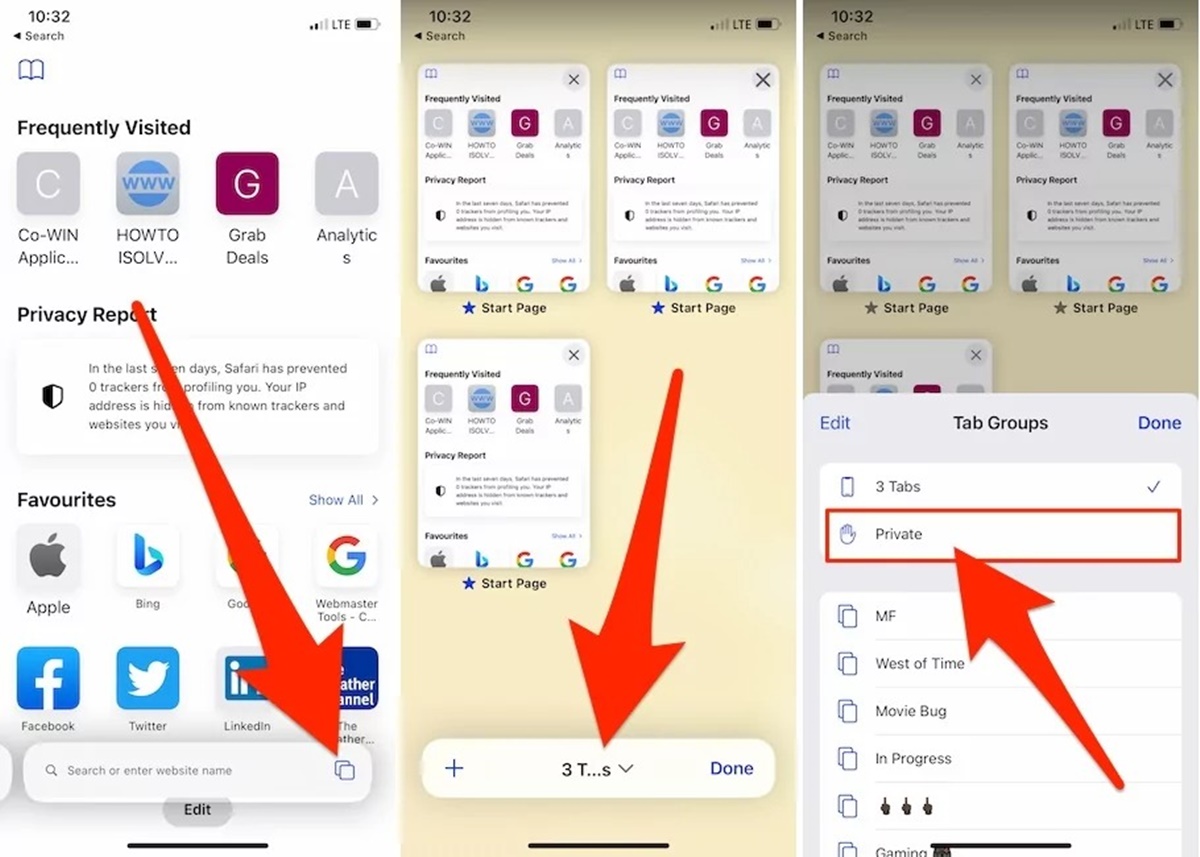
In the Safari app, you will find a series of tabs at the bottom of the screen. Tap on the tab switcher icon, which looks like two overlapping squares, to access the tab management interface.
Step 3: Look for the Private Button
In the tab management interface, you will see a row of buttons at the bottom. Look for the “Private” button, which is represented by a purple mask icon. Tap on it to enable private browsing mode.
Step 4: Tap on the Private Button
Once you tap on the “Private” button, Safari will display a prompt asking if you want to “Close All Tabs” or “Keep All Tabs.” This choice will determine whether your open tabs will be closed or saved when you switch to private browsing mode. Select the option that best suits your needs.
Step 5: Confirm Private Browsing Mode
After selecting to “Close All Tabs” or “Keep All Tabs,” Safari will confirm that you are now in private browsing mode. You can verify this by looking at the top of the screen, where Safari’s user interface will turn dark gray and display a “Private” label.
Step 6: Start Browsing in Private Mode
With private browsing mode enabled, you can now browse the web without your browsing history or cookies being saved. Any websites you visit, forms you fill out, or searches you perform while in private browsing mode will not be accessible in your browsing history.
Step 7: View Your Open Private Tabs
To access the tabs you have opened in private browsing mode, tap on the tab switcher icon again. You will see a separate section labeled “Private” that displays your open private tabs. From here, you can switch between tabs or open a new private tab.
Step 8: Close Private Browsing Mode
To exit private browsing mode, tap on the tab switcher icon and then tap on the “Private” button again. Safari will prompt you to “Close” or “Keep” your private tabs. Choose the option that suits your needs, and Safari will return to regular browsing mode.
With these easy steps, you can quickly enable private browsing in Safari for iOS and enjoy a more confidential browsing experience. It is important to note that while private browsing helps protect your privacy and keeps your activities hidden on your device, it does not provide complete anonymity. Other parties, such as your internet service provider or the websites you visit, may still have access to your online activities. To further enhance your privacy and security, consider using a virtual private network (VPN) in conjunction with private browsing.
Step 1: Open Safari
To enable private browsing in Safari for iOS, the first step is to locate and open the Safari app on your iOS device’s home screen. Safari is the default web browser on iPhone, iPad, and iPod Touch, and its icon usually features a compass-like design.
Once you have found the Safari app, tap on it to open the browser. This will launch Safari and direct you to its default homepage or the last website you visited.
Safari offers a seamless and user-friendly browsing experience, with a clean interface and easy-to-navigate features. Upon opening the app, you will notice the toolbar at the bottom of the screen, which comprises various icons and options that allow you to control your browsing activities.
By default, Safari’s homepage displays a search bar at the top, where you can enter website URLs or search terms. Below the search bar, there are additional tools such as the bookmark button, sharing options, and the tabs button.
It’s worth noting that you can customize the Safari browser settings according to your preferences. For instance, you can select your preferred search engine, set the homepage, and manage privacy and security settings. To access these settings, tap on the “Settings” icon on your iOS device’s home screen, scroll down to find “Safari,” and tap on it. From there, you can explore the different options available and tailor Safari to suit your needs.
Now that you have successfully opened Safari, you are ready to proceed to the next step and enable private browsing mode.
Step 2: Tap on the Tab Switcher Icon
After opening Safari on your iOS device, the next step to enable private browsing is to tap on the tab switcher icon. This icon is located at the bottom right corner of the Safari interface and is represented by two overlapping squares.
Tapping on the tab switcher icon will bring up the tab management interface, where you can view and navigate through your open tabs. The tab switcher feature in Safari allows you to have multiple websites open simultaneously, making it easy to switch between them with just a few taps.
When you tap on the tab switcher icon, Safari will display a grid of your open tabs, each represented by a thumbnail image of the website. You may see several tabs if you have been browsing multiple websites or if you left tabs from previous browsing sessions open.
In addition to the thumbnail images, the tab management interface also provides useful options for managing your tabs. You can swipe left or right to scroll through the tabs, allowing you to locate the tab you want to switch to quickly. Alternatively, you can swipe up on a tab to close it and remove it from the tab list.
It’s important to note that when you enable private browsing mode in Safari, it will not automatically close your existing tabs. Instead, you will have the option to either close all tabs or keep them open in private browsing mode. We will explore these options further in the upcoming steps.
Tapping on the tab switcher icon and accessing the tab management interface is a fundamental step to navigate through your open tabs and prepare for private browsing mode. Once you have mastered this step, you are ready to proceed to the next step and continue the process of enabling private browsing in Safari for iOS.
Step 3: Look for the Private Button
As you proceed to enable private browsing in Safari for iOS, the next step is to look for the “Private” button. This button allows you to switch to private browsing mode, where your browsing history and cookies are not saved.
Located at the bottom left corner of the tab management interface, the “Private” button is represented by a purple mask icon. It signifies the activation of private browsing mode in Safari.
To find the “Private” button, tap on the tab switcher icon to open the tab management interface. Once you’re on this interface, direct your attention to the buttons at the bottom of the screen. The “Private” button should be among this row of buttons.
When you locate the “Private” button, it’s important to proceed with caution. Activating private browsing mode will affect how Safari handles your browsing activities, such as disabling the saving of history and cookies. Take a moment to ensure that you are indeed ready to enter private browsing mode. If you’re unsure, you can continue browsing in regular mode and access private browsing later.
Private browsing mode can be particularly useful in scenarios where you want to keep your online activities private. It allows you to browse websites without leaving behind a trace of your visit, as the browser won’t remember the websites you’ve accessed or any information you’ve filled out.
After identifying the “Private” button, you’re now prepared to proceed to the next step, where you will activate private browsing mode and enjoy a more discreet browsing experience in Safari for iOS.
Step 4: Tap on the Private Button
Once you have located the “Private” button in Safari’s tab management interface, the next step to enable private browsing is to tap on the button itself. By doing so, you will activate private browsing mode and ensure that your browsing activities remain confidential.
When you tap on the “Private” button, Safari will present you with a prompt that gives you the option to either “Close All Tabs” or “Keep All Tabs.” This choice will determine the fate of any open tabs you currently have.
If you select “Close All Tabs,” Safari will close all of your open tabs and switch to private browsing mode. This means that when you exit private browsing mode, these tabs will not be restored. It’s important to take note of this option if you have important tabs open that you would like to review later.
On the other hand, if you choose to “Keep All Tabs,” Safari will preserve your open tabs, and they will be available to you when you switch back to regular browsing mode. This option can be useful if you want to continue working with the current tabs you have open and access them later without losing any information.
It’s essential to pay attention to the prompt and make the appropriate choice that aligns with your needs and preferences. Take a moment to consider your browsing session and any open tabs that you may want to preserve or close before proceeding.
By tapping on the “Private” button and confirming your preference to either close or keep your open tabs, you will successfully activate private browsing mode in Safari for iOS. This means that any actions you perform while browsing in this mode will not be saved, ensuring greater privacy and confidentiality for your online activities.
Now that you have entered private browsing mode, it’s time to explore the benefits and enjoy your discreet browsing experience. Let’s move on to the following steps and learn more about browsing securely in private mode.
Step 5: Confirm Private Browsing Mode
After tapping on the “Private” button in Safari’s tab management interface, you need to confirm that you have successfully entered private browsing mode. Safari will provide visual cues to indicate that you are browsing privately.
Upon activating private browsing mode, you will notice a change in the appearance of Safari’s user interface. The toolbar and other elements will turn dark gray, and a “Private” label will be displayed at the top of the screen.
The dark gray color scheme serves as a visual reminder that you are in private browsing mode and that Safari is not recording your browsing history or saving cookies. The “Private” label confirms that Safari has successfully transitioned into private browsing mode and that your online activities will remain private during your browsing session.
It’s important to keep in mind that while private browsing mode helps protect your privacy, it does not provide complete anonymity. It primarily ensures that your browsing history and cookies are not stored on your device. However, your internet service provider, websites you visit, or network administrators may still be able to track your online activities.
Private browsing mode is particularly beneficial when you are using a shared device or want to browse websites without leaving any traces. It allows you to maintain a certain level of confidentiality and prevent others who use the same device from accessing your browsing history or login credentials.
With the confirmation that you have successfully entered private browsing mode, you are now ready to explore the various benefits it offers. Continue to browse the web knowing that your online activities are not being stored, and enjoy a heightened sense of privacy during your browsing session.
As you continue using private browsing mode, you may want to take note of any particular websites or information that you need to access later. In the following steps, we will discuss how you can manage and view your open private tabs, as well as how to exit private browsing mode when you are finished.
Step 6: Start Browsing in Private Mode
With private browsing mode enabled in Safari for iOS, you can now start browsing the web knowing that your browsing history, cookies, and other data will not be saved. This allows you to enjoy a more discreet and private browsing experience, especially when you’re accessing sensitive information or using a shared device.
When you’re in private browsing mode, any websites you visit, forms you fill out, or searches you perform will not be accessible in your browsing history. This means that you can explore different websites or perform online activities without leaving any trace on your device.
Whether you’re shopping for a surprise gift, conducting research on a private topic, or accessing personal accounts, private browsing mode can help keep your activities confidential. It prevents your device from storing any data that can potentially be accessed by others or used for targeted advertising purposes.
While in private browsing mode, Safari functions much like regular browsing mode. You can still visit your favorite websites, read articles, watch videos, and interact with online content. The main difference is that Safari will not retain any record of your browsing session once you exit private browsing mode.
It’s important to note that private browsing mode does not provide complete anonymity. Although your browsing activities are not saved on your device, they may still be visible to your internet service provider, the websites you visit, or other entities monitoring your internet traffic.
Lastly, private browsing mode does not offer protection against viruses, malware, or other threats. Therefore, it is recommended to maintain your regular browsing habits of avoiding suspicious websites, installing security software, and practicing safe online behavior.
Now that you’re browsing in private mode, feel free to navigate the web and explore the content you desire without worrying about leaving any traces on your device. Enjoy the enhanced privacy and peace of mind that private browsing mode provides while you browse the internet.
In the next step, we will discuss how you can view the tabs you have opened in private browsing mode and manage them as needed.
Step 7: View Your Open Private Tabs
While browsing in private mode in Safari for iOS, you may open multiple tabs and visit various websites. To easily manage and switch between these open tabs, Safari offers a convenient feature that allows you to view and access your open private tabs.
To view your open private tabs, tap on the tab switcher icon once again. This icon is located at the bottom right corner of the Safari interface and is represented by two overlapping squares. Tapping on it will bring up the tab management interface.
Within the tab management interface, you will notice a section labeled “Private.” This section displays the list of tabs that you have opened during your current private browsing session. These tabs will be separate from your regular browsing tabs, making it easy to differentiate between private and non-private tabs.
Scroll horizontally within the tab management interface to view all your open private tabs. Each tab will be represented by a thumbnail image of the website, allowing you to visually identify and switch between tabs with ease.
Additionally, you can also interact with your private tabs just like you would with regular tabs. Swipe left or right to scroll through the tabs and tap on a thumbnail to switch to that particular website. You can also swipe up on a tab to close it and remove it from the list of open tabs.
This feature allows you to have multiple private tabs open simultaneously, giving you the flexibility to switch between different websites and keep your browsing session organized. It also ensures that you can quickly access and continue your browsing activities in private mode whenever you need to.
Remember that these private tabs will only be accessible while you are in private browsing mode. If you choose to exit private browsing mode or close Safari, your private tabs will no longer be available when you reopen the browser.
Now that you know how to view and manage your open private tabs, you can keep track of your browsing activities and easily switch between websites while maintaining your privacy. In the next step, we will discuss how to exit private browsing mode and return to regular browsing in Safari for iOS.
Step 8: Close Private Browsing Mode
When you’re ready to exit private browsing mode in Safari for iOS, it’s important to follow the correct steps to ensure that your browsing activities return to regular mode. Closing private browsing mode is simple and allows you to resume normal browsing with your browsing history and cookies being saved.
To close private browsing mode, begin by tapping on the tab switcher icon located at the bottom right corner of the Safari interface. This action will bring up the tab management interface, where you can view and navigate through your open tabs.
Within the tab management interface, locate the “Private” button at the bottom left corner. This button should be highlighted to indicate that it is currently active and in private browsing mode. Tap on the “Private” button to toggle it off and exit private browsing mode.
After tapping on the “Private” button, Safari will present you with a prompt asking if you want to “Close” or “Keep” your private tabs. Choose the option that aligns with your preferences and needs.
If you select “Close,” Safari will close all of your open private tabs and switch back to regular browsing mode. This means that once you re-open Safari, you will not have access to the websites you had opened in private browsing mode.
However, if you choose to “Keep” your private tabs, Safari will preserve them, and they will be available to you when you switch back to regular browsing mode. This option is useful if you want to continue working with the tabs you have open and access them later without losing any information.
After making your choice, Safari will exit private browsing mode and return to its regular browsing functionality. You will now be able to browse the web as usual, with your browsing history being saved and cookies stored for future use.
It’s important to note that closing private browsing mode does not delete or remove any trace of your previous browsing session in private mode. Therefore, if you want to ensure complete privacy and remove any temporary files or cookies created during your private browsing session, it’s a good practice to clear your browsing history and data from Safari’s settings.
By following these steps to close private browsing mode in Safari for iOS, you can seamlessly transition back to regular browsing and continue your online activities while benefiting from the privacy and convenience that private browsing mode provides.