
Why Would You Want to Turn Off Parental Controls on iPhone?
Parental controls on iPhone are a useful tool for protecting children and ensuring their safety in the digital world. These controls allow parents to set limits, monitor usage, and restrict access to certain content or features. However, there may be situations where you might need to turn off parental controls temporarily or permanently. Here are a few reasons why:
- Age-appropriate freedom: As children grow older, they naturally crave more independence and freedom. Turning off parental controls allows them to explore and use their iPhones without unnecessary restrictions, while still maintaining a level of responsible usage.
- Personal privacy: Parental controls often involve monitoring and tracking your child’s online activities. Once your child reaches a certain age or demonstrates responsible behavior, they may want their privacy protected and to have more control over their own device.
- School assignments and projects: Many educational apps and websites may be restricted by parental controls, limiting your child’s access to necessary resources for school assignments and projects. Temporarily disabling these controls can provide them with the tools they need to excel academically.
- Appropriate communication: Parental controls may restrict communication with certain contacts or through specific messaging platforms. As your child grows older and develops more responsible online behavior, you may want to allow them to expand their communication network and connect with friends or other trusted individuals.
- Exploring new interests: Parental controls often restrict access to certain apps, websites, or content categories. Turning off these controls allows your child to explore their interests and discover new hobbies or educational resources that may have been previously restricted.
- Trusted environment: There may come a time when you feel confident in your child’s ability to navigate the digital world responsibly. Turning off parental controls can symbolize trust and foster open communication between you and your child.
While parental controls are essential for maintaining a safe online environment for your child, there may be valid reasons to turn them off temporarily or permanently. It’s important to have open discussions with your child and establish clear guidelines for their device usage as they grow older and demonstrate responsible behavior.
How to Turn Off Content & Privacy Restrictions on iPhone
Content & Privacy Restrictions, also known as parental controls, allow you to manage and restrict certain features, apps, and content on your child’s iPhone. However, if the need arises to turn off these restrictions, you can easily do so. Here’s how:
- Open the Settings app on your iPhone and tap on “Screen Time.”
- Scroll down and select “Content & Privacy Restrictions.”
- If prompted, enter your Screen Time passcode.
- Tap on “Content & Privacy Restrictions” to access the settings.
- Scroll down to the “Allowed Apps” section and toggle off the switch next to each app you want to disable restrictions for.
- To completely turn off all restrictions, tap on “Content & Privacy Restrictions” at the top of the page.
- Enter your Screen Time passcode again.
- Toggle off the switch next to “Content & Privacy Restrictions”.
- You may be prompted to enter your Apple ID password to confirm the action.
- After performing these steps, parental controls will be disabled on your iPhone, and your child will have unrestricted access to all apps, content, and features.
It’s important to note that turning off Content & Privacy Restrictions should be done with careful consideration and only when it is appropriate for your child’s age and level of responsibility. Regular communication and establishing guidelines for device usage are crucial to maintaining a safe and healthy digital environment for your child.
How to Disable Screen Time on iPhone
Screen Time is a feature on iPhones that allows you to track and manage the amount of time spent on your device. If you no longer wish to use or have the need for Screen Time, you can easily disable it. Here’s how:
- Open the Settings app on your iPhone and tap on “Screen Time.”
- Scroll down and select “Turn Off Screen Time.”
- If prompted, enter your Screen Time passcode.
- A confirmation message will appear, informing you that turning off Screen Time will delete all of its data, including app usage history and limits set for individual apps.
- Tap on “Turn Off” to confirm and disable Screen Time.
- Your iPhone’s Screen Time feature will now be turned off, and you will no longer have access to its monitoring and management tools.
Disabling Screen Time can be useful if you feel that you no longer need this level of insight or control over your device usage. However, it’s important to note that Screen Time provides valuable information about your digital habits and can be a useful tool in managing screen time for yourself or your children.
If you disable Screen Time and later decide to re-enable it, simply follow these steps:
- Open the Settings app on your iPhone and tap on “Screen Time.”
- Tap on “Turn On Screen Time.”
- Set up a passcode if prompted, or enter your existing Screen Time passcode.
By following these steps, you can easily disable or re-enable Screen Time on your iPhone, depending on your specific needs and preferences.
How to Remove Parental Controls Passcode on iPhone
If you have forgotten the passcode for your parental controls on iPhone, you may need to remove it in order to regain unrestricted access to your device. Here’s how you can remove the parental controls passcode:
- Open the Settings app on your iPhone and tap on “Screen Time.”
- Scroll down and select “Change Screen Time Passcode.” If you haven’t set a passcode before, tap on “Forgot Passcode” instead.
- Enter your current passcode. If you have forgotten it, tap on “Forgot Passcode” and follow the prompts to reset your passcode. This will require you to authenticate with your Apple ID.
- After entering your passcode, tap on “Change Screen Time Passcode.”
- In the next screen, leave the enter passcode field blank and tap on “Change Passcode.”
- You will be prompted to confirm the removal of the passcode. Tap on “Remove Passcode” to proceed.
- You will now have successfully removed the parental controls passcode from your iPhone.
It’s important to note that removing the parental controls passcode will also remove any restrictions and limits that were set. If you wish to reapply parental controls, you will need to set up a new passcode and configure the restrictions as desired.
Remember to keep your passcode secure after removing the parental controls passcode to ensure the privacy and security of your device. Regularly reviewing and updating your settings can help you maintain a safe and healthy digital environment for yourself and your family.
How to Turn Off App Restrictions on iPhone
App restrictions on iPhone allow you to control access to certain apps, preventing them from being used or downloaded. However, there may be instances where you want to turn off these restrictions and allow unrestricted access to all apps on your device. Here’s how to do it:
- Open the Settings app on your iPhone and go to “Screen Time.”
- Tap on “Content & Privacy Restrictions” and enter your Screen Time passcode if prompted.
- Scroll down and select “Allowed Apps.”
- On the next screen, you will see a list of all installed apps on your iPhone.
- To turn off app restrictions and allow access to all apps, ensure that the switch next to “All Apps & Categories” is toggled on. If it is already on, then all apps are already allowed.
- If you have specific apps that are currently restricted and you want to allow access to them, toggle on the switch next to each individual app.
- Once you have made the necessary changes, you can exit the settings.
By following these steps, you can easily disable app restrictions on your iPhone and enable access to all apps. It’s important to note that turning off app restrictions means that there will be no restrictions on app usage, downloads, or in-app purchases. This can be useful if you find that the previously imposed restrictions are no longer necessary or if you want to grant someone else temporary unrestricted access to your device.
Remember to review and reassess your app restrictions periodically to ensure the appropriate level of control and safety for your device usage. Regular communication and open discussions about responsible app usage are essential for maintaining a healthy digital environment.
How to Disable Website Restrictions on iPhone
Website restrictions on iPhone allow you to block certain websites or set limits on the types of content that can be accessed. However, there may be instances where you want to disable these restrictions and have unrestricted access to all websites. Here’s how you can do it:
- Open the Settings app on your iPhone and go to “Screen Time.”
- Tap on “Content & Privacy Restrictions” and enter your Screen Time passcode if prompted.
- Scroll down and select “Content Restrictions.”
- Tap on “Web Content.”
- On the next screen, you will see the option to choose between “Limit Adult Websites” or “Allowed Websites Only.”
- To disable website restrictions completely and allow access to all websites, select “All Websites.”
- If you have specific websites that are currently restricted and you want to allow access to them, tap on “Add Website” and enter the URL of the website.
- Once you have made the necessary changes, you can exit the settings.
By following these steps, you can easily disable website restrictions on your iPhone and have unrestricted access to all websites. It’s important to note that disabling website restrictions means that there will be no limitations or filters on the type of content that can be accessed. This can be useful if you find that the previously imposed restrictions are no longer necessary or if you need temporary access to specific websites.
Remember to review and reassess your website restrictions periodically to ensure the appropriate level of control and safety for your browsing experience. Regular communication and open discussions about responsible internet usage are essential for maintaining a healthy and secure digital environment.
How to Stop Sharing Location with Parental Controls on iPhone
Location sharing is a feature of parental controls on iPhone that allows parents to track the location of their children. However, there may come a time when you want to stop sharing your location and have more privacy. Here’s how you can do it:
- Open the Settings app on your iPhone and go to “Screen Time.”
- Tap on “Content & Privacy Restrictions” and enter your Screen Time passcode if prompted.
- Scroll down and select “Location Services.”
- On the next screen, tap on “Share My Location.”
- Select “Never” to completely stop sharing your location.
- If you want to allow specific contacts to continue seeing your location, you can select “From” and choose the contacts you want to share your location with.
- Exit the settings after making the necessary changes.
By following these steps, you can easily stop sharing your location with parental controls on your iPhone. It’s important to note that disabling location sharing means that your parents or other trusted individuals will no longer be able to track your location using parental control features.
Remember to communicate your intentions with your parents or guardians if you decide to stop sharing your location. Open and honest conversations about privacy and trust are important for maintaining a healthy relationship and understanding each other’s boundaries.
If you ever decide to resume location sharing, simply follow the same steps and choose the appropriate options to enable location sharing with the desired contacts.
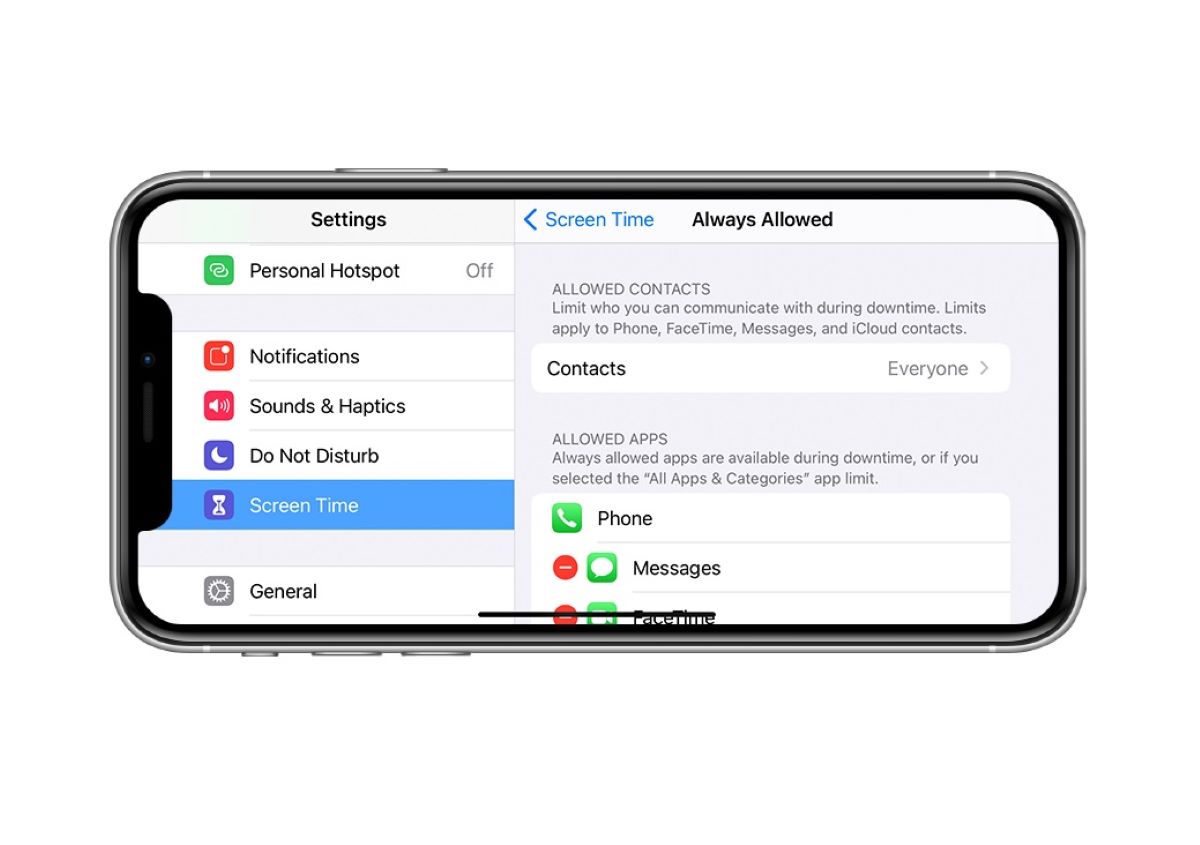
How to Lift Communication Limits on iPhone
Communication limits on iPhone allow parents to manage who their children can communicate with and through which platforms. However, as your child grows older and demonstrates responsible behavior, you may want to lift these communication limits and allow them to have more freedom in choosing their contacts. Here’s how you can do it:
- Open the Settings app on your iPhone and go to “Screen Time.”
- Tap on “Content & Privacy Restrictions” and enter your Screen Time passcode if prompted.
- Scroll down and select “Allowed Apps.”
- Tap on “Contacts” to access the communication limits settings.
- On the next screen, you will see the option to allow communication with “Everyone” or limit it to “Contacts Only.”
- Select “Everyone” to lift the communication limits.
- If you want to allow communication with specific contacts only, you can choose the “Contacts Only” option and select the desired contacts from your address book.
- Exit the settings after making the necessary changes.
By following these steps, you can easily lift communication limits on your iPhone and allow unrestricted communication. It’s important to note that lifting communication limits means that your child will have the freedom to communicate with anyone, including people outside their contacts list.
Remember to have open conversations with your child about responsible communication and online safety as you lift these limits. It’s important to guide them on making informed decisions regarding their contacts and ensuring that they understand the potential risks and consequences of communicating with unfamiliar individuals.
If you ever want to re-impose communication limits, simply follow the same steps and choose the appropriate options to limit communication to specific contacts or groups.
How to Disable App Store Restrictions on iPhone
App Store restrictions on iPhone allow parents to control and restrict the downloading and installation of apps. However, there may be times when you want to disable these restrictions and have unlimited access to the App Store. Here are the steps to disable App Store restrictions:
- Open the Settings app on your iPhone and go to “Screen Time.”
- Tap on “Content & Privacy Restrictions” and enter your Screen Time passcode if prompted.
- Scroll down and select “iTunes & App Store Purchases.”
- On the next screen, tap on “Installing Apps.”
- Select “Allow” to disable app installation restrictions.
- If you want to remove any age-based restrictions, tap on “App Limits & Allowed Apps” on the previous screen.
- Enter your Screen Time passcode again.
- Tap on “App Store” under the “Allowed Apps” section.
- Select “Allow” to enable full access to the App Store.
- You can now exit the settings.
By following these steps, you can easily disable App Store restrictions on your iPhone. It’s important to note that disabling these restrictions means that you have unrestricted access to download and install any app from the App Store, including those with age restrictions.
Remember to use your newfound freedom responsibly and be mindful of the apps you choose to download. Regularly reviewing and discussing app choices with your parents or guardians can help ensure a safe and enjoyable experience on your device.
If you ever want to re-impose App Store restrictions, simply follow the same steps and choose the appropriate options to limit app downloads, install age-restricted apps, or use app limits.
How to Allow Previously Restricted Apps on iPhone
App restrictions on iPhone allow you to control and limit access to specific apps on your device. However, there may come a time when you want to override these restrictions and allow access to previously restricted apps. Here’s how you can do it:
- Open the Settings app on your iPhone and go to “Screen Time.”
- Tap on “Content & Privacy Restrictions” and enter your Screen Time passcode if requested.
- Scroll down and select “Allowed Apps.”
- On the next screen, you’ll see a list of apps that were previously restricted.
- To allow a previously restricted app, simply toggle on the switch next to the app name.
- You can repeat this step for each app you want to allow.
- Once you have allowed all the previously restricted apps, you can exit the settings.
By following these steps, you can easily allow previously restricted apps on your iPhone. This can be helpful if you have reassessed the appropriateness of certain apps or if you want to grant access to apps that were previously restricted for other reasons.
Remember to regularly review the apps on your device and have open discussions with your parents or guardians about responsible app usage. Adjusting app restrictions as needed can help you strike the right balance between enjoying the benefits of technology and maintaining a safe and healthy digital environment.
If you ever want to re-impose restrictions on certain apps, simply follow the same steps and toggle off the switch next to the app name to remove it from the allowed apps list.
How to Remove Parental Control Software from iPhone
If you no longer require the use of parental control software on your iPhone, you may want to remove it from your device. Here are the steps to remove parental control software:
- Open the Settings app on your iPhone.
- Scroll down and tap on “General.”
- Scroll down again and select “Profiles.”
- You will see a list of installed profiles on your iPhone.
- Look for the profile associated with your parental control software. The name may vary depending on the specific software you are using.
- Tap on the profile to select it.
- On the next screen, you will see an option to remove the profile. Tap on “Remove Profile” or “Delete Profile.”
- If prompted, enter your iPhone passcode to confirm the removal.
- Follow any additional on-screen instructions to complete the removal process.
- The parental control software will now be removed from your iPhone.
By following these steps, you can easily remove parental control software from your iPhone. It’s important to note that removing the software may revoke any monitoring or restrictions put in place by the software. Make sure to discuss the removal with your parents or guardians and come to a mutual understanding about device usage and the responsible use of the internet.
If you ever decide to reinstall or use a different parental control software, you can follow the instructions provided by the software provider to set it up on your iPhone.
How to Reset iPhone to Remove Parental Controls
If you want to completely remove all parental controls and restrictions from your iPhone, you can do so by resetting your device. Here are the steps to reset your iPhone and remove parental controls:
- Before proceeding, make sure to backup any important data on your iPhone as resetting will erase all content and settings.
- Open the Settings app on your iPhone and go to “General.”
- Scroll down and tap on “Reset.”
- Select “Erase All Content and Settings.”
- If prompted, enter your passcode or Apple ID password to confirm the reset process.
- Read the warning message that appears, informing you that this action will erase all data from your iPhone and return it to its factory settings.
- If you have Find My iPhone enabled, you may be asked to enter your Apple ID password for security purposes before you can proceed with the reset.
- Tap on “Erase Now” to confirm the reset process. Your iPhone will be erased, and all content and settings will be removed.
- Your iPhone will restart and present the initial setup screen, indicating that the reset is complete.
- Follow the on-screen instructions to set up your iPhone as a new device.
By following these steps, you can reset your iPhone and remove all parental controls and restrictions that were previously in place. It’s important to note that resetting your iPhone will erase all data and settings, so it’s crucial to backup any important information before proceeding.
After the reset, you will have a fresh start and can set up your iPhone according to your preferences. Remember to establish clear guidelines for device usage and responsible internet usage to maintain a safe and healthy digital environment.