
Prepare Your iPhone
Before transferring your contacts from your iPhone to your Android device, there are a few steps you need to take to ensure a smooth transition. By following these steps, you can ensure that your contacts are properly synced and ready to be transferred.
1. Backup Your Contacts: It is always a good practice to back up your contacts before making any changes to your device. You can use iCloud or other backup services to create a backup of your contacts. This way, if anything goes wrong during the transfer process, you can easily restore your contacts.
2. Update Your iPhone: Make sure that your iPhone is running the latest version of iOS. Updating your device will not only ensure that you have the latest features and security enhancements, but it will also help in the smooth transfer of contacts.
3. Disable iMessage: If you are switching from an iPhone to an Android device, it is crucial to disable iMessage. iMessage is an iOS-exclusive messaging service, and if it is still active on your iPhone, you may experience issues receiving text messages on your new Android device. To disable iMessage, go to Settings > Messages and toggle off the iMessage option.
4. Remove iCloud Contacts Sync: If you have enabled iCloud contacts sync on your iPhone, it is recommended to turn it off before transferring to Android. This will prevent any conflicts or duplication of contacts during the transfer process. To disable iCloud contacts sync, go to Settings > [Your Name] > iCloud, and toggle off the Contacts option.
5. Gather Necessary Information: Before proceeding with the transfer, make sure you have all the necessary information handy. This may include your Apple ID and password, email accounts, and any other login credentials that may be needed during the transfer process.
By following these preparatory steps, you can ensure that your iPhone is ready for the contact transfer process. Now that you have prepared your iPhone, let’s move on to the next step of syncing your contacts with your Apple ID.
Sync Contacts with Apple ID
Syncing your contacts with your Apple ID is a convenient way to ensure that your contacts are securely stored and easily accessible across all your Apple devices. By syncing your contacts with your Apple ID, you can easily transfer them to your new Android device.
Here’s how you can sync your contacts with your Apple ID:
1. Open the “Settings” app on your iPhone and tap on your Apple ID at the top of the screen to access your Apple ID settings.
2. Scroll down and tap on “iCloud.”
3. Toggle on the “Contacts” option to enable contact syncing with your Apple ID. Your iPhone will now sync your contacts with your Apple ID in the iCloud.
4. If prompted, select the option to merge your existing contacts with the contacts stored in your iCloud. This will ensure that all your contacts are combined and synced with your Apple ID.
Once your contacts are synced with your Apple ID, they are securely stored in the iCloud and can be accessed from any device using the same Apple ID. Now, let’s proceed to the next step of exporting your contacts from your iPhone.
If you have multiple Apple devices, make sure that contact syncing is enabled on all of them to ensure that your contacts are up to date across all devices.
Please note that syncing your contacts with your Apple ID may take some time depending on the number of contacts you have. It is important to ensure that the sync process is complete before proceeding with the next steps of transferring your contacts to your Android device.
Export Contacts from iPhone
Once you have synced your contacts with your Apple ID, the next step is to export them from your iPhone in a format that is compatible with your Android device. There are different methods you can use to export your contacts from your iPhone.
Here are some common methods to export contacts from your iPhone:
1. Using the Contacts App: Open the “Contacts” app on your iPhone. Tap on the contact you want to export, then tap on the “Share” icon. From the available options, choose the method of export that is compatible with your Android device, such as email or text message. Repeat this process for each contact you want to export.
2. Using a Third-Party App: There are several third-party apps available on the App Store that can help you export your contacts from your iPhone. These apps allow you to export your contacts in various formats, such as CSV, vCard, or Excel. Search for a trusted app, download and install it, and follow the instructions provided to export your contacts.
3. Using iCloud: If you prefer to export all your contacts at once, you can use iCloud to download a vCard file that contains all your contacts. Open a web browser on your computer and go to the iCloud website (www.icloud.com). Sign in with your Apple ID and click on the “Contacts” icon. Select all the contacts you want to export (or press Control + A to select all), click on the settings gear icon at the bottom left corner, and choose “Export vCard.” The vCard file will be downloaded to your computer, and you can transfer it to your Android device.
Make sure to save the exported contacts in a format that is compatible with your Android device. The most commonly supported formats are vCard (.vcf) and CSV (Comma Separated Values).
By following these methods, you can successfully export your contacts from your iPhone. Now, let’s move on to the next step of importing your contacts to your Android device.
Import Contacts to Android
After successfully exporting your contacts from your iPhone, the next step is to import them to your Android device. There are various methods available to import contacts to an Android device, depending on the format in which you have exported your contacts.
Here are some common methods to import contacts to your Android device:
1. Using Google Account: If you have a Google Account synced with your Android device, importing contacts becomes seamless. Transfer the exported vCard or CSV file to your Android device storage. Open the Contacts app, tap on the menu icon (three horizontal lines), and select “Import/Export.” Choose the option to import contacts from storage, locate the exported file, and select it. Follow the on-screen instructions to complete the import process.
2. Using a Third-Party App: There are several third-party apps available on the Google Play Store that can help you import contacts to your Android device. These apps support different file formats and offer additional features to manage your contacts effectively. Search for a trusted app that suits your needs, download and install it from the Play Store, and follow the instructions provided to import your contacts.
3. Using SIM Card: If your Android device supports it, you can export your contacts to a SIM card. Insert the SIM card into your iPhone, go to the Contacts app, select the contacts you want to export, and choose the option to export to SIM card. Once the contacts are saved on the SIM, remove the SIM card from the iPhone and insert it into your Android device. Open the Contacts app, go to the settings, and select the option to import contacts from the SIM card.
4. Using Cloud Services: Many cloud services, such as Google Contacts, offer the option to import contacts from other platforms. You can upload the exported vCard or CSV file to your cloud storage and then use the cloud service app on your Android device to sync and import the contacts to your device.
Before importing your contacts, ensure that you review and clean up the contacts if necessary. Eliminate any duplicates or outdated information to ensure a clean and organized contact list on your Android device.
By using one of these methods, you can successfully import your contacts to your Android device. Now, let’s explore additional transfer methods in case the above methods don’t suit your preferences.
Use Transfer Apps
If you’re looking for a hassle-free and convenient way to transfer your contacts from your iPhone to your Android device, using transfer apps can be a great option. These apps are specifically designed to help you seamlessly transfer your contacts, along with other data, from one device to another.
Here are some popular transfer apps that you can use:
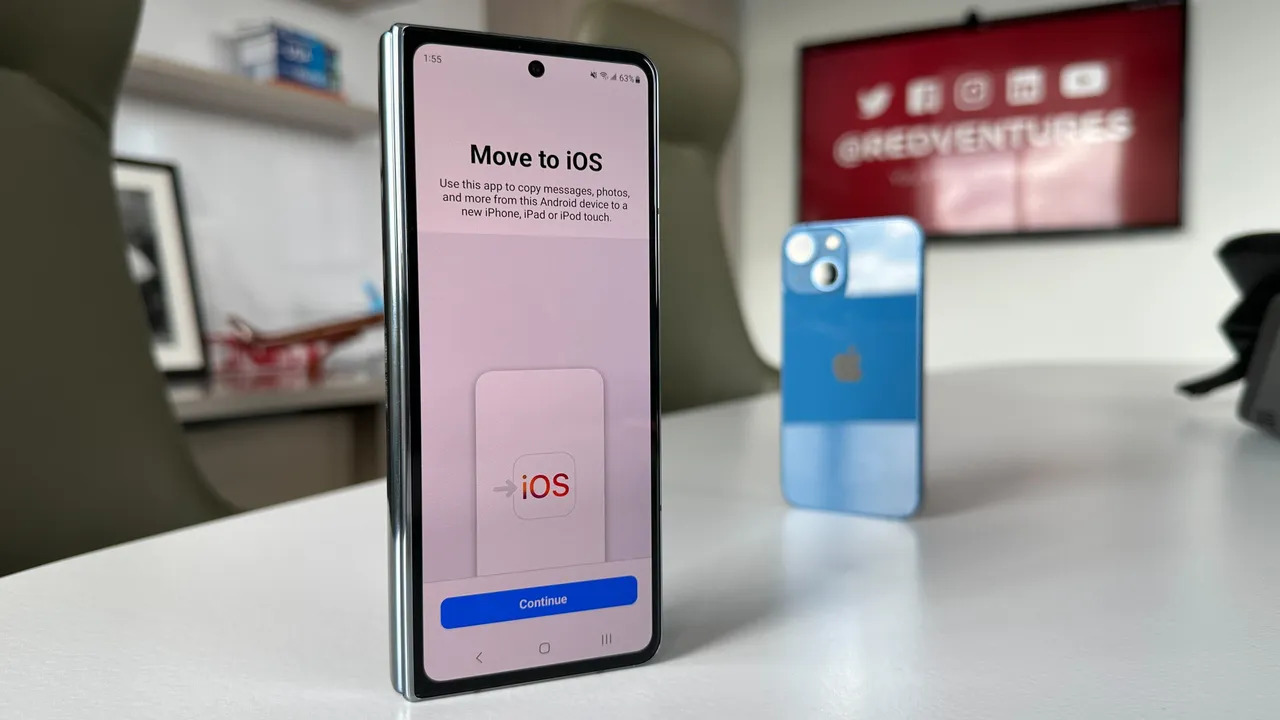
1. Move to iOS: This app, developed by Apple, allows you to transfer your contacts, messages, photos, and more from an iPhone to an Android device. To use the app, download it from the Google Play Store on your new Android device. During the setup process of your Android device, select the option to transfer data from an iPhone. Follow the on-screen instructions and connect both devices to the same Wi-Fi network. You’ll be given a code to enter on your iPhone to establish the connection and begin the transfer process.
2. AnyTrans: AnyTrans is a powerful transfer app that supports transferring various types of data, including contacts, between different devices. Install AnyTrans on your computer and connect both your iPhone and Android device to the computer using USB cables. Launch AnyTrans and choose the option to transfer contacts. Select your iPhone as the source device and your Android device as the target. Follow the on-screen instructions to complete the transfer process.
3. Shareit: Shareit is a widely used app for transferring files and data between different devices. Install Shareit on both your iPhone and Android device. Launch the app on both devices and select the option to send or receive contacts. On your iPhone, choose the contacts you want to transfer, and on your Android device, select the option to receive contacts. The app will establish a connection between the devices and transfer the selected contacts.
These transfer apps provide a straightforward and user-friendly interface to ensure a smooth transfer process. They offer additional features like selective transfer, backup, and device management to make your transition from iPhone to Android seamless.
Remember to uninstall the transfer app once the transfer process is complete to free up storage space on your Android device.
By utilizing transfer apps like Move to iOS, AnyTrans, or Shareit, you can effortlessly transfer your contacts from your iPhone to your Android device. Now, let’s explore another method of transferring contacts via SIM card.
Use SIM Card
If you prefer a straightforward and traditional method to transfer your contacts from your iPhone to your Android device, using a SIM card can be a viable option. This method allows you to physically transfer your contacts without the need for any additional apps or internet connectivity.
Here’s how you can use a SIM card to transfer your contacts:
1. Export Contacts to SIM Card: On your iPhone, go to the Contacts app and select the contacts you want to transfer to your Android device. Tap on the option to export the contacts to the SIM card. Keep in mind that SIM cards have limited storage capacity, so you may need to select only the essential contacts or multiple batches of contacts if needed.
2. Remove SIM Card: Once the contacts are saved on the SIM card, remove the SIM card from your iPhone. Make sure to power off both your iPhone and Android device before proceeding with the next step.
3. Insert SIM Card into Android Device: Insert the SIM card with the exported contacts into your Android device. Ensure that the SIM card is properly inserted and the device recognizes it.
4. Import Contacts from SIM Card: Power on your Android device and go to the Contacts app. Open the settings within the Contacts app and select the option to import contacts or import from SIM card. Follow the on-screen instructions to import the contacts from the SIM card into the Contacts app on your Android device.
Upon completion, you should see the transferred contacts in your Android device’s Contacts app. Please note that SIM cards have limitations, such as limited storage capacity and the inability to transfer additional contact details like email addresses, notes, or photos. It is always a good idea to double-check and ensure that all the necessary contact information has been successfully transferred.
After transferring your contacts, you can remove the SIM card from your Android device and reinsert your regular SIM card, if applicable.
Using a SIM card to transfer contacts offers a straightforward solution for those who prefer a simple and offline method. However, it may not be suitable for transferring a large number of contacts or complex contact information. In such cases, alternative methods like using transfer apps or cloud services can be more suitable.
Now, let’s explore another method of transferring contacts via iCloud.
Use iCloud
If you have your contacts synced with iCloud on your iPhone, you can easily transfer them to your Android device by using iCloud. iCloud is Apple’s cloud storage service that allows you to store and sync your contacts, photos, documents, and more across your Apple devices.
Here’s how you can transfer your contacts from iCloud to your Android device:
1. Export Contacts from iCloud: Open a web browser on your computer and go to the iCloud website (www.icloud.com). Sign in with your Apple ID and password. Click on the “Contacts” icon to access your contacts stored in iCloud. Select all the contacts or the specific ones you want to transfer. To select all contacts, press Control + A (Windows) or Command + A (Mac). Click on the settings cog icon at the bottom left corner and choose “Export vCard” to export the contacts in a vCard file format.
2. Transfer vCard File to Android Device: After exporting the vCard file from iCloud, transfer it to your Android device. You can do this through various methods, such as email, messaging apps, or by connecting your Android device to your computer and transferring the file directly.
3. Import vCard File to Android Contacts: Once the vCard file is transferred to your Android device, open the Contacts app. Go to the settings within the Contacts app and select the option to import contacts or import from vCard. Locate and select the vCard file that you transferred. Follow the on-screen instructions to import the contacts into the Contacts app on your Android device.
After the import process is complete, you should see all the transferred contacts in your Android device’s Contacts app. It is recommended to review the contacts to ensure that all the information has transferred correctly and make any necessary adjustments or edits if needed.
Using iCloud to transfer contacts provides a seamless way to transfer your contacts from your iPhone to your Android device. However, it requires access to a computer and an internet connection to export the contacts from iCloud. If you prefer a more direct method, continue reading to learn about transferring contacts using your Google account.
Use Google Account
If you have a Google account, transferring contacts from your iPhone to your Android device becomes effortless. Google provides a seamless integration between devices, allowing you to sync and access your contacts across multiple platforms.
Here’s how you can transfer your contacts using your Google account:
1. Sync Contacts with Google Account on iPhone: On your iPhone, go to the settings and select “Passwords & Accounts” or “Mail, Contacts, Calendars,” depending on your iOS version. Tap on “Add Account,” select “Google,” and enter your Google account credentials. Toggle on the “Contacts” option to sync your contacts with your Google account. Your iPhone will now sync your contacts with your Google account.
2. Setup Google Account on your Android Device: On your Android device, go to the settings and select “Accounts” or “Users & Accounts.” Tap on “Add Account” and choose “Google.” Follow the on-screen instructions to log in to your Google account or set up a new account if needed.
3. Sync Contacts with Google Account on Android: After setting up your Google account, ensure that the “Contacts” option is toggled on to sync your contacts with your Android device. The sync process will automatically transfer your contacts from your Google account to your Android device.
By syncing your contacts with your Google account, you’ll have your phonebook readily available on your Android device. You can access and manage your contacts through the dedicated Contacts app or by logging into your Google account on any device with internet access.
It’s worth noting that the syncing process may take some time depending on the number of contacts you have. It is recommended to keep your Android device connected to a stable internet connection during the syncing process to ensure a smooth and complete transfer.
Using your Google account to transfer contacts provides a seamless and efficient method, especially if you already use Google services such as Gmail or Google Calendar. Now let’s explore another method of transferring contacts using email.
Use Email
If you prefer a simple and versatile method to transfer contacts from your iPhone to your Android device, using email can be a convenient option. You can export your contacts as a file and send it via email to yourself, then download and import the contacts on your Android device.
Here’s how you can transfer contacts using email:
1. Export Contacts from iPhone: Open the Contacts app on your iPhone and select the contacts you want to transfer. Tap on the option to export the contacts, which may vary depending on your iOS version. Choose the file format that is compatible with your Android device, such as vCard (.vcf) or CSV (Comma Separated Values).
2. Send Email with Contacts: Once you have exported the contacts, compose an email on your iPhone’s email app. Attach the exported contacts file to the email and send it to yourself or any other email address you can access on your Android device.
3. Open Email on Android Device: On your Android device, open the email app that you used to send the contacts file. Locate the email and download the attached contacts file to your device.
4. Import Contacts on Android Device: After downloading the contacts file, open the Contacts app on your Android device. Go to the settings within the Contacts app and select the option to import contacts or import from a file. Navigate to the location where the contacts file is saved and select it. Follow the on-screen instructions to import the contacts into the Contacts app on your Android device.
By using email to transfer contacts, you can easily send the contacts file to yourself or others and conveniently import the contacts on your Android device. It allows for flexibility as you can use any email app or service that supports attachments.
Keep in mind that the availability of specific export and import options may vary depending on your iPhone’s iOS version, the Contacts app you use, and the email apps on both devices. It is recommended to follow the instructions provided by the respective apps or consult their documentation for more accurate guidance.
Now that you have explored various methods to transfer contacts, choose the one that suits you best and enjoy a seamless transition from your iPhone to your Android device.
Use VCF File
One of the most commonly used methods to transfer contacts from an iPhone to an Android device is by using a VCF (vCard) file. A VCF file is a standardized format for contact information that is compatible across different platforms and devices.
Here’s how you can transfer contacts using a VCF file:
1. Export Contacts as VCF File: Open the Contacts app on your iPhone and select the contacts you want to transfer. Depending on your iOS version, you can usually find an option to export contacts as a VCF file. Choose this option, and the contacts will be saved as a VCF file on your iPhone.
2. Transfer VCF File to Android Device: There are several methods to transfer the VCF file from your iPhone to your Android device. You can send it via email, use cloud storage services like Dropbox or Google Drive, or transfer it directly through a USB cable or Bluetooth connection.
3. Import VCF File to Android Contacts: Once you have transferred the VCF file to your Android device, open the Contacts app. Go to the settings within the Contacts app and select the option to import contacts or import from a file. Locate the VCF file and select it. Follow the on-screen instructions to import the contacts into the Contacts app on your Android device.
By utilizing a VCF file, you can easily transfer your contacts from your iPhone to your Android device while preserving all essential details such as names, phone numbers, email addresses, and other relevant information.
This method is efficient for transferring a large number of contacts or when you want to transfer contacts selectively. It offers compatibility across different devices and operating systems, making it a versatile option for contact transfer.
It’s important to note that some pre-installed Android contact apps may have slightly different import options or locations for the import feature. However, most Android devices offer a way to import contacts from a VCF file within the Contacts app or Settings menu.
Now that you’re familiar with the process of transferring contacts using a VCF file, choose the method that works best for you and enjoy a seamless transition to your new Android device.