
What is iMessage?
iMessage is a messaging service developed by Apple that allows users to send text messages, photos, videos, and other types of media to other Apple device users. It is available on iPhone, iPad, iPod Touch, and Mac devices, providing a seamless and integrated messaging experience across all platforms.
One of the key benefits of iMessage is that it uses an Internet connection to send messages instead of relying on traditional SMS messaging. This means that you can send unlimited messages to other iMessage users without incurring additional charges from your mobile carrier.
iMessage also offers a range of features and functionalities that make it a popular choice for Apple users. Here are some of the key benefits of syncing iMessage to your Mac:
1. Seamless Communication
Syncing iMessage to your Mac enables you to seamlessly communicate with your contacts across multiple Apple devices. Whether you’re using your iPhone on the go or sitting at your Mac, you can continue conversations without interruption.
2. Access to Media Files
iMessage allows you to send and receive not only text messages but also photos, videos, documents, and more. When you sync iMessage to your Mac, you can easily view and access these media files on a larger screen, making it more convenient to share and enjoy multimedia content.
3. Message Syncing
By syncing iMessage to your Mac, all your messages will be synchronized across devices. This means that you can start a conversation on your iPhone and seamlessly continue it on your Mac, saving you time and effort in switching between devices.
4. Enhanced Productivity
Having iMessage on your Mac allows you to stay productive and efficient. You can quickly respond to messages without having to pick up your iPhone, making it easier to multitask and stay focused on your work.
5. End-to-End Encryption
iMessage ensures that your conversations are secure and private with end-to-end encryption. This means that only you and the intended recipient can read your messages, providing an added layer of protection for your sensitive discussions.
Now that you have a clear understanding of iMessage and its benefits, let’s explore how to sync iMessage to your Mac and make the most out of this messaging service.
Benefits of Syncing iMessage to Mac
Syncing iMessage to your Mac offers numerous advantages that enhance your messaging experience and streamline communication. Here are some of the key benefits:
1. Expanded Accessibility
When you sync iMessage to your Mac, you gain the ability to send and receive messages directly from your computer. This feature broadens your accessibility options, allowing you to stay connected even if your iPhone is not within reach. Whether you’re working on your Mac or simply prefer a larger screen for messaging, syncing iMessage expands your messaging capabilities.
2. Seamless Message Continuity
By syncing iMessage between your Apple devices, you enjoy seamless message continuity. This means that regardless of which device you use to send or receive messages, the conversation thread remains intact and up to date. You can start a conversation on your iPhone, continue it on your Mac, and even pick it up later on your iPad without missing a beat. Message syncing removes the hassle of juggling between devices and allows for fluid conversation transitions.
3. Effortless Media Sharing
iMessage on Mac provides a convenient platform for effortlessly sharing media files. With a larger screen and familiar desktop environment, you can easily drag and drop images, videos, documents, and more directly into your iMessage conversations. This seamless media sharing feature makes it simple to collaborate, share memories, or send important files without having to rely solely on your iPhone.
4. Keyboard Convenience
Typing on a physical keyboard can be much faster and more comfortable than using a touchscreen. When you sync iMessage to your Mac, you can take advantage of this convenience by composing and responding to messages using your Mac’s keyboard. This can boost your typing speed and accuracy, especially for more extended or detailed conversations, enhancing productivity and reducing potential errors.
5. Enhanced Organization and Search
With iMessage on Mac, finding past conversations becomes more efficient. You can easily search for specific messages or keywords using the built-in search functionality. Additionally, viewing messages on a larger screen allows for better organization and management of conversations, making it easier to keep track of important discussions, attachments, and shared links.
By syncing iMessage to your Mac, you unlock a host of benefits that make messaging more convenient, efficient, and enjoyable. Whether you need to collaborate, stay connected, or simply prefer the versatility of using multiple devices, syncing iMessage provides a seamless and unified messaging experience.
Checking for Updates
Keeping your iMessage app and Mac operating system up to date is essential to ensure optimal performance, bug fixes, and access to the latest features. Here’s how you can check for updates on your Mac:
1. Software Updates
To check for software updates on your Mac, follow these steps:
- Click on the Apple menu in the top-left corner of your screen.
- Select “System Preferences” from the drop-down menu.
- In the System Preferences window, click on “Software Update.”
- Your Mac will check for any available updates. If updates are found, click on the “Update Now” button to install them.
Make sure you have a stable Internet connection during the update process. Your Mac may need to restart to complete the installation of the updates.
2. App Store Updates
If you have the Mac App Store version of iMessage installed, you can check for app updates specifically for iMessage using the App Store:
- Open the App Store on your Mac.
- Click on the “Updates” tab at the top of the App Store window.
- If an update is available for iMessage, you will see it listed. Click on the “Update” button next to iMessage to download and install the update.
It’s important to regularly check for updates for both your Mac’s operating system and the iMessage app to ensure that you have the latest security patches and feature enhancements. Keeping your software up to date helps maintain a secure and smooth messaging experience.
Note: The steps for checking for updates may vary slightly depending on the version of macOS and the specific App Store settings on your Mac.
By staying vigilant and regularly checking for updates, you can ensure that your iMessage app and Mac are running the latest software versions, providing you with the best possible messaging experience.
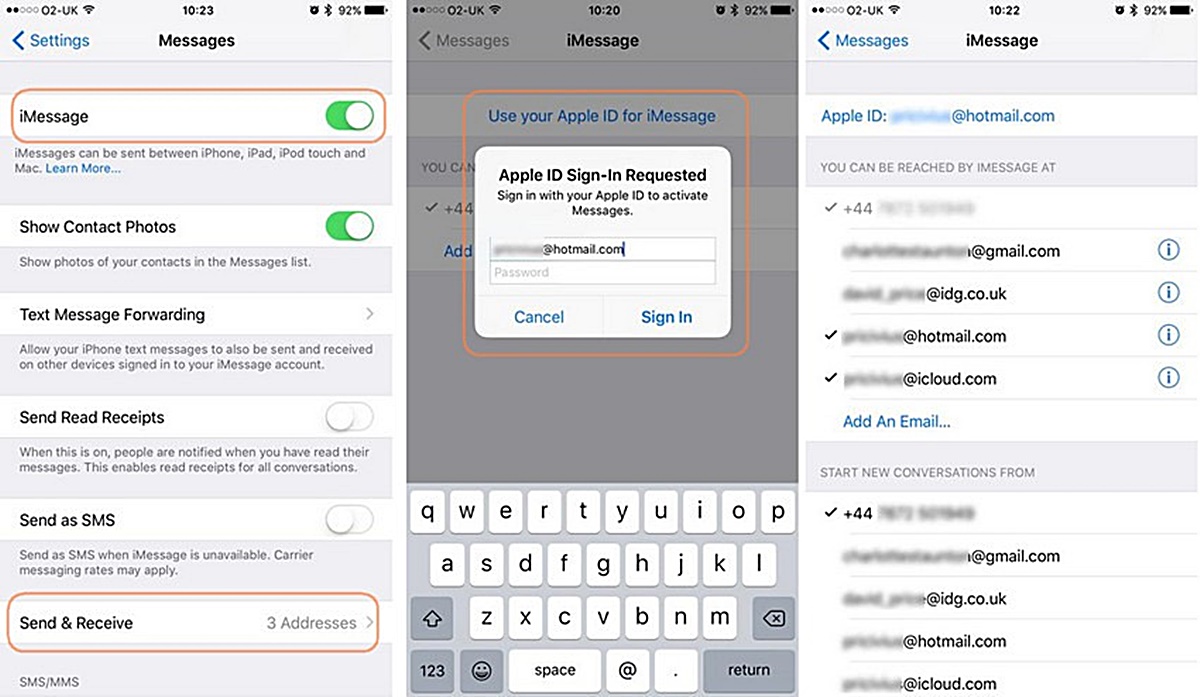
Signing in to iMessage on Mac
Signing in to iMessage on your Mac allows you to sync your messages, conversations, and media across all your Apple devices seamlessly. Here’s a step-by-step guide on how to sign in to iMessage on Mac:
1. Open iMessage
Launch the iMessage app on your Mac. You can find it in the Applications folder or by searching for “iMessage” using Spotlight (press Command + Space and type “iMessage”).
2. Enter your Apple ID
Once iMessage opens, you’ll be prompted to sign in with your Apple ID. Enter the email address associated with your Apple ID and click on the “Next” button.
3. Enter your Password
In the next step, enter your Apple ID password and click on the “Sign In” button. If you’ve enabled two-factor authentication or two-step verification, you may need to complete additional verification steps.
4. Choose your iMessage Settings
After signing in, you’ll be presented with the option to customize your iMessage settings. You can choose to enable or disable features like read receipts, message effects, app integrations, and more. Make your selections according to your preferences and click on the “Next” button.
5. Enable Text Message Forwarding (optional)
If you want to forward your iPhone’s SMS and MMS messages to your Mac, you can enable the Text Message Forwarding feature. Your iPhone must be connected to the same Wi-Fi network and signed in to the same Apple ID. Follow the on-screen instructions to complete the setup process.
6. Complete the Signing In Process
Once you’ve gone through the setup steps, iMessage will finish signing you in. Your messages and conversations will start syncing with your Mac, and you’ll be able to send and receive messages directly from your computer.
Tip: If you’re experiencing any issues signing in to iMessage, ensure that your Mac is connected to the internet and that your Apple ID credentials are correct. If the problem persists, try restarting your Mac and signing in again.
By signing in to iMessage on your Mac, you unlock the power of seamless messaging synchronization between your Apple devices. Stay connected, access your iMessages from your computer, and enjoy the convenience of a unified messaging experience across platforms.
Enabling iMessage Syncing on Mac
Enabling iMessage syncing on your Mac allows you to access and sync your messages, conversations, and media across all your Apple devices. Here’s a step-by-step guide on how to enable iMessage syncing:
1. Open System Preferences
Click on the Apple menu in the top-left corner of your screen and select “System Preferences” from the drop-down menu.
2. Select iCloud
In the System Preferences window, find and click on the “iCloud” icon. This will open the iCloud preferences panel.
3. Sign in with Apple ID
If you’re not already signed in to iCloud, enter your Apple ID and password in the designated fields and click on the “Sign In” button.
4. Enable Messages
In the iCloud preferences panel, you’ll see a list of selectable apps and services. Make sure the checkbox next to “Messages” is checked. This will enable iMessage syncing across your devices.
5. Allow Syncing of Messages
A pop-up message may appear, asking if you want to enable syncing of messages across devices. Click on the “Enable” or “Sync Now” button to proceed.
6. Wait for Syncing to Complete
Once you’ve enabled iMessage syncing, your Mac will start syncing your messages, conversations, and media from your other Apple devices. The syncing process may take some time, depending on the number of messages and media files you have.
7. Verify Syncing Status
You can verify the syncing status by going to the Messages app on your Mac. Open the app, and you should see your messages and conversations from other Apple devices synchronized and available on your Mac.
Tip: To ensure a seamless syncing experience, make sure your other Apple devices are also signed in to the same Apple ID and have iMessage enabled.
Enabling iMessage syncing on your Mac provides a unified messaging experience across all your Apple devices. Access your messages effortlessly, stay connected, and enjoy the convenience of synchronized conversations wherever you are.
Troubleshooting Syncing Issues
Sometimes, you may encounter syncing issues when trying to sync iMessage on your Mac. Here are some troubleshooting steps you can take to resolve common syncing issues:
1. Check Internet Connection
Ensure that your Mac is connected to a stable and reliable internet connection. A poor or intermittent internet connection can disrupt the syncing process. Try disconnecting and reconnecting to your network or switch to a different network to see if it resolves the issue.
2. Verify Apple ID
Double-check that you are signed in to iMessage with the correct Apple ID on all your devices, including your Mac, iPhone, iPad, or iPod Touch. If you are signed in with different Apple IDs on different devices, it can cause syncing problems. Sign out and sign back in to iMessage on all devices using the same Apple ID to ensure synchronization.
3. Update Software
Make sure that your Mac, as well as your other Apple devices, have the latest software updates installed. Outdated software versions can sometimes result in syncing issues. Check for and install any available software updates for macOS and iOS or iPadOS.
4. Restart Devices
Try restarting your Mac and your other Apple devices. Sometimes, a simple reboot can fix syncing issues by refreshing the system’s connection and clearing any temporary glitches.
5. Disable and Re-enable iMessage Syncing
If the issue persists, you can try disabling and then re-enabling iMessage syncing on your Mac. To do this, go to System Preferences > iCloud, uncheck the box next to “Messages,” and then check it again. This action will refresh the syncing process and may resolve any sync-related problems.
6. Reset iCloud Settings
If none of the above steps work, you can try resetting your iCloud settings on your Mac. Go to System Preferences > iCloud and click on the “Sign Out” button. Restart your Mac and then sign back in to iCloud. This process may fix any underlying issues with your iCloud account that are causing the syncing problem.
If you’ve tried all these troubleshooting steps and are still unable to resolve the syncing issue, you may need to contact Apple Support for further assistance. They can help you identify and troubleshoot any specific issues that may be affecting your iMessage syncing.
By following these troubleshooting steps, you can address common syncing issues and ensure a smooth and seamless iMessage syncing experience on your Mac.
Viewing iMessage on Mac
Once you have signed in and enabled iMessage on your Mac, you can easily view and access your iMessage conversations and messages. Here’s how to view iMessage on your Mac:
1. Open the Messages App
Locate and open the Messages app on your Mac. You can find it in the Applications folder or by searching for “Messages” using Spotlight (press Command + Space and type “Messages”).
2. Conversation List
Upon opening the Messages app, you’ll see the conversation list on the left-hand side of the window. This list displays all your ongoing conversations and previous messages.
3. Select a Conversation
Click on a conversation in the list to open it and view the messages within that conversation. The conversation will be displayed in the main window of the Messages app.
4. Message Display
Inside a conversation, you can view the messages exchanged, including text, photos, videos, and other media. The most recent messages will appear at the bottom of the conversation, and older messages can be scrolled up to view.
5. Attachments and Media
If there are any attachments or media files exchanged in the conversation, you can easily view them by clicking on the respective icons. Photos and videos will be displayed directly in the messages window, while other file types may open in their respective default applications.
6. Search Messages
If you’re looking for a specific message or keyword within a conversation, you can use the search bar at the top right corner of the Messages app. Enter the search term, and Messages will display relevant messages that match your search criteria.
Tip: If you have a long list of conversations and find it difficult to locate a specific one, you can use the search bar at the top left corner of the Messages app to search for specific contacts or conversation participants.
By following these steps, you can easily view and navigate through your iMessage conversations on your Mac. Enjoy the convenience of accessing and managing your messages seamlessly on a larger screen.
Sending and Receiving iMessages on Mac
With iMessage enabled on your Mac, you can easily send and receive iMessages directly from your computer. Here’s how to send and receive iMessages on your Mac:
Sending an iMessage
1. Open the Messages App
Launch the Messages app on your Mac. You can find it in the Applications folder or by searching for “Messages” using Spotlight (press Command + Space and type “Messages”).
2. Start a New Conversation
In the Messages app, click on the “Compose” button (represented by a square icon with a pencil). Alternatively, you can use the keyboard shortcut Command + N.
3. Enter Recipient
In the new message window, enter the name, email address, or phone number of the person you want to send an iMessage to. As you type, the app will suggest matching contacts from your address book. Select the desired contact.
4. Compose Your Message
Type your message into the text field at the bottom of the new message window. You can include text, emojis, stickers, or media attachments such as photos, videos, or files. To send a message, press Enter on your keyboard or click on the “Send” button (represented by an upward arrow icon).
5. Sending Options
Before sending the message, you can take advantage of various sending options. For example, you can enable or disable read receipts, set a specific message effect, or choose to send as an SMS if the recipient doesn’t have iMessage. These options can be accessed via the icons in the toolbar above the text field.
Receiving an iMessage
When someone sends you an iMessage, it will appear as a notification on your Mac. You can respond directly from the notification without opening the Messages app. Here’s how:
1. When a new iMessage notification appears on your Mac, click on it to open the conversation in the Messages app.
2. Type your reply in the text field at the bottom of the conversation window.
3. Press Enter on your keyboard or click on the “Send” button to send your response.
Additionally, any iMessages you receive will also be displayed in the conversation list on the left-hand side of the Messages app. You can click on a conversation to view and reply to individual messages.
Tip: If you have an iPhone or other Apple devices connected to the same Apple ID, iMessages will also be synced across these devices, allowing you to seamlessly continue conversations on different devices.
By following these steps, you can easily send and receive iMessages on your Mac, keeping your conversations in sync across all your Apple devices for a seamless messaging experience.
Managing iMessage Settings on Mac
Managing your iMessage settings on your Mac allows you to customize your messaging experience and tailor it to your preferences. Here’s how to manage your iMessage settings:
1. Open the Messages App
Launch the Messages app on your Mac. You can find it in the Applications folder or by searching for “Messages” using Spotlight (press Command + Space and type “Messages”).
2. Access Preferences
In the Menu bar at the top of the screen, click on “Messages” and select “Preferences” from the drop-down menu. Alternatively, you can use the keyboard shortcut Command + Comma (,).
3. Customize General Settings
In the Preferences window, select the “General” tab. Here, you can customize general settings for iMessage:
- Default Account: Specify the default iMessage account to use for sending messages. If you have multiple accounts set up, choose the one you prefer.
- Notifications: Configure notifications settings, including whether to show message notifications, play sounds, or display message previews.
- App Icon Badge: Enable or disable the badge count on the Dock icon to show the number of unread messages.
4. Manage iMessage Accounts
Under the “Accounts” tab in the Preferences window, you can manage your iMessage accounts. Here you can:
- Add Account: Click on the “+” button to add a new iMessage account to your Mac. Follow the prompts to set up the account using your Apple ID.
- Remove Account: Select an account and click on the “-” button to remove it from your Mac.
5. Customize Messages Settings
In the Preferences window, select the “Messages” tab. Here, you can customize various settings related to messaging:
- Show Contact Photos: Enable or disable the display of contact photos in message threads.
- Keep Messages: Specify how long to keep your messages on your Mac, ranging from 30 days to 1 year or Forever.
- Show Most Recent Message at the Top: Toggle the option to display the most recent message at the top of the conversation.
6. Configure Advanced Settings
In the Preferences window, select the “Advanced” tab. Here, you can configure advanced settings for iMessage:
- Automatic Login: Choose whether to automatically sign in to iMessage when you open the Messages app.
- Enable Messages in iCloud: Toggle the option to sync your messages across all your Apple devices using iCloud.
- Multitasking: Choose whether to allow background sync and message notifications
After customizing your iMessage settings, click on the “OK” button to save your changes.
By managing your iMessage settings on your Mac, you can personalize your messaging experience and configure it to suit your preferences. Take advantage of the available options to enhance and streamline your messaging workflow.
Frequently Asked Questions about Syncing iMessage to Mac
Here are answers to some common questions related to syncing iMessage to your Mac:
1. Can I sync iMessage to multiple Macs?
Yes, you can sync iMessage to multiple Macs by signing in to iMessage with the same Apple ID on each Mac. This allows you to access your iMessage conversations and messages across all your synced Mac devices seamlessly.
2. Can I sync iMessage to my Mac and iPhone?
Absolutely! By signing in to iMessage with the same Apple ID on your Mac and iPhone, you can sync your iMessages across both devices. This enables you to send and receive messages on either device and have the conversation updated in real-time on the other.
3. Will syncing iMessage delete messages on my other devices?
No, syncing iMessage will not delete messages on your other devices. The syncing feature ensures that your messages are replicated across your devices, allowing you to access them from any synced device without affecting the message history on other devices.
4. What happens if I logout from iMessage on my Mac?
If you sign out of iMessage on your Mac, you will no longer receive iMessages or be able to send them from that device. However, your message history and conversations will still be accessible on your other synced devices.
5. How do I know if my iMessage is syncing on my Mac?
If iMessage is syncing on your Mac, you will see your conversations and messages appear in the Messages app. You can also check the status of syncing by going to System Preferences > iCloud on your Mac. Ensure that the “Messages” checkbox is checked to confirm that iMessage syncing is enabled.
6. Are attachments and media files synced with iMessage?
Yes, attachments and media files, such as photos, videos, and documents, are synced with iMessage across your devices. When you send or receive attachments in iMessage, they will be accessible on your Mac as long as iMessage is synced and enabled.
7. Can I access iMessage on my Mac without an iPhone?
Yes, you can access iMessage on your Mac even if you do not have an iPhone. As long as you sign in to iMessage with your Apple ID on your Mac, you can send and receive iMessages using your Mac’s internet connection, regardless of whether you have an iPhone or not.
These answers should help address some of the common concerns and questions regarding syncing iMessage to your Mac. By utilizing the syncing feature, you can enjoy a cohesive and convenient messaging experience across all your Apple devices.