
How to Strikethrough Text in Google Docs
Google Docs is a powerful online word processing tool that offers various formatting options to make your documents visually appealing. One of these formatting options is the ability to strikethrough text. Strikethrough is commonly used to indicate deleted or edited content. If you’re wondering how to apply strikethrough to your text in Google Docs, here are a few methods you can try:
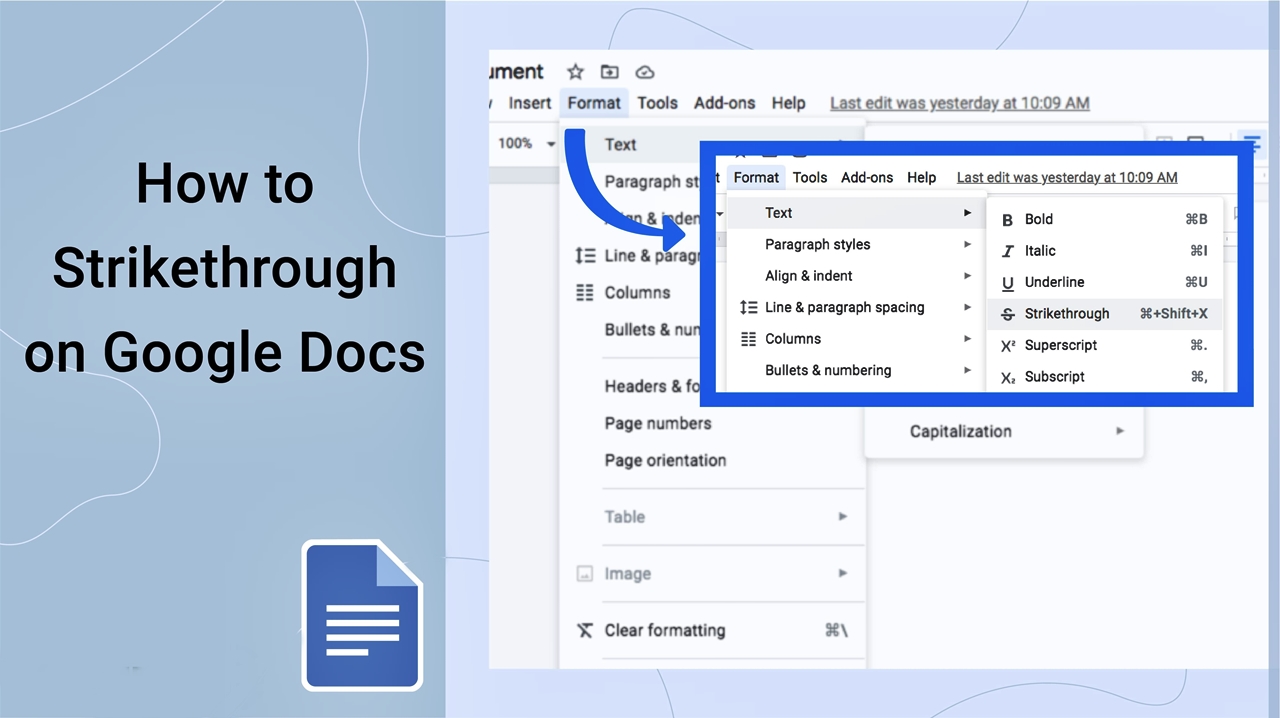
1. Using the Toolbar: Start by selecting the text you want to strikethrough. Then, click on the “Format” tab in the menu bar at the top of your document. Finally, click on the “Strikethrough” option from the dropdown menu.
2. Using Keyboard Shortcuts: Highlight the text you want to strikethrough, and then press the following keys simultaneously: “Ctrl” and “Shift” along with the “X” key (Ctrl+Shift+X).
3. Using the Format Menu: Select the text you want to strikethrough, go to the “Format” tab, click on “Text,” and then click on “Strikethrough.”
4. Using the Format Paintbrush Tool: This method allows you to apply strikethrough to multiple sections of text. First, select the text with the formatting you want to copy. Then click on the “Paint format” icon in the toolbar. Finally, highlight the text you want to apply the strikethrough format to.
5. Using the Explore Feature: The Explore feature in Google Docs allows you to access additional formatting options. To use this feature, select the text you want to strikethrough, right-click, and choose “Explore” from the dropdown menu. In the Explore pane that appears on the right side of your screen, select the “Format” tab, and then click on the “Strikethrough” option.
These methods can help you easily apply strikethrough formatting to your text in Google Docs. Experiment with each method to find the one that works best for you. Now you can confidently highlight edited or deprecated content in your documents using the strikethrough feature.
Method 1: Using the Toolbar
One of the simplest and most convenient ways to strikethrough text in Google Docs is by using the toolbar. This method allows you to apply the strikethrough formatting to selected text with just a few clicks. Here’s how you can do it:
1. Start by selecting the text you want to strikethrough. You can do this by clicking and dragging your cursor over the desired text.
2. Once you have selected the text, locate the toolbar at the top of your Google Docs document. The toolbar contains various formatting options that you can use to modify your text.
3. Click on the “Format” tab in the toolbar. This will display a dropdown menu with a list of formatting options.
4. From the dropdown menu, click on the “Text” option. This will open a submenu with additional formatting choices.
5. In the submenu, click on the “Strikethrough” option. Instantly, the selected text will be crossed out, indicating the strikethrough effect.
By following these simple steps, you can easily apply the strikethrough formatting to your text using the toolbar in Google Docs. This method is straightforward and ideal for users who prefer using the graphical interface for formatting options.
Remember that you can always remove the strikethrough effect by following the same steps and deselecting the “Strikethrough” option. The toolbar in Google Docs offers other formatting options as well, allowing you to customize your text according to your needs.
Method 2: Using Keyboard Shortcuts
For those who prefer using keyboard shortcuts to save time and increase efficiency, Google Docs offers a convenient way to apply strikethrough formatting to text. By using a combination of keys, you can quickly cross out selected text. Here’s how to use keyboard shortcuts to apply strikethrough formatting in Google Docs:
1. Start by selecting the text you want to strikethrough. You can do this by clicking and dragging your cursor over the desired text.
2. Once the text is selected, simultaneously press the following keys: “Ctrl” and “Shift” along with the “X” key (Ctrl+Shift+X).
3. Instantly, the selected text will be crossed out, indicating the strikethrough effect.
Using keyboard shortcuts is a quick and efficient way to apply the strikethrough formatting in Google Docs. It allows you to avoid navigating through menus or using the mouse to access formatting options. Once you become familiar with the shortcut keys, you can easily apply the strikethrough effect to your text with just a few keystrokes.
To remove the strikethrough effect, follow the same steps and apply the keyboard shortcut (Ctrl+Shift+X) to the selected text. This will remove the cross-out formatting and restore the text to its original state.
Using keyboard shortcuts not only streamlines your workflow in Google Docs but also enables you to work more efficiently. Whether you prefer mouse or keyboard input, Google Docs offers various methods to apply formatting, ensuring that you have the flexibility to choose the method that suits your needs best.
Method 3: Using the Format Menu
Another way to apply strikethrough formatting to text in Google Docs is by using the Format menu. This method offers a straightforward approach to accessing formatting options and customizing your text. Here’s how you can use the Format menu to apply strikethrough formatting:
1. Start by selecting the text you want to strikethrough. You can do this by clicking and dragging your cursor over the desired text.
2. Once the text is selected, go to the top menu bar of your Google Docs document and click on the “Format” tab. This will display a dropdown menu with various formatting options.
3. From the dropdown menu, hover your cursor over the “Text” option. This will open a submenu with additional text formatting choices.
4. In the submenu, click on the “Strikethrough” option. The selected text will instantly show the strikethrough effect, indicating that it has been crossed out.
Using the Format menu is a simple and easy way to access and apply strikethrough formatting to your text in Google Docs. This method eliminates the need to remember keyboard shortcuts or navigate through multiple windows or toolbars.
To remove the strikethrough effect, repeat the steps and click on the “Strikethrough” option in the Format menu. This will remove the crossed-out formatting, restoring the text to its original state.
The Format menu in Google Docs offers a wide range of text formatting options, allowing you to customize your documents to meet your specific needs. By exploring the available formatting choices, you can enhance the appearance and readability of your text while conveying important information through the strikethrough effect.
Method 4: Using the Format Paintbrush Tool
If you have multiple sections of text that you want to apply the strikethrough formatting to, using the Format Paintbrush tool in Google Docs can be a time-saving option. This method allows you to copy the formatting of a selected text and apply it to other parts of your document. Here’s how to use the Format Paintbrush tool to apply strikethrough formatting:
1. Start by selecting a portion of text that has the desired strikethrough formatting. This will act as your formatting source.
2. After selecting the text, locate the “Paint format” icon in the toolbar at the top of your Google Docs document. The icon resembles a paintbrush.
3. Click on the “Paint format” icon. Your cursor will transform into a paintbrush tool.
4. Once the paintbrush tool is active, click and drag your cursor over the text portions where you want to apply the strikethrough formatting. As you drag the paintbrush tool, Google Docs will apply the strikethrough effect to the selected sections of text.
Using the Format Paintbrush tool saves you time by allowing you to quickly apply the strikethrough formatting to multiple sections of text without having to go through menu options repeatedly. It is especially handy when dealing with documents that require consistent formatting throughout, such as reports or manuscripts.
To deactivate the Format Paintbrush tool, simply click on another tool or press the “Esc” key. This will return your cursor to its default state.
Remember that the Format Paintbrush tool not only applies strikethrough formatting but also copies and applies other text formatting attributes such as font, size, color, and more. If you want to copy and apply only the strikethrough formatting, be sure to deselect other formatting options before using the tool.
By utilizing the Format Paintbrush tool, you can efficiently apply the strikethrough formatting to multiple sections of text in your Google Docs document, saving you time and effort.
Method 5: Using the Explore Feature
Google Docs offers a powerful feature called Explore that allows you to access additional formatting options, including strikethrough. This method is particularly useful when you want to explore more formatting choices without leaving your document. Here’s how you can use the Explore feature to apply strikethrough formatting:
1. Start by selecting the text you want to strikethrough. You can do this by clicking and dragging your cursor over the desired text.
2. Once the text is selected, right-click on it. This will open a context menu with various options.
3. From the context menu, choose “Explore.” This will open the Explore pane on the right side of your Google Docs document.
4. In the Explore pane, you will find a range of suggestions and options related to your selected text. Look for the “Format” tab and click on it.
5. Under the “Format” tab, you will find various formatting options, including “Strikethrough.” Click on the “Strikethrough” option to apply the formatting to your text.
Using the Explore feature allows you to access a wide range of formatting options, including strikethrough, without leaving the document. It provides a convenient way to explore different formatting choices without interrupting your workflow.
To remove the strikethrough effect, follow the same steps and click on the “Strikethrough” option again in the Explore pane. This will remove the strikethrough formatting from the selected text.
The Explore feature in Google Docs not only offers formatting suggestions but also provides you with research information, images, and other contextual suggestions that can enhance your document creation process. It serves as a valuable tool to discover and apply formatting options efficiently.
Tips and Tricks for Strikethrough in Google Docs
When using the strikethrough formatting in Google Docs, there are several tips and tricks that can help you work more efficiently. Here are some handy tips to enhance your experience with strikethrough in Google Docs:
1. Keyboard Shortcuts: Memorize the keyboard shortcut (Ctrl+Shift+X) for applying strikethrough. It saves time and eliminates the need to navigate through menus.
2. Format Painter: Use the Format Painter tool to quickly copy the strikethrough formatting from one section of text to another. This is especially useful when you have multiple sections that require the same formatting.
3. Clear Formatting: If you accidentally apply strikethrough formatting to the wrong text, use the “Clear formatting” option in the toolbar (paint roller icon) to remove all formatting, including strikethrough, from selected text.
4. Strikethrough Shortcut: To toggle the strikethrough formatting on or off without having to reselect the text, highlight the text and use the keyboard shortcut “Ctrl+Alt+5” (Cmd+Option+5 for Mac users).
5. Hover-Over Preview: When accessing formatting options from the toolbar or Format menu, hover your cursor over each option to view a live preview of the formatting, including strikethrough. This can help you visualize the effect before applying it.
6. Undo/Redo: If you make a mistake while applying strikethrough or want to revert a change, use the “Undo” (Ctrl+Z) or “Redo” (Ctrl+Y) shortcuts to quickly reverse or restore formatting.
By utilizing these tips and tricks, you can streamline your workflow, save time, and efficiently apply and manage the strikethrough formatting in Google Docs. Experiment with different techniques to find the ones that work best for your document editing process.
Remember, strikethrough is not only useful for indicating deleted or edited content but can also be a creative way to add emphasis or highlight specific sections in your document. With these tips and tricks, you can elevate your formatting skills and make your Google Docs stand out.