
Enable Voice Typing
Voice typing in Google Docs allows you to transcribe your spoken words into written text with ease. To enable this feature, follow these simple steps:
- Open your Google Docs document.
- Click on the “Tools” tab in the menu bar.
- From the dropdown menu, select “Voice typing.”
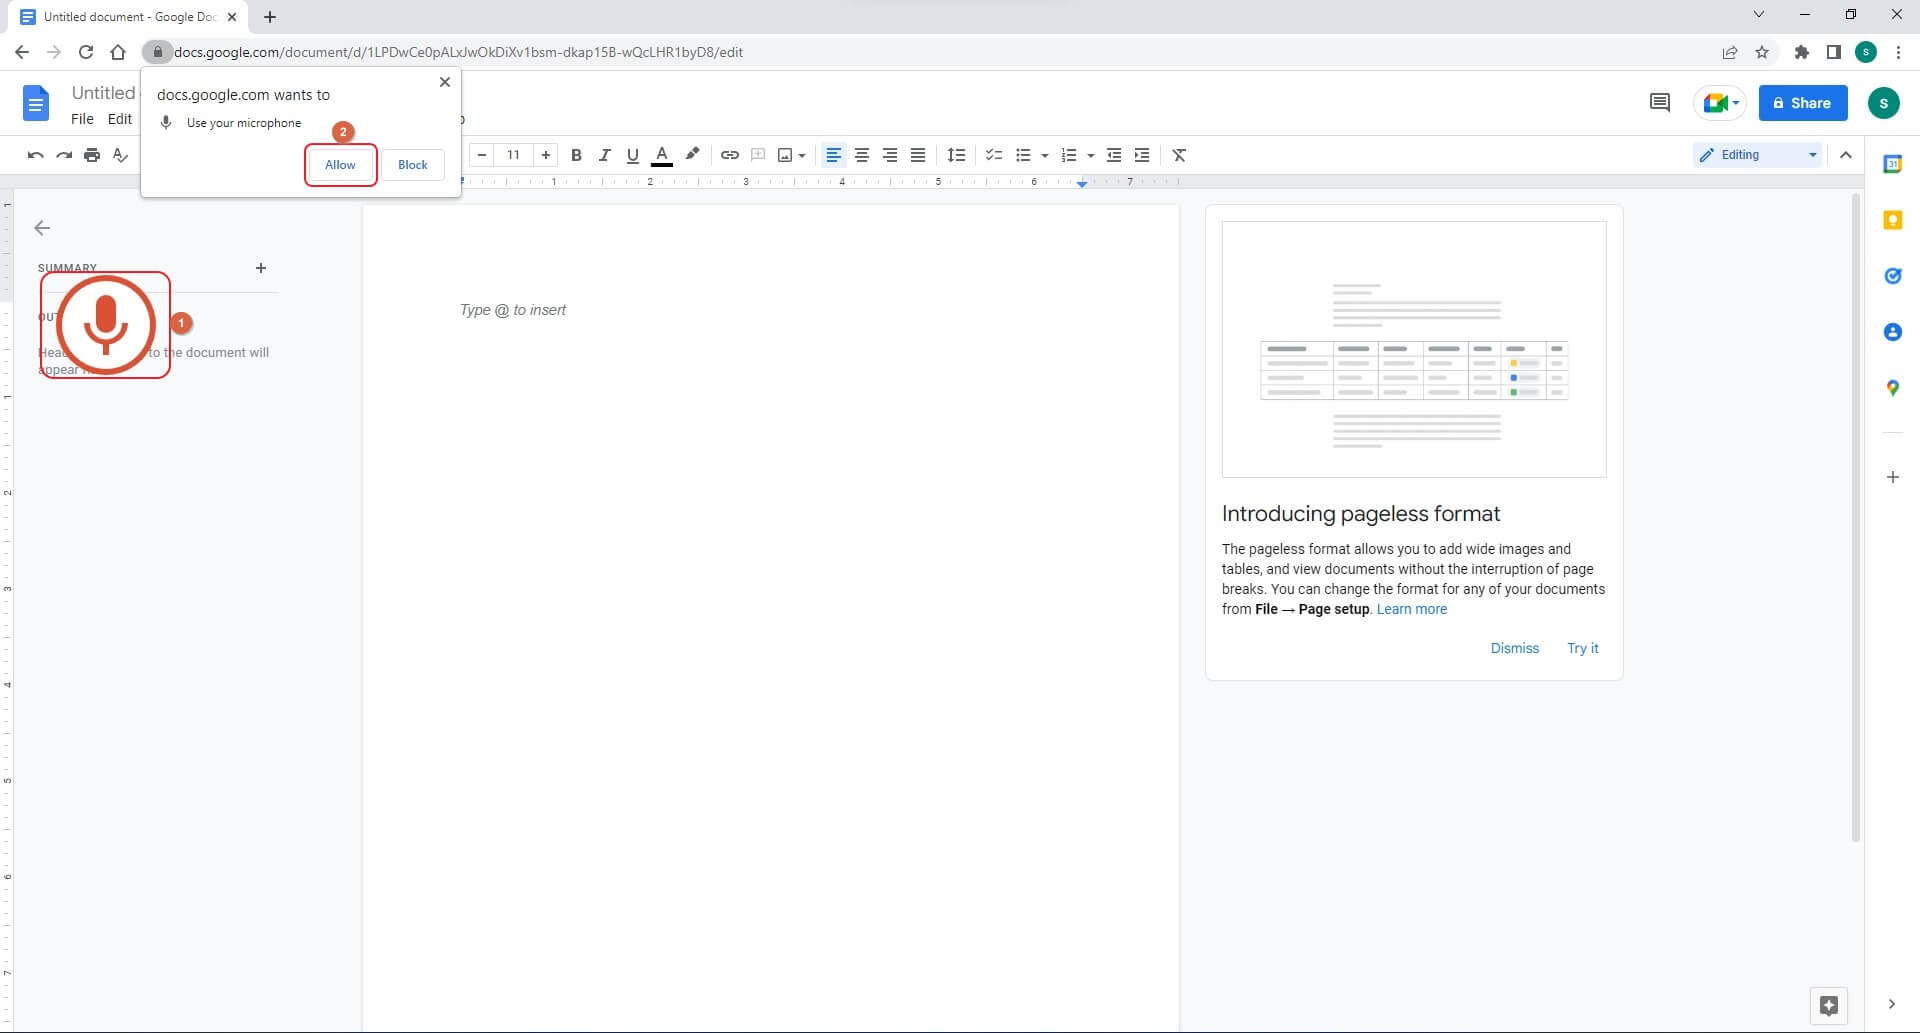
- A microphone icon will appear on the left side of your document. Click on it to start voice typing.
- Grant permission for your browser to access your microphone when prompted.
Once you have enabled voice typing, you are ready to start converting your spoken words into written text.
It is important to note that voice typing in Google Docs requires a stable internet connection. Make sure you have a reliable internet connection before proceeding. Additionally, voice typing works best on the Google Chrome browser.
Now that you have enabled voice typing, let’s explore how to utilize this feature effectively.
Start Voice Typing
Now that you’ve enabled voice typing in Google Docs, it’s time to start using it to transcribe your spoken words. Here’s how to get started:
- Position your cursor in the document where you want to begin typing.
- Click on the microphone icon on the left side of the document, or press the assigned hotkey (Ctrl + Shift + S on Windows, or Command + Shift + S on Mac) to start voice typing.
- Start speaking clearly and audibly into your microphone. Your spoken words will be transcribed into text in real-time.
- You can use simple punctuation commands such as “period,” “comma,” or “question mark” to punctuate your text.
- To end voice typing, click on the microphone icon again, or press the assigned hotkey. Alternatively, you can say “stop listening” to stop voice typing.
Always remember to speak clearly and enunciate your words properly for accurate transcription. Take breaks between sentences if needed, to give the system time to process your speech.
Remember, voice typing is a powerful tool to increase your productivity and streamline your writing process. It is especially useful for those who prefer speaking over typing or for those who need to transcribe long recordings.
Now that you know how to start voice typing, let’s explore the different modes available to enhance your voice typing experience in Google Docs.
Dictation Mode vs. Command Mode
When using voice typing in Google Docs, you have two main modes to choose from: dictation mode and command mode. Let’s explore the differences between these modes:
Dictation Mode: Dictation mode is the default mode when you start voice typing. In dictation mode, your spoken words are transcribed into written text. You can speak naturally and let Google Docs convert your speech into text without any specific voice commands.
Command Mode: In command mode, you can use voice commands to perform various formatting and editing actions. By using specific voice commands, you can format text, navigate through the document, or make edits without manually selecting or clicking on options. Command mode enhances the efficiency and speed of your voice typing experience.
To switch between dictation mode and command mode, you can use the voice command “Switch to dictation mode” or “Switch to command mode.” Alternatively, you can click on the microphone icon on the left side of the document and select the desired mode from the dropdown menu.
Now that you know the difference between dictation mode and command mode, let’s dive into some useful voice commands for formatting your text while using voice typing in Google Docs.
Voice Commands for Formatting
When using voice typing in Google Docs, you can utilize various voice commands to format your text seamlessly. Here are some useful voice commands for formatting:
- Bold: Say “Bold” or “Bold on” to apply bold formatting to the selected text. To turn off bold, say “Bold off.”
- Italic: Use the voice command “Italic” or “Italicize” to apply italic formatting to the selected text. To disable italics, say “Italic off.”
- Underline: Say “Underline” or “Underline on” to add an underline to the selected text. Say “Underline off” to remove the underline.
- Strikethrough: Use the command “Strike through” or “Strikethrough on” to apply strikethrough formatting to the selected text. Say “Strikethrough off” to remove the strikethrough.
- Heading Styles: Apply different heading styles using voice commands like “Heading 1,” “Heading 2,” etc. This helps to structure your document and create a table of contents.
- Font Size: Change the font size by saying “Font size” followed by the desired size, e.g., “Font size 12.” You can also use voice commands like “Bigger font” or “Smaller font” to adjust the font size accordingly.
- Text Alignment: Align your text to the left, right, center, or justify using voice commands like “Align left,” “Align right,” “Align center,” or “Justify.”
- Text Color: Use voice commands like “Text color” followed by a color name, e.g., “Text color red” to change the text color. You can also specify RGB or hex color codes for more precise color selection.
These voice commands for formatting allow you to format your text effortlessly while voice typing in Google Docs. Experiment with these commands to customize the appearance of your document without manual formatting.
Now that you are familiar with voice commands for formatting, let’s explore how voice typing can assist you with document navigation.
Voice Commands for Navigation
When using voice typing in Google Docs, navigating through your document can be done swiftly and efficiently using various voice commands. Here are some useful voice commands for document navigation:
- Move to the beginning/end of the line: Say “Go to the beginning/end of the line” to navigate to the start or end of the current line.
- Move to the beginning/end of the document: Use the voice command “Go to the beginning/end of the document” to jump to the start or end of the document.
- Move to a specific page: Say “Go to page [page number]” to navigate directly to a particular page in your document.
- Scroll up/down: Use the voice commands “Scroll up” or “Scroll down” to navigate through your document without using the scroll bar.
- Go to a specific heading or section: If you have used heading styles in your document, say “Go to [heading name]” to move directly to that section.
- Select a word/line/paragraph: Use voice commands like “Select word,” “Select line,” or “Select paragraph” to easily highlight and select different elements of your document.
- Undo/redo changes: Say “Undo” to revert the last action or “Redo” to restore any removed changes.
Using these voice commands for navigation, you can quickly move around your document, locate specific sections, and perform actions without the need to click or scroll manually. This saves time and enhances your overall productivity.
Now that you have learned about navigation, let’s explore voice commands for making edits while using voice typing in Google Docs.
Voice Commands for Editing
When using voice typing in Google Docs, you can easily edit and make changes to your document using a range of voice commands. Here are some useful voice commands for editing:
- Delete: Say “Delete” followed by the specific element you want to remove, such as “Delete word,” “Delete line,” or “Delete paragraph.”
- Copy/Cut/Paste: Use voice commands like “Copy,” “Cut,” or “Paste” to perform these editing actions without using the keyboard shortcuts.
- Undo/Redo: Say “Undo” to reverse the last action or “Redo” to restore any changes that were undone.
- Insert Link: Use the voice command “Insert link” followed by the URL to insert a hyperlink within your document.
- Insert Comment: Say “Insert comment” to add a comment to a specific section of your document, enabling collaboration and feedback.
- Format Painter: Use the voice command “Format painter” to copy the formatting from one section of text to another. Select the desired text after using the command to apply the formatting.
- Find/Replace: Say “Find” or “Replace” followed by the word or phrase you want to find or replace within your document.
By utilizing these voice commands for editing, you can effortlessly make changes, format text, and manage your document without the need for manual input. It simplifies the editing process and allows you to focus on your content.
Now that you are familiar with voice commands for editing, let’s explore how voice typing facilitates collaboration and document sharing.
Voice Commands for Collaboration
Voice typing in Google Docs not only improves your individual productivity but also offers functionality for collaboration and document sharing. Here are some useful voice commands for collaboration:
- Share Document: Say “Share document” to open the sharing options and invite others to collaborate on your document.
- Invite Collaborators: Use the voice command “Invite collaborators” followed by the email addresses of the individuals you want to invite to collaborate.
- Add Comment: Say “Add comment” to leave feedback or ask questions about a specific section of the document. Your collaborators will be notified of the comment.
- Suggesting Mode: Activate suggesting mode by saying “Turn on suggesting mode.” This allows collaborators to make changes that are visible to all but can be accepted or rejected by the document owner.
- Accept/Reject Changes: Use voice commands like “Accept suggestion” or “Reject suggestion” to manage the revisions made by your collaborators.
- Version History: Say “Version history” to view the revision history of the document, enabling you to review changes made over time.
- Restore Previous Version: Use the voice command “Restore previous version” to revert the document back to a previous state from the version history.
With these voice commands for collaboration, you can easily share your document with others, leave comments, and manage revisions without the need for manual input. It enhances the collaborative workflow and makes it easier to work together on a document.
Now that you have learned about voice commands for collaboration, let’s address some common voice recognition issues and provide solutions to overcome them.
Common Voice Recognition Issues and Solutions
While voice typing in Google Docs can be a powerful tool, there are some common voice recognition issues that you may encounter. Here are a few issues and their potential solutions:
- Inaccurate Transcriptions: Sometimes, the voice recognition system may not accurately transcribe your spoken words. To minimize this issue, speak clearly, enunciate your words, and ensure a quiet environment that reduces background noise.
- Incorrectly Recognized Commands: Voice commands may not always be recognized correctly. If you encounter this issue, double-check the voice command you used and try again. Additionally, familiarize yourself with the specific voice commands supported by Google Docs.
- Trouble with Uncommon Words or Accents: Uncommon words or accents may pose a challenge for voice recognition. To improve accuracy, consider adding unique or complex words to your personal dictionary in Google Docs. You can also try adjusting the speech recognition settings to adapt better to your accent.
- Misinterpretation of Punctuation: Voice typing may misinterpret punctuation commands. If you encounter this issue, manually edit such punctuation marks to ensure accuracy.
- Lag or Delay: Voice typing may sometimes experience lag or delay in transcribing your speech. Ensure a stable internet connection and close any unnecessary applications or browser tabs to optimize performance.
By keeping these solutions in mind and practicing good speech habits, you can overcome common voice recognition issues and improve the accuracy and reliability of voice typing in Google Docs.
Now that you are aware of the common issues and solutions, let’s explore some advanced tips and tricks to enhance your voice typing experience.
Advanced Tips and Tricks
To further optimize your voice typing experience in Google Docs, consider these advanced tips and tricks:
- Practice and Familiarize: Like any new skill, voice typing requires practice to become comfortable and efficient. Spend some time getting used to the voice commands, practicing clear enunciation, and experimenting with different speech patterns.
- Use Natural Language: Voice typing works best when you speak naturally. Avoid robotic or unnatural speech patterns and try to maintain a conversational tone to achieve accurate transcriptions.
- Learn Keyboard Shortcuts: While voice typing is a powerful tool, knowing keyboard shortcuts can help you navigate and make edits more efficiently. Familiarize yourself with the commonly used shortcuts to complement your voice typing workflow.
- Edit and Proofread: Even though voice typing saves time, it’s important to remember that it may not be perfect. Take the time to review and edit your document for any inaccuracies or mistakes that may have occurred during transcription.
- Utilize Punctuation Commands: Punctuation is essential for clear and coherent writing. Make use of punctuation commands such as “period,” “comma,” and “question mark” to punctuate your text correctly without manual input.
- Explore Third-Party Tools: Consider exploring third-party voice recognition software or applications that offer additional features and customization options to enhance your voice typing experience.
- Experiment with Voice Commands: Don’t hesitate to experiment and try different voice commands. Google Docs offers a wide range of voice commands beyond formatting and editing. Explore the possibilities and find commands that suit your workflow and preferences.
These advanced tips and tricks can help you make the most of voice typing in Google Docs, allowing you to increase productivity, streamline your writing process, and achieve accurate transcriptions.
Now that you are equipped with these advanced tips and tricks, you’re ready to utilize the full potential of voice typing in Google Docs.