
Opening a Word Document in Google Docs
Google Docs is a powerful tool that allows you to create, edit, and collaborate on documents online. While it excels at working with its native file format, the .docx format used by Microsoft Word can also be opened and edited in Google Docs. Here’s how to get started:
1. Open Google Docs: Open your web browser and navigate to https://docs.google.com. Sign in to your Google account if prompted.
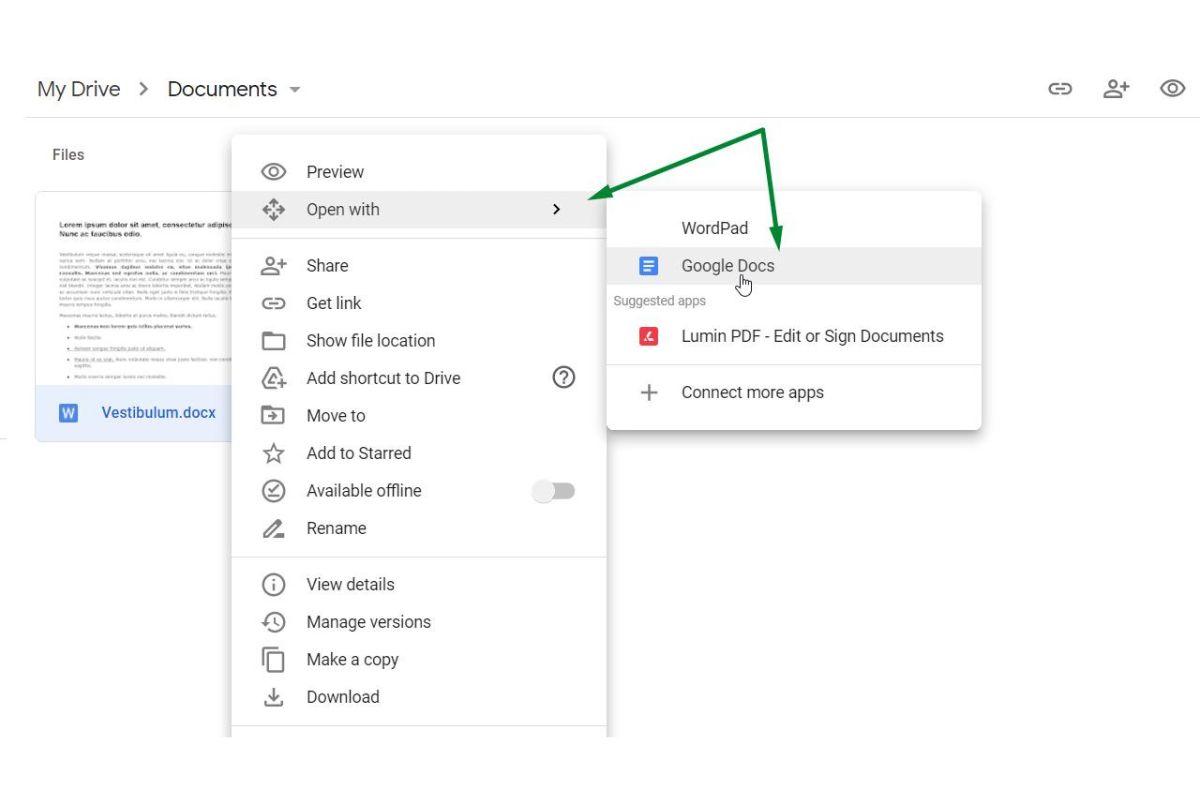
2. Upload the Word document: Once you’re in the Google Docs interface, click on the “File” tab at the top-left corner of the screen and select “Open” from the drop-down menu. A file explorer window will appear.
3. Choose the Word document: In the file explorer window, locate and select the Word document you want to open in Google Docs. You can either double-click on the file or click on it once and then click the “Open” button.
4. Conversion process: Google Docs will automatically convert the Word document into its own format, allowing you to edit it within the Google Docs interface. This conversion process may take a few moments, depending on the size and complexity of the document.
5. Start editing: Once the conversion is complete, you can begin editing the document in Google Docs. The interface is similar to other word processing software, with options for changing fonts, formatting text, inserting images, and more.
6. Save and share: Google Docs automatically saves your changes as you work, so there’s no need to worry about losing your progress. You can also share the document with others by clicking on the “Share” button in the top-right corner of the screen and entering the email addresses of the people you want to collaborate with.
By following these simple steps, you can easily open your Word documents in Google Docs and take advantage of its powerful editing and collaboration features. Whether you’re working on a document on your own or collaborating with a team, Google Docs provides a flexible and user-friendly platform for all your document needs.
Editing Text in Google Docs
Google Docs offers a wide range of tools and features to help you edit and enhance your text. Whether you need to make simple changes or perform more advanced formatting, Google Docs has got you covered. Here are some ways to edit text in Google Docs:
1. Selecting and deleting text: To edit a specific section of your document, simply click and drag your mouse cursor over the text you want to modify. You can then press the “Delete” key on your keyboard to remove the selected text.
2. Adding and replacing text: To insert new text, place your cursor in the desired location and start typing. The existing text will move to make room for your new additions. If you want to replace existing text, simply select it and type your desired replacement.
3. Formatting options: Google Docs offers a variety of formatting options to customize the appearance of your text. You can change the font style, size, and color using the toolbar at the top of the screen. Additionally, you can apply bold, italic, or underline styles to emphasize specific words or phrases.
4. Alignment and indentation: You can adjust the alignment of your text by using the alignment buttons in the toolbar. You can choose between left, center, right, and justify alignment. To indent text, use the increase and decrease indent buttons.
5. Bullets and numbering: Google Docs allows you to create bulleted or numbered lists to organize your content. Use the list buttons in the toolbar to apply either option and start typing your list items. Pressing the enter key will automatically create a new bullet or number item.
6. Find and replace: If you need to locate specific words or phrases within your document, you can use the “Find and replace” feature. Click on “Edit” in the toolbar, then select “Find and replace” from the dropdown menu. Enter the word or phrase you want to find and optionally specify a replacement if needed.
7. Undo and redo: Accidentally made a mistake? Don’t worry, you can easily undo and redo your actions in Google Docs. Use the undo and redo buttons in the toolbar or press “Ctrl + Z” (Windows) or “Cmd + Z” (Mac) on your keyboard to reverse or redo your recent edits.
Now that you’re familiar with the basic text editing features in Google Docs, feel free to explore and experiment with other advanced options to further enhance your documents. From adjusting line spacing to adding hyperlinks and headers, Google Docs offers a robust set of tools to make your text look polished and professional.
Formatting Text in Google Docs
Formatting text in Google Docs can greatly enhance the visual appeal and readability of your documents. Google Docs provides a variety of formatting options to help you customize your text. Here are some ways to format text in Google Docs:
1. Font styles: Google Docs offers a wide range of font styles to choose from. You can change the font of your text by selecting the desired font from the drop-down menu in the toolbar. Experiment with different fonts to find the one that best suits your document.
2. Font size: Adjusting the font size can make your text more legible or help important information stand out. You can change the font size by selecting the desired size from the drop-down menu in the toolbar. Alternatively, you can use the increase and decrease font size buttons to adjust the size gradually.
3. Text color: Adding color to your text can make it visually appealing and help differentiate important information. To change the text color, select the text you want to modify and click on the text color button in the toolbar. A color picker will appear, allowing you to choose from a wide array of colors.
4. Bold, italic, and underline: Use these formatting options to emphasize specific words or phrases. Select the text you want to modify and click on the corresponding button in the toolbar. You can also use keyboard shortcuts such as “Ctrl + B” for bold, “Ctrl + I” for italic, and “Ctrl + U” for underline.
5. Strikethrough: If you want to indicate that certain text is no longer relevant or has been removed, you can apply the strikethrough formatting. Select the text you want to modify and click on the strikethrough button in the toolbar.
6. Superscript and subscript: Use these formatting options to write mathematical equations, chemical formulas, or footnotes. Select the text you want to modify and click on the respective buttons in the toolbar. The selected text will appear above or below the baseline.
7. Text alignment: Google Docs allows you to align your text to the left, right, center, or justify it. Use the alignment buttons in the toolbar to adjust the alignment of your text. Justified alignment aligns the text with both the left and right margins, creating a clean, professional look.
8. Line spacing: Adjusting the line spacing can improve the readability of your document. You can change the line spacing by clicking on the line spacing button in the toolbar and selecting the desired option from the drop-down menu. Alternatively, you can choose “Custom spacing” to specify your own line spacing.
With these formatting options at your disposal, you can make your text visually appealing and effectively convey your message. Remember to use formatting sparingly and consistently to maintain a polished and professional look throughout your document.
Collaborating on Word Documents in Google Docs
One of the standout features of Google Docs is its ability to facilitate collaboration on documents in real-time. Whether you’re working on a group project, need feedback from colleagues, or want to streamline the editing process, Google Docs offers a seamless collaborative experience. Here’s how you can collaborate on Word documents in Google Docs:
1. Sharing the document: To collaborate with others, you need to share the Word document. Click on the “Share” button in the top-right corner of the screen. Enter the email addresses of the people you want to collaborate with, adjust the access level (either “Can edit,” “Can comment,” or “Can view”), and click “Send.” Note that collaborators require a Google account to access and edit the document.
2. Real-time editing: Once your collaborators open the document, you can all simultaneously make edits, comment, and communicate within the Google Docs interface. As each collaborator types, their changes appear in real-time, allowing for efficient collaboration without the need for constant file sharing or version control.
3. Suggesting changes: In addition to direct editing, Google Docs allows users to suggest changes to the Word document. This mode enables contributors to propose modifications without altering the original document. To enable “Suggesting” mode, click on the “Editing” button in the top-right corner of the screen and select “Suggesting.” Collaborators can then propose modifications, which the document owner can either accept or decline.
4. Version history: Google Docs provides a version history feature, allowing you to track changes made to the document over time. This feature preserves previous versions of the document, making it easy to revert to an older version if needed. Access the version history by clicking on “File” in the toolbar, selecting “Version history,” and choosing “See version history.”
5. Commenting and communication: Alongside the text, collaborators can leave comments and suggestions within the document. To add a comment, highlight the text or select the desired location, right-click, and choose “Comment.” This feature is particularly useful for providing feedback, asking questions, or engaging in a discussion about specific sections of the document.
6. Notifications and email alerts: Google Docs provides notifications and email alerts to keep collaborators informed about changes and comments. You can customize your notification preferences, ensuring that you receive updates in real-time or through daily or weekly summaries.
By embracing the collaborative features of Google Docs, you can streamline the editing process, improve communication, and work efficiently with others on Word documents. Whether you’re collaborating on a school project, a business proposal, or a research paper, Google Docs’ collaborative functionality enhances productivity and fosters seamless teamwork.
Adding Comments and Suggestions in Google Docs
Google Docs provides a comprehensive commenting and suggestion system that allows for effective collaboration and feedback on documents. Whether you want to provide input, ask questions, or offer suggestions, Google Docs’ commenting and suggestion features make it easy to communicate and engage with others. Here’s how to add comments and suggestions in Google Docs:
1. Adding comments: To leave a comment on a specific section of the document, highlight the relevant text or select the desired location. Right-click on the highlighted area, and select “Comment” from the dropdown menu. A comment box will appear on the right side of the screen. Enter your comment and press “Enter” to post it. Collaborators can view and reply to the comment, promoting discussion and addressing specific points.
2. Resolving comments: Once a comment has been addressed or is no longer relevant, you can resolve it to keep the document clean and organized. To resolve a comment, hover over it and click on the “Resolve” button that appears on the right side of the comment box. The resolved comment will be hidden, but it can still be accessed through the document’s version history.
3. Adding suggestions: Alongside direct editing and commenting, Google Docs allows users to suggest changes to the document. This feature is particularly useful when you want to propose modifications without altering the original content. To enable suggestion mode, click on the “Editing” button in the top-right corner of the screen and select “Suggesting.” Collaborators can suggest modifications, which can be reviewed, accepted, or rejected by the document owner.
4. Reviewing and accepting suggestions: When suggestions are made, they are color-coded and appear as underlined text in the document. To review a suggestion, click on the underlined text. A comment box will appear on the right side of the screen, displaying the suggestion and allowing you to leave additional comments or accept/reject the suggested change. To accept or reject a suggestion, click on the corresponding buttons in the comment box.
5. Notifications and email alerts: Google Docs provides notifications and email alerts to keep collaborators informed about comments and suggestions. You can customize your notification preferences, ensuring that you receive updates in real-time or through daily or weekly summaries. This allows for prompt response and engagement with the document’s collaborators.
By leveraging the commenting and suggestion features in Google Docs, you can foster effective communication, encourage feedback, and collaborate seamlessly with others. Whether you’re working on a team project, seeking input from colleagues, or engaging in peer review, Google Docs offers a versatile and user-friendly platform for collaborative document editing.
Inserting Tables, Images, and Other Elements in Google Docs
Google Docs allows you to enhance your documents by inserting various elements, such as tables, images, and other media. These elements can help organize information, illustrate concepts, and make your document visually engaging. Here’s how you can insert tables, images, and other elements in Google Docs:
1. Inserting tables: To insert a table into your document, click on the “Table” tab in the toolbar and hover over the desired number of rows and columns. Click to select the dimensions for your table, and it will appear in the document. You can then add content to each cell by simply clicking and typing.
2. Adjusting table properties: Google Docs provides options to customize the appearance and layout of your tables. To modify table properties, click on the table to reveal the table editing toolbar. From there, you can adjust the table border width, add or delete rows and columns, merge or split cells, and format the table’s style and colors.
3. Inserting images: To add images to your document, click on the “Insert” tab in the toolbar and select “Image.” You can then choose to upload an image from your computer, select an image from your Google Drive, or utilize the image search feature to find and insert images directly into your document. Once inserted, you can resize, reposition, and adjust the image’s alignment and text wrapping options as needed.
4. Adding other elements: Google Docs offers a variety of other elements to augment your document. These include shapes, lines, equations, charts, and more. To insert these elements, click on the “Insert” tab, hover over the desired element category, and choose the specific element you want to add. Once inserted, you can customize the element’s properties and appearance to suit your needs.
5. Formatting text in tables and captions: Tables and images can benefit from formatted text within captions and individual cells. You can apply text formatting features such as bold, italic, underline, bullet points, and numbering within table cells and image captions. Select the text you wish to format and use the formatting options available in the toolbar.
By leveraging the ability to insert tables, images, and other elements, you can create visually appealing and informative documents in Google Docs. Whether you need to present data, illustrate ideas, or enhance the overall visual appeal, these features enable you to make your document more engaging and professional.
Using the Explore feature in Google Docs
The Explore feature in Google Docs provides a powerful tool to enhance your document creation process. It offers a convenient way to gather information, generate insights, and improve the overall quality of your content. Here’s how to make the most of the Explore feature:
1. Accessing Explore: To open the Explore feature in Google Docs, click on the “Explore” button located in the bottom-right corner of the screen. Alternatively, you can access it by going to the “Tools” tab in the toolbar and selecting “Explore.”
2. Integrated research: Explore brings the power of Google’s search engine directly into your document. Simply enter a search query in the search box, and Explore will provide relevant search results including web pages, images, and other resources. Clicking on a search result will insert a citation with a link to the original source, which can be extremely useful when referencing external content.
3. Generating document suggestions: Explore can offer intelligent suggestions to improve your document. It can analyze the content of your document and provide recommendations for formatting, grammar, and even related topics to include. These suggestions can assist in enhancing the overall structure, readability, and coherence of your document, saving you valuable time and effort.
4. Adding visuals: Explore enables you to quickly add relevant visuals to your document. When researching a topic, you can easily insert images and charts directly into your document without the need to switch between tabs or download and upload files. Simply select the desired image or chart from the search results provided by Explore and click to insert it.
5. Data analysis and insights: If your document contains numerical data, Explore can help you gain insights by generating charts or tables based on that data. Simply select the data and click on the “Insert chart” or “Insert table” option in the Explore pane. This feature is particularly useful for visualizing data trends and making your document more informative and engaging.
6. Personalize your Explore results: Explore takes into account your previous actions and preferences to provide more relevant results. By signing in to your Google account, you can personalize the Explore feature to match your specific needs and interests. This allows for a more tailored and efficient research and writing experience.
The Explore feature in Google Docs serves as a valuable assistant, offering research capabilities, document suggestions, and data analysis tools right at your fingertips. By leveraging the power of Explore, you can streamline your workflow, improve the quality of your content, and create compelling and well-informed documents.
Downloading a Google Docs File as a Word Document
Google Docs is a cloud-based platform that allows you to create and edit documents online. However, there may be times when you need to download a Google Docs file as a Word document (.docx) for compatibility purposes or to work with offline. Here’s how you can easily download a Google Docs file as a Word document:
1. Open the document: Sign in to your Google account and navigate to Google Docs (https://docs.google.com). Locate and open the Google Docs file you want to download as a Word document.
2. Go to the “File” menu: At the top-left corner of the screen, click on the “File” tab in the toolbar. A drop-down menu will appear.
3. Select “Download” > “Microsoft Word (.docx)”: In the drop-down menu, hover over “Download,” and another menu will appear. From this menu, select “Microsoft Word (.docx).” Google Docs will then convert the file to a Word document format and begin downloading it to your computer.
4. Save the file: Once the download is complete, you will be prompted to choose a location on your computer where you want to save the Word document. Navigate to the desired folder and click “Save.”
5. Access and edit the Word document: The downloaded Word document can now be opened in your preferred word processing software, such as Microsoft Word or other compatible applications. You can make further edits, format the document, or print it as needed.
It’s important to note that while Google Docs does a great job of converting your document into a Word format, there may be slight variations in formatting between the original Google Docs file and the downloaded Word document. It’s a good practice to review the downloaded file to ensure that the formatting is consistent with your desired outcome.
Downloading a Google Docs file as a Word document provides you with the flexibility to share and work on your documents across different platforms and with users who may not have access to Google Docs. It enables seamless collaboration and ensures that your files can be easily accessed and edited, regardless of the software being used.