
Understanding Starred Messages in Gmail
Gmail’s starred messages feature is a powerful tool that allows you to highlight and prioritize important emails. When you star a message, it stands out from the rest of your inbox, making it easier to find and keep track of essential communications. Whether it’s a crucial project update, an important document, or a message that requires further action, using stars can help you stay organized and focused.
Starring a message is like pinning a note on your virtual bulletin board. It serves as a visual reminder of its significance and helps you quickly identify it among the sea of incoming emails. By leveraging this feature, you can improve your productivity and ensure that nothing important slips through the cracks.
To star a message in Gmail, you have two options. First, you can click on the star icon located beside the email subject line. This will toggle the star on and off, indicating its status. Alternatively, you can use keyboard shortcuts by pressing the ‘*’ key to star or unstar a message while it’s open.
Once you’ve starred a message, it will be automatically moved to the “Starred” section in your Gmail sidebar. This section acts as a dedicated folder for all your prioritized emails, making them easily accessible whenever you need to reference them. Additionally, starred messages will also remain in their original location within your inbox or other assigned labels, ensuring that they’re not hidden from view.
It’s worth noting that starred messages are not automatically archived or deleted. They will stay in your inbox or labeled folders until you decide to take further actions, such as archiving or deleting them.
By default, Gmail’s starred messages are represented by a single yellow star. However, you can customize the star options according to your preferences. Gmail offers several star color options, including red, orange, yellow, green, blue, purple, and a plain white outline. This flexibility allows you to assign different meanings to the various star colors, such as prioritizing urgent messages with red stars or using blue stars for personal emails.
Now that you have a better understanding of starred messages in Gmail, let’s explore how you can view and organize your prioritized emails.
How to Star a Message in Gmail
Starring a message in Gmail is incredibly simple and can be done in a few different ways. Below are three easy methods to star a message:
- Star Icon: When you have an email open, you can find a star icon located beside the email subject line. Simply click on this star to toggle it on and off, indicating whether the message is starred or not.
- Keyboard Shortcut: Gmail offers keyboard shortcuts that make it even quicker to star messages. When you have an email open, press the ‘*’ key (shift + 8) to toggle the star on and off.
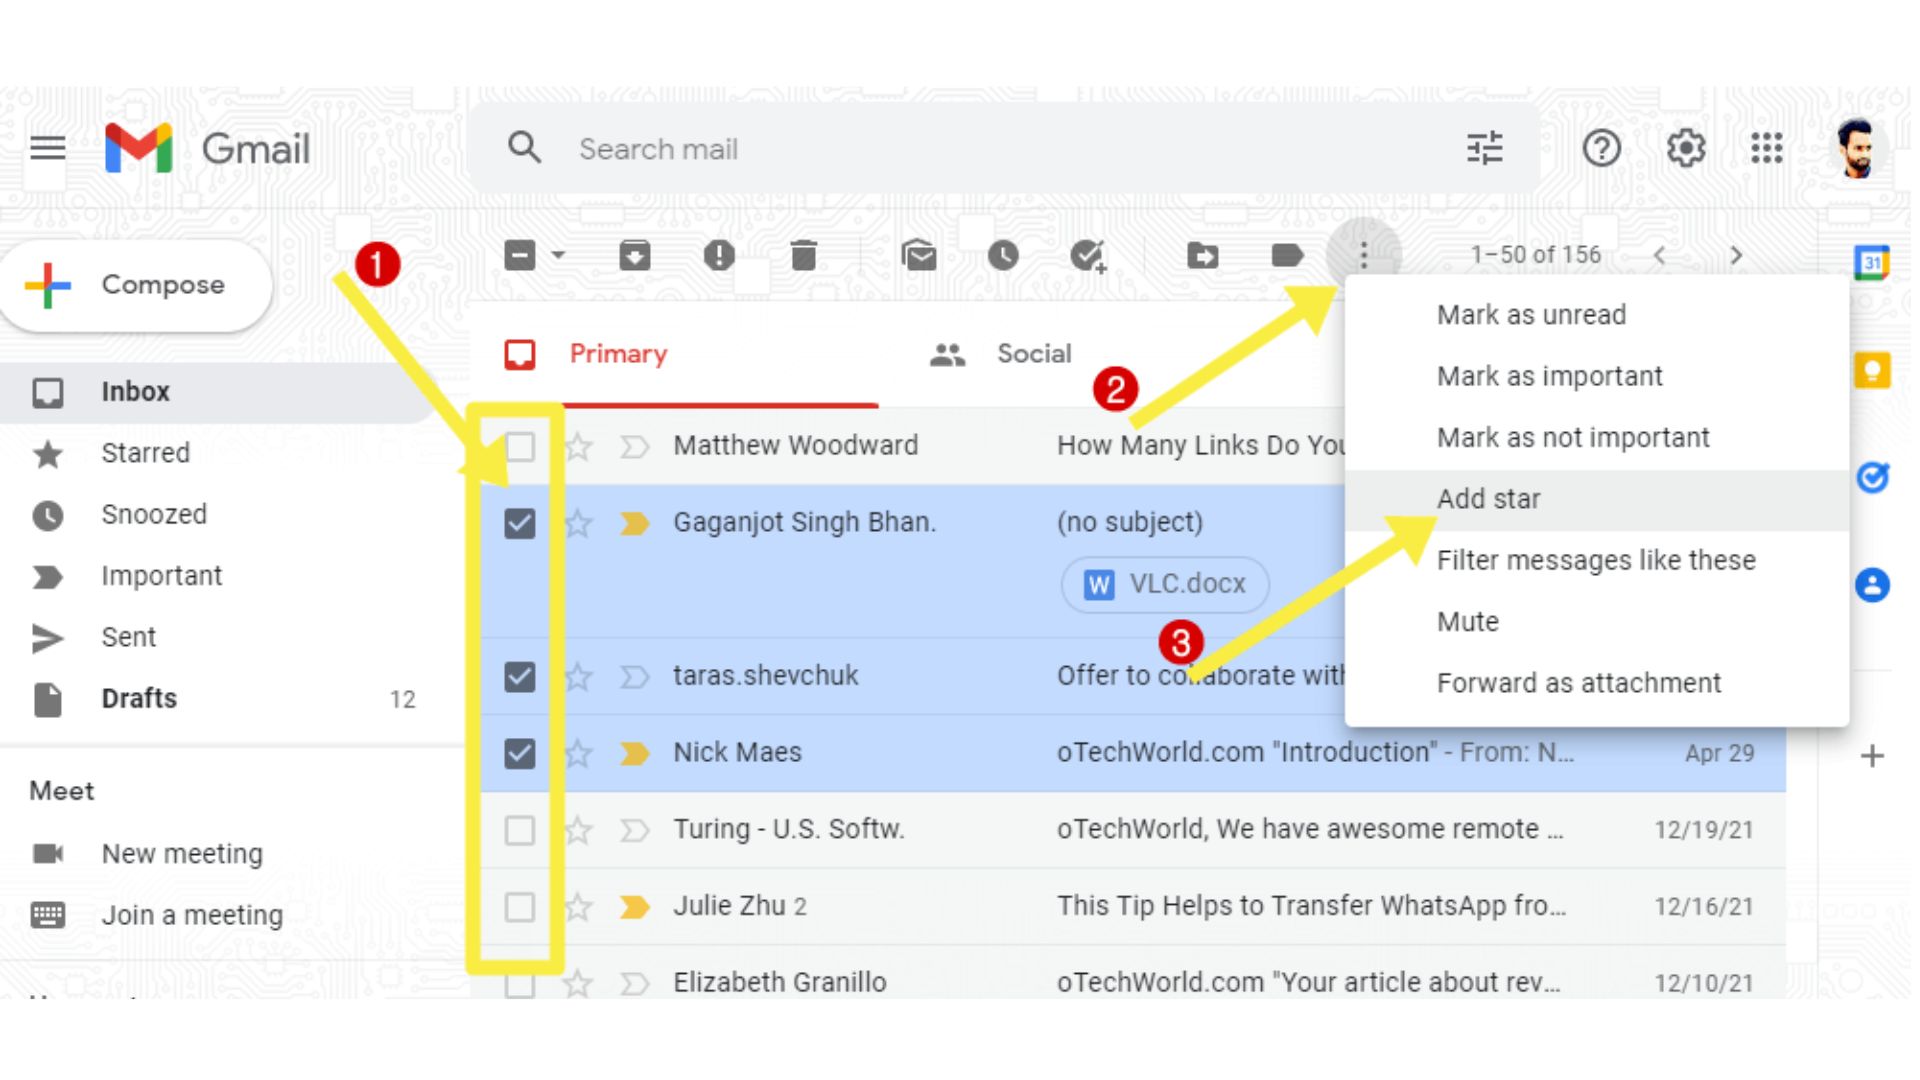
- Right-Click Menu: Another way to star a message is by using the right-click menu. Right-click on the email in your inbox, and from the dropdown menu, select “Add star.” This will instantly star the message.
After you’ve successfully starred a message, you’ll notice that the star icon beside its subject line changes to its filled state, indicating that it has been prioritized.
It’s important to note that starring a message doesn’t automatically archive or delete it. It simply flags it as important and moves it to the “Starred” section within your Gmail sidebar. You can still find starred messages in their original locations within your inbox or other labeled folders.
Now that you know how to star a message in Gmail, let’s move on to exploring how you can view and manage your starred messages more effectively.
Viewing Your Starred Messages
Gmail provides a convenient way to access and view all your starred messages in one place. Follow the steps below to view your starred messages:
- Using the Sidebar: On the left-hand side of your Gmail interface, you’ll see a list of labels. Scroll down until you find the “Starred” label. Clicking on it will display all your starred messages.
- Using the Search Bar: Another method to view your starred messages is by using the search bar at the top of the Gmail interface. Simply click on the search bar and enter “is:starred” (without quotes). Hit enter or click the magnifying glass icon, and Gmail will display all your starred messages.
- Using the Search Operators: Gmail provides various search operators that allow you to refine your search for starred messages. For example, you can combine the “is:starred” operator with other search criteria such as a specific sender, subject, or date range to narrow down your results.
Once you’ve accessed your starred messages, you can easily review, reply to, or take further actions on those important emails. Remember that starred messages will continue to appear in their original locations within your inbox or labeled folders as well.
Being able to view your starred messages separately enables you to focus on important conversations and ensures that you don’t miss any critical information.
Now that you know how to view your starred messages in Gmail, let’s explore how you can organize them using labels.
Organizing Starred Messages with Labels
In Gmail, organizing your starred messages becomes even more efficient by utilizing labels. Labels act as virtual folders that allow you to categorize and group related emails together. By applying labels to your starred messages, you can further enhance your email management. Here’s how you can organize your starred messages with labels:
- Creating Labels: To create a label, navigate to the left-hand side of your Gmail interface and locate the “Labels” section. Click on the “Create new label” option. Give your label a descriptive name, such as “Important” or “Action Required.” Once created, you can apply this label to your starred messages.
- Applying Labels: To apply a label to a starred message, open the email and click on the “Label” icon or option (represented by a folder icon). From the dropdown menu, select the desired label. You can assign multiple labels to a single message, allowing you to categorize it in different ways.
- Viewing Labeled Messages: To view messages with a specific label, navigate to the left-hand side of your Gmail interface and click on the corresponding label under the “Labels” section. This will display all the messages with that particular label, including your starred messages.
- Removing Labels: If you want to remove a label from a starred message, open the email, click on the “Label” icon or option, and uncheck the label. This will remove the label from the message while keeping it starred.
By organizing your starred messages with labels, you can quickly locate and manage important emails based on specific criteria. Whether it’s categorizing them by project, priority, or any other custom classification, labels offer a flexible way to stay organized within Gmail’s ecosystem. Remember that labeled starred messages will still appear in the “Starred” section, ensuring they remain easily accessible.
Now that you know how to organize your starred messages with labels, let’s move on to learning how to search for them efficiently.
Searching for Starred Messages
Gmail’s searching capabilities make it effortless to find specific starred messages in a cluttered inbox. By utilizing Gmail’s search operators, you can quickly narrow down your search and locate the exact messages you need. Here’s how you can search for starred messages in Gmail:
- Basic Search: To search for starred messages, click on the search bar at the top of the Gmail interface. Enter “is:starred” (without quotes) followed by any additional search criteria, such as a keyword, sender, subject, or date range. Hit enter or click the magnifying glass icon to initiate the search.
- Advanced Search Operators: Gmail offers various search operators that can help you further refine your search for starred messages. For example, you can combine the “is:starred” operator with other operators like “from:”, “subject:”, or “before:” to narrow down your results to specific senders, subjects, or time frames.
- Search Suggestions: As you type in the search bar, Gmail provides suggestions based on your email history and starred messages. These suggestions can help you quickly find relevant messages without having to type out the full search query.
By using these powerful search capabilities, you can easily locate starred messages that might otherwise get lost in your inbox. Whether you’re searching for recent starred messages, starred messages from a specific sender, or starred messages related to a particular project, Gmail’s search functionality has you covered.
Remember that starred messages will still appear in the “Starred” section in your Gmail sidebar, regardless of the search results. This ensures that you have multiple ways to locate and access your important emails.
Now that you know how to efficiently search for starred messages in Gmail, let’s explore some additional tips and tricks to customize your star options.
Customizing Star Options in Gmail
In Gmail, you have the flexibility to customize your star options to suit your preferences and workflow. By personalizing the star icons and colors, you can add a visual element to help differentiate and prioritize your starred messages. Here’s how you can customize the star options in Gmail:
- Star Settings: To access the star settings, click on the gear icon in the top-right corner of your Gmail interface and select “Settings” from the dropdown menu. In the settings menu, navigate to the “Labels” tab. Scroll down until you find the “Stars” section.
- Choose Star Types: In the star settings, you’ll see a list of available star options. You can select and enable different star icons to represent different levels of importance or significance. By default, Gmail provides one yellow star, but you can choose to enable additional stars from the list.
- Assign Star Colors: Along with star types, you can also assign different colors to each star. This feature allows you to visually categorize your starred messages based on your preferences. For instance, you might use a red star for urgent emails, a green star for important but non-urgent emails, and a blue star for personal correspondences.
- Drag and Drop: To reorder the star options, simply click and drag them in the star settings menu. This allows you to prioritize the star types according to your preferred order.
- Save Changes: Once you have customized your star options, scroll down to the bottom of the settings page and click on the “Save Changes” button to apply your new star settings.
By customizing your star options, you can personalize your Gmail experience and tailor it to match your workflow. Having different star types and colors helps you visually identify the level of importance or urgency of each starred message at a glance.
Remember that these customizations do not affect how your starred messages are displayed in the “Starred” section or in their original locations. The customization solely impacts the visual representation of the stars.
Now that you know how to customize your star options in Gmail, let’s move on to learning some tips and tricks for using stars effectively.
Tips and Tricks for Using Stars in Gmail
Stars in Gmail are a versatile tool that can greatly enhance your email management and organization. Here are some tips and tricks to help you make the most out of using stars in Gmail:
- Establish a Star System: Create a system that assigns specific meanings to different star types and colors. For example, you can use a red star for urgent emails, a yellow star for important but non-urgent emails, and a green star for emails that require further action. This way, you can easily identify the priority and importance of each message at a glance.
- Consistent Usage: Stay consistent with your star usage to avoid confusion. Use stars only for important messages that require your attention or further action. Avoid starring every message, as it may diminish the effectiveness of the star system.
- Combine Stars with Labels: Leverage the power of labels in conjunction with stars to further organize and categorize your messages. Apply relevant labels to your starred messages to classify them by projects, clients, or other custom categories. This allows for advanced filtering and easy retrieval of specific groups of messages.
- Unstar and Reevaluate: Regularly review your starred messages to identify any emails that no longer require priority. Unstar messages that have been resolved, delegated, or no longer hold significant importance. This keeps your starred messages focused on current and actionable items.
- Use Search Operators: Combine the “is:starred” search operator with other search parameters to quickly find specific starred messages. This saves time and ensures you can locate important emails even if you have a large number of starred messages in your account.
- Utilize Mobile Apps: Take advantage of Gmail’s mobile apps to manage your starred messages on the go. The mobile apps provide easy access to your starred messages, allowing you to stay organized and productive even when you’re away from your computer.
By following these tips and utilizing the power of stars in Gmail, you can streamline your email workflow, ensure important messages receive the attention they deserve, and maintain an organized inbox.
Now that you’re equipped with these practical tips and tricks, you can make the most of using stars in Gmail to stay organized and efficient in managing your emails.