
Why Use Labels in Gmail
Gmail labels are a powerful organizational tool that can help you tame the chaos of your inbox and stay on top of your email communications. With labels, you can categorize and sort your messages, making it easier to find important emails, track ongoing conversations, and prioritize your tasks. Here are some reasons why you should consider using labels in Gmail:
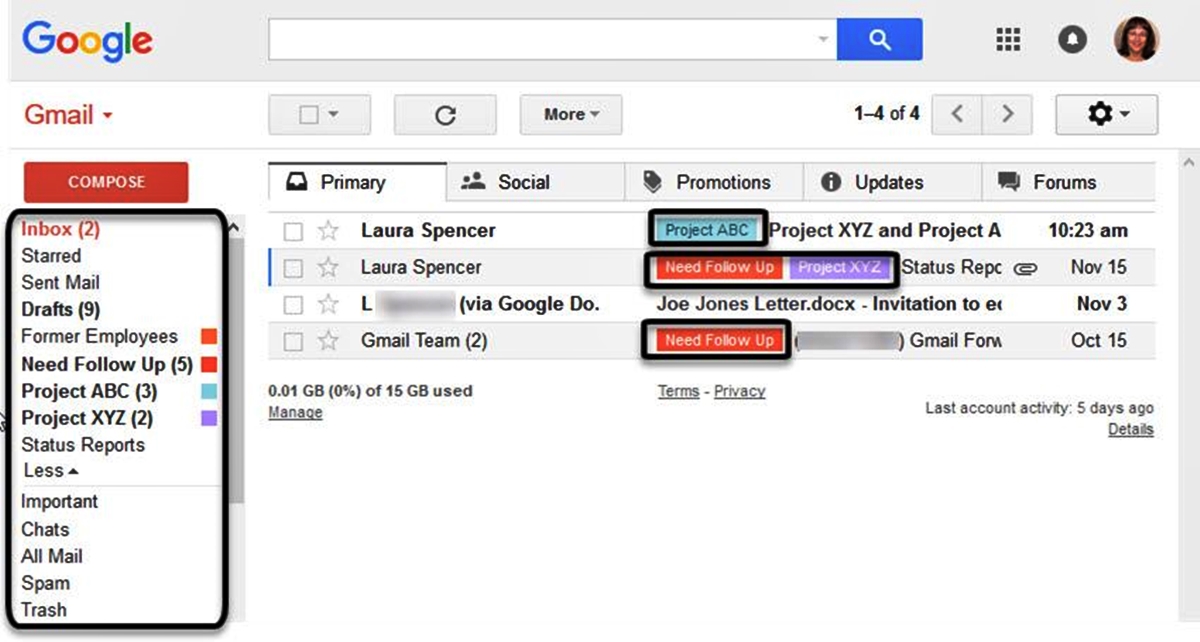
- Better Organization: Labels allow you to create a structured system for organizing your emails. Instead of relying solely on the default hierarchical folder structure, labels provide a flexible way to categorize your messages. You can assign multiple labels to a single email, making it easier to locate specific conversations later.
- Efficient Email Management: Labels can help you separate important emails from the clutter. By tagging messages with relevant labels, you can quickly identify and prioritize the emails that require immediate attention. This can save you time and ensure that important emails don’t get lost in the sea of unread messages.
- Track Ongoing Conversations: Labels enable you to group related emails together, making it simple to track conversations. Instead of searching through your entire inbox or relying on the chronological view, you can easily locate all the messages associated with a particular project, client, or topic by simply clicking on the corresponding label.
- Customizable Organization: Gmail allows you to create and customize labels according to your specific needs. You can choose a label name that makes sense to you, whether it’s based on clients, projects, priority levels, or any other criteria. This level of personalization ensures that your email organization system aligns with your unique workflow.
- Quick Email Filtering: Labels provide a convenient way to filter emails based on specific criteria. You can set up filters that automatically assign labels to incoming messages, helping you sort and prioritize emails as they arrive. This automation can significantly streamline your email management process.
Overall, Gmail labels offer a powerful solution for managing your emails effectively and efficiently. By implementing a labeling system that suits your needs, you can bring order to your inbox, increase productivity, and stay on top of your email correspondence.
How to Create Labels in Gmail
Gmail makes it easy to create labels and personalize your email organization system. Follow these simple steps to create labels in Gmail:
- Step 1: Login to your Gmail account on your computer or mobile device.
- Step 2: On the left side of the Gmail interface, you will find the label section. Scroll down and click on the “+ Create new label” option.
- Step 3: A pop-up window will appear. Enter the desired name for your new label in the “Label name” field.
- Step 4: Optionally, you can choose to create a sublabel by selecting an existing label from the “Nest label under” dropdown menu. This allows you to organize your labels hierarchically.
- Step 5: Click on the “Create” button to save your new label.
That’s it! You have successfully created a label in Gmail. The new label will now appear in the label section on the left side of the Gmail interface.
To create additional labels, simply repeat the above steps. You can create as many labels as you need to organize your emails effectively.
Note that labels are not the same as folders in Gmail. While folders are mutually exclusive, an email can have multiple labels assigned to it. This feature allows for greater flexibility in organizing your emails and makes it easier to categorize and locate messages later.
In addition to manually creating labels, Gmail also allows you to automatically assign labels to incoming emails using filters. This can be helpful for managing specific types of emails or categorizing messages from specific senders.
Now that you know how to create labels in Gmail, you can begin organizing your emails in a way that suits your needs and enhances your productivity. With a well-structured labeling system in place, you’ll be able to find and manage your emails more efficiently.
Customizing Labels in Gmail
In Gmail, you have the flexibility to customize your labels according to your preferences and workflow. Here are some ways to customize labels in Gmail:
- Label Colors: Gmail allows you to assign colors to your labels, making it easier to visually identify and differentiate them. To assign a color to a label, simply right-click on the label in the sidebar, select “Label color,” and choose your desired color from the palette.
- Label Visibility: By default, Gmail displays all your labels in the sidebar. However, you can choose to hide specific labels that you don’t frequently use. To hide a label, simply go to the label section, hover over the label you want to hide, click on the three dots that appear, and select “Hide” from the options.
- Label Descriptions: Adding descriptions to your labels can provide additional context and information. To add a description to a label, right-click on the label in the sidebar, select “Label settings,” enter the description in the “Description” field, and click “Save.”
- Order of Labels: Gmail allows you to customize the order in which your labels are displayed in the sidebar. To change the order, simply click and drag a label to your desired position.
- Hide Labels from Certain Sections: Gmail has different sections such as primary, social, promotions, updates, and forums. You can choose to hide specific labels from certain sections to reduce clutter. To do this, right-click on the label, go to “Label settings,” and uncheck the sections where you want the label to be hidden.
These customization options give you greater control over how your labels appear and function in Gmail. By utilizing them, you can create a label system that is tailored to your specific needs and preferences. Take some time to experiment with these customization features to optimize your email organization in Gmail.
How to Add Labels to Inbox Messages
Labels in Gmail provide a convenient way to categorize and organize your inbox messages. Here’s how you can add labels to inbox messages:
- Method 1: Manual Labeling
- Select the email(s) you want to label by clicking the checkbox next to the message(s).
- At the top of the Gmail interface, you’ll find the label icon (a square with a tag inside). Click on it.
- A dropdown will appear, showing your existing labels. Select the label(s) you want to apply to the selected email(s).
- The labels will be added to the emails, and you’ll see them listed in the label section on the left side of the Gmail interface.
- Method 2: Drag and Drop Labeling
- Click and hold the desired label from the label section on the left side of the Gmail interface.
- While holding the mouse button, drag the label onto the email(s) you want to label in the inbox.
- Release the mouse button to drop the label onto the email(s).
- Method 3: Right-click Labeling
- Right-click on the email(s) you want to label in the inbox.
- In the context menu that appears, hover over the “Label as” option.
- A submenu will appear, displaying your existing labels. Select the label(s) you want to apply to the email(s).
Using any of these methods, you can easily add labels to your inbox messages, helping you organize and locate them more effectively. Remember that you can assign multiple labels to a single email, allowing you to categorize messages based on various criteria such as project, client, or priority.
By incorporating labels into your email management system, you can streamline your workflow and efficiently handle your inbox messages with ease.
How to Add Labels to Sent Messages
In Gmail, you can also add labels to the messages that you send. This can be helpful for organizing your sent messages and easily tracking ongoing conversations. Here’s how you can add labels to sent messages:
- Method 1: Manual Labeling
- After composing your email and clicking on the “Send” button, the message will be moved to the Sent folder.
- To add labels to the sent message, open the Sent folder by clicking on it in the Gmail sidebar.
- Select the sent email(s) to which you want to add labels by clicking the checkbox next to the message(s).
- At the top of the Gmail interface, click on the label icon (a square with a tag inside).
- Choose the label(s) you want to apply to the selected sent email(s) from the dropdown menu.
- The labels will be added to the sent emails, and you’ll see them listed in the label section on the left side of the Gmail interface.
- Method 2: Drag and Drop Labeling
- Open the Sent folder by clicking on it in the Gmail sidebar.
- Click and hold the desired label from the label section on the left side of the Gmail interface.
- While holding the mouse button, drag the label onto the sent email(s) you want to label.
- Release the mouse button to drop the label onto the sent email(s).
- Method 3: Right-click Labeling
- Open the Sent folder by clicking on it in the Gmail sidebar.
- Right-click on the sent email(s) to which you want to add labels.
- In the context menu that appears, hover over the “Label as” option.
- A submenu will appear, displaying your existing labels. Select the label(s) you want to apply to the sent email(s).
By adding labels to your sent messages, you can easily categorize and track conversations, making it simpler to locate specific emails and reference previous communications. This helps you stay organized and ensure that important information is easily accessible.
Take advantage of these methods to label your sent messages effectively and enhance your overall email organization in Gmail.
How to Add Labels to Drafts
In Gmail, you can also label your drafts to help categorize and organize them. Adding labels to drafts can be beneficial for tracking ongoing projects or distinguishing different types of drafts. Here’s how you can add labels to drafts in Gmail:
- Method 1: Manual Labeling
- Compose a new email and save it as a draft by clicking on the “Save” button instead of sending it.
- To add labels to the draft, click on the “Drafts” folder located on the left side of the Gmail interface.
- Select the draft(s) to which you want to add labels by clicking the checkbox next to the draft(s).
- At the top of the Gmail interface, click on the label icon (a square with a tag inside).
- Choose the label(s) you want to apply to the selected draft(s) from the dropdown menu.
- The labels will be added to the drafts, and you’ll see them listed in the label section on the left side of the Gmail interface.
- Method 2: Drag and Drop Labeling
- Open the Drafts folder by clicking on it in the Gmail sidebar.
- Click and hold the desired label from the label section on the left side of the Gmail interface.
- While holding the mouse button, drag the label onto the draft(s) you want to label.
- Release the mouse button to drop the label onto the draft(s).
- Method 3: Right-click Labeling
- Open the Drafts folder by clicking on it in the Gmail sidebar.
- Right-click on the draft(s) to which you want to add labels.
- In the context menu that appears, hover over the “Label as” option.
- A submenu will appear, displaying your existing labels. Select the label(s) you want to apply to the draft(s).
These methods allow you to easily add labels to your drafts, helping you categorize, organize, and locate them more efficiently. By applying relevant labels to your drafts, you can have a clearer picture of your ongoing projects and streamline your drafting process.
Utilize the available options to label your drafts effectively and enhance your overall email management in Gmail.
How to Add Labels to Archived Messages
In Gmail, you have the ability to add labels to archived messages, allowing you to categorize and organize them for easier retrieval in the future. Adding labels to archived messages is a great way to maintain an organized email system. Here’s how you can add labels to archived messages in Gmail:
- Method 1: Manual Labeling
- Open the “All Mail” folder in the Gmail sidebar.
- Select the archived message(s) to which you want to add labels by clicking the checkbox next to the message(s).
- At the top of the Gmail interface, click on the label icon (a square with a tag inside).
- Choose the label(s) you want to apply to the selected archived message(s) from the dropdown menu.
- The labels will be added to the archived messages, and you’ll see them listed in the label section on the left side of the Gmail interface.
- Method 2: Drag and Drop Labeling
- Open the “All Mail” folder in the Gmail sidebar.
- Click and hold the desired label from the label section on the left side of the Gmail interface.
- While holding the mouse button, drag the label onto the archived message(s) you want to label.
- Release the mouse button to drop the label onto the archived message(s).
- Method 3: Right-click Labeling
- Open the “All Mail” folder in the Gmail sidebar.
- Right-click on the archived message(s) to which you want to add labels.
- In the context menu that appears, hover over the “Label as” option.
- A submenu will appear, displaying your existing labels. Select the label(s) you want to apply to the archived message(s).
By adding labels to your archived messages, you can easily categorize and find them whenever needed. The labeled archived messages will be organized within the label section of Gmail, allowing for quick retrieval based on specific categories or criteria.
Make use of these methods to effectively label your archived messages in Gmail and maintain an organized email management system.
How to Add Labels to Starred Messages
In Gmail, you can add labels to starred messages to further organize and categorize them. Adding labels to starred messages allows you to apply additional context and easily locate important emails. Here’s how you can add labels to starred messages:
- Method 1: Manual Labeling
- Open the “Starred” folder in the Gmail sidebar.
- Select the starred message(s) to which you want to add labels by clicking the checkbox next to the message(s).
- At the top of the Gmail interface, click on the label icon (a square with a tag inside).
- Choose the label(s) you want to apply to the selected starred message(s) from the dropdown menu.
- The labels will be added to the starred messages, and you’ll see them listed in the label section on the left side of the Gmail interface.
- Method 2: Drag and Drop Labeling
- Open the “Starred” folder in the Gmail sidebar.
- Click and hold the desired label from the label section on the left side of the Gmail interface.
- While holding the mouse button, drag the label onto the starred message(s) you want to label.
- Release the mouse button to drop the label onto the starred message(s).
- Method 3: Right-click Labeling
- Open the “Starred” folder in the Gmail sidebar.
- Right-click on the starred message(s) to which you want to add labels.
- In the context menu that appears, hover over the “Label as” option.
- A submenu will appear, displaying your existing labels. Select the label(s) you want to apply to the starred message(s).
By adding labels to your starred messages, you can further categorize and organize important emails based on various criteria such as projects, clients, or priority. This allows for easier navigation and retrieval of specific emails that are starred and labeled with relevant information.
Take advantage of these labeling methods to enhance your email organization in Gmail and easily manage your starred messages.
How to Remove Labels from Messages
In Gmail, labels can be removed from messages when they are no longer relevant or need to be reorganized. Removing labels allows you to keep your email organization streamlined and up-to-date. Here’s how you can remove labels from messages in Gmail:
- Method 1: Manual Removal
- Select the message(s) from which you want to remove the label(s) by clicking the checkbox next to the message(s).
- At the top of the Gmail interface, click on the label icon (a square with a tag inside).
- In the dropdown menu that appears, uncheck the label(s) you want to remove.
- The label(s) will be removed from the selected messages.
- Method 2: Drag and Drop Removal
- Click and hold the desired label from the label section on the left side of the Gmail interface.
- While holding the mouse button, drag the label onto the message(s) from which you want to remove it.
- Release the mouse button to drop the label onto the message(s).
- The label will be removed from the selected message(s).
- Method 3: Right-click Removal
- Right-click on the message(s) from which you want to remove the label(s).
- In the context menu that appears, hover over the “Remove label” option.
- A submenu will appear, displaying your existing labels. Select the label(s) you want to remove.
- The label(s) will be removed from the selected messages.
By removing labels from messages, you can keep your email organization precise and avoid clutter. This allows you to maintain a focused and streamlined view of your emails.
Whether you need to reorganize your labels or no longer need certain labels for specific messages, using these methods will help you effectively remove labels from your messages in Gmail.
How to Create Sublabels in Gmail
Gmail offers the ability to create sublabels, which are labels nested under other labels. Sublabels allow for a more hierarchical and organized approach to labeling your emails. Here’s how you can create sublabels in Gmail:
- Step 1: Login to your Gmail account on your computer or mobile device.
- Step 2: On the left side of the Gmail interface, scroll down to the label section and click on the “+ Create new label” option.
- Step 3: In the pop-up window that appears, enter the desired name for your new label in the “Label name” field.
- Step 4: To create a sublabel, select an existing label from the “Nest label under” dropdown menu. This will establish the parent label for your new sublabel.
- Step 5: Click on the “Create” button to save your new sublabel.
Once you have created a sublabel, it will be nested under the parent label in the label section of Gmail. This allows you to create a more organized and hierarchical structure for your email labeling system.
Note that sublabels can also have their own sublabels, creating a hierarchical tree-like structure. This allows for further categorization and organization of your emails.
Utilizing sublabels in Gmail can help you achieve a more structured approach in managing your emails. With the ability to create nested labels, you can categorize your emails in a way that suits your specific needs, making it easier to locate and manage them efficiently.
How to Nest Labels in Gmail
Gmail provides the option to nest labels, allowing you to create a hierarchical structure for organizing your emails. Nesting labels can help you establish a more detailed and organized system based on different categories or subtopics. Here’s how you can nest labels in Gmail:
- Step 1: Log in to your Gmail account on your computer or mobile device.
- Step 2: On the left side of the Gmail interface, scroll down to the label section and click on the “+ Create new label” option.
- Step 3: In the pop-up window that appears, enter the desired name for your new label in the “Label name” field.
- Step 4: To nest the label under an existing label, select the parent label from the “Nest label under” dropdown menu.
- Step 5: Click on the “Create” button to save your nested label.
Once you have created a nested label, it will appear indented under the parent label in the label section of Gmail. This visually represents the hierarchical relationship between the labels.
You can continue to nest labels further by creating sublabels under existing nested labels. Simply follow the same steps mentioned above and choose the appropriate parent label when creating the sublabel.
Nesting labels allows you to create a more organized and structured approach to organizing your emails. You can categorize your emails into broad categories with parent labels and then further break them down into subcategories with nested labels. This hierarchical structure enables you to easily navigate and locate emails based on specific criteria or topics.
By utilizing nested labels in Gmail, you can establish a more detailed and personalized system for organizing and managing your emails.
How to Add Multiple Labels to Messages
In Gmail, you have the flexibility to add multiple labels to your messages, allowing for more precise organization and easy retrieval. Assigning multiple labels to messages can help you categorize them under different criteria or topics. Here’s how you can add multiple labels to messages in Gmail:
- Method 1: Manual Labeling
- Select the message(s) you want to label by clicking the checkbox next to the message(s).
- At the top of the Gmail interface, click on the label icon (a square with a tag inside).
- In the dropdown menu that appears, select the labels you want to assign to the selected message(s) by checking the checkboxes next to them.
- The selected labels will be added to the messages, and they will appear in the label section on the left side of the Gmail interface.
- Method 2: Drag and Drop Labeling
- Click and hold the desired labels from the label section on the left side of the Gmail interface.
- While holding the mouse button, drag the labels onto the message(s) you want to label.
- Release the mouse button to drop the labels onto the message(s).
- The labels will be added to the messages, and they will appear in the label section on the left side of the Gmail interface.
- Method 3: Right-click Labeling
- Right-click on the message(s) you want to label.
- In the context menu that appears, hover over the “Label as” option.
- A submenu will appear, displaying your existing labels. Select the multiple labels you want to assign to the message(s).
- The selected labels will be added to the messages, and they will appear in the label section on the left side of the Gmail interface.
By using any of these methods, you can easily add multiple labels to your messages in Gmail. This allows for a more detailed and versatile organization of your emails, ensuring that they can be easily accessed and managed based on different criteria or topics.
Take advantage of the ability to assign multiple labels to messages, and make the most out of Gmail’s robust labeling system to keep your emails well-organized and easily accessible.
How to Color-code Labels in Gmail
Gmail offers a convenient feature that allows you to color-code your labels, enabling you to visually distinguish and organize your emails. Color-coding labels can enhance your email management system and make it easier to identify specific categories or priorities at a glance. Here’s how you can color-code labels in Gmail:
- Step 1: Login to your Gmail account on your computer or mobile device.
- Step 2: On the left side of the Gmail interface, scroll down to the label section.
- Step 3: Right-click on the label to which you want to assign a color.
- Step 4: In the context menu that appears, select the “Label color” option.
- Step 5: Choose the desired color from the available palette.
- Step 6: The selected label will now be color-coded, and the color will be applied to the label in the label section.
By color-coding labels, you can quickly identify and differentiate between various categories or types of emails in your inbox. For example, you can assign a red color to labels associated with urgent tasks or a blue color to labels for personal emails.
In addition to color-coding individual labels, Gmail also provides the option to color-code entire categories of emails. This can be done by assigning a color to the parent label, and the color will automatically apply to all sublabels within that category.
Color-coded labels serve as visual cues, making it easier to locate and prioritize specific emails without having to read through each message individually. This can significantly enhance your email management workflow and improve overall efficiency.
Experiment with different colors and assign them to your labels based on your personal preferences and organizational needs. By color-coding your labels in Gmail, you can create a more visually appealing and intuitive email organization system.
How to Filter Messages by Labels
Gmail’s filtering feature allows you to automatically sort and organize your emails based on specific labels. Filtering messages by labels helps you streamline your inbox and quickly access emails that meet certain criteria. Here’s how you can filter messages by labels in Gmail:
- Step 1: Login to your Gmail account on your computer or mobile device.
- Step 2: At the top of the Gmail interface, locate the search bar.
- Step 3: Type the label name in the search bar, preceded by the “label:” keyword. For example, if you want to filter messages with the label “Work,” type “label:Work”.
- Step 4: Hit the Enter or Return key on your keyboard or click the search icon.
- Step 5: Gmail will display all the messages that are assigned with the specified label.
In addition to searching for individual labels, you can also combine multiple labels to create more precise filters. For example, if you want to filter messages that have both the “Work” and “Important” labels, you can type “label:Work label:Important” in the search bar.
You can further refine your label filters by adding other search parameters like sender, recipient, specific words, or date range. This allows you to create complex filters that bring together various criteria to precisely locate the emails you need.
Gmail’s ability to filter messages by labels provides a powerful organizational tool. By leveraging this feature, you can automatically sort and manage your emails, saving you time and improving your productivity. Whether it’s categorizing work-related emails, identifying important messages, or filtering specific projects, label filtering allows for efficient email management.
Take advantage of Gmail’s filtering capability and use label filters to streamline your inbox and effortlessly find the emails you need.
How to Search Messages by Labels
Gmail provides a robust search functionality that allows you to easily find messages based on their assigned labels. Searching messages by labels can help you locate specific emails within your inbox, making it convenient to access conversations and information related to a particular category or topic. Here’s how you can search messages by labels in Gmail:
- Step 1: Login to your Gmail account on your computer or mobile device.
- Step 2: In the search bar at the top of the Gmail interface, type the label name followed by a colon (:). For example, if you want to search for messages with the label “Work,” type “Work:” in the search bar.
- Step 3: Hit the Enter or Return key on your keyboard or click the search icon.
- Step 4: Gmail will display all the messages that are assigned with the specified label.
In addition to searching for a single label, you can combine multiple labels in your search to further refine the results. For example, if you want to search for messages that have both the “Work” and “Important” labels, type “label:Work label:Important” in the search bar.
Furthermore, you can also combine label searches with other search criteria, such as a specific sender, recipient, subject keyword, or date range, to narrow down the results and find exactly what you’re looking for.
Gmail’s search capability combined with label searches empowers you to quickly locate and access specific emails without having to manually navigate through your entire inbox. Whether it’s retrieving project-related conversations, finding important updates, or referencing specific topics, searching messages by labels provides a convenient and efficient way to manage your email communications.
Make the most of Gmail’s robust search functionality and use label searches to easily locate and retrieve messages based on specific labels that are relevant to your organizational needs.
How to Automate Label Actions with Filters
Gmail’s filter feature allows you to automate label actions based on specific criteria. By setting up filters, you can automatically apply labels to incoming emails, making it easier to categorize and organize your messages without manual intervention. Here’s how you can automate label actions with filters in Gmail:
- Step 1: Login to your Gmail account on your computer or mobile device.
- Step 2: In the search bar at the top of the Gmail interface, click on the down arrow icon on the right side.
- Step 3: In the dropdown menu that appears, specify the search criteria for the emails you want to apply labels to (e.g., sender, recipient, subject, keywords).
- Step 4: Click on the “Create filter” link next to the search bar.
- Step 5: Choose the label(s) you want to apply to the filtered emails by selecting the “Apply the label” checkbox and selecting the desired label(s) from the dropdown menu.
- Step 6: Optionally, you can also choose to apply the filter to existing conversations by selecting the “Also apply filter to X matching conversations” checkbox.
- Step 7: Click on the “Create filter” button to save the filter and apply the specified label actions.
Once the filter is set up, Gmail will automatically apply the designated label(s) to incoming emails that meet the specified criteria. This saves you time and effort in manually applying labels to individual messages.
Additionally, Gmail filters allow you to perform other actions besides applying labels, such as archiving, marking as read, forwarding to another email address, or deleting emails. You can configure the filter to perform multiple actions simultaneously.
By automating label actions with filters, you can swiftly organize your inbox and ensure that your emails are sorted according to your desired criteria. This streamlines your email management process and enables you to focus on more important tasks without the hassle of manual labeling.
Experiment with filters in Gmail to automate label actions and discover how it can simplify and optimize your email organization.
How to Remove Labels from Messages with Filters
Gmail’s filtering feature not only allows you to apply labels to messages but also provides the ability to remove labels from messages automatically. This can be helpful when you want to reorganize or update your label system. Here’s how you can remove labels from messages with filters in Gmail:
- Step 1: Login to your Gmail account on your computer or mobile device.
- Step 2: In the search bar at the top of the Gmail interface, click on the down arrow icon on the right side.
- Step 3: In the dropdown menu that appears, specify the search criteria for the emails from which you want to remove labels (e.g., sender, recipient, subject, keywords).
- Step 4: Click on the “Create filter” link next to the search bar.
- Step 5: Choose the label(s) you want to remove from the filtered emails by selecting the “Remove the label” checkbox and selecting the desired label(s) from the dropdown menu.
- Step 6: Optionally, you can also choose to apply the filter to existing conversations by selecting the “Also apply filter to X matching conversations” checkbox.
- Step 7: Click on the “Create filter” button to save the filter and remove the specified labels from the filtered emails.
Once the filter is set up and applied, Gmail will automatically remove the designated label(s) from the emails that meet the specified criteria. This ensures that your label system remains relevant and up to date without the need for manual label removal.
Filters with label removal actions can be useful when you want to reorganize your emails or update labels based on changing priorities or criteria. By removing labels through filters, you can maintain a streamlined and accurate email organization system.
Furthermore, note that applying multiple filters with conflicting label actions may lead to unexpected results. It’s important to review and manage your filters to ensure they align with your intended label removal actions.
By utilizing filters to remove labels from messages, you can efficiently update and refine your email organization system in Gmail, saving time and effort in manually removing labels from individual emails.
How to Manage Labels on Mobile Devices
Gmail’s label management features are not limited to desktop computers but are also accessible on mobile devices, allowing you to efficiently organize and manage your emails on the go. Here’s how you can manage labels on mobile devices:
- Step 1: Open the Gmail app on your mobile device and sign in to your account.
- Step 2: Tap on the three horizontal lines icon (also known as the hamburger menu) located at the top-left corner of the app to access the menu.
- Step 3: Scroll down the menu and tap on the “Labels” option.
- Step 4: You will see a list of your existing labels. To manage a specific label, tap on it.
- Step 5: In the label settings, you can perform various actions:
- Rename: Tap on “Rename” to change the name of the label.
- Remove: Tap on “Remove” to delete the label.
- Change color: Select a new color for the label by tapping on “Label color.”
- Step 6: To create a new label, go back to the list of labels and tap on the “+” icon or “Create new” option.
- Step 7: Enter a name for the new label and customize it with a color if desired.
- Step 8: Tap on “Create” to save the new label.
With these steps, you can easily manage your labels on the Gmail app for mobile devices. Whether it’s renaming labels, deleting unnecessary ones, changing label colors, or creating new labels, you have full control over your email organization system.
Managing labels on mobile devices enables you to stay organized even when you’re away from your desktop computer. You can adapt and refine your label system as needed and ensure that your emails are properly categorized and accessible, whether you’re working on the go or simply using your mobile device for email management.
Take advantage of Gmail’s label management features on mobile devices to keep your email organization system efficient and effective, no matter where you are.
Tips for Efficient Label Management
Efficient label management is crucial for maintaining an organized and streamlined email system. Here are some tips to help you effectively manage your labels in Gmail:
- Review and Streamline: Regularly review your existing labels and ensure they are still relevant. Remove any labels that are no longer necessary, consolidating them when possible to avoid clutter.
- Consistent Label Naming: Develop a consistent naming convention for your labels to make them easily recognizable and searchable. Use clear and concise names that accurately represent the content or purpose of the label.
- Apply Multiple Labels: Take advantage of the ability to assign multiple labels to messages. Utilize this feature to accurately categorize emails based on different criteria or topics. This allows for more efficient and targeted searches.
- Color-Coding: Assign colors to your labels to visually differentiate and prioritize them in the label section. Color-coding makes it easier to locate and identify specific categories or types of emails at a glance.
- Review and Adjust Filters: Regularly review your filters and ensure they are accurately applying labels as intended. Adjust or create new filters when needed to automate label actions and streamline your email management process.
- Utilize Nested Labels: Take advantage of nested labels to create a hierarchical structure for organizing your emails. This allows for a more detailed and organized approach, especially when dealing with a large volume of emails and different categories.
- Automate Label Actions: Use filters in Gmail to automate label actions based on specific criteria. This feature saves time and streamlines your email management by automatically applying labels to incoming messages.
- Regular Maintenance: Set aside time regularly to maintain your label system. Delete or merge unnecessary labels, update existing labels as needed, and ensure that your organization system remains effective and efficient.
- Keep it Simple: Avoid excessive label creation and complexity. Strive for simplicity in your label system to ensure ease of use and avoid confusion. Focus on creating labels that genuinely serve a purpose and make your email management process smoother.
By implementing these tips, you can optimize your label management in Gmail, resulting in a more organized and efficient email workflow. A well-organized label system will enable you to quickly locate, prioritize, and manage your emails with ease.
Experiment with these label management practices to find the approach that works best for your unique needs and preferences. With effective label management, you’ll have better control over your inbox and improve your overall productivity and email organization.