
Set up Filters to Automatically Organize Emails
Are you tired of sifting through a cluttered inbox filled with irrelevant emails? Setting up filters in Gmail can be a game-changer, helping you automatically organize your emails and save time. Filters allow you to categorize incoming messages based on various criteria, such as sender, subject, keywords, or attachments.
To set up a filter in Gmail, follow these simple steps:
- Click on the settings icon in the upper right corner of your Gmail inbox.
- Select “See all settings” from the drop-down menu.
- Go to the “Filters and Blocked Addresses” tab.
- Click on “Create a new filter.”
- Specify the criteria for the filter, such as the sender’s email address, keywords in the subject line, or specific words in the email body.
- Click on “Create filter.”
- Choose what actions to apply to these filtered emails. For example, you can automatically skip the inbox, mark them as read, archive them, or apply a specific label.
- Click on “Create filter” again to save the settings.
By setting up filters, you can automate the process of organizing emails. For instance, you can create filters to automatically label and archive emails from specific senders or with specific keywords. This way, your inbox will stay clutter-free, and you can easily find and prioritize important messages.
Filters can also be handy for organizing newsletters, promotional emails, or subscription updates. You can set up a filter to automatically categorize such emails into a separate folder or label, keeping them separate from your primary inbox. This ensures that important emails from colleagues, clients, or personal contacts receive your full attention.
Remember to periodically review and update your filters. As your email habits change, you may need to modify or create new filters to accommodate these changes. With a little initial setup and regular maintenance, filters can significantly reduce the time spent sorting through your inbox, allowing you to focus on what truly matters.
Use the Archive Feature to Remove Emails from Your Inbox
Is your Gmail inbox overflowing with emails that you no longer need to keep visible in your main inbox? The Archive feature in Gmail is an excellent solution for decluttering your inbox without permanently deleting important emails. Archiving an email removes it from your inbox, but it remains accessible in your All Mail folder and can be easily retrieved if needed.
To archive an email in Gmail, follow these simple steps:
- Select the email or emails you want to archive by checking the checkbox next to each message.
- Click on the “Archive” button located at the top of your inbox, or simply press the “E” key on your keyboard.
Archived emails are not lost; they are simply moved out of your inbox to keep it clutter-free. You can still search for archived emails using keywords or apply filters to find specific messages easily.
The Archive feature is particularly useful for emails that you have read and no longer require immediate access to. For example, if you have completed a conversation or a task associated with a particular email, archiving it helps keep your inbox focused on current and relevant messages.
Gmail will automatically archive emails that have been labeled and skip the inbox based on your filter settings. This means that with the help of filters (as mentioned in the previous section), you can automatically sort incoming emails and keep important ones in your inbox while archiving others for future reference.
Furthermore, archiving emails provides an efficient way to keep your Gmail storage space optimized. Deleting emails permanently removes them from your account and reduces your storage capacity, while archiving allows you to keep important emails accessible while keeping your inbox uncluttered.
To access your archived emails, you can either navigate to the “All Mail” folder or use the search bar in Gmail to search for specific messages. You can also create custom labels and apply them to archived emails for easier organization and retrieval.
By using the Archive feature in Gmail, you can keep your inbox clean and organized without losing important emails or consuming unnecessary storage space. Take advantage of this simple yet powerful feature to streamline your email management and improve your overall productivity.
Utilize the Priority Inbox to Focus on Important Emails
Do you find it challenging to identify and prioritize important emails in your Gmail inbox? The Priority Inbox feature is a valuable tool that helps you stay focused on high-priority messages while minimizing distractions from less important emails. By intelligently organizing your inbox, Priority Inbox ensures that you never miss crucial correspondences.
To enable and use the Priority Inbox feature in Gmail, follow these steps:
- Click on the settings icon in the upper right corner of your Gmail inbox.
- Select “See all settings” from the drop-down menu.
- Go to the “Inbox” tab in the settings menu.
- Scroll down to the “Inbox type” section and select “Priority Inbox.”
- Choose the criteria you want to use for prioritizing your inbox, such as important and unread messages, starred emails, or specific labels.
- Click on “Save Changes” to apply the Priority Inbox settings.
Once you’ve set up Priority Inbox, Gmail will automatically divide your inbox into multiple sections – “Important and Unread,” “Starred,” and “Everything Else.” The “Important and Unread” section will contain messages Gmail deems as high priority, while the “Everything Else” section will display less critical emails.
By using the Priority Inbox, you can quickly scan and respond to important messages, ensuring timely communication with clients, colleagues, and anyone else whose emails you consider a priority. Starred emails will also be prominently displayed in the Priority Inbox, allowing you to highlight specific messages that require attention or follow-up.
It’s worth noting that Gmail’s Priority Inbox feature learns from your actions. As you interact with your emails, marking them as important or unimportant, Gmail will adapt and improve its sorting algorithm. Over time, this leads to a more accurate prioritization of emails based on your preferences and behavior.
If Gmail misclassifies an email as either important or unimportant, you can manually correct it by selecting the email and using the “Mark as Important” or “Mark as Unimportant” options from the menu or toolbar. This helps train Gmail’s algorithm and further enhances the accuracy of the Priority Inbox feature.
By utilizing the Priority Inbox in Gmail, you can stay focused on important emails and streamline your email management. This feature allows you to make the most efficient use of your valuable time by prioritizing messages that require immediate attention while reducing the distractions caused by less urgent emails.
Take Advantage of Gmail’s Snooze Feature
Do you ever come across emails that require your attention but not at the present moment? Gmail’s Snooze feature is the perfect solution for temporarily setting aside emails and bringing them back to your attention at a more convenient time. By utilizing the Snooze feature, you can maintain a clutter-free inbox while ensuring that important emails don’t get forgotten.
To use the Snooze feature in Gmail, follow these simple steps:
- Select the email that you want to snooze by checking the checkbox next to it.
- Click on the “Snooze” button located at the top of your inbox, or right-click on the email and select “Snooze.”
- Choose the snooze time that best suits your needs, such as later today, tomorrow, this weekend, or a custom date and time.
- Click on the snooze option to save the settings.
When an email is snoozed, it temporarily disappears from your inbox and reappears at the specified time. This way, you can focus on more pressing matters without the distraction of emails that can be dealt with later.
Gmail offers a “Snoozed” folder where you can access all snoozed emails. You can also use the search bar to find specific snoozed emails based on keywords or other criteria. Additionally, Gmail provides options to snooze emails until a specific location or event, such as when you arrive at work or when you have a scheduled meeting.
The Snooze feature not only helps you manage your inbox but also assists in prioritizing your tasks. By snoozing an email, you can ensure that it resurfaces at a time when you are better equipped to address it effectively. This feature is especially helpful for emails that require thoughtful responses or when you want to delay certain actions until a specific time.
It’s worth noting that Gmail’s Snooze feature works seamlessly across multiple devices, including your computer, smartphone, or tablet. This allows you to snooze emails wherever you are, ensuring that you never miss an important message or let emails pile up because you’re unable to respond immediately.
By taking advantage of Gmail’s Snooze feature, you can better manage your inbox, reduce email-related stress, and improve your overall productivity. Embrace the flexibility and control offered by snoozing emails, and find a balance that allows you to stay on top of your emails without getting overwhelmed.
Create Labels and Apply Them to Categorize Emails
Do you struggle to find specific emails or wish to organize your inbox in a more structured manner? Gmail’s labeling feature is a powerful tool that allows you to categorize and organize your emails based on different criteria. Creating custom labels and applying them to your emails can significantly improve your email management and help you locate important messages with ease.
To create labels in Gmail and apply them to your emails, follow these steps:
- Click on the settings icon in the upper right corner of your Gmail inbox.
- Select “See all settings” from the drop-down menu.
- Go to the “Labels” tab in the settings menu.
- Scroll down to the “Labels” section and click on “Create new label.”
- Enter a name for your label and click on “Create.”
- To apply the label to an email, select the email and click on the “Label” button located at the top of your inbox. Then, choose the desired label from the list.
Labels offer endless possibilities for organizing your emails. You can create labels for specific projects, clients, departments, or any other category that makes sense for your workflow. By applying labels to your emails, you can quickly identify and sort them into relevant folders for easier access.
Gmail provides the option to automatically apply labels using filters. This means that you can create filters based on specific criteria, such as sender, subject, or keywords, and assign corresponding labels to incoming emails. Automation saves time and ensures that emails are consistently categorized, even as new messages arrive.
Labels not only enhance the organization of your inbox but also enable better searchability. You can easily locate emails by selecting the corresponding label or by utilizing the search bar to search for emails with specific labels. This feature is particularly useful when you need to find emails related to a particular project, client, or topic.
Gmail allows for nested labels, allowing you to create a hierarchical structure for better organization. For example, you can have a “Work” label and create sub-labels for different clients or projects within it. This nesting feature provides a more granular level of categorization.
It’s essential to periodically review and declutter your labels. As your email habits change and projects evolve, you may find that certain labels become obsolete or no longer serve their purpose. By regularly evaluating and refining your labels, you can ensure that they continue to support your email organization effectively.
Create labels and apply them to categorize your emails, and experience the benefits of a well-organized inbox. Take advantage of Gmail’s labeling feature to streamline your email management and find peace of mind in knowing that important messages are easily accessible.
Use the Search Option to Find and Delete Unnecessary Emails
Is your Gmail inbox cluttered with numerous unnecessary emails, making it difficult to find important messages? Gmail’s robust search option provides a powerful tool to quickly locate and delete unwanted emails, helping you declutter your inbox and improve overall email management.
To effectively use the search option in Gmail, follow these steps:
- Click on the search bar at the top of your Gmail inbox.
- Enter keywords, sender names, or any other relevant search criteria to narrow down your search results.
- Click on the search icon or press “Enter” to perform the search.
Gmail’s search functionality offers a wide range of operators and modifiers that allow you to refine your search even further. Some useful operators include:
- “from:” to search for emails from a specific sender
- “subject:” to search for emails with specific words in the subject line
- “has:attachment” to search for emails with attachments
- “before:” or “after:” to search for emails within a certain timeframe
- “label:” to search for emails with specific labels
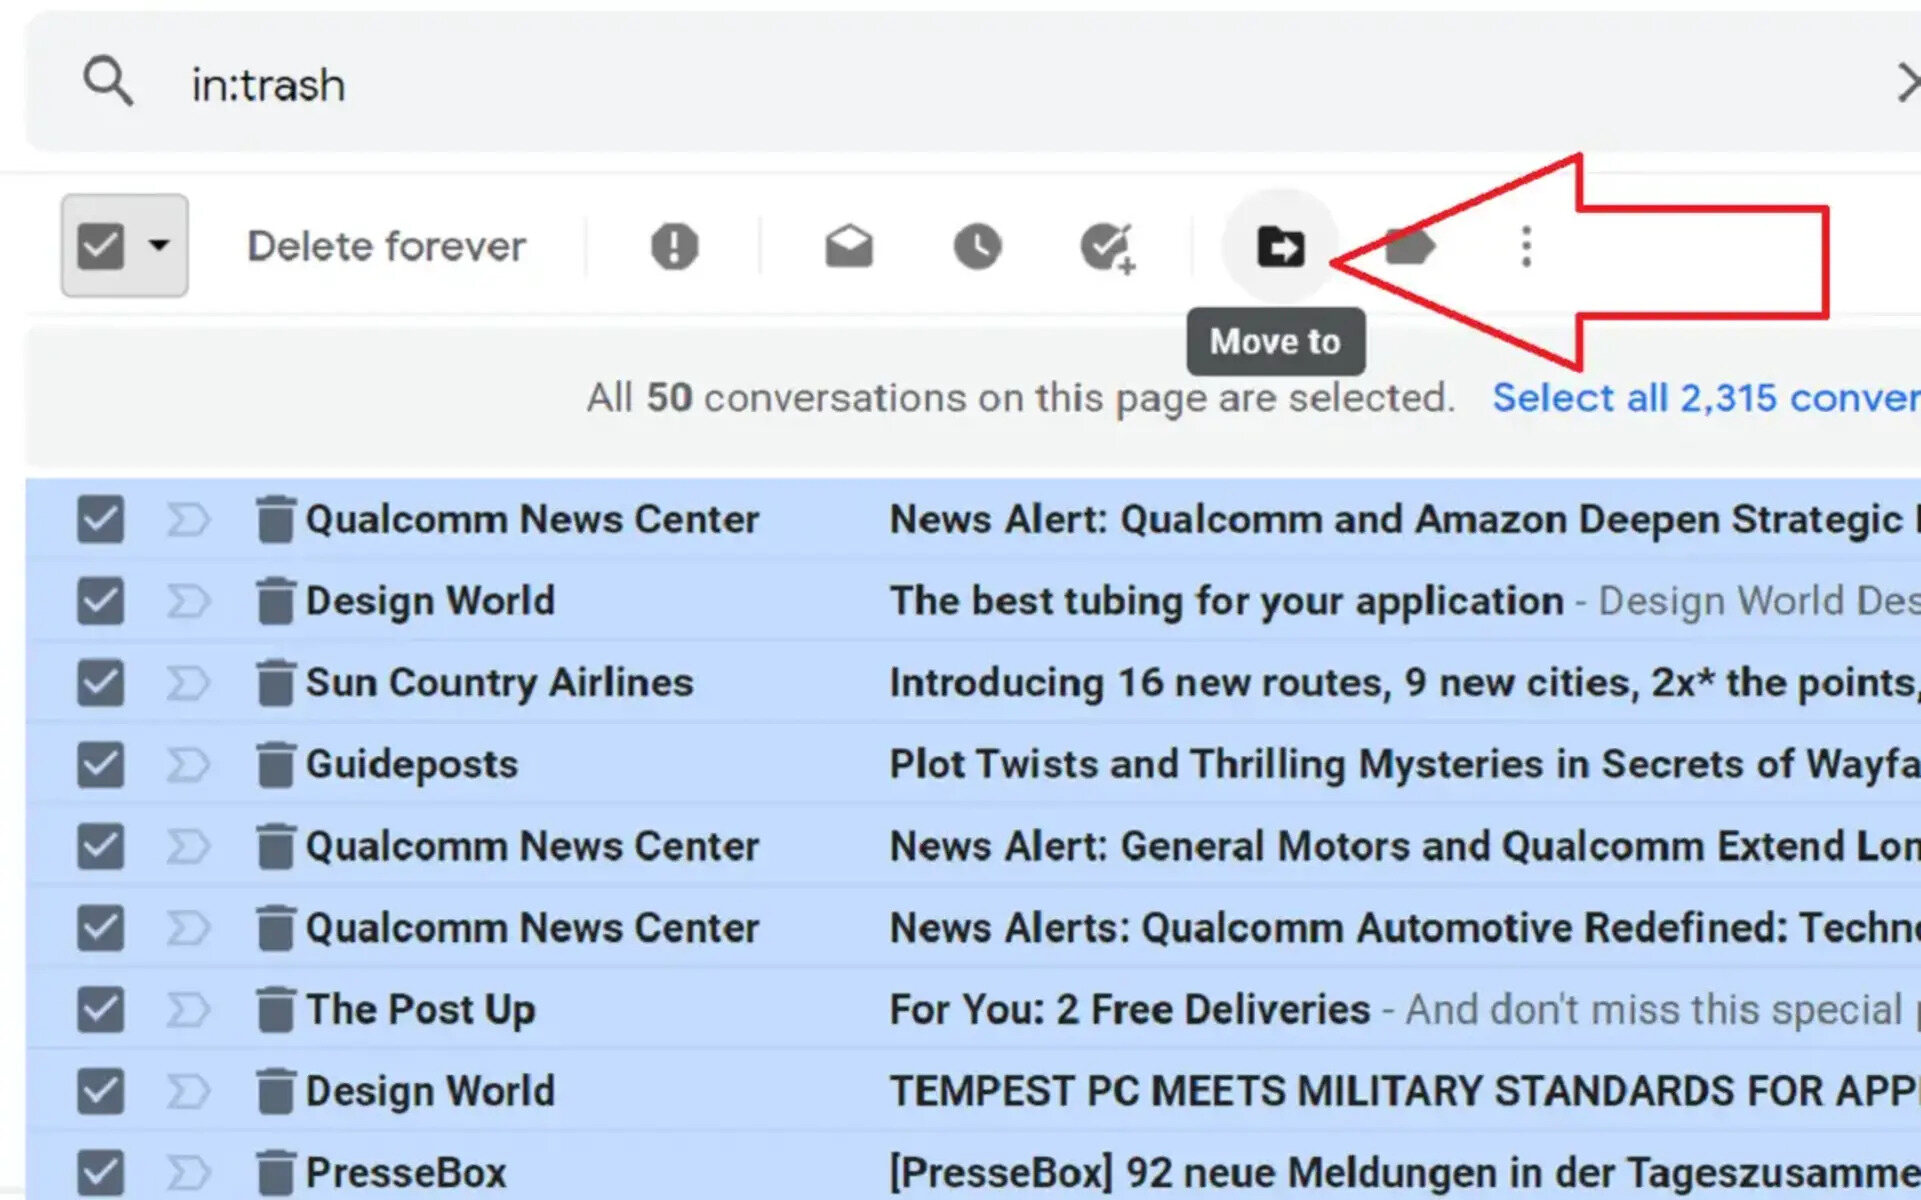
Once you’ve performed a search and identified unnecessary emails, Gmail offers various options to delete them:
- Select the emails you want to delete by checking the checkbox next to each message.
- Click on the trash can icon located at the top of your inbox, or simply press the “#” key on your keyboard.
Deleting unnecessary emails not only declutters your inbox but also frees up storage space in your Gmail account. Remember that deleted emails are moved to the trash folder and can be retrieved within a specific period before they are permanently deleted.
If you want to automatically delete specific types of unwanted emails, you can create filters (as discussed in a previous section) that directly move these emails to the trash or apply a label to them for review before deleting them. This helps streamline the process and ensures that future unwanted emails are automatically handled.
The search option in Gmail is a powerful tool that goes beyond simply finding emails. You can also use it to free up space by searching for large attachments and deleting them to optimize your storage capacity.
Regularly utilizing the search option to find and delete unnecessary emails is essential to keep your inbox clean and organized. By doing so, you can improve your productivity, reduce clutter, and focus on the emails that truly matter to you.
Unsubscribe from Unwanted Newsletters and Email Subscriptions
Is your Gmail inbox flooded with a barrage of unwanted newsletters and email subscriptions? Constantly dealing with irrelevant emails can be time-consuming and overwhelming. Take control of your inbox by unsubscribing from these unwanted communications, allowing you to regain focus on the emails that truly matter.
To unsubscribe from newsletters and email subscriptions in Gmail, follow these steps:
- Open an email from the newsletter or subscription you want to unsubscribe from.
- Scroll to the bottom of the email.
- Look for the unsubscribe link, often located in small font at the bottom of the email.
- Click on the unsubscribe link.
- Follow any prompts or instructions provided to complete the unsubscribe process.
By unsubscribing from unwanted newsletters and email subscriptions, you can reduce the influx of unnecessary emails and keep your inbox tidy. However, keep in mind that it may take a few days for the unsubscribe request to take effect, and you may still receive emails during that time. So, be patient and continue unsubscribing from other unwanted communications.
If an email does not have an unsubscribe link, you can use the Gmail search option to find and identify these emails. Use keywords like “unsubscribe” or the name of the company or publication to locate such emails. Alternatively, you can create filters to automatically move these emails to a specific folder or label for easy identification and review before unsubscribing.
It’s important to note that legitimate companies are required to include an unsubscribe link in their emails. If you repeatedly receive emails from a sender who doesn’t provide an unsubscribe option, mark the email as spam, and Gmail’s spam filters will help prevent similar emails from reaching your inbox.
Unsubscribing from unwanted newsletters and email subscriptions not only declutters your inbox but also improves the overall quality of your email communications. It allows you to focus on messages that are important to you, ensuring that you’re not distracted by irrelevant information.
Be selective about the newsletters and subscriptions you choose to keep. Consider whether the content is genuinely valuable and aligns with your interests or professional goals. By being mindful of the sources you subscribe to, you can maintain a more streamlined and curated inbox experience.
Regularly reviewing and unsubscribing from unwanted newsletters and subscriptions is an ongoing process. As your interests and needs change, your preferences for the content you receive may evolve as well. Stay proactive in managing your email subscriptions to maintain a clutter-free inbox and maximize the effectiveness of your email communication.
Utilize the “Mark as Read” Feature to Quickly Clear your Inbox
Do you find yourself overwhelmed by a cluttered Gmail inbox with numerous unread emails? Gmail’s “Mark as Read” feature is a handy tool that allows you to quickly clear your inbox by marking selected or all emails as read. By utilizing this feature, you can reduce email anxiety and stay organized.
To mark emails as read in Gmail, follow these steps:
- Select the emails you want to mark as read by checking the checkbox next to each message. Alternatively, you can choose to mark all emails in your inbox as read.
- Click on the “More” button located at the top of your inbox.
- Select the “Mark as read” option from the drop-down menu.
Marking emails as read will remove the visual indication of unread messages, making it easier to identify new and important emails at a glance. This can be especially helpful in reducing the overwhelm that comes with a cluttered inbox.
If you prefer to automate the process, you can use filters to automatically mark certain emails as read based on specific criteria. For example, you can create a filter to mark emails from specific senders or with specific keywords as read upon arrival. This way, you can ensure that less important or non-urgent emails are immediately marked as read and don’t clutter your inbox.
Keep in mind that marking an email as read does not delete or archive it. It simply removes the unread indicator. The marked email will still be accessible in your inbox, labeled folders, or All Mail folder depending on how you have organized your emails.
The “Mark as read” feature is particularly useful when you have scanned through emails, but do not necessarily need to respond or take any further action on them. By marking those emails as read, you can mentally prioritize your tasks and focus on emails that require your attention and response.
If you accidentally mark an email as read, Gmail provides an “Undo” option that appears briefly at the top of your inbox. Clicking on “Undo” will revert the email’s status back to unread, ensuring you don’t miss any important messages.
By utilizing the “Mark as Read” feature in Gmail, you can quickly clear your inbox of unread emails, reduce clutter, and improve your email management. Keep your inbox organized and efficient by regularly applying this feature to stay on top of your email communications.
Use Keyboard Shortcuts to Speed Up Your Email Management
Are you looking for ways to streamline your email management in Gmail and save precious time? Gmail offers a range of keyboard shortcuts that can significantly improve your efficiency and productivity when handling emails. By mastering these shortcuts, you can navigate through your inbox, perform actions, and respond to messages with ease.
To enable and use keyboard shortcuts in Gmail, follow these steps:
- Click on the settings icon in the upper right corner of your Gmail inbox.
- Select “See all settings” from the drop-down menu.
- Go to the “General” tab in the settings menu.
- Scroll down to the “Keyboard shortcuts” section and ensure the “Keyboard shortcuts on” option is selected.
- Click on “Save Changes” to apply the keyboard shortcuts.
Once you have enabled keyboard shortcuts, you can use various combinations of keys to perform common actions:
- “C” to compose a new email
- “R” to reply to an email
- “F” to forward an email
- “E” to archive an email
- “#” to delete an email
- “N” to move to the next email
- “P” to move to the previous email
- “X” to select an email
These are just a few examples of the many keyboard shortcuts available in Gmail. The more shortcuts you learn, the faster and more efficient you’ll become in managing your emails.
Using keyboard shortcuts can help you perform actions without the need to navigate menus or use a mouse. This saves time and minimizes the chances of distraction. With practice, the use of shortcuts will become second nature, enhancing your workflow and enabling you to accomplish tasks more rapidly.
If you ever forget a specific shortcut, you can always press “?” within Gmail to access the full list of available keyboard shortcuts. Take the time to familiarize yourself with the most useful shortcuts for your email management needs.
It’s important to note that keyboard shortcuts might vary depending on the browser or operating system you are using. Make sure to consult Gmail’s official documentation or review the shortcut settings in your specific environment to ensure compatibility and optimization.
To fully leverage the benefits of keyboard shortcuts, regularly practice and reinforce your knowledge. The more you incorporate these shortcuts into your daily email management routine, the more proficient and efficient you’ll become.
By using keyboard shortcuts, you can drastically speed up your email management in Gmail, allowing you to focus on essential tasks rather than getting caught up in repetitive actions. Embrace the power of shortcuts and experience a more streamlined and productive email workflow.
Set Up Reminders to Follow Up on Important Emails
Have you ever forgotten to follow up on important emails, causing delays and missed opportunities? Gmail’s reminder feature can be a valuable tool to ensure that you never overlook crucial email threads. By setting up reminders, you can stay organized, stay on top of your tasks, and maintain effective communication.
To set up reminders in Gmail, follow these steps:
- Open the email you want to set a reminder for.
- Click on the “More” button located at the top of the email.
- Select the “Add to tasks” option from the dropdown menu.
By adding an email to tasks, you are effectively creating a reminder to follow up on that particular thread. This ensures that important conversations or action items do not get forgotten or lost amidst other emails.
Once you have set a reminder, Gmail will automatically add it to your Google Tasks list, which can be accessed from the workspace sidebar in Gmail, Google Calendar, or directly through the Google Tasks app.
Google Tasks provides a convenient interface where you can view and manage all your reminders. You can set due dates, add notes, and even create subtasks within each reminder. This allows you to break down larger tasks into manageable steps and stay organized.
Furthermore, Google Tasks seamlessly integrates with other Google services, such as Google Calendar. Reminders set in Google Tasks will also be visible in your calendar so that you can see your email-related tasks alongside your other appointments and events.
It’s important to review your Google Tasks regularly to stay on top of your email reminders. Prioritize your tasks, set realistic due dates, and mark them as complete once you’ve taken the necessary action. Regularly updating and reviewing your tasks will help you stay organized and ensure that you never miss an important follow-up.
Moreover, Gmail allows you to easily convert an email into a task even if you don’t have it open. By hovering over an email in your inbox or search results, clicking the three-dot menu, and selecting “Add to Tasks,” you can quickly create a reminder without losing your current context.
By utilizing the reminder feature in Gmail, you can maintain an organized workflow, prioritize important email conversations, and ensure timely responses. Take advantage of this powerful tool to stay on top of your email communications and ensure that crucial follow-ups are never overlooked or delayed.