
Adding and organizing songs in an Apple Music playlist
Creating and organizing playlists in Apple Music allows you to curate a collection of songs that perfectly suits your mood or style. Whether you want to create a playlist for a road trip, workout session, or simply to unwind, Apple Music provides a seamless experience for adding and organizing songs.
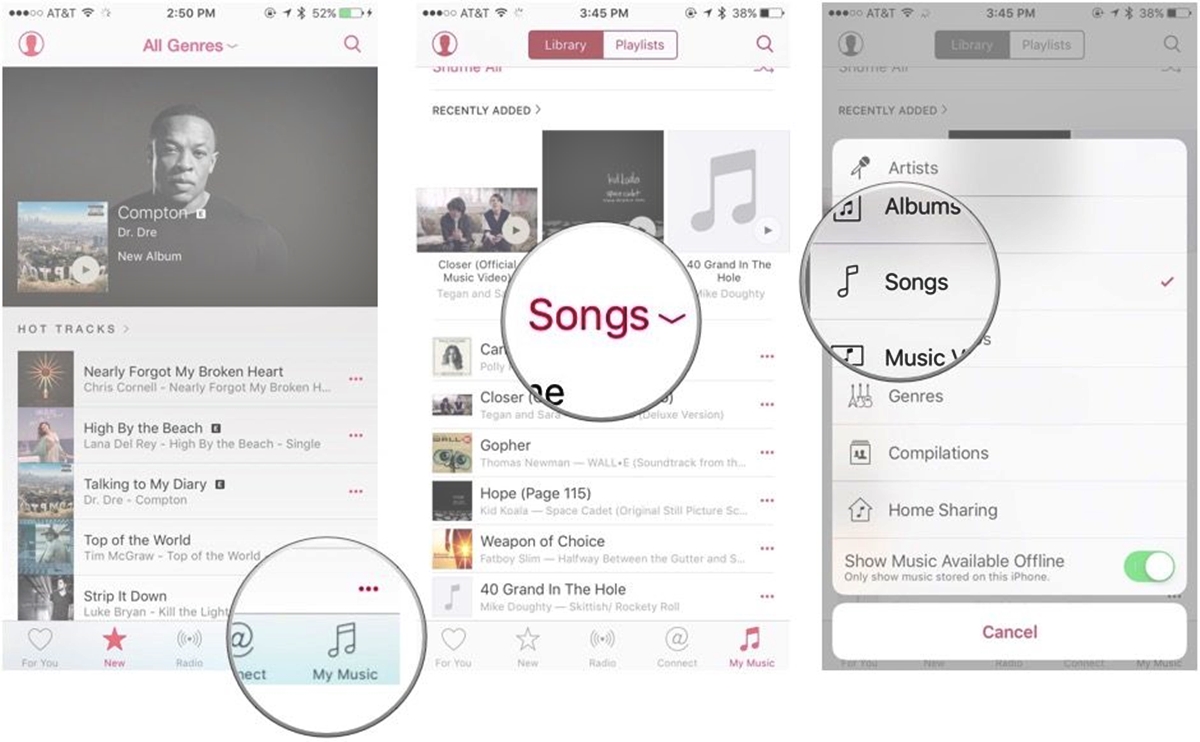
To get started, open the Apple Music app on your device and head to the ‘Library’ tab. From there, you can either create a new playlist by tapping the ‘New Playlist’ button or select an existing playlist to organize.
Adding songs to a playlist is as easy as tapping the ‘+’ icon next to the desired track. You can search for specific songs, artists, or albums using the search bar at the top of the screen. Additionally, Apple Music’s vast library gives you access to millions of songs, so you’re bound to find exactly what you’re looking for.
Once you’ve added songs to your playlist, it’s time to organize them to your liking. Apple Music offers multiple ways to sort and arrange songs within a playlist, making it a breeze to create the perfect listening experience.
One method of organizing songs is manual sorting. Simply tap and hold a song in your playlist, then drag it to the desired position. This allows you to arrange the songs in the order that best suits your preferences.
Another option is to utilize Apple Music’s recommendations. By tapping the three dots next to a song in your playlist and selecting ‘Recommendations,’ Apple Music will suggest similar songs that you might enjoy. This feature is particularly useful if you want to discover new songs while maintaining a cohesive vibe within your playlist.
If you prefer a more structured approach, you can sort songs by various criteria. By tapping the sorting icon (typically denoted with three lines) at the top right corner of the playlist screen, you can choose to sort by song title, artist name, album name, genre, release date, or popularity. This allows you to create playlists that are organized based on your preferred criteria.
Additionally, you have the option to reverse the order of songs in a playlist. This is great for mixing things up or creating a sense of progression within your playlist. Simply tap the three dots at the top right corner of the playlist screen, select ‘Edit,’ and toggle on ‘Reverse.’
If you want to save time and automate the sorting process, you can create smart playlists. Smart playlists automatically update based on the criteria you specify, such as genre, artist, or song rating. To create a smart playlist, tap ‘New Playlist,’ then choose ‘Smart Playlist’ and set the desired criteria.
Lastly, there are third-party apps available that provide additional sorting options and customization features for Apple Music playlists. These apps offer advanced functionality, including sorting by BPM (beats per minute), mood, or even smart playlists based on specific factors like weather or time of day.
Sorting songs manually
Sorting songs manually in an Apple Music playlist allows you to have complete control over the order in which your songs are played. This method is particularly useful when you want to create a specific mood or flow within your playlist.
To sort songs manually, start by opening your Apple Music app and navigating to the playlist you want to organize. Once you’re in the playlist, tap and hold on a song until it lifts up from the screen. You can then drag the song to a new position within the playlist.
This manual sorting method gives you the flexibility to arrange your songs in any order you desire. For example, you might want to start your playlist with an energetic track to set the mood, followed by some more mellow songs, and then end with a powerful and uplifting song.
In addition to rearranging the songs, you can also delete songs from your playlist or add new ones. Simply tap the red minus button next to a song to remove it, or tap the ‘+’ button to add a new song to the playlist.
One useful tip when sorting songs manually is to listen to your playlist as you organize it. This way, you can ensure that the flow and transitions between songs are smooth and seamless. Be mindful of the tempo, key, and mood of each song, as well as how they complement each other as you arrange them.
Another helpful feature when sorting songs manually is the ability to create sections within your playlist. By adding headers or labels to different parts of your playlist, you can further enhance the organization and ease of navigation.
To create a section, simply tap and hold on a song, then drag it slightly to the right until you see a gray vertical line. Release your finger, and the song will be placed in a separate section. You can add a title to the section by tapping the ‘Add Section’ option that appears.
When using the manual sorting method, keep in mind that your changes will only apply to the specific playlist you’re working on. If you want to sort songs across multiple playlists or devices, you’ll need to manually organize them in each playlist or device separately.
Whether you’re creating a playlist for a party, a workout, or simply for personal enjoyment, sorting songs manually in an Apple Music playlist gives you the freedom to curate a unique and personalized listening experience.
Using Apple Music recommendations to sort songs
Apple Music provides a powerful feature that allows you to use their recommendations to sort songs within your playlists. This feature is not only convenient but also helps you discover new music that complements the songs you already love.
To utilize Apple Music recommendations, open your Apple Music app and navigate to the playlist you want to sort. Once you’re in the playlist, tap on the three dots next to a song and select ‘Recommendations’ from the menu that appears.
Apple Music will analyze the selected song and provide a list of recommended songs that share similar qualities, such as genre, tempo, or mood. You can then choose to add these recommended songs directly to your playlist.
This feature is particularly useful when you want to maintain a cohesive vibe within your playlist while adding new songs that fit seamlessly. It allows you to expand your musical horizons and discover artists and songs that you may not have come across otherwise.
Additionally, the recommendations feature in Apple Music is dynamic and keeps evolving based on your listening habits and preferences. As you continue to use the app and interact with different songs and genres, the recommendations will become more accurate and tailored to your individual taste.
You can also adjust the recommendations by providing feedback to Apple Music. If you find the suggestions to be off base or not aligned with your preferences, you can tap the ‘Dislike’ button next to a recommendation. On the other hand, if you discover a great song through the recommendations, you can tap the ‘Like’ button to further refine the recommendations.
Using Apple Music recommendations to sort songs adds a layer of convenience and personalization to the playlist creation process. It not only saves you time searching for new songs but also helps you discover hidden gems that enhance the listening experience.
Next time you’re curating a playlist, give Apple Music recommendations a try and let the app help you find the perfect songs to complement your existing favorites.
Sorting by song title
The ability to sort songs in an Apple Music playlist by their titles provides a straightforward and organized way to arrange your music collection. This sorting method is particularly useful when you want to locate a specific song quickly or group songs with similar titles together.
To sort songs by their title, open the Apple Music app and navigate to the playlist you want to sort. Once you’re in the playlist, tap on the sorting icon (typically denoted by three lines) at the top right corner of the screen.
In the sorting options, select “Song” to sort the songs in alphabetical order based on their titles. This will arrange the songs from A to Z, making it easier for you to find a specific song by scrolling through the playlist.
When sorting by song title, keep in mind that Apple Music disregards articles like “a,” “an,” and “the” in the beginning of the titles. For example, a song titled “The One” would be sorted under the letter “O” rather than “T.”
Sorting songs by title also allows you to create a specific narrative or theme within your playlist. For example, you can create a playlist where the song titles tell a story or spell out a message when read in order.
If you want to reverse the order of the songs, you can do so by tapping the sorting icon again and selecting “Reverse.” This is helpful when you want to create a unique listening experience by starting with the last song and working your way backwards through the playlist.
Another useful tip when sorting by song title is to include numerical digits at the beginning of song titles to control their display order. For example, you can name songs as “01. Song Title” and “02. Song Title” to ensure that they appear in the desired order in the playlist.
The ability to sort songs by their title in an Apple Music playlist adds a level of organization and ease of navigation to your music collection. It allows you to quickly find a specific song and create playlists that follow a specific alphabetical sequence or narrative structure.
Next time you’re organizing a playlist, give sorting songs by title a try to enhance your listening experience and maintain a sense of order in your music library.
Sorting by artist name
Sorting songs in an Apple Music playlist by the artist’s name provides a convenient and organized way to group songs by the artist or band who performed them. This sorting method is particularly useful when you want to create playlists dedicated to specific artists or genres.
To sort songs by artist name, open the Apple Music app and navigate to the playlist you want to sort. Once you’re in the playlist, tap on the sorting icon (typically denoted by three lines) at the top-right corner of the screen.
In the sorting options, select “Artist” to arrange the songs alphabetically based on the artist’s name. This will group songs by the artist, making it easier to browse and locate songs by specific musicians or bands.
If you have songs by multiple artists in your playlist, they will be organized in alphabetical order based on the artist’s name. For example, songs by Adele will be grouped together under “A,” while songs by The Beatles will be grouped together under “B”.
Sorting songs by artist name is especially helpful when you have playlists dedicated to a particular artist or band. It allows you to easily access and listen to all the songs by your favorite musicians in one place.
In addition, sorting by artist name can also be useful when creating themed playlists. For example, if you have a playlist dedicated to ’90s music, you can sort the songs by the artist’s name to create a chronological flow or to highlight the contributions of specific artists from that era.
To reverse the order of the songs, you can tap the sorting icon again and select “Reverse.” This is helpful when you want to have a different listening experience by starting with the last song and working your way backwards through the playlist, based on the artist’s name.
By sorting songs in an Apple Music playlist by artist name, you can easily organize your music collection and create playlists that are focused on specific artists or genres. It simplifies the process of searching for songs by your favorite musicians and enhances your overall listening experience.
Next time you’re curating a playlist, consider utilizing the sorting by artist name feature in Apple Music to create a well-organized and artist-centric musical journey.
Sorting by album name
Sorting songs in an Apple Music playlist by the album name provides a convenient way to group songs together based on their respective albums. This sorting method is particularly useful when you want to listen to an album in its entirety or create playlists that showcase specific music albums.
To sort songs by album name, open the Apple Music app and navigate to the playlist you want to sort. Once you’re in the playlist, tap on the sorting icon (typically denoted by three lines) at the top-right corner of the screen.
In the sorting options, select “Album” to arrange the songs alphabetically based on their album names. This will group songs together based on the album they belong to, making it easier to enjoy a complete album experience or browse through your playlist by albums.
Sorting songs by album name is particularly beneficial when you want to listen to a specific album from start to finish. Instead of searching for individual songs, you can simply select the album and enjoy the songs in their intended order as curated by the artist or label.
In addition, sorting by album name is useful for creating playlists that highlight a specific music collection. For example, if you have a playlist dedicated to the greatest hits of a particular artist, sorting the songs by album name allows you to showcase the songs in the order they were compiled on the artist’s greatest hits album.
If you have songs from multiple albums in your playlist, they will be organized alphabetically by the album name. This makes it easy to locate and listen to songs from specific albums, especially when you have a large and diverse music collection.
To reverse the order of the songs, you can tap the sorting icon again and select “Reverse.” This is helpful when you want to explore your playlist from a different perspective, starting with the songs from the last album and working your way towards the first.
By sorting songs in an Apple Music playlist by album name, you can quickly access and enjoy complete albums, create playlists that highlight specific music collections, and easily navigate through your music library.
Next time you’re organizing a playlist, consider utilizing the sorting feature in Apple Music to sort songs by album name and enhance your listening experience.
Sorting by genre
Sorting songs in an Apple Music playlist by genre provides a convenient way to group songs together based on their musical style or genre. This sorting method is particularly useful when you want to create playlists that cater to specific moods, occasions, or musical preferences.
To sort songs by genre, open the Apple Music app and navigate to the playlist you want to sort. Once you’re in the playlist, tap on the sorting icon (typically denoted by three lines) at the top-right corner of the screen.
In the sorting options, select “Genre” to arrange the songs alphabetically based on their genre. This will group the songs together based on their specific musical style, allowing you to easily navigate through your playlist based on different genres.
Sorting songs by genre is particularly beneficial when you want to create playlists that cater to specific moods or occasions. For example, you can create a playlist with upbeat and energetic songs from genres like pop, rock, and electronic music for a workout session, or a playlist with relaxing and soothing songs from genres like jazz, classical, and ambient music for a peaceful evening.
In addition to creating mood-based playlists, sorting by genre is also useful for showcasing specific music styles or exploring different genres. By organizing songs in a playlist by genre, you can create a diverse and eclectic collection that highlights the richness and variety of different musical genres.
If you have songs from multiple genres in your playlist, they will be arranged alphabetically by genre. This makes it easy to navigate and listen to songs from specific music styles, especially if you have a diverse music library with songs spanning various genres.
To reverse the order of the songs, you can tap the sorting icon again and select “Reverse.” This allows you to explore your playlist from a different perspective, starting with songs from the last genre and working your way towards the first.
By sorting songs in an Apple Music playlist by genre, you can create playlists that cater to specific moods and occasions, explore the richness of different musical styles, and easily navigate through your music library based on different genres.
Next time you’re curating a playlist, consider utilizing the sorting feature in Apple Music to sort songs by genre and enhance your listening experience, allowing you to easily dive into the diverse world of music genres.
Sorting by release date
Sorting songs in an Apple Music playlist by their release date provides a convenient way to organize your music collection chronologically. This sorting method is particularly useful when you want to explore the evolution of your favorite artists or create playlists that take you on a musical journey through different time periods.
To sort songs by release date, open the Apple Music app and navigate to the playlist you want to sort. Once you’re in the playlist, tap on the sorting icon (typically denoted by three lines) at the top-right corner of the screen.
In the sorting options, select “Release Date” to arrange the songs in chronological order based on when they were released. This will allow you to explore your playlist in a timeline fashion, starting from the earliest releases and moving towards the most recent ones.
Sorting songs by release date is particularly beneficial when you want to create playlists that showcase the evolution of a particular artist or genre over time. For example, you can create a playlist that starts with early works of an artist and progresses through different albums, highlighting their artistic development.
In addition, sorting by release date can also help you better understand the historical context of music by arranging songs in a chronological order. By exploring your playlist by release date, you can gain insights into musical trends, cultural shifts, and the influence of specific genres or movements on the evolution of music.
If you have songs from various time periods in your playlist, they will be arranged based on their release dates, with the earliest releases appearing first. This allows you to easily navigate through your playlist and listen to songs from different eras.
To reverse the order of the songs, you can tap the sorting icon again and select “Reverse.” This is helpful when you want to explore your playlist in reverse chronological order, starting with the most recent releases and moving towards the earliest ones.
By sorting songs in an Apple Music playlist by release date, you can create playlists that take you on a journey through the evolution of music, explore the historical context of different genres or artists, and gain a deeper appreciation for the rich tapestry of musical history.
Next time you’re curating a playlist, consider utilizing the sorting feature in Apple Music to sort songs by release date and discover the fascinating evolution of your favorite artists and music genres over time.
Sorting by popularity
Sorting songs in an Apple Music playlist by popularity allows you to discover the most popular and widely enjoyed tracks within your music collection. This sorting method is particularly useful when you want to create playlists that feature the most beloved songs or when you’re looking for a crowd-pleasing selection for a social gathering or event.
To sort songs by popularity, open the Apple Music app and navigate to the playlist you want to organize. Once you’re in the playlist, tap on the sorting icon (typically denoted by three lines) at the top-right corner of the screen.
In the sorting options, select “Popularity” to arrange the songs based on their popularity ranking. This will order the songs in the playlist from the most popular to the least popular, based on factors like streaming numbers, chart performance, and listener engagement.
Sorting songs by popularity is particularly beneficial when you want to create playlists that are bound to be crowd-pleasers. By featuring popular songs, you can ensure that your playlist resonates with a wide audience and keeps everyone engaged and entertained.
In addition to creating universally appealing playlists, sorting by popularity can also help you discover new music that may have escaped your radar. The popular songs within your collection are likely to be widely loved by listeners and can serve as an introduction to artists, albums, or genres that you may not have explored yet.
If you have a mix of popular and less popular songs in your playlist, sorting by popularity allows you to identify and highlight the standout tracks. This can be particularly useful when creating playlists dedicated to the greatest hits of an artist or when curating a collection that showcases the best songs of a specific genre.
To reverse the order of the songs, you can tap the sorting icon again and select “Reverse.” This is useful when you want to explore your playlist in reverse popularity order, starting from the least popular songs and moving towards the most popular ones.
By sorting songs in an Apple Music playlist by popularity, you can create playlists that feature the most beloved tracks, discover new music based on popular appeal, and ensure that your music collection caters to a wide audience and keeps everyone entertained.
Next time you’re curating a playlist, consider utilizing the sorting feature in Apple Music to sort songs by popularity and create a crowd-pleasing music selection that is sure to be enjoyed by many.
Reversing the order of songs in a playlist
Reversing the order of songs in an Apple Music playlist provides a refreshing twist to your listening experience and offers a different perspective on your music collection. This feature is particularly useful when you want to create a unique and unexpected flow within your playlist.
To reverse the order of songs in a playlist, open the Apple Music app and navigate to the playlist you want to modify. Once you’re in the playlist, tap on the three dots at the top-right corner of the screen and select “Edit.”
In the Edit mode, you’ll see a rearrange icon (usually represented by three horizontal lines) next to each song in the playlist. Tap and hold on the rearrange icon of the first song, then drag it all the way down to the last position in the playlist.
Continue this process for each song in the playlist, dragging them one by one to the position before the previous one. As you do this, you’ll notice the songs being reordered and the last song appearing as the first song in the playlist.
Reversing the order of songs in a playlist allows you to discover your music collection from a different perspective. By starting with the last song and working your way back through the playlist, you may notice new connections between songs or experience a fresh appreciation for familiar tracks.
This feature is especially useful when you want to create a sense of progression or build-up within your playlist. Whether you’re curating a workout playlist or creating the ultimate party mix, the reverse order can add a surprising twist that keeps listeners engaged and intrigued.
Reversing the order of songs also offers a creative way to explore your music collection when you feel like breaking away from the familiar. By rearranging the songs in a different order, you may discover new connections between songs or experience the lyrics and melodies in a different context.
To return the playlist to its original order, you can follow the same steps and reverse the reverse! Simply drag the last song back to its original position and continue dragging the rest of the songs back to their original order.
By utilizing the feature to reverse the order of songs in an Apple Music playlist, you can create a unique and unexpected listening experience, discover fresh connections within your music collection, and appreciate your favorite songs from a new perspective.
Next time you’re curating a playlist, consider using the reverse order feature in Apple Music to add a creative twist and keep your listening experience engaging and exciting.
Using smart playlists to automatically sort songs
Apple Music’s smart playlists feature offers a convenient way to automatically sort songs based on specific criteria, saving you time and effort in organizing your music collection. Smart playlists dynamically update themselves, ensuring that your playlist stays up-to-date and relevant without manual intervention.
To create a smart playlist, open the Apple Music app and navigate to the “Library” tab. Tap on the “New Playlist” button and select “Smart Playlist” from the options.
In the smart playlist creation screen, you can set various criteria to determine which songs will be included in the playlist. You can choose from criteria such as artist, genre, album, song rating, play count, release year, and more.
For example, you can create a smart playlist that includes songs from a specific genre, such as “Indie Rock,” with a song rating of four stars or above. As you add new songs to your library that meet the selected criteria, they will automatically be added to the smart playlist.
Smart playlists can be a powerful tool for organizing and sorting songs based on your preferences. You can create dynamic playlists that adapt to your changing music library and cater to specific moods, genres, or artists.
Additionally, smart playlists can help you rediscover forgotten gems in your music collection. For example, you can create a smart playlist that includes songs you haven’t played in a while or songs that haven’t been given a high rating. This allows you to uncover songs that you may have overlooked and give them a chance to shine again.
With the ability to set multiple criteria for a smart playlist, you can create intricate combinations that filter your music library precisely. Whether you want to create a playlist featuring songs from a particular decade, songs by a specific artist and genre combination, or songs that match a certain BPM, the smart playlists feature provides the flexibility to accommodate your preferences.
Smart playlists automatically update themselves whenever new songs are added to your library that match the criteria you set. This ensures that your playlist stays fresh and tailored to your preferences without requiring manual adjustments.
Using smart playlists to automatically sort songs in Apple Music provides a seamless and efficient way to create personalized playlists that adapt to your evolving music library. It allows you to stay organized, discover hidden gems, and ensure that your playlists always reflect your current musical preferences.
Next time you’re curating a playlist, consider harnessing the power of smart playlists in Apple Music to effortlessly sort and organize songs based on specific criteria that meet your individual taste.
Using third-party apps to sort songs in an Apple Music playlist
While Apple Music provides built-in sorting options for playlists, you can also explore third-party apps to further enhance and customize the sorting capabilities for your Apple Music playlists. These apps offer additional features and functionality that allow for a more personalized and tailored sorting experience.
One popular third-party app that can help you sort songs in an Apple Music playlist is SongShift. SongShift allows you to transfer and sync playlists between different music streaming services, including Apple Music. With SongShift, you can not only sort your songs within a playlist but also transfer playlists from other services directly into your Apple Music library.
Another app worth considering is Stamp. Stamp lets you transfer playlists between various music streaming platforms, including Apple Music. With Stamp, you can easily sort songs and reorganize your playlist by simply dragging and dropping songs in the desired order.
Additionally, TuneMyMusic is another app that offers playlist transfer and management features for Apple Music. It allows you to sort songs within a playlist, remove duplicates, and even merge multiple playlists into one cohesive collection.
By using these third-party apps, you can expand your sorting options beyond what Apple Music offers natively. These apps often provide more advanced sorting capabilities, such as sorting by additional criteria like tempo, key, or even mood. Some apps also offer features like intelligent shuffling or automatic sorting based on your listening patterns.
When using third-party apps for sorting songs in an Apple Music playlist, it’s important to ensure that they are compatible with your device and that they have proper access to your music library. It’s always a good idea to read reviews and do some research to find apps that are reputable and trusted within the music community.
Keep in mind that while third-party apps can enhance the sorting experience for your Apple Music playlists, they may require additional setup or have certain limitations. Always refer to the app’s instructions or user guides to make the most out of their features and functionality.
Using third-party apps to sort songs in an Apple Music playlist gives you more flexibility and customization options. It allows you to explore advanced sorting features, transfer playlists between different services, and personalize your music listening experience even further.
When sorting songs using third-party apps, it’s important to carefully consider your requirements, select reputable apps, and follow the app’s guidelines to ensure a smooth and enjoyable experience.
Tips for Efficiently Sorting Songs in an Apple Music Playlist
Sorting songs in an Apple Music playlist can be a fun and rewarding process, allowing you to create a personalized and enjoyable listening experience. To help you efficiently organize and sort your songs, here are some helpful tips:
- Plan ahead: Before starting to sort your playlist, have a clear idea of the desired order or organization you want to achieve. Consider the mood, theme, or flow you want to create within the playlist, as well as any specific criteria you want to use for sorting.
- Utilize keyboard shortcuts: If you are using a computer or laptop to sort your playlist, take advantage of keyboard shortcuts for faster navigation. Learning shortcuts like Ctrl/Command+X to cut songs, Ctrl/Command+V to paste songs, and Ctrl/Command+Up Arrow/Down Arrow to move songs up or down can significantly speed up the sorting process.
- Use drag and drop: Take advantage of the drag and drop functionality in the Apple Music app. This allows you to easily rearrange songs in the playlist by dragging them to their desired positions. It’s a simple and intuitive way to sort your songs exactly how you want them.
- Consider the overall flow: Pay attention to the overall flow and transitions between songs in your playlist. Think about the tempo, key, and mood of each song and how they will fit together. Smooth transitions can greatly enhance the listening experience, creating a cohesive and enjoyable playlist.
- Experiment with different sorting criteria: Don’t be afraid to explore different sorting options. Apple Music offers various criteria like genre, artist, album, and release date. Try sorting your playlist by different criteria to see how it affects the overall feel and organization of the songs.
- Take advantage of playlists within playlists: If you have a large playlist and want to create subcategories or sections within it, consider using playlists within playlists. You can create separate playlists for different genres, artists, or themes and nest them within your main playlist. This allows for a more granular organization and easy navigation within the playlist.
- Regularly update and refresh your playlist: As you discover new songs or your musical preferences change, be sure to regularly update and refresh your playlist. Remove songs that no longer resonate with you and add new ones that enhance the overall experience. This ensures that your playlist stays relevant and continues to bring you joy.
Remember, sorting songs in an Apple Music playlist should be a creative and enjoyable process. It allows you to craft a unique musical journey that reflects your taste and style. Experiment with different techniques, trust your instincts, and have fun creating the perfect playlist.