
What are Smart Playlists?
Smart Playlists are a powerful feature available in both Apple Music and iTunes that allow users to create dynamic playlists based on specific criteria. Unlike traditional playlists that require manual selection of songs, Smart Playlists automatically update themselves based on the set rules and conditions.
These dynamic playlists offer a convenient way to organize and curate your music collection based on various attributes like genre, artist, album, date added, play count, and more. Smart Playlists can help you discover new songs, rediscover old favorites, and create personalized mixes tailored to your musical preferences.
With Smart Playlists, you can create highly specific filters to include or exclude songs based on criteria you define. This allows you to have playlists that adapt and grow with your music library, ensuring that you always have a fresh selection of tunes to listen to.
Whether you want a playlist of your most recently added songs, a mix of tracks from a particular artist, or a compilation of your most played tracks, Smart Playlists can save you time and effort in manually curating playlists.
Not only are these playlists functional in Apple Music on your iPhone or iPad, but they can also be managed and customized using iTunes on your Mac or PC. This flexibility allows you to create and adjust your Smart Playlists across multiple platforms and have them seamlessly sync to your devices.
Next, we will cover step-by-step instructions on how to create and edit Smart Playlists in both Apple Music and iTunes.
How to Create a Smart Playlist in Apple Music
Creating a Smart Playlist in Apple Music is a straightforward process that allows you to customize your music collection based on your preferences and criteria. Here’s a step-by-step guide to help you get started:
- Step 1: Open Apple Music on your iPhone or iPad or launch iTunes on your Mac or PC.
- Step 2: Click on File in the menu bar at the top of the screen.
- Step 3: Select New Smart Playlist from the drop-down menu. A dialog box will appear.
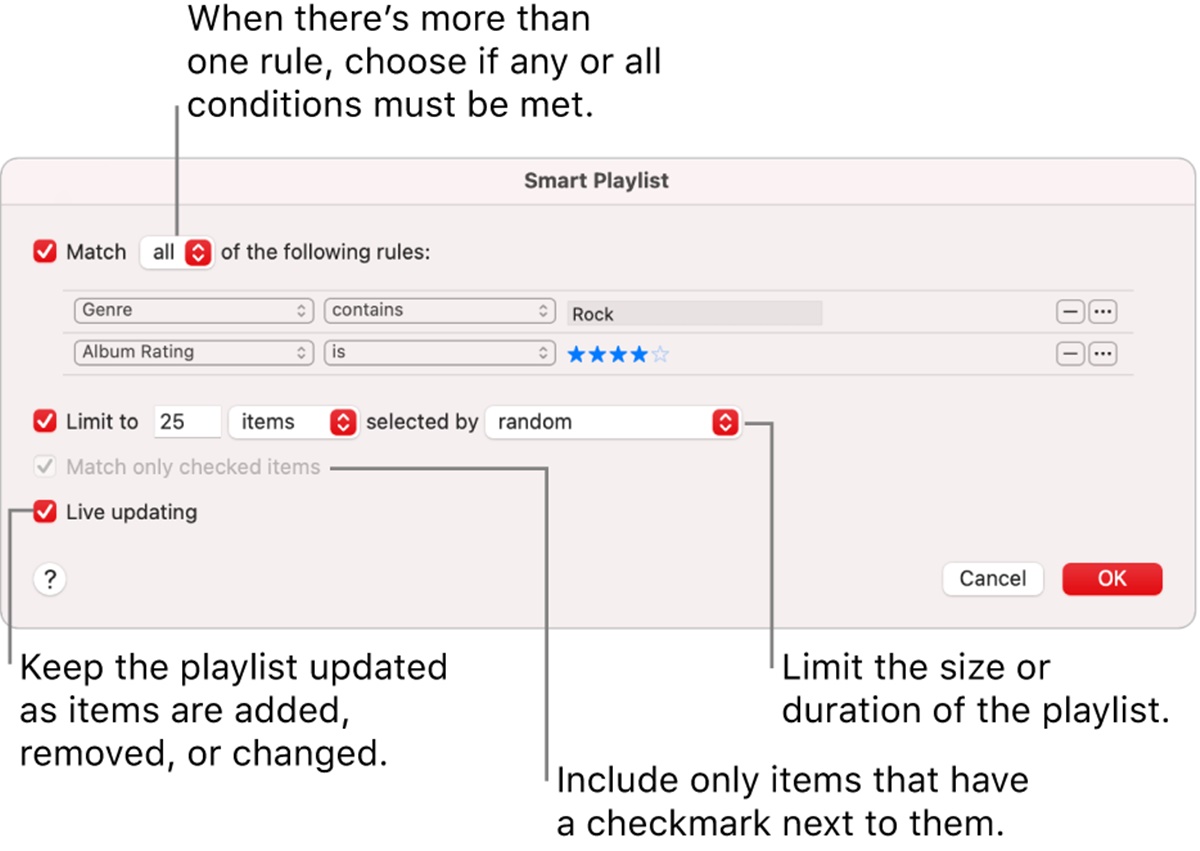
- Step 4: Define Your Criteria by setting specific rules and conditions for your playlist. You can choose from various attributes like genre, artist, album, play count, and more. For example, you can create a Smart Playlist that includes songs with the genre “Rock” and an artist containing “The Rolling Stones”.
- Step 5: Adjust the Limitations and Sort Order to refine your playlist further. You can set the maximum number of songs, the duration of the playlist, and the order in which the songs should be sorted.
- Step 6: Save Your Smart Playlist by giving it a name and clicking the OK or Save button. Your Smart Playlist will now be listed in your library.
Once you have created a Smart Playlist, it will automatically update itself based on the defined criteria and reflect any changes in your music library. This means that as you add new songs or modify existing ones, your Smart Playlist will adapt accordingly, ensuring that it always aligns with your preferences.
You can access and listen to your Smart Playlist on any device with Apple Music or iTunes, allowing you to enjoy personalized and dynamic collections of music wherever you go.
Now that you know how to create a Smart Playlist in Apple Music, let’s move on to the next section where we will explore how to edit and make changes to your existing Smart Playlists.
Step 1: Open Apple Music or iTunes
The first step in creating a Smart Playlist in Apple Music or iTunes is to open the respective application on your device. Here’s how you can do it:
If you’re using an iPhone or iPad, locate the Apple Music app on your home screen and tap on it to launch the application. Once opened, you’ll have access to the vast library of music and features that Apple Music offers.
If you’re using a Mac or PC, you’ll need to open iTunes. Look for the iTunes icon in your applications folder or on the taskbar (for Windows users), and click on it to start the application. iTunes provides a comprehensive platform for managing your music, including creating playlists and syncing them to your Apple devices.
Whether you’re using Apple Music on your mobile device or iTunes on your computer, both platforms offer a user-friendly interface that allows you to easily navigate and explore your music collection.
Upon opening Apple Music or iTunes, you’ll be greeted with various tabs and options, such as “Library,” “For You,” “Browse,” and more. These sections provide different ways to discover and listen to music. To create a Smart Playlist, we’ll need to proceed to the appropriate settings or menu.
Now that you have successfully opened Apple Music or iTunes, you’re ready to move on to the next step of creating your Smart Playlist. In the following sections, we will guide you through the remaining steps, ensuring you can create a personalized and dynamic playlist tailored to your music preferences and criteria.
Step 2: Click on File
After opening Apple Music or iTunes, the next step in creating a Smart Playlist is to click on the “File” option. This step is essential for accessing the necessary menu options to create and customize your playlist. Here’s how you can do it:
If you’re using Apple Music on your iPhone or iPad, the “File” option may not be visible on the main screen. In this case, you’ll need to tap on the ellipsis (…) or the More option (represented by three dots) to reveal additional menu options. From there, you should see the “File” option among the available choices.
If you’re using iTunes on your Mac or PC, you’ll find the “File” option in the menu bar at the top of the application window, next to other options like “Edit,” “View,” and “Controls.” Simply click on “File” to access the drop-down menu.
Clicking on the “File” option will open a drop-down menu that provides various functionalities related to managing and organizing your music library. The options available may differ slightly between Apple Music and iTunes, but the necessary options for creating a Smart Playlist can be found in this menu.
By selecting the “File” option, you’re now one step closer to creating your Smart Playlist. In the next section, we will guide you through the specific menu option you need to select in order to proceed with the playlist creation process.
Ensure that you have successfully clicked on the “File” option before moving forward. This will ensure that you have access to all the necessary menu options required to create and customize your Smart Playlist.
Step 3: Select New Smart Playlist
Once you have clicked on the “File” option in Apple Music or iTunes, the next step is to select “New Smart Playlist.” This menu option is essential for initiating the creation of your Smart Playlist. Here’s how you can do it:
If you’re using Apple Music on your iPhone or iPad, after clicking on the “File” option, you should see a list of menu items. Scroll through the options until you find “New Smart Playlist” and tap on it. This will open a dialog box where you can define the criteria for your playlist.
If you’re using iTunes on your Mac or PC, after clicking on the “File” option in the menu bar, a drop-down menu will appear. From this menu, select “New Smart Playlist.” Alternatively, you can use the keyboard shortcut “Command + Option + N” (Mac) or “Ctrl + Alt + N” (PC) to directly access the “New Smart Playlist” dialog box.
After selecting “New Smart Playlist,” a dialog box will open that allows you to specify the rules and conditions for your Smart Playlist. This is where you define the criteria based on which your playlist will automatically update itself.
By selecting “New Smart Playlist,” you have successfully initiated the creation process for your Smart Playlist. In the next step, we will guide you through how to define the specific criteria for your playlist, ensuring that it aligns with your desired preferences and filters.
Double-check that you have selected “New Smart Playlist” before proceeding. This will ensure that you have access to the necessary options to customize your playlist in the upcoming steps.
Step 4: Define Your Criteria
After selecting “New Smart Playlist” in Apple Music or iTunes, the next step is to define the criteria for your Smart Playlist. This step allows you to create specific rules and conditions that will determine which songs are included in your playlist. Here’s how you can do it:
In the dialog box that appears after selecting “New Smart Playlist,” you’ll find various options and fields where you can set your criteria. These criteria are based on attributes such as genre, artist, album, play count, and more. You can use one or multiple criteria to make your playlist as specific or broad as you desire.
For example, you can choose to create a Smart Playlist that includes songs with a specific genre, such as “Rock.” To do this, you would select the “Genre” option from the drop-down menu, enter “Rock” in the text field, and click the “+” button to add it as a filter.
In addition to genres, you can apply criteria based on artists, albums, release years, and other attributes. This gives you the flexibility to create playlists that cater to your specific musical preferences.
As you define your criteria, you’ll notice that the playlist is automatically populated with songs that match your selected attributes. This allows you to preview the playlist and make adjustments if needed.
By defining your criteria, you are shaping your Smart Playlist to include songs that meet your preferences and filters. Once you are satisfied with the criteria you have set, you can proceed to the next step to further customize your playlist’s limitations and sort order.
Ensure that you have defined your criteria and reviewed the initial list of songs in your Smart Playlist before moving forward. This will help you create a playlist that is tailored to your musical tastes and preferences.
Step 5: Adjust the Limitations and Sort Order
Once you have defined the criteria for your Smart Playlist in Apple Music or iTunes, the next step is to adjust the limitations and sort order. These settings will allow you to further customize your playlist and fine-tune its content. Here’s how you can do it:
In the dialog box where you defined your criteria, you’ll find additional options below the criteria fields. These options include setting the maximum number of songs, specifying a duration limit, and choosing the sort order for your playlist.
The “Limit to” option allows you to specify the maximum number of songs you want in your playlist. This is useful if you want to create a playlist with a specific length or want to limit the number of songs added to your device.
Furthermore, you can set a duration limit for your Smart Playlist, which ensures that the playlist doesn’t exceed a certain length. This can be helpful if you’re creating a playlist for a specific activity or event and want it to fit within a specific time frame.
In addition to limitations, you can also choose the sort order for your Smart Playlist. You can sort the songs by various criteria such as title, artist, album, play count, and more. This allows you to arrange your playlist in a way that suits your listening preferences.
By adjusting the limitations and sort order, you can refine and structure your Smart Playlist to provide a personalized listening experience. Whether you want a specific number of songs, a playlist of a certain duration, or songs sorted in a particular order, these settings allow you to fine-tune your playlist.
Once you have adjusted the limitations and sort order to your liking, you can move on to the final step of saving your Smart Playlist and preparing it for use.
Make sure you have carefully adjusted the limitations and sort order according to your preferences before proceeding. This will ensure that your Smart Playlist aligns with your specific criteria and desired playlist structure.
Step 6: Save Your Smart Playlist
After adjusting the limitations and sort order for your Smart Playlist in Apple Music or iTunes, the final step is to save your playlist. Saving your playlist will allow you to easily access it whenever you want to listen to the curated selection of songs. Here’s how you can save your Smart Playlist:
In the dialog box where you defined your criteria and adjusted the limitations and sort order, you’ll find a field where you can enter a name for your playlist. This is where you can give your Smart Playlist a descriptive and memorable title.
Enter a name for your Smart Playlist that reflects its content or purpose. For example, if your playlist consists of your most played songs from the genre “Pop,” you can name it “Top Pop Tracks”. This will make it easier for you to find and identify the playlist later on.
Once you have entered a name for your Smart Playlist, click the “OK” or “Save” button to finalize the creation of your playlist. The dialog box will close, and your Smart Playlist will be added to your library or playlists section, depending on the platform you are using.
By saving your Smart Playlist, you ensure that it is preserved and ready for use whenever you want to listen to it. It will automatically update itself based on the defined criteria, reflecting any changes in your music library.
Your saved Smart Playlist can be accessed and listened to in Apple Music on your iOS device or via iTunes on your Mac or PC. This allows you to enjoy your personalized and dynamic playlist across different platforms and devices.
Congratulations! You have successfully created and saved your Smart Playlist in Apple Music or iTunes. You can now start enjoying your tailored collection of songs based on your specified criteria.
Remember to double-check the name you have entered for your Smart Playlist and ensure that it accurately represents the content of the playlist before saving.
How to Edit a Smart Playlist in Apple Music
If you have already created a Smart Playlist in Apple Music and you want to make changes to it, editing the playlist is a simple and straightforward process. Here’s a step-by-step guide on how to edit a Smart Playlist:
- Step 1: Open the Smart Playlist that you want to edit. To do this, go to the “Library” tab in Apple Music on your iPhone or iPad, or navigate to the “Playlists” section in iTunes on your Mac or PC. Find the Smart Playlist you wish to edit, and click or tap on it to open it.
- Step 2: Click on the Edit button. In Apple Music on iOS, you’ll see an “Edit” button at the top-right corner of the screen. Tap on it to enter the editing mode. In iTunes on a computer, you can simply click on the “Edit” button located in the top-right corner of the playlist window.
- Step 3: Make the desired changes to your Smart Playlist. You can modify the existing criteria, add new criteria, remove criteria, adjust limitations, change the sort order, or make any other necessary adjustments to your playlist.
- Step 4: Save the changes you’ve made to your Smart Playlist. To do this, simply exit the editing mode by tapping the “Done” button on iOS or clicking on the “Done” button in iTunes. Your changes will be automatically saved.
By following these steps, you can easily access and edit your Smart Playlist in Apple Music or iTunes. This allows you to adapt your playlist to match your evolving music preferences and criteria.
Remember that any changes you make to your Smart Playlist will take effect immediately. The playlist will update itself based on the new criteria or modifications you’ve made, ensuring that it continues to provide you with a personalized and dynamic listening experience.
Now that you know how to edit a Smart Playlist, you can make adjustments whenever you like, allowing you to refine and customize your playlist to perfectly suit your music preferences.
Step 1: Open the Smart Playlist
When you want to make changes to a Smart Playlist in Apple Music, the first step is to open the playlist that you wish to edit. By accessing the playlist, you can modify its criteria, limitations, sort order, or any other settings. Here’s how you can open a Smart Playlist:
If you’re using Apple Music on your iPhone or iPad, start by launching the app and navigating to the “Library” tab. In the Library section, you’ll find the list of all your playlists, including your Smart Playlists. Locate the Smart Playlist you want to edit and tap on it to open the playlist details.
If you’re using iTunes on your Mac or PC, open the application and go to the “Playlists” section. Look for the playlist sidebar on the left side of the screen and find the Smart Playlist you wish to edit. Click on the Smart Playlist to open it and view its contents.
Once you’ve opened the Smart Playlist, you’ll see a list of songs that currently meet the defined criteria. This gives you an overview of the playlist’s content and allows you to assess whether any changes are needed.
It’s important to note that Smart Playlists automatically update themselves based on the defined criteria. Therefore, the songs in the playlist may change as your music library evolves. By opening the playlist, you can review its current state and make any necessary adjustments.
Now that you’ve successfully opened the Smart Playlist, you’re ready to proceed to the next step of editing the playlist. In the following sections, we’ll guide you through the specific actions you can take to modify and customize your Smart Playlist according to your preferences.
Make sure you have successfully opened the Smart Playlist and are viewing its contents before moving forward. This will ensure that you’re able to make the desired changes to the playlist in the upcoming steps.
Step 2: Click on the Edit button
After opening the Smart Playlist that you wish to edit in Apple Music or iTunes, the next step is to click on the “Edit” button. This will allow you to enter the editing mode and make changes to the playlist’s settings and criteria. Here’s how you can do it:
On your iPhone or iPad, once you have opened the Smart Playlist, you’ll notice an “Edit” button located at the top-right corner of the screen. Tap on this button to enter the editing mode. As a result, the playlist will become editable, and options to modify its criteria will become available.
If you’re using iTunes on your Mac or PC, locate the playlist you want to edit and click on it to open it. Once the playlist is open, you’ll find an “Edit” button at the top-right corner of the window. Simply click on this button to initiate the editing mode.
By clicking the “Edit” button, you’re now ready to modify the settings and criteria of the Smart Playlist to suit your preferences. This will allow you to add, remove, or adjust the criteria, limitations, or any other aspects of the playlist.
Entering the editing mode provides a user-friendly interface that makes it easy to make changes to the playlist. It allows you to fine-tune and customize the Smart Playlist according to your evolving music preferences and criteria.
Now that you are in the editing mode, you can proceed to the next step of making the desired changes to your Smart Playlist. In the upcoming section, we’ll guide you through the specific actions you can take to modify and refine the playlist.
Ensure that you have successfully clicked on the “Edit” button before proceeding, so you can access the necessary options to edit your Smart Playlist.
Step 3: Make the desired changes
After entering the editing mode for your Smart Playlist in Apple Music or iTunes, the next step is to make the desired changes to the playlist. This step allows you to customize and modify the playlist’s criteria, limitations, sort order, or any other settings according to your preferences. Here’s how you can do it:
Once you are in the editing mode, you’ll find various options and controls that allow you to modify the Smart Playlist. These options may vary depending on the platform you are using. However, common changes you can make include adding, removing, or adjusting the criteria that determine which songs are included in the playlist.
To make changes to the Smart Playlist’s criteria, you can add new criteria by specifying attributes such as genre, artist, album, play count, or any other available options. You can also remove existing criteria that no longer meet your preferences. Additionally, you can fine-tune the existing criteria by adjusting their parameters or values.
In addition to modifying the criteria, you may have options to change the limitations of the Smart Playlist. For example, you can adjust the maximum number of songs included, set a duration limit, or specify other conditions that affect the songs’ selection. This allows you to tailor the playlist to your desired length or specifications.
Furthermore, you might have the ability to modify the sort order of the playlist. This allows you to choose the order in which the songs are displayed based on attributes like title, artist, album, or play count. By adjusting the sort order, you can arrange the playlist to suit your preferred listening experience.
Take your time to review and make the desired changes to the Smart Playlist. Experiment with different criteria, adjust limitations, or modify the sort order until you’ve customized the playlist to your satisfaction.
Now that you have made the desired changes to the Smart Playlist, you’re ready to save your modifications and proceed to the next step. In the upcoming section, we’ll guide you through the final step of saving your edited Smart Playlist.
Ensure that you have made all the necessary changes to the Smart Playlist before proceeding, so that it reflects your preferences and criteria accurately.
Step 4: Save the changes
After making the desired changes to your Smart Playlist in Apple Music or iTunes, the final step is to save the modifications you’ve made. Saving your edited Smart Playlist ensures that your changes are preserved and will be reflected the next time you access the playlist. Here’s how you can save the changes:
In Apple Music on your iPhone or iPad, once you’ve finished making the desired changes to the Smart Playlist, you can simply exit the editing mode by tapping the “Done” button located at the top-right corner of the screen. Upon tapping “Done,” your modifications will be automatically saved, and the playlist will be updated accordingly.
If you’re using iTunes on your Mac or PC, after completing the changes to the Smart Playlist, you can save the modifications by clicking on the “Done” button located in the top-right corner of the playlist window. Clicking “Done” will exit the editing mode and save your changes to the playlist.
By saving the changes to your Smart Playlist, you ensure that the playlist is updated based on the modifications you have made. Whether you have added new criteria, adjusted limitations, or modified the sort order, the playlist will reflect these changes.
Once the changes are saved, you can access and enjoy the updated Smart Playlist at any time. It will dynamically adapt to your music library, automatically including or excluding songs based on the criteria and settings you’ve defined.
Now that you have successfully saved the changes to your Smart Playlist, you can start listening to your customized collection of songs. Explore the updated playlist and enjoy the personalized and dynamic music experience it provides.
Make sure you have saved the changes by clicking or tapping the “Done” button before proceeding, so that your Smart Playlist accurately reflects the modifications you’ve made.
Tips for Creating Smart Playlists
Creating Smart Playlists in Apple Music or iTunes allows you to curate dynamic and personalized collections of music. Here are some helpful tips to consider when creating your Smart Playlists:
Tip 1: Use multiple criteria for more specific playlists
By adding multiple criteria to your Smart Playlist, you can create more refined and specific playlists. For example, instead of creating a Smart Playlist based solely on the genre, consider combining criteria such as genre, artist, and play count to further narrow down the selection to your preferred songs.
Tip 2: Utilize the random option for variety
When defining the sort order of your Smart Playlist, consider using the random option. This allows your playlist to shuffle and provide a more diverse listening experience. By incorporating randomness, you can discover different songs within the same criteria and make your playlist more exciting.
Tip 3: Keep your smart playlists organized
As you create multiple Smart Playlists, it’s essential to keep them organized. Consider using descriptive names for your playlists that reflect their content or purpose. You can also use playlists folders or categories to group related Smart Playlists together. This will make it easier to navigate and locate your playlists as your library grows.
Remember, Smart Playlists are flexible and dynamic, so you can always go back and make changes to them as your music preferences and library evolve. Experiment with different criteria, exclusions, and combinations to create Smart Playlists that perfectly match your listening preferences.
By following these tips, you can create Smart Playlists that offer an enjoyable and tailored music experience. Take advantage of the customization options available to you and create playlists that truly reflect your musical tastes and preferences.
Now you have the knowledge to start creating your own Smart Playlists. Get creative, explore different criteria, and have fun curating a personalized collection of songs!
Tip 1: Use multiple criteria for more specific playlists
When creating Smart Playlists in Apple Music or iTunes, utilizing multiple criteria can help you create more specific and tailored playlists. By combining different criteria, you can refine your playlist to include songs that align with your preferences and desired attributes. Here’s why using multiple criteria is beneficial, along with some practical examples:
Using multiple criteria allows you to create playlists that go beyond a single factor, such as genre or artist. By adding more criteria, you can narrow down your playlist to specific attributes that resonate with your musical preferences.
For example, let’s say you want to create a Smart Playlist of upbeat songs from your favorite artist. Instead of solely relying on the artist’s name, you can further define the playlist by including criteria like tempo, energy level, or even play count. This will result in a more dynamic and catered playlist that features your preferred artist’s most energetic and popular tracks.
Another use case for multiple criteria is creating genre-based playlists with specific time periods. For instance, you might want a Smart Playlist that includes only songs from the 90s within a particular genre. By using both the genre and the release year as criteria, you can create a playlist that exclusively features 90s tracks, providing a nostalgic musical experience.
Additionally, you can combine criteria like album and play count to create thematic playlists. For instance, you can define a Smart Playlist that includes songs from a specific album by an artist but limits the selection to those with a play count below a certain threshold. This can help you rediscover overlooked tracks within a favorite album or ensure variety in a playlist by excluding overly-played songs.
By utilizing multiple criteria, you gain more control over the content and specificity of your Smart Playlists. Experiment with combinations of different attributes, and fine-tune your playlists until they perfectly align with your musical preferences and desired themes.
Remember, Smart Playlists are dynamic, meaning they automatically update themselves based on the defined criteria. This ensures that as your music library evolves, your playlists continue to reflect your preferences in real-time.
By incorporating multiple criteria into your Smart Playlists, you can create playlists that are uniquely tailored to your musical taste and preferences. So, take advantage of this feature and enjoy the enhanced customization and personalization that multiple criteria bring to your playlists.
Tip 2: Utilize the random option for variety
When creating Smart Playlists in Apple Music or iTunes, one way to enhance variety and unpredictability in your playlists is by utilizing the random option. The random option allows the playlist to shuffle its content, providing a more dynamic and exciting listening experience. Here’s why and how you can leverage this option:
By enabling the random option, your Smart Playlist will present songs in a randomized order each time you listen to it. This can add a sense of freshness and surprise to your playlist, making it less predictable and more enjoyable.
The random option is especially useful if you have a large music library or if you want to break away from listening to songs in a specific order. It can help you discover hidden gems or revisit tracks that you may have overlooked with repetitive listening.
For example, if you have a Smart Playlist specifically for road trips, enabling the random option can keep the playlist engaging and prevent it from becoming too predictable. It ensures that every road trip is accompanied by a unique arrangement of songs, creating a fresh and exciting atmosphere.
Another scenario where the random option can be useful is when you have a Smart Playlist for a specific genre or mood. Enabling random playback within this playlist can introduce unexpected songs, artists, or even genres, giving you a diverse listening experience and broadening your musical horizons.
To enable the random option for your Smart Playlist, simply access the settings or options for the playlist and look for the shuffle or randomization feature. Activate it, and your playlist will automatically shuffle its content when played. This option is easy to toggle on and off, allowing you to choose whether you want random playback or prefer to listen to the playlist in its original order.
By utilizing the random option, you can inject variety and surprise into your Smart Playlists. This feature enhances the listening experience by presenting songs in a randomized manner, allowing you to discover new tracks, rekindle your interest in familiar songs, and enjoy a more spontaneous musical journey.
So, experiment with the random option and embrace the unpredictability it brings to your Smart Playlists. Let your music library surprise and delight you with its random playback, breathing life into your playlists and elevating your music listening experience.
Tip 3: Keep your smart playlists organized
Organizing your Smart Playlists in Apple Music or iTunes is important to ensure easy navigation and management of your curated collections. Keeping your playlists organized allows for a more efficient and enjoyable music browsing experience. Here are some tips to help you keep your smart playlists organized:
1. Use descriptive names: When creating a Smart Playlist, give it a name that accurately reflects its content or purpose. Having clear and descriptive names makes it easier to locate and identify specific playlists later on. For example, instead of naming a playlist “Favorites,” consider naming it “Favorite 80s Rock Anthems” to provide more context.
2. Create playlist folders or categories: As your collection of Smart Playlists grows, it can become overwhelming to locate a specific playlist. To overcome this, consider organizing your playlists into folders or categories. You can create folders based on themes, genres, moods, or any other criteria that make sense for your collection. It provides a neat and hierarchical structure, making it easier to locate and manage your playlists.
3. Arrange playlists sequentially: Reordering your playlists can help you maintain a logical and organized display. Arrange your playlists in a way that makes sense to you, such as alphabetically, by genre, or by mood. This way, you’ll quickly find the playlist you’re looking for without scrolling through a long list.
4. Regularly update and review your playlists: As your musical tastes evolve, it’s essential to review and update your Smart Playlists accordingly. Remove songs that no longer fit the criteria or add new songs that align with your preferences. Regularly reviewing and updating your playlists ensures that they stay relevant and accurate.
5. Remove duplicate playlists: Over time, you may inadvertently duplicate playlists or create similar ones with slightly different criteria. It’s a good practice to regularly check for duplicate playlists and remove them to avoid confusion and repetition. This helps to maintain a streamlined and clutter-free playlist collection.
6. Take advantage of playlist search functions: If you have an extensive library of Smart Playlists, you can take advantage of the search function within Apple Music or iTunes. Simply type in keywords or phrases related to the playlist you’re looking for, and the search feature will quickly locate the playlist you need.
By implementing these tips, you can keep your Smart Playlists organized and easily accessible. Maintaining an organized playlist collection allows you to navigate and manage your curated playlists more effectively, ensuring an enjoyable and hassle-free music listening experience.
So, take the time to organize your Smart Playlists, create folders, and regularly review and update them. With a well-organized collection, you’ll efficiently find your favorite playlists and enjoy a seamless and personalized music experience.
Troubleshooting Common Issues with Smart Playlists
While creating Smart Playlists in Apple Music or iTunes offers a convenient and personalized way to organize your music, you may encounter some common issues from time to time. Here are a few troubleshooting tips to help address these issues:
Issue 1: Playlist not updating automatically
If you notice that your Smart Playlist is not updating automatically with new songs or changes in your music library, there are a few steps you can take to resolve this. First, ensure that the “Live Updating” or “Automatically Update” option is enabled for the playlist. This ensures that the playlist dynamically reflects changes in your library. If the issue persists, try refreshing your library or restarting the Apple Music or iTunes app. This can refresh the playlist and trigger the automatic update process.
Issue 2: Songs not appearing in the playlist
If you add new songs to your library and they’re not appearing in the Smart Playlist, double-check the criteria you’ve set. Ensure that the criteria match the attributes of the new songs. For example, if you’ve set the criteria to include songs from a specific artist, ensure the artist tag on the new songs matches. Additionally, check if any limitations or exclusions are preventing certain songs from appearing. Modify the criteria or limitations accordingly to ensure the desired songs are included.
Issue 3: Duplicates in the Smart Playlist
Finding duplicate songs in your Smart Playlist can sometimes happen, especially if you have multiple Smart Playlists with similar criteria. To resolve this issue, review your Smart Playlists and ensure there are no redundant or overlapping criteria. Consolidate your playlists and remove any duplicate criteria or playlists with the same purpose. This will help eliminate duplication and simplify your playlist collection.
If you’re still experiencing issues with your Smart Playlists, you can try rebuilding your library or reset certain settings. Reach out to Apple Support or consult official documentation for further assistance. They can provide specific troubleshooting steps tailored to your device and software version.
Remember, Smart Playlists are designed to dynamically update and adapt to changes in your music library. If you encounter any issues, taking the appropriate troubleshooting steps can help ensure that your Smart Playlists continue to provide the personalized and curated music experience you desire.
By following these troubleshooting tips, you can address common issues with Smart Playlists and enjoy a seamless and hassle-free music listening experience.
Issue 1: Playlist not updating automatically
One common issue that users may encounter with Smart Playlists in Apple Music or iTunes is when the playlist fails to update automatically. This can be frustrating, especially if you expect new songs or changes in your library to be reflected in the playlist. Here are some troubleshooting steps to help resolve this issue:
Step 1: Check the “Live Updating” or “Automatically Update” option: Ensure that the “Live Updating” or “Automatically Update” option is enabled for the Smart Playlist. This option ensures that the playlist dynamically reflects any changes in your music library. To check this setting, go to the playlist’s settings or options and ensure that the option is turned on.
Step 2: Refresh your library: Occasionally, refreshing your library can help trigger the automatic update process for your Smart Playlist. To refresh your library, go to the library settings or preferences and look for an option to manually refresh or update your library. This can force the system to recognize any changes in your music library and apply them to your Smart Playlist.
Step 3: Restart Apple Music or iTunes: Sometimes, a simple restart of the Apple Music or iTunes app can resolve issues with Smart Playlist updates. Close the app completely and then relaunch it. This can refresh the app’s cache and settings, potentially resolving any issues that were preventing the playlist from updating automatically.
If the issue persists after trying these troubleshooting steps, it’s worth checking for any updates to the Apple Music or iTunes app. Updates often contain bug fixes and improvements that can address issues with Smart Playlists. Install any available updates and test if the playlist now updates automatically.
In some rare cases, the issue may be related to a specific device or software compatibility. Reach out to Apple Support or consult official documentation for further assistance. They can provide more specific troubleshooting steps based on your device and software version.
Remember, Smart Playlists are designed to dynamically update themselves based on the criteria you’ve set. If you’re experiencing issues with automatic updates, following these troubleshooting steps can help ensure that your Smart Playlists continue to reflect any changes in your music library.
By addressing this issue, you can enjoy the convenience and personalized experience that Smart Playlists bring to your music collection.
Issue 2: Songs not appearing in the playlist
Another common issue that users may encounter with Smart Playlists in Apple Music or iTunes is when songs fail to appear in the playlist despite meeting the defined criteria. This can be frustrating, especially when you add new songs to your library and expect them to be included in the playlist. Here are some troubleshooting steps to help resolve this issue:
Step 1: Verify the criteria and attributes: Double-check the criteria you’ve set for the Smart Playlist. Ensure that the attributes you’re using match the attributes of the songs you expect to see in the playlist. For example, if you’ve specified a certain genre or artist, verify that the songs in question have the corresponding genre or artist tag correctly assigned in your library.
Step 2: Remove any limitations or exclusions: Review the limitations or exclusions you’ve set for the playlist. If there are limitations in place that prevent certain songs from appearing in the playlist, modify or remove them accordingly. It’s possible that the criteria combined with the limitations are excluding the songs you expect to see.
Step 3: Refresh the playlist: If you’ve made changes to your music library or modified the criteria of the Smart Playlist, try refreshing the playlist to update the song selection. This can be done by toggling the “Live Updating” or “Automatically Update” option off and then back on. Alternatively, you can remove the playlist from your device and then re-sync it to force a complete refresh.
Step 4: Check for any duplicate songs or criteria: Duplicate songs or duplicate criteria within your Smart Playlist can cause issues with song visibility. Remove any duplicate songs from your library and ensure there are no duplicate criteria or conditions within the playlist. Duplicate entries can disrupt the proper functioning of the playlist and result in unexpected exclusions or omissions.
If the issue persists after trying these troubleshooting steps, consider checking for any software updates for Apple Music or iTunes. Updates may include bug fixes and improvements that can address issues with Smart Playlists. It’s also recommended to reach out to Apple Support or consult official documentation for further assistance, as they can provide more specific troubleshooting steps based on your device and software version.
By addressing this issue, you can ensure that your Smart Playlists accurately reflect the songs that meet the specified criteria, allowing you to enjoy a curated and personalized music experience.
Issue 3: Duplicates in the Smart Playlist
Duplicates in a Smart Playlist can be a common issue when managing your music collection in Apple Music or iTunes. It can result in repetitive songs and a cluttered playlist. Here are some troubleshooting steps to help address this issue:
Step 1: Review the playlist criteria: Carefully review the criteria you have set for the Smart Playlist. Duplicate songs may appear in the playlist if the criteria overlap or if multiple criteria lead to similar results. Adjust the criteria to ensure they are distinct and avoid duplications.
Step 2: Consolidate similar playlists: Check if you have multiple Smart Playlists with similar or identical criteria. If multiple playlists serve the same purpose, consider consolidating them into a single playlist. Removing duplicates will simplify your playlist collection and help eliminate repetitive songs.
Step 3: Remove duplicate songs from your library: If you have duplicate songs in your library, it’s essential to remove them. Duplicates can occur when you unintentionally import the same song multiple times, resulting in duplicates being added to Smart Playlists. Review your library for duplicate songs and delete any unnecessary copies.
Step 4: Utilize the “Only include distinct songs” option: Apple Music and iTunes offer a helpful feature called “Only include distinct songs” for Smart Playlists. Enable this option to ensure that the playlist only includes unique songs, excluding any duplicate entries.
Step 5: Check for discrepancies in song metadata: Duplicates can also occur due to slightly different metadata associated with songs. Check for any variations or inconsistencies in song titles, artist names, or album information. Correcting these discrepancies can help resolve the issue of duplicated songs in Smart Playlists.
If these troubleshooting steps do not resolve the issue, consider rebuilding your library or reaching out to Apple Support for further assistance. They can provide more specific guidance based on your device and software version.
By addressing the issue of duplicates in your Smart Playlists, you can enjoy a streamlined and clutter-free music listening experience.