
How to Access iPhone Music Settings
When it comes to fine-tuning your iPhone’s music experience, having easy access to the music settings is crucial. Fortunately, Apple has made it simple to access these settings directly from the Music app. Whether you want to adjust the volume and sound settings, enable the equalizer, or manage playlists, you can easily do so with just a few taps. Here’s how to access iPhone music settings:
-
Step 1: Open the Music app on your iPhone by tapping on the Music icon from your home screen. The Music app is represented by a colorful music note icon, making it easy to identify.
-
Step 2: Once you’re in the Music app, look for the “Settings” option. On the bottom right corner of the screen, you’ll find an icon with three horizontal lines. Tap on this icon to open the settings menu.
-
Step 3: In the settings menu, you’ll see several options related to your music settings. Scroll down to explore the various settings available to you.
-
Step 4: To adjust the volume and sound settings, tap on “Playback & Audio.” Here, you can control the volume level, balance, and even choose to enable Sound Check to ensure consistent playback volume.
-
Step 5: If you prefer to tweak the audio output, you can tap on “Output” to select your preferred audio source, including headphones, Bluetooth speakers, or Apple TV.
-
Step 6: To enable the equalizer and customize the sound to your liking, tap on “EQ.” You’ll find a list of preset equalizer settings, such as Bass Booster or Jazz, as well as the option to create your own custom equalizer setting.
By following these simple steps, you can easily access and customize your iPhone’s music settings. Whether you want to adjust the volume, fine-tune the equalizer, or choose your preferred audio output, having control over these settings ensures a personalized listening experience.
How to Adjust Volume and Sound Settings
Being able to adjust the volume and sound settings on your iPhone is essential for creating an enjoyable music experience. Fortunately, Apple has provided users with an intuitive way to control these settings directly from the Music app. Whether you want to crank up the volume or fine-tune the sound balance, here’s how you can adjust your iPhone’s volume and sound settings:
-
Step 1: Open the Music app on your iPhone by tapping on the Music icon from your home screen. The Music app is represented by a colorful music note icon.
-
Step 2: Once you’re in the Music app, locate the “Settings” option. Look for the icon with three horizontal lines at the bottom right corner of the screen and tap on it to access the settings menu.
-
Step 3: In the settings menu, scroll down until you find “Playback & Audio” and tap on it.
-
Step 4: Within the “Playback & Audio” section, you’ll see various options to adjust your volume and sound settings. You can control the volume level by sliding the volume bar left or right. Dragging it to the right will increase the volume, while dragging it to the left will decrease it.
-
Step 5: If you want to ensure consistent playback volume across different songs, you can enable “Sound Check.” This feature automatically adjusts the playback volume to a consistent level, preventing any sudden volume changes.
-
Step 6: If you prefer to balance the sound between the left and right channels, you can use the “Balance” option. This allows you to adjust the audio balance to your preference.
These simple steps make it easy to adjust the volume and sound settings on your iPhone. Whether you want to enjoy your music at a high volume or customize the balance for a better listening experience, having control over these settings ensures that your music sounds just the way you want it to.
How to Enable or Disable Equalizer
The equalizer is a powerful tool that allows you to customize the sound output on your iPhone and enhance your music listening experience. With the equalizer, you can boost the bass, add more treble, or adjust the sound to suit your preferences. Apple has made it easy to enable or disable the equalizer directly from the Music app. Here’s how you can do it:
-
Step 1: Open the Music app on your iPhone by tapping on the Music icon from your home screen. You’ll find the Music app represented by a colorful music note icon.
-
Step 2: Once you’re in the Music app, locate the “Settings” option. Look for the icon with three horizontal lines at the bottom right corner of the screen and tap on it to access the settings menu.
-
Step 3: In the settings menu, scroll down until you find “EQ” and tap on it.
-
Step 4: Within the “EQ” section, you’ll find a list of preset equalizer settings. These presets include options like Bass Booster, Treble Reducer, and many more. You can tap on any of these presets to enable it and apply the corresponding sound adjustment.
-
Step 5: If you prefer to create your own custom equalizer setting, you can tap on “Custom” at the top of the EQ section. This will open up a graphic equalizer screen where you can manually adjust the sound frequencies to your liking.
-
Step 6: If you no longer want to use the equalizer and prefer the default sound settings, you can simply tap on “Off” at the top of the EQ section to disable the equalizer.
By following these simple steps, you can easily enable or disable the equalizer on your iPhone. Whether you want to enhance the bass, reduce treble, or create a custom sound profile, having the equalizer at your fingertips gives you the freedom to tailor your music’s audio output to suit your personal preferences.
How to Change Audio Output
Changing the audio output source on your iPhone allows you to listen to your music through different devices or accessories. Whether you want to switch to headphones, a Bluetooth speaker, or even your Apple TV, Apple provides a seamless way to change the audio output directly from the Music app. Here’s how you can do it:
-
Step 1: Open the Music app on your iPhone by tapping on the Music icon from your home screen. The Music app is represented by a colorful music note icon.
-
Step 2: Once you’re in the Music app, locate the “Settings” option. Look for the icon with three horizontal lines at the bottom right corner of the screen and tap on it to access the settings menu.
-
Step 3: In the settings menu, scroll down until you find “Output” and tap on it.
-
Step 4: Within the “Output” section, you’ll see a list of available audio output sources. This includes options like iPhone Speaker, Bluetooth Devices, and any connected accessories.
-
Step 5: To switch to a different audio output source, simply tap on the desired option. For example, if you want to listen with headphones, tap on “Bluetooth Devices” to view the available Bluetooth devices and select your headphones from the list.
-
Step 6: If you prefer to use the iPhone’s built-in speaker, select “iPhone Speaker” from the list. The music will then play through the iPhone’s speaker.
-
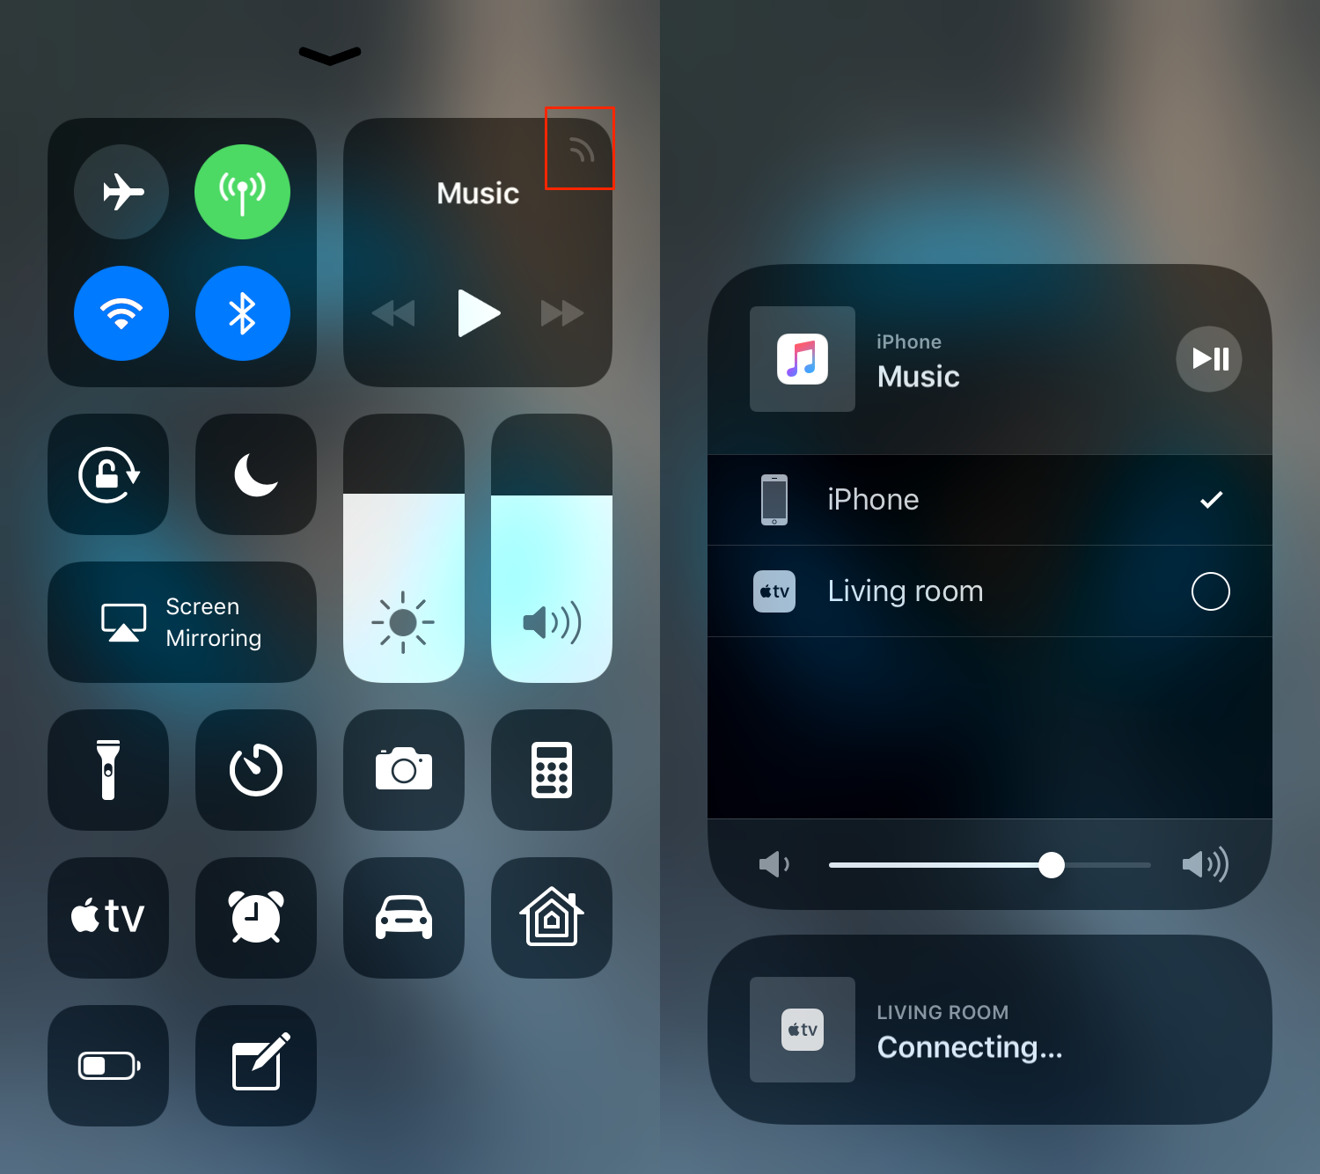
Step 7: If you have an Apple TV or other AirPlay-enabled devices, you can tap on “AirPlay & Bluetooth Devices” to view and select those devices as your audio output source.
With these simple steps, you can easily change the audio output source on your iPhone. Whether you want to listen to music privately through headphones, enjoy it wirelessly through a Bluetooth speaker, or share it on a larger screen using AirPlay, having control over the audio output allows you to tailor the listening experience to your liking.
How to Control Shuffle and Repeat
Controlling the shuffle and repeat options on your iPhone allows you to customize the playback experience of your music. Whether you want to shuffle your entire music library or repeat your favorite song, Apple has made it easy to control these settings directly from the Music app. Here’s how you can do it:
-
Step 1: Open the Music app on your iPhone by tapping on the Music icon from your home screen. The Music app is represented by a colorful music note icon.
-
Step 2: Once you’re in the Music app, start playing a song or playlist.
-
Step 3: To control the shuffle option, swipe up from the bottom of the screen to reveal the Now Playing screen. Here, you’ll find the playback controls.
-
Step 4: To shuffle your music, tap on the shuffle icon, which looks like two crossing arrows. When the shuffle icon is highlighted in red, it means that shuffle mode is enabled and your music will play in a random order.
-
Step 5: If you want to turn off shuffle mode, simply tap on the shuffle icon again to disable it. The icon will no longer be highlighted in red.
-
Step 6: To control the repeat option, swipe up from the bottom of the screen to reveal the Now Playing screen.
-
Step 7: Tap on the repeat icon, which looks like two arrows forming a loop. The first tap will enable repeat mode for the entire album or playlist, indicated by a highlighted icon.
-
Step 8: If you want to repeat a single song, tap on the repeat icon again. The icon will change to show a one-loop symbol, indicating that the current song will repeat continuously.
-
Step 9: To turn off repeat mode completely, tap on the repeat icon once more. The icon will no longer be highlighted, and the songs will play in sequential order without repetition.
By following these simple steps, you can easily control the shuffle and repeat options on your iPhone. Whether you want to shuffle your entire music library or repeat your favorite song, having control over these settings allows you to create a customized and enjoyable music listening experience.
How to Edit and Organize Music
Editing and organizing your music collection on your iPhone can help you keep your music library tidy and easy to navigate. With the Music app, you can easily edit song information, create playlists, and manage your music files. Here’s how you can edit and organize your music on your iPhone:
-
Step 1: Open the Music app on your iPhone by tapping on the Music icon from your home screen. The Music app is represented by a colorful music note icon.
-
Step 2: Once you’re in the Music app, go to the “Library” tab. Here, you’ll find all your music files organized by songs, albums, artists, and playlists.
-
Step 3: To edit the information of a song, find the song you want to edit and tap on it to open the Now Playing screen.
-
Step 4: On the Now Playing screen, tap on the three-dot menu icon (•••) located at the bottom right corner of the screen.
-
Step 5: From the options that appear, tap on “Edit” to edit the song’s information. Here, you can edit the song title, artist, album name, album cover, and other details.
-
Step 6: After making your desired changes, tap on “Done” to save the edits.
-
Step 7: To create a playlist, go back to the Library tab and tap on the “Playlists” section.
-
Step 8: Tap on the “+” button to create a new playlist. Give your playlist a name and add songs from your library by tapping on the “+” button next to each song.
-
Step 9: To organize your music, go back to the Library tab and tap on “Songs” or “Albums.” From here, you can sort your music by title, artist, or other criteria by tapping on the appropriate sorting option at the top of the list.
By following these simple steps, you can easily edit and organize your music on your iPhone. Whether you want to update song information, create playlists for different moods, or organize your music collection in a specific way, having control over your music library ensures that it is both personalized and easy to navigate.
How to Set Up and Use Apple Music
Apple Music is a popular streaming service that provides access to millions of songs and personalized recommendations. Setting up and using Apple Music on your iPhone is a straightforward process that allows you to explore a vast music library, create playlists, and discover new music. Here’s how you can set up and use Apple Music:
-
Step 1: Open the Music app on your iPhone by tapping on the Music icon from your home screen. The Music app is represented by a colorful music note icon.
-
Step 2: If you’re not already signed in with your Apple ID, you’ll be prompted to sign in or create a new Apple ID. Follow the on-screen instructions to sign in or create an account.
-
Step 3: Once you’re signed in, tap on the “For You” tab at the bottom of the screen. This is where Apple Music curates personalized recommendations based on your music preferences.
-
Step 4: To explore the vast Apple Music library, tap on the “Browse” tab. Here, you can browse through various genres, playlists, and charts to discover new music.
-
Step 5: To search for specific songs, albums, or artists, tap on the “Search” tab. You can use the search bar at the top to enter keywords or browse through the suggested search results.
-
Step 6: To save songs to your library or create playlists, simply tap on the “+” icon next to each song, album, or playlist.
-
Step 7: For a personalized radio experience, you can go to the “Radio” tab and explore various radio stations or create your own personalized station based on your favorite songs or artists.
-
Step 8: To access your saved music and playlists, go to the “Library” tab. Here, you’ll find all your saved music organized by songs, albums, artists, and playlists.
-
Step 9: To customize the Apple Music experience, go to the “Settings” tab by tapping on the icon with three horizontal lines at the bottom right corner of the screen. From here, you can adjust playback settings, enable or disable explicit content, and more.
By following these simple steps, you can easily set up and use Apple Music on your iPhone. Whether you want to explore new music, create personalized playlists, or enjoy a radio experience, Apple Music provides a comprehensive platform to satisfy your music needs.
How to Manage and Create Playlists
Managing and creating playlists is a great way to organize your music and have quick access to your favorite songs and albums. With the Music app on your iPhone, you can easily manage existing playlists, add new songs, and create customized playlists for different moods or occasions. Here’s how you can manage and create playlists on your iPhone:
-
Step 1: Open the Music app on your iPhone by tapping on the Music icon from your home screen. The Music app is represented by a colorful music note icon.
-
Step 2: Go to the “Library” tab at the bottom of the screen. Here, you’ll find all your music files organized by songs, albums, artists, and playlists.
-
Step 3: To manage existing playlists, tap on the “Playlists” section. You’ll see a list of your saved playlists.
-
Step 4: To add songs to a playlist, tap on the playlist you want to edit. Tap on the “+” button to browse through your music library and select the songs you want to add. You can also use the search bar to find specific songs.
-
Step 5: To reorder songs within a playlist, tap on the playlist and then tap on the “Edit” button. Now, you can tap and drag the songs to rearrange their order.
-
Step 6: If you want to delete a song from a playlist, swipe left on the song and tap on the “Delete” button that appears.
-
Step 7: To create a new playlist, go back to the Library tab and tap on the “Playlists” section. Then, tap on the “+” button to create a new playlist.
-
Step 8: Give your playlist a name and tap on “Add Songs” to start adding songs from your music library. You can search for songs or browse through albums and artists to find the songs you want.
-
Step 9: After adding songs to your playlist, tap on “Done” to save the new playlist.
By following these simple steps, you can easily manage and create playlists on your iPhone. Whether you want to organize your music by genre, create a workout playlist, or have a collection of your favorite songs, managing and creating playlists allows you to have instant access to the music that suits your mood and preferences.
How to Sync Music from iTunes
Syncing music from iTunes to your iPhone is a convenient way to transfer your music library from your computer to your device. By connecting your iPhone to your computer, you can easily sync your favorite songs, albums, and playlists. Here’s how you can sync music from iTunes to your iPhone:
-
Step 1: Connect your iPhone to your computer using the USB cable. Make sure to use the cable that came with your iPhone or a compatible one.
-
Step 2: Open iTunes on your computer. If you don’t have iTunes installed, you can download it for free from the Apple website.
-
Step 3: In iTunes, click on the device icon that appears in the top left corner of the iTunes window. This will open the Summary page for your iPhone.
-
Step 4: In the left sidebar, click on “Music” to access the music syncing options.
-
Step 5: To sync your entire music library, check the box next to “Sync Music.” If you only want to sync selected albums, artists, playlists, or genres, choose the appropriate option and select the items you want to sync.
-
Step 6: If you want to include music videos, podcasts, or audiobooks in the sync, check the respective boxes.
-
Step 7: Click on the “Apply” or “Sync” button in the bottom right corner of the iTunes window. iTunes will start syncing your selected music to your iPhone.
-
Step 8: Wait for the sync to complete. The progress will be displayed in the top middle portion of the iTunes window.
-
Step 9: Once the sync is complete, disconnect your iPhone from your computer.
By following these simple steps, you can easily sync music from iTunes to your iPhone. Whether you want to transfer your entire music library or select specific songs and playlists, syncing music allows you to enjoy your favorite tracks on the go, without needing an internet connection.
How to Delete Songs and Albums
Deleting songs and albums that you no longer want on your iPhone can help free up storage space and keep your music library organized. With the Music app, you can easily delete individual songs or entire albums with just a few simple steps. Here’s how you can delete songs and albums on your iPhone:
-
Step 1: Open the Music app on your iPhone by tapping on the Music icon from your home screen. The Music app is represented by a colorful music note icon.
-
Step 2: Go to the “Library” tab at the bottom of the screen. Here, you’ll find all your music files organized by songs, albums, artists, and playlists.
-
Step 3: To delete a song, simply locate the song you want to remove and swipe left on it. A “Delete” button will appear on the right side of the song’s name.
-
Step 4: Tap on the “Delete” button. A prompt will appear asking if you want to delete the song. Confirm the deletion by tapping on “Delete From Library.”
-
Step 5: To delete an entire album, go to the “Albums” section under the “Library” tab. Find the album you want to remove and swipe left on it.
-
Step 6: Tap on the “Delete” button that appears next to the album’s name. Confirm the deletion by tapping on “Delete from Library.”
-
Step 7: If you have Apple Music, keep in mind that deleting a song or album from your library will only remove it from your device, not your Apple Music account. You can always re-download the song or album if needed.
By following these simple steps, you can easily delete songs and albums from your iPhone. Whether you want to remove individual songs that you no longer enjoy or delete entire albums to free up storage space, managing your music library allows you to have a clutter-free and personalized music collection.
How to Control Music with Siri
Controlling your music with Siri is a convenient and hands-free way to manage playback, switch songs, and control the volume on your iPhone. Siri, Apple’s voice assistant, allows you to perform various music-related tasks without needing to manually navigate through the Music app. Here’s how you can control your music using Siri:
-
Step 1: Activate Siri by saying “Hey Siri” or by pressing and holding the Side or Home button, depending on your iPhone model.
-
Step 2: Once Siri is activated, you can give a voice command to control your music. For example, you can say “Play [song/album/artist/playlist name]” to start playing a specific song, album, artist, or playlist.
-
Step 3: To pause or resume playback, simply say “Pause” or “Play.”
-
Step 4: If you want to skip to the next song, you can say “Skip” or “Next.”
-
Step 5: Similarly, if you want to go back to the previous song, you can say “Previous” or “Go back.”
-
Step 6: To control the volume, you can say “Increase volume,” “Decrease volume,” or specify a particular volume level like “Set volume to 50%.”
-
Step 7: If you want to shuffle your music, you can say “Shuffle.”
-
Step 8: To ask Siri for information about the currently playing song or artist, you can say “What song is this?” or “Who is the artist?” Siri will provide you with the relevant details.
-
Step 9: If you have Apple Music, you can ask Siri to play music based on genres, moods, or even ask for specific recommendations. For example, you can say “Play some workout music” or “Recommendations for jazz songs.”
By following these simple voice commands with Siri, you can easily control your music playback, skip songs, adjust the volume, and explore your music library on your iPhone. Utilizing Siri for managing your music allows for a hands-free and effortless music experience, leaving you free to enjoy your favorite tunes.
How to Limit Music and Volume for Children
Ensuring a safe and appropriate music experience for children is important. Fortunately, Apple provides built-in features on your iPhone that allow you to set limits on music playback and control the volume to protect your child’s hearing. Here’s how you can limit music and volume for children on your iPhone:
-
Step 1: Open the Settings app on your iPhone.
-
Step 2: Scroll down and tap on “Screen Time.”
-
Step 3: If you haven’t set up Screen Time before, tap on “Turn On Screen Time” and follow the on-screen instructions to set it up.
-
Step 4: Once you have Screen Time activated, tap on “Content & Privacy Restrictions.”
-
Step 5: If prompted, enter your Screen Time passcode. If you haven’t set one up, follow the on-screen instructions to create a passcode.
-
Step 6: Tap on “Content Restrictions.”
-
Step 7: Tap on “Music, Podcasts & News.”
-
Step 8: Here, you can choose to allow explicit content or restrict it by selecting “Clean” or “Explicit.”
-
Step 9: To limit the maximum volume for your child’s device, go back to the Content & Privacy Restrictions menu and tap on “Volume Limit.”
-
Step 10: Here, you can set a maximum volume limit by dragging the slider to a comfortable level for your child. This will prevent the volume from going above the specified limit.
-
Step 11: Additionally, you can enable “Volume Limit on Headphones” to make sure the volume on connected headphones doesn’t exceed the set limit.
By following these steps, you can easily limit music playback and control the volume for children on your iPhone. Setting content restrictions and volume limits ensures that your child is exposed to age-appropriate content and helps protect their hearing at the same time. By providing a safe and controlled environment, you can let your child enjoy music without worries.