
Check CD Format Compatibility
Before you can copy a music CD to iTunes, it’s important to ensure that the CD format is compatible with iTunes. While iTunes supports various audio formats, including CD audio (CDA) and MP3, it does not support other formats like FLAC or WMA. To check the CD format compatibility, follow these steps:
- Insert the music CD into your computer’s CD/DVD drive.
- Open File Explorer on Windows or Finder on Mac.
- Locate the CD drive and right-click (or Control-click on Mac) on it.
- Select “Properties” (Windows) or “Get Info” (Mac) from the context menu.
- Look for the “File System” (Windows) or “Format” (Mac) information. It should indicate CD Audio (CDA) or another supported audio format.
If the CD format is compatible with iTunes, you can proceed with the copying process. However, if it’s not supported, you may need to convert the tracks to a compatible format before importing them into iTunes.
Remember that some music CDs may have copy protection or digital rights management (DRM) restrictions, which can prevent you from copying the tracks directly. In such cases, you may need to explore alternative methods or obtain the DRM-free version of the songs to import into iTunes.
By checking the CD format compatibility, you can ensure a smooth and successful process of copying your music CD to iTunes. Now that you’ve confirmed the format compatibility, let’s move on to the next steps.
Insert the CD into Your Computer
To start the process of copying your music CD to iTunes, you’ll need to insert the CD into your computer’s CD/DVD drive. Follow these steps to insert the CD:
- Locate the CD/DVD drive slot on your computer. It is usually located on the front panel of desktop computers or on the side of laptops.
- Gently push the CD into the drive slot, with the label side facing up.
- Push the CD all the way into the drive until it is fully seated.
- Wait for a moment as the computer recognizes the CD and prepares to read its contents.
Ensure that you handle the CD with care to avoid any scratches or damage to the surface. A scratched CD may result in reading errors and make it difficult to copy the tracks accurately.
Once the CD is inserted, you are ready to proceed with the copying process. It’s important to note that some computers may have multiple CD/DVD drives, so make sure you insert the music CD into the correct drive that you intend to use for copying to iTunes.
Now that you have successfully inserted the CD into your computer, it’s time to move on to the next step: opening iTunes.
Open iTunes
To copy a music CD to iTunes, you’ll need to have iTunes installed on your computer. If you don’t already have it installed, you can download it for free from the official Apple website. Once you have iTunes installed, follow these steps to open it:
- Locate the iTunes application icon on your computer’s desktop or in your programs list.
- Double-click on the iTunes icon to launch the application.
- Wait for iTunes to open. This may take a few moments, depending on your computer’s performance.
- Once iTunes is open, you will see the familiar iTunes interface, with options to access your music library, playlists, and more.
If you’re using a Mac, you can also open iTunes by clicking on the iTunes icon in the Dock at the bottom of your screen. Additionally, on Windows, you can use the Start menu to search for and open iTunes.
Opening iTunes is the crucial first step to copying a music CD to your iTunes library. By launching the application, you are now ready to proceed with the next steps in the copying process.
Now that you have successfully opened iTunes, it’s time to move on to the next step: disabling CD AutoPlay to prevent any interruptions during the copying process.
Disable CD AutoPlay
Before you start importing your music CD into iTunes, it’s a good idea to disable the AutoPlay feature for CDs on your computer. This prevents any unintended interruptions or prompts that may interfere with the copying process. Here’s how you can disable CD AutoPlay:
For Windows:
- Click the Start button and select “Settings” (the gear icon).
- In the Settings window, click on “Devices.”
- In the left-hand menu, click on “AutoPlay.”
- Toggle the “Use AutoPlay for all media and devices” switch to the “Off” position.
This disables AutoPlay for all CDs on your Windows computer.
For Mac:
- Click on the Apple menu and select “System Preferences.”
- In the System Preferences window, click on “CDs & DVDs.”
- Next to “When you insert a music CD,” select “Ignore.”
This ensures that AutoPlay is disabled for music CDs on your Mac.
Disabling CD AutoPlay prevents any pop-up windows or prompts from interfering with the importing process. It ensures a smoother and more efficient experience when copying your music CD to iTunes.
Now that you have successfully disabled CD AutoPlay, you’re ready to move on to the next step: configuring the import settings in iTunes.
Import Settings
Before importing your music CD into iTunes, it’s important to configure the import settings to ensure that the imported tracks meet your desired specifications. By adjusting these settings, you can choose the format, quality, and other parameters for the imported songs. Follow these steps to configure the import settings:
- Open iTunes and click on “Edit” in the menu bar (Windows) or “iTunes” on the menu bar (Mac).
- Select “Preferences” from the drop-down menu.
- In the Preferences window, click on the “General” tab.
- Click on the “Import Settings” button.
A separate window will open, where you can customize the import settings according to your preferences.
Within the Import Settings window, you have several options to consider:
- Import Using: Select the desired audio format for the imported tracks, such as MP3 or AAC.
- Settings: Choose the audio quality, including bit rate and sample rate.
- Customize: Configure additional settings like stereo mode, channel, and more.
Take your time to customize these settings based on your preferences and the available options. Keep in mind that higher audio quality settings may result in larger file sizes, while lower settings may compromise the audio quality. Find a balance that suits your needs.
Once you have adjusted the import settings to your liking, click “OK” to save the changes and close the Import Settings window.
Configuring the import settings allows you to have control over the format and quality of the imported songs in iTunes. Take a moment to adjust these settings before proceeding to the next step.
Now that you have successfully configured the import settings, it’s time to proceed with importing the CD into iTunes.
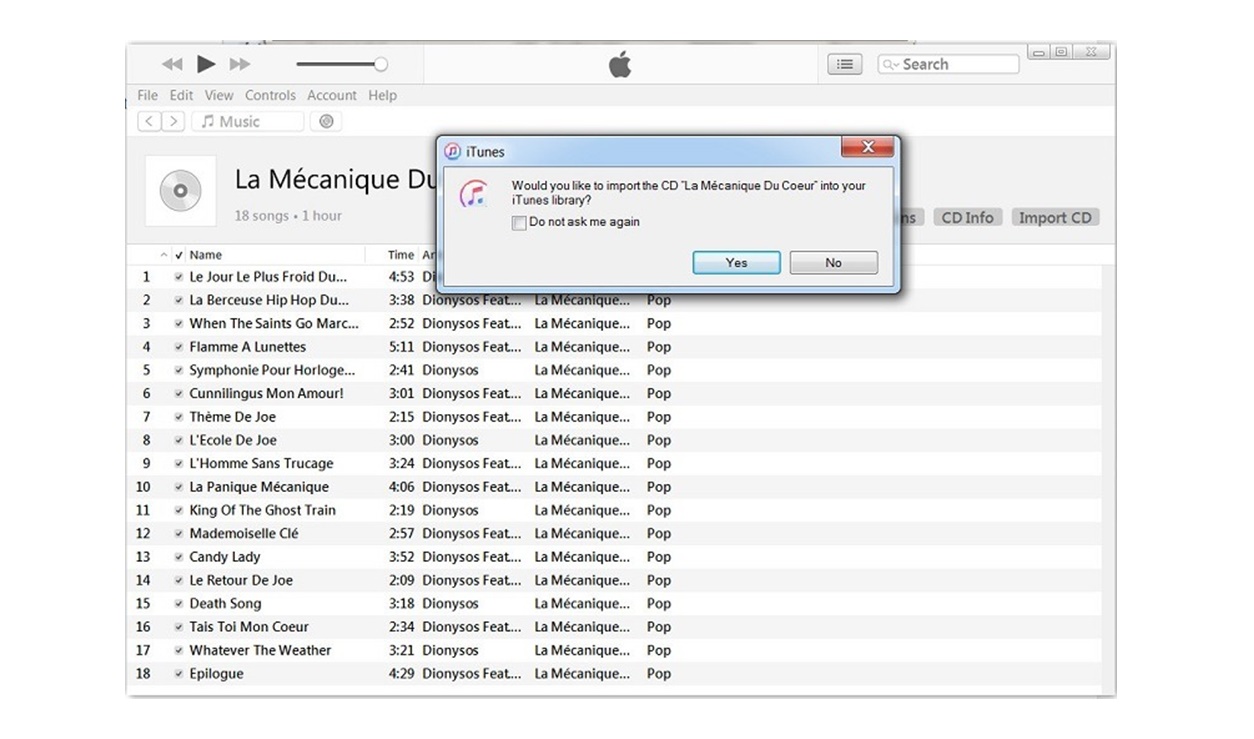
Choose Import CD
Once you have configured the import settings in iTunes, you’re now ready to choose the import CD option and begin the process of copying the tracks from the music CD into your iTunes library. Follow these steps to select the import CD option:
- Ensure that the music CD is still inserted in your computer’s CD/DVD drive.
- In iTunes, click on the “CD” button located at the top left corner of the iTunes window. The CD should appear in the left-hand sidebar.
- If the CD does not automatically appear in the left-hand sidebar, click on the “File” menu, select “Devices,” and then choose the name of the CD.
- Once the CD is selected, you will see a list of the tracks on the CD displayed in the main iTunes window.
At this point, you have successfully chosen the import CD option in iTunes, and the tracks from your music CD are ready to be copied into your iTunes library.
Before proceeding with the import, make sure to double-check your import settings by clicking on the “Preferences” menu and selecting the “Import Settings” tab. Verify that the format, quality, and other parameters are set according to your preferences.
It’s worth noting that if you want to import only specific tracks from the CD instead of the entire album, you can deselect the unwanted tracks by unchecking the boxes next to their names.
Now that you have chosen the import CD option in iTunes and made the necessary adjustments, it’s time to move on to customizing the import settings for the CD tracks.
Customize Import Settings
Customizing the import settings in iTunes allows you to further tailor the imported tracks from the CD to meet your specific requirements. By making these adjustments, you can control important factors like audio format, quality, and file organization. Follow these steps to customize the import settings:
- With the music CD selected in iTunes, click on the “Options” button located at the top right corner of the iTunes window.
- A drop-down menu will appear. Select “Customize Import Settings” from the menu.
- A new window titled “Import Settings” will open, displaying several options to customize the import process.
Within the Import Settings window, you’ll find the following options:
- Import Using: Choose the desired audio format for the imported tracks, such as MP3, AAC, AIFF, or WAV.
- Settings: Adjust the audio quality and format specific settings, including bit rate, sample rate, and codec.
- File Organization: Specify the way the imported tracks will be organized within your iTunes library, such as by artist, album, and genre.
- CD Text: Enable or disable the inclusion of CD text information, if available, with the imported tracks.
Take your time to customize these settings based on your preferences and requirements. Consider factors like storage space, audio quality, and future compatibility with different devices when making these choices.
Once you have made the necessary adjustments to the import settings, click “OK” to save the changes and close the Import Settings window.
By customizing the import settings, you have full control over the format, quality, and organization of the imported tracks in your iTunes library. Take a moment to make these customizations before proceeding to the next step of importing the CD tracks into iTunes.
Begin Importing
Now that you have customized the import settings in iTunes, it’s time to start importing the tracks from the CD into your iTunes library. The import process will transfer the audio files from the CD to your computer, allowing you to access and enjoy them within iTunes. Follow these steps to begin the importing process:
- Ensure that the music CD is still selected in iTunes and that the import settings are correctly configured.
- Click on the “Import CD” button located at the top right corner of the iTunes window. This button may appear as “Import” or “Import CD” depending on your iTunes version.
As soon as you initiate the import process, iTunes will read each track from the CD and convert it into the format you specified in the import settings. The progress will be displayed in the top-center of the iTunes window, showing the number of tracks imported and the total progress percentage.
Depending on the number of tracks and the speed of your computer, the import process may take a few minutes to complete. You can monitor the progress by checking the status bar or the spinning CD icon in iTunes.
It’s worth noting that during the import process, iTunes will retrieve the track information from an online database, such as the song titles, artist names, and album details, and assign them to the imported tracks in your library. This helps organize your music collection and provides convenient access to the correct song metadata.
Once the import is complete, you will find the imported tracks in your iTunes library, ready to be organized, played, and synced with your devices. The tracks will be stored in the location specified in the import settings, following the organization preferences you set.
Now that you have successfully begun the process of importing the CD into iTunes, it’s time to move on to the next steps of checking the imported songs and organizing them within your library.
Check Imported Songs
Once the import process is complete, it’s important to double-check the imported songs in your iTunes library to ensure that they have been successfully transferred and that they meet your expectations. By reviewing the imported songs, you can verify the accuracy of the track information and address any issues that may have occurred during the import process. Follow these steps to check the imported songs:
- Navigate to the “Music” or “Library” tab in iTunes to access your music library.
- Look for the newly imported album or artist name in the sidebar or main window of iTunes.
- Click on the album or artist name to reveal the imported tracks.
- Scroll through the tracks to ensure that all the songs have been imported successfully.
- Verify that the track information, such as song title, artist name, and album name, is correct for each imported song.
- If you notice any missing or incorrect track information, you can manually edit it by right-clicking on the song and selecting “Get Info.” Make the necessary changes in the song’s information window.
By carefully checking the imported songs and their accompanying information, you can ensure the accuracy and quality of your music library in iTunes. This step allows you to identify and rectify any issues that may have arisen during the import process.
If you encounter any problems, such as missing tracks or incorrect metadata, consider re-importing the CD or manually adding the missing information to the songs. Additionally, you can explore iTunes’ “Organize Library” feature to consolidate and organize your music collection further.
Now that you have successfully checked the imported songs and verified their accuracy, it’s time to proceed with ejecting the CD from your computer.
Eject CD
After successfully importing the songs from the music CD into iTunes and confirming their accuracy in your library, it’s time to safely eject the CD from your computer’s CD/DVD drive. Ejecting the CD ensures its safe removal without any risk of damage or data loss. Follow these steps to eject the CD:
- In iTunes, make sure you are on the “Music” or “Library” tab to view your music library.
- Locate the CD name in the sidebar or main window of iTunes.
- Right-click (or Control-click on Mac) on the CD name.
- From the context menu, select “Eject” or “Eject CD.”
After selecting the eject option, you will notice that the CD icon disappears from the iTunes sidebar or main window, indicating that it has been successfully ejected from your computer. At this point, it is safe to physically remove the CD from the CD/DVD drive.
It is important to handle the CD with care while ejecting it. Hold it by the edges and avoid touching the shiny surface to prevent any fingerprints, smudges, or scratches that could affect its playability in the future.
Now that you have successfully ejected the CD from your computer, you can store it in its case or return it to its designated location. The songs from the CD are now safely imported into your iTunes library and can be accessed and played directly from iTunes.
With the CD safely ejected, you have completed the process of copying a music CD to iTunes. Now you can enjoy your favorite tracks anytime, organize your music library, create playlists, and sync them with your devices.
Organize Imported Songs
After importing the songs from your music CD into iTunes, you may want to organize them within your library to have a well-structured and easily navigable music collection. Organizing your imported songs allows you to locate specific tracks, albums, or artists effortlessly and enhances your overall listening experience. Here are some steps you can take to organize your imported songs:
- Create playlists: Group your songs into playlists based on genres, moods, or personal preferences. To create a new playlist, click on the “File” menu in iTunes, select “New,” and then choose “Playlist.” Give your playlist a name and drag and drop the desired songs into it.
- Update song information: Review the imported song information and make any necessary changes for accuracy. Right-click on a song, select “Get Info,” and edit the details such as song title, artist name, album name, track number, and more. Click “OK” to save the changes.
- Add album art: Enhance the visual appeal of your music library by adding album artwork to your imported songs. Right-click on a song, select “Get Info,” and go to the “Artwork” tab. Click on “Add Artwork” and select the image file to upload the album cover. Repeat this process for each song or album.
- Use the sorting options: Take advantage of iTunes’ sorting options to arrange your songs alphabetically, by artist, by album, or any other criteria. Click on the column headers in your music library to sort your songs in ascending or descending order based on the selected category.
- Create folders: If you have a vast music library, consider creating folders to further organize your songs. Right-click in the sidebar, select “New Folder,” and name it accordingly. Drag and drop playlists, albums, or artists into the appropriate folders for better organization.
By following these organizing techniques, you can create a well-curated and personalized iTunes library that reflects your taste in music and makes navigation and discovery a breeze.
Take the time to explore the various organizational features offered by iTunes and experiment with different arrangements to find the method that works best for you. Regularly updating and maintaining the organization of your imported songs will ensure a seamless and enjoyable music listening experience within iTunes.
Now that you have successfully organized your imported songs, you can fully enjoy your music library in iTunes by easily finding and playing your favorite tracks, creating custom playlists, and exploring new music.
Verify Imported Songs are in iTunes Library
After importing your music CD into iTunes and organizing your songs, it’s essential to verify that all the imported tracks are present in your iTunes library. Verifying the presence of songs ensures that the import process was successful, and you can access and enjoy your music without any missing tracks. Follow these steps to verify the presence of imported songs in your iTunes library:
- Open iTunes and navigate to the “Music” or “Library” tab to access your music library.
- Scroll through the list of artists, albums, or songs to visually confirm that the imported tracks are present.
- Use the search bar at the top right corner of iTunes to search for a specific song or artist. Enter the relevant keyword, and check if the desired track appears in the search results.
- Create a temporary playlist containing all the imported songs. To do this, select all the songs by clicking on the first track, holding down the Shift key, and then clicking on the last track. Right-click on the selected songs and choose “Add to Playlist,” then select “New Playlist” and give it a name. Check if all the songs are added to the playlist.
By following these verification steps, you can ensure that all the imported songs are successfully stored and accessible within your iTunes library. Should you discover any missing tracks, you may need to re-import the CD or locate the missing songs from an alternative source.
If you encounter any issues during the verification process, you can use iTunes’ “Consolidate files” feature to ensure that all your music files are properly organized and stored within the iTunes Media folder. This feature helps to maintain a consistent file structure and prevents accidental deletion or misplacement of tracks.
By verifying the presence of your imported songs in the iTunes library, you can enjoy your music collection without any surprises or missing tracks. Now that you have confirmed the successful import, you are ready to dive into your iTunes library and enjoy your favorite tunes.
Enjoy Your Music
Now that you have successfully copied your music CD to iTunes, organized your songs, and verified their presence in your library, it’s time to sit back, relax, and enjoy your favorite tunes. iTunes provides a user-friendly platform to explore, play, and manage your music collection, offering various features to enhance your listening experience. Here are some ways you can enjoy the music in your iTunes library:
- Create playlists: Curate personalized playlists based on different moods, genres, or occasions. Mix and match your favorite tracks to create the perfect soundtrack for any moment.
- Shuffle play: Let iTunes surprise you by enabling the shuffle feature. This randomizes the play order and ensures that you discover hidden gems and enjoy a diverse selection of songs from your library.
- Sync with devices: Connect your iPhone, iPad, or iPod to iTunes and sync your music library to enjoy your music on the go. Whether you’re commuting, exercising, or relaxing, your favorite songs are just a tap away.
- Explore new music: Utilize the iTunes Store or Apple Music to discover and explore new artists, albums, and genres. Browse recommended playlists, listen to radio stations, and stay up-to-date with the latest releases.
- Customize equalizer settings: Fine-tune the sound of your music with iTunes’ built-in equalizer. Adjust the bass, treble, and other parameters to suit your preferences and optimize the listening experience.
- Discover album artwork: Enjoy the visually appealing aspect of your music library by viewing album artwork. Let iTunes display the vibrant and unique cover art associated with each album as you listen.
Take advantage of these features and explore the full potential of your iTunes library to immerse yourself in the joy of music. Rediscover old favorites, uncover new gems, and let the power of your music collection transport you.
Remember to regularly update your iTunes library by adding new albums, removing duplicates, and exploring recommended playlists. This keeps your music collection fresh and ensures that you always have an extensive selection of songs at your fingertips.
Now that you have successfully imported, organized, and verified your music in iTunes, it’s time to sit back, hit play, and enjoy the limitless possibilities of your music library. Happy listening!