
What is Philips Hue Play Light Bar?
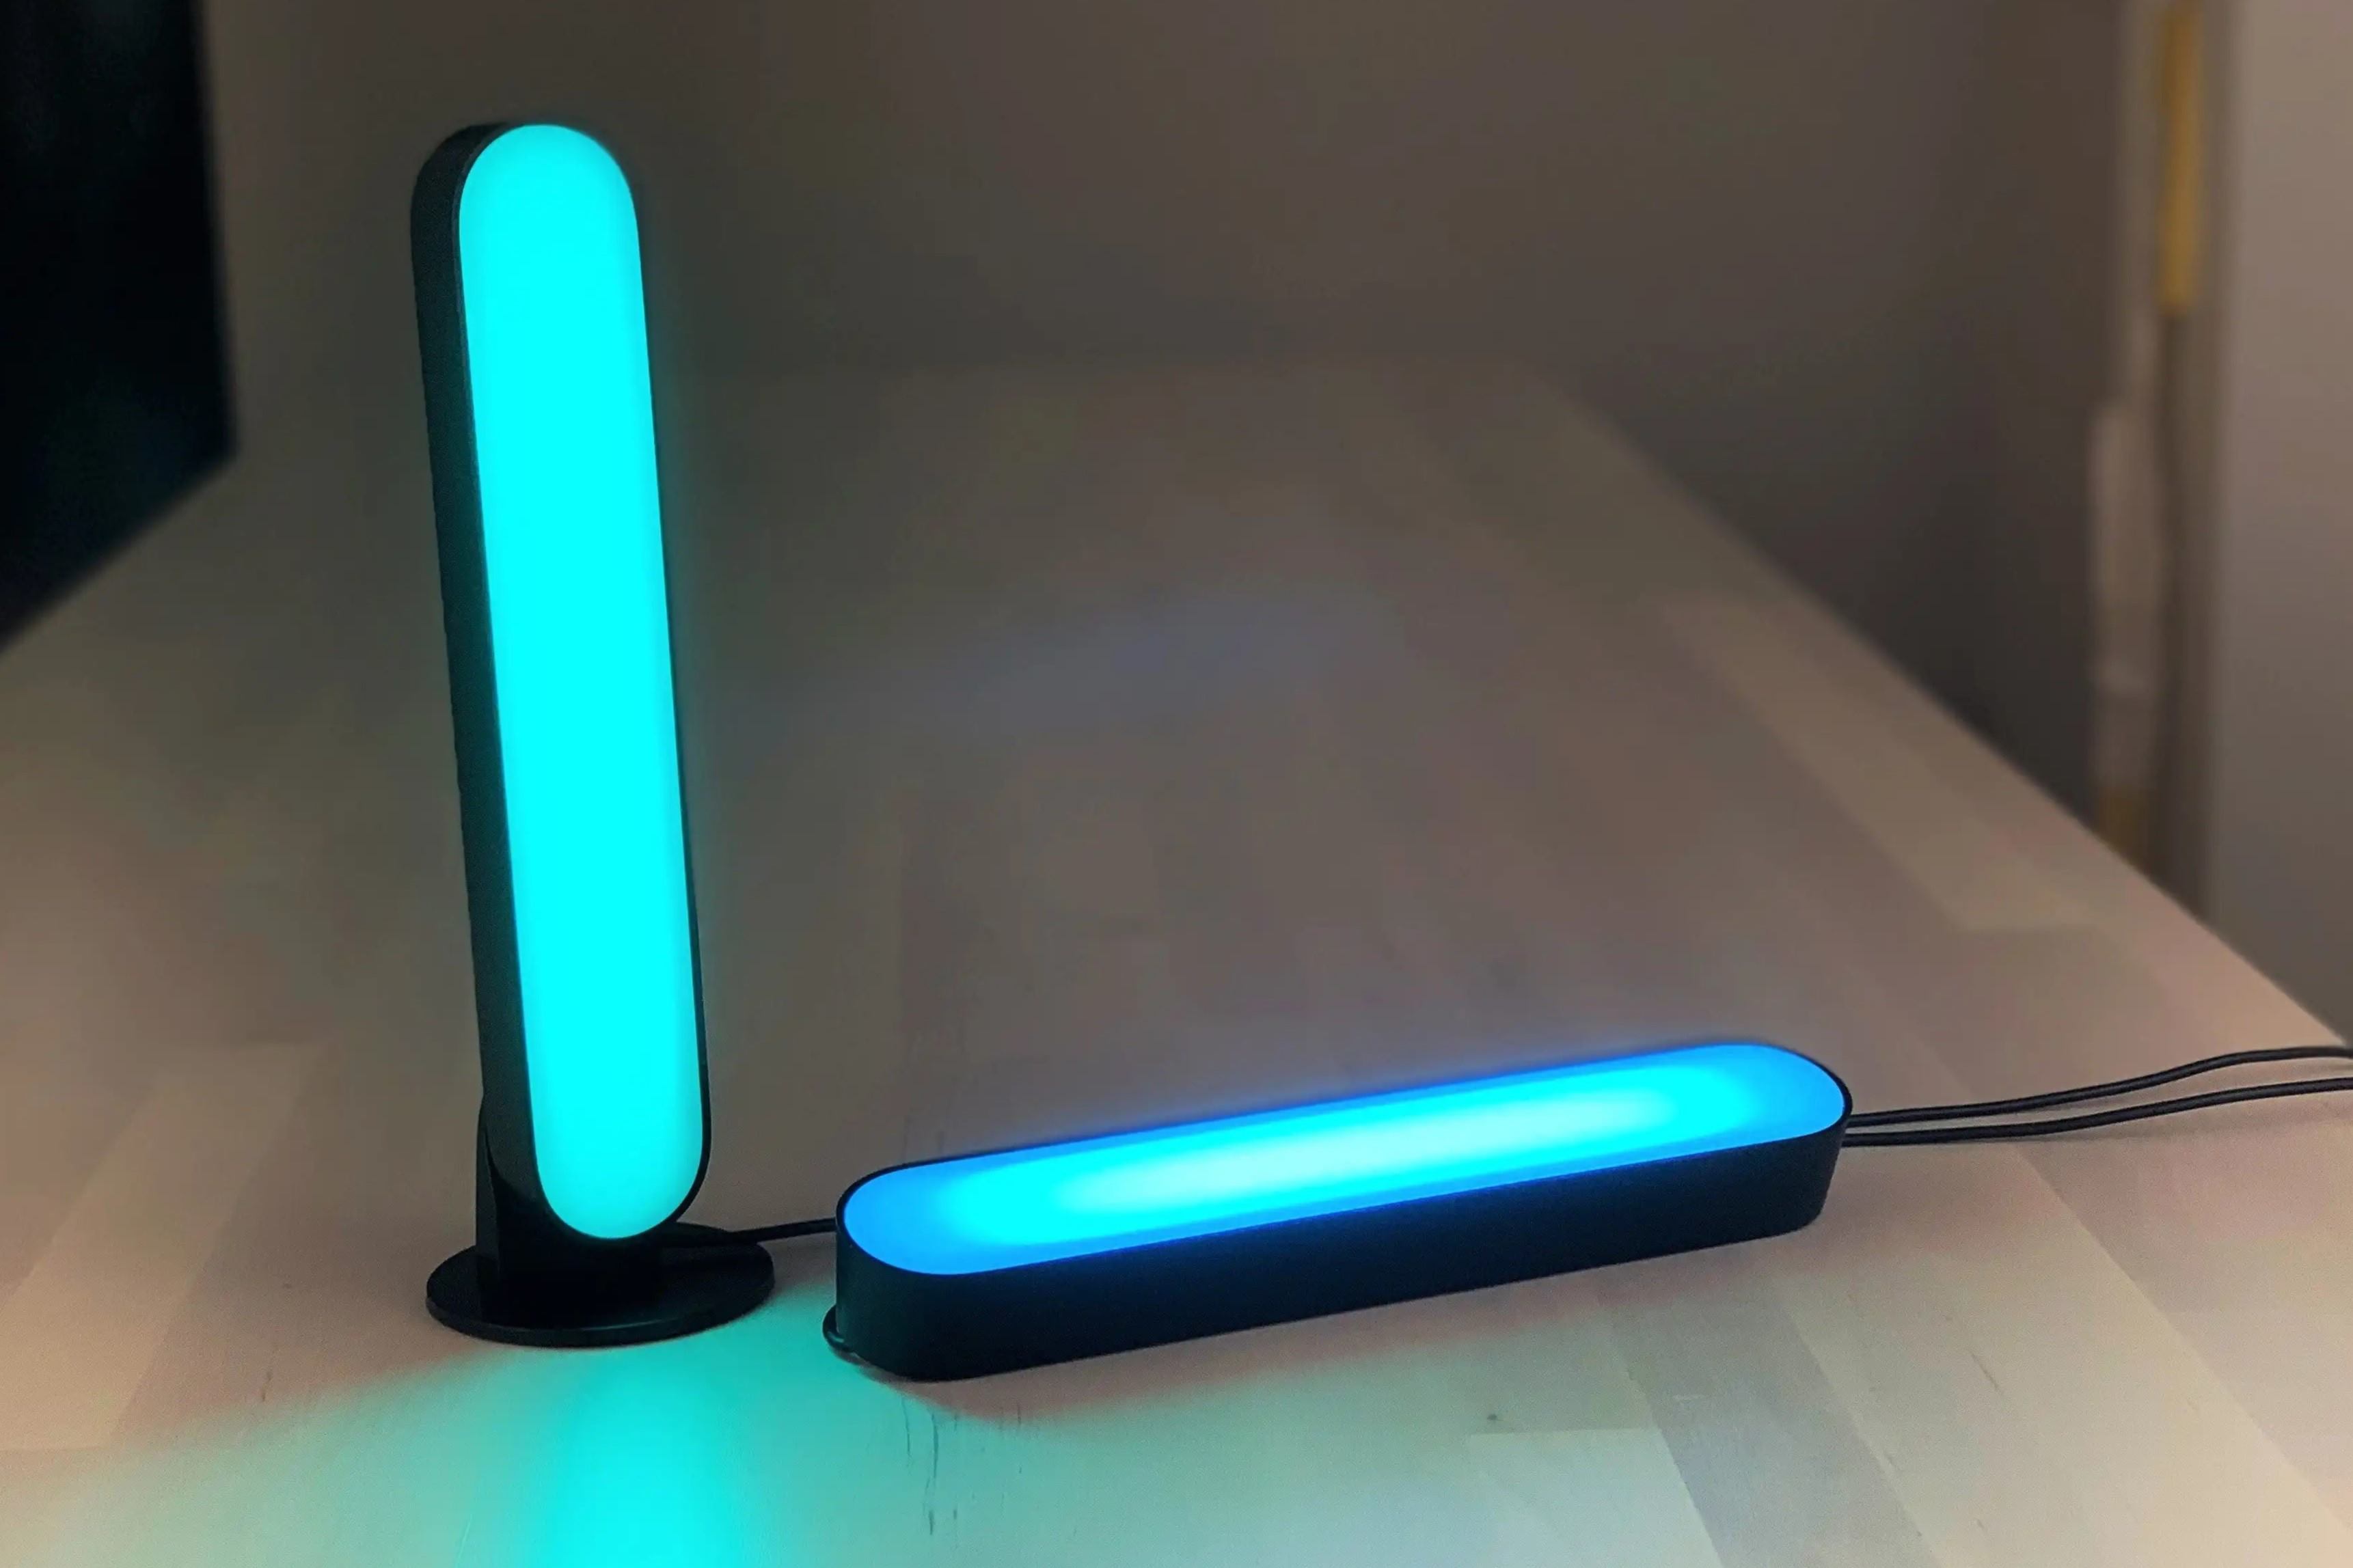
The Philips Hue Play Light Bar is a versatile lighting solution that allows you to create a stunning ambiance in your home. It is a compact, smart LED strip that can be placed behind your TV or any other furniture to cast a vibrant glow.
The Play Light Bar is a part of the popular Philips Hue ecosystem, which offers a wide range of smart lighting products. It is compatible with various Hue accessories and can be seamlessly integrated into your existing Hue setup.
One of the standout features of the Play Light Bar is its ability to produce a wide spectrum of colors. With millions of color options to choose from, you can effortlessly transform your living space to match your mood or enhance your entertainment experiences.
Additionally, the Play Light Bar supports dynamic lighting effects, such as color looping, pulse, and gradient transitions, which can be synchronized with music, movies, or games. This allows you to create an immersive and personalized lighting experience.
Controlling the Philips Hue Play Light Bar is easy and convenient. You can use the Philips Hue app on your smartphone or tablet to adjust the brightness, change colors, and create schedules. Moreover, it is compatible with voice assistants like Amazon Alexa, Google Assistant, and Apple HomeKit, enabling you to control your lights with simple voice commands.
The Play Light Bar is not only suitable for enhancing your entertainment areas, but it can also be used to highlight architectural features, create accent lighting, or add a touch of elegance to your home. Its sleek design and versatility make it a popular choice among both tech enthusiasts and interior design enthusiasts.
What comes in the box?
When you purchase the Philips Hue Play Light Bar, you can expect to find a neatly packaged box that contains everything you need to get started with your smart lighting setup. Each box includes:
- The Philips Hue Play Light Bar(s): The number of light bars included in the box depends on the package you have chosen. It could be a single unit or a set of two or more.
- The Philips Hue Bridge: This is a crucial component that acts as the central hub for all your Philips Hue smart lights. It facilitates communication between the lights and your smartphone, allowing you to control and customize your lighting setup.
- Power Adapters and Cables: The box will also contain the necessary power adapters and cables to connect your Philips Hue Play Light Bar(s) and Bridge to a power source.
- Mounting Kit: To ensure easy installation, the Play Light Bar comes with a mounting kit that includes adhesive tape and screws. This allows you the flexibility to either mount the light bars securely or stick them to the desired surface.
- Quick Start Guide: Philips Hue Play Light Bar comes with a detailed quick start guide that provides step-by-step instructions on how to set up and configure your lights.
Additionally, it’s worth noting that some packages may also include accessories like extension cables or sync boxes, depending on the variant you choose. These accessories can be useful in extending the reach of your light bars and enhancing the overall lighting experience.
Before starting the setup process, it is recommended to carefully review the items in the box and ensure that everything is present. If you find any missing or damaged components, reach out to Philips Support for assistance.
Step 1: Download the Philips Hue app
The first step in setting up your Philips Hue Play Light Bar is to download the Philips Hue app. The app is available for free on both iOS and Android devices, and it serves as the main control hub for your smart lighting system.
To download the app, follow these simple steps:
- Open the App Store (iOS) or Google Play Store (Android) on your smartphone or tablet.
- Search for “Philips Hue” in the search bar.
- Tap on the Philips Hue app from the search results.
- Select “Download” or “Install” to begin the installation process. Make sure you have a stable internet connection to avoid any interruptions.
Once the app is successfully installed on your device, you are ready to move on to the next step of the setup process.
The Philips Hue app offers a user-friendly interface that allows you to control and customize your lighting experience. It provides a wide range of features and functionalities, including:
- Switching lights on/off
- Adjusting brightness
- Selecting and changing colors
- Creating scenes and presets
- Setting timers and schedules
- Syncing lights with music, movies, and games
Additionally, the app allows you to group and organize your lights according to rooms or specific areas of your home. You can create different lighting setups for your living room, bedroom, kitchen, and more, giving you complete control over your smart lighting system.
Before moving forward, make sure you have your smartphone or tablet handy, as you will need it for the subsequent steps of the setup process. Also, it is recommended to keep your device updated with the latest version of the Philips Hue app to ensure compatibility and access to the latest features.
Step 2: Connect the Philips Hue Bridge
Now that you have downloaded the Philips Hue app, the next step is to connect the Philips Hue Bridge to your home network. The Bridge acts as the central hub that enables communication between your smart lights and the app.
Follow these steps to connect the Philips Hue Bridge:
- Locate a suitable spot for the Bridge near your Wi-Fi router. Ensure that it is within range and has a stable power source nearby.
- Using the provided Ethernet cable, connect one end to the Philips Hue Bridge and the other end to an available Ethernet port on your router.
- Connect the power adapter to the Bridge and plug it into a nearby power outlet.
- The Bridge will start booting up and you will see a series of lights on the front indicating its status. Once all the lights are solid, it means the Bridge is successfully connected to your home network.
At this point, you may also want to make sure that your smartphone or tablet is connected to the same Wi-Fi network as the Bridge.
In some cases, you may require an additional Ethernet cable if you have multiple Bridges or if your setup requires more connections. Consult the user manual or the Philips Hue website for further instructions.
Connecting the Bridge to your home network is a crucial step in the setup process as it allows the app to communicate with your smart lights. It creates a secure and reliable connection, ensuring that you have full control over your lighting system from anywhere in your home.
Once the Bridge is successfully connected to your network, you are ready to move on to the next step of the setup process, which involves plugging in the Philips Hue Play Light Bar.
Step 3: Plug in the Philips Hue Play Light Bar
After connecting the Philips Hue Bridge to your home network, it’s time to plug in the Philips Hue Play Light Bar. This step is essential for powering up the light bar and preparing it for the setup process.
Follow these simple steps to plug in the light bar:
- Take the Philips Hue Play Light Bar out of the box.
- Identify the power adapter that came with the light bar.
- Connect one end of the power adapter to the light bar.
- Plug the other end of the power adapter into a nearby power outlet.
Ensure that the power outlet you choose is easily accessible and within reach of the light bar’s cable. This will allow for easy installation and removal if necessary.
Once plugged in, the Philips Hue Play Light Bar will power on and you will notice the lights on the light bar illuminate, indicating that it is ready for the next step of the setup process.
It’s important to note that the Philips Hue Play Light Bar requires a power source to function. Without power, the light bar will not be able to connect to the app or change colors. Make sure to keep the light bar connected to a power source at all times for uninterrupted functionality.
In case you need to move or reposition the light bar, always remember to unplug it from the power outlet first for safety purposes. This will prevent any accidental damage or electrical hazards that may occur during the process.
With the Philips Hue Play Light Bar now plugged in and powered up, you are ready to proceed to the next step, which involves connecting the light bar to the Philips Hue Bridge.
Step 4: Connect the Philips Hue Play Light Bar to the Bridge
Now that you have the Philips Hue Play Light Bar powered on, it’s time to connect it to the Philips Hue Bridge. This step is crucial for establishing communication between the light bar and the app.
Follow these steps to connect the Philips Hue Play Light Bar to the Bridge:
- Open the Philips Hue app on your smartphone or tablet.
- Tap on the “Settings” tab at the bottom right corner of the app.
- Select “Light setup” from the list of options.
- Tap on “Add light” or the “+” icon to start searching for new lights.
- The app will begin searching for available lights. Once the Philips Hue Play Light Bar is detected, it will appear on the screen.
- Select the detected light bar and follow the on-screen instructions to complete the connection process.
During the connection process, the app may prompt you to press the button on the Philips Hue Bridge to establish a secure connection. Follow the instructions provided on the screen to complete this step.
It’s important to ensure that the Philips Hue Play Light Bar is within range of the Philips Hue Bridge and that there are no physical or signal obstructions between them. This will ensure a smooth and reliable connection.
Once the connection between the light bar and the Bridge is established, the app will confirm the successful pairing. You can then proceed to the next step, which involves setting up the Philips Hue Play Light Bar in the app.
In case the connection process fails, make sure that the light bar is powered on and that your smartphone or tablet is connected to the same Wi-Fi network as the Philips Hue Bridge. If the issue persists, consult the troubleshooting section or reach out to Philips Support for further assistance.
Step 5: Set up the Philips Hue Play Light Bar in the app
Once you have successfully connected the Philips Hue Play Light Bar to the Bridge, it’s time to set it up in the Philips Hue app. This step allows you to customize and personalize your lighting experience to suit your preferences.
Follow these steps to set up the Philips Hue Play Light Bar in the app:
- Open the Philips Hue app on your smartphone or tablet.
- Tap on the “Settings” tab at the bottom right corner of the app.
- Select “Light setup” from the list of options.
- You will see a list of connected lights, including the Philips Hue Play Light Bar. Tap on the light bar’s name to access its settings.
- In the light bar’s settings, you can customize various aspects of its behavior and appearance. You can adjust the brightness, change colors, and even create custom scenes or presets.
- Explore the different options and features available to create the desired lighting effect. You can experiment with different colors, adjust saturation levels, and even select from predefined scenes.
- Take advantage of the app’s advanced features to further enhance your lighting experience. You can sync the light bar with your music, movies, or games for a more immersive effect.
- Once you are satisfied with your settings, save them and exit the light bar’s settings page. Your changes will be reflected in the physical light bar immediately.
The Philips Hue app provides a user-friendly interface that makes it easy to configure and control your Philips Hue Play Light Bar. Experiment with different settings, colors, and effects to create the perfect lighting ambiance for any occasion.
Remember that you can always go back to the app and make adjustments to the light bar’s settings whenever you want. Whether you want to set a specific lighting scene for a cozy movie night or create a vibrant lighting display for a party, the app allows you to unleash your creativity and set the mood for any situation.
By completing this step, you have successfully set up the Philips Hue Play Light Bar in the app and are ready to enjoy its customizable lighting capabilities. The next step involves customizing your lighting experience even further.
Step 6: Customize your lighting experience
Now that you have set up the Philips Hue Play Light Bar in the app, it’s time to unleash your creativity and customize your lighting experience to suit your preferences and mood. The Philips Hue app offers a range of features and options to help you create the perfect ambiance.
Follow these steps to customize your lighting experience:
- Open the Philips Hue app on your smartphone or tablet.
- Navigate to the “Rooms” or “Lights” tab to access your connected Philips Hue Play Light Bar.
- Choose the individual light bar or a group of light bars that you want to customize.
- Experiment with different colors by using the color wheel or selecting from the variety of pre-defined scenes and colors available in the app.
- Adjust the brightness to your desired level. Whether you want a subtle and relaxing glow or a vibrant burst of light, the app allows you to fine-tune the brightness accordingly.
- Create custom scenes or presets to quickly set up your preferred lighting settings with just a tap. You can save scenes for specific activities or moods, such as “Movie Night” or “Party Mode.”
- Utilize the app’s scheduling features to automate your lighting. Set timers to turn the light bar on or off at specific times or create dynamic schedules that simulate natural daylight.
- Explore additional features, such as syncing your lights with music, movies, or games. This allows the light bar to respond to the audio or visual cues, further enhancing your entertainment experience.
- Group your lights together to create a cohesive lighting experience throughout a room or your entire home. This allows you to control multiple light bars simultaneously and create uniform lighting effects.
Remember, the customization possibilities are endless. Play around with different color combinations, effects, and brightness levels to create the perfect lighting ambiance for any occasion or mood.
Additionally, don’t forget to save your customized settings and presets for easy access in the future. This way, you can quickly set up your preferred lighting with just a few taps.
By following these steps, you have successfully customized your Philips Hue Play Light Bar’s lighting experience to suit your preferences and create the desired ambiance in your living space. Enjoy the ability to transform your environment with just a touch of a button or a voice command.
Troubleshooting tips
While setting up and using the Philips Hue Play Light Bar, you may encounter some common issues or challenges. Don’t worry! Here are some troubleshooting tips to help you address any potential problems:
- Connection issues: If you’re having trouble connecting your light bar to the Philips Hue Bridge, ensure that both devices are powered on and within range of each other. Check that your smartphone or tablet is connected to the same Wi-Fi network as the Bridge. If necessary, reset the Bridge and try establishing the connection again.
- No power or lights: If the light bar is not turning on or displaying any lights, double-check that it is properly plugged into a power outlet and that the power source is working. If there are multiple light bars, ensure that each one is receiving power. If the problem persists, try using a different power adapter or contact Philips Support for further assistance.
- Inconsistent or flickering lights: If you notice inconsistent or flickering lights, there may be an issue with the power supply or the connection. Check that the power adapter is fully plugged in and secured. If you’re using an extension cable, ensure it’s properly connected. If the issue persists, try connecting the light bar directly to the Bridge or consult Philips Support for further guidance.
- Unresponsive app: If the Philips Hue app is not responding or experiencing connectivity issues, make sure your smartphone or tablet has a stable internet connection. Close and reopen the app, or try uninstalling and reinstalling it if necessary. Ensure that the app is updated to the latest version and reboot your device if needed.
- Interference from other devices: If you notice signal interference or connectivity issues, keep the Bridge and the light bar away from other electronic devices that may cause interference, such as routers, cordless phones, or microwave ovens. Try relocating the Bridge or troubleshooting your Wi-Fi connection to minimize any potential interference.
- Resetting the system: If all else fails, you can try resetting the Philips Hue system. This involves resetting the Bridge and reconnecting all your lights. Consult the user manual or the Philips Hue website for specific instructions on how to reset your system.
If these troubleshooting tips do not resolve your issue, it is recommended to reach out to Philips Support or visit their online support resources for further assistance. They can provide more specific guidance based on your situation and help ensure a smooth and enjoyable experience with your Philips Hue Play Light Bar.