
Why Send an iPhone or iPad App as a Gift?
Sending an iPhone or iPad app as a gift can be a thoughtful and convenient way to surprise and delight your friends, family, or loved ones. It allows you to share your favorite apps with them, introduce them to new and exciting apps, or even help them discover useful tools to enhance their digital experience.
There are several reasons why sending an app as a gift can be a great choice. Firstly, it offers a wide range of options to suit different interests and preferences. Whether the recipient is a tech enthusiast, a fitness fanatic, a photography lover, or a gaming enthusiast, you can find apps that cater to their specific hobbies and interests.
Furthermore, gifting an app shows that you have taken the time to carefully consider their needs and preferences. It demonstrates your thoughtfulness and adds a personalized touch to the gift-giving experience. Instead of opting for a generic present, an app that aligns with their interests can bring them joy and excitement.
Sending an app as a gift is also a great way to connect and engage with your loved ones. It allows you to share your experiences and passions with them, opening up opportunities for conversations and bonding. When they use the app you’ve gifted them, they will be reminded of you and the special occasion.
Additionally, sending an app as a gift is incredibly convenient. With just a few taps, you can send a digital gift that can be instantly accessed and enjoyed. There is no need to worry about shipping or delivery times, making it an ideal choice for last-minute gifts or long-distance gifting.
Lastly, sending an app as a gift promotes a greener and more sustainable approach to gift-giving. By opting for digital gifts, you eliminate the need for physical products and packaging, reducing waste and environmental impact.
Overall, sending an iPhone or iPad app as a gift allows you to share your favorite apps, personalize the gift-giving experience, connect with your loved ones, and contribute to a more sustainable future. It offers a convenient and thoughtful way to show your appreciation and make someone’s day a little brighter.
Step 1: Open the App Store
To send an iPhone or iPad app as a gift, the first step is to open the App Store on your device. The App Store is the official marketplace for iOS apps, where you can browse and download a wide variety of applications.
To access the App Store, locate the “App Store” icon on your device’s home screen and tap on it. The icon is represented by a blue background with a white letter “A” in the center. Tapping on this icon will launch the App Store and take you to the main interface.
Once the App Store is open, you will be presented with various sections, including “Today,” “Games,” “Apps,” and “Search.” These sections allow you to explore featured apps, top charts, categories, and search for specific apps.
Take a moment to familiarize yourself with the different sections of the App Store. You can swipe left or right to navigate between the sections and discover apps that catch your interest. Explore the “Today” section for curated collections and recommendations, or visit the “Games” and “Apps” sections to browse through the latest and most popular apps.
If you already know the specific app you want to gift, you can skip the browsing process and use the search function. Tap on the “Search” tab located at the bottom of the screen, enter the name of the app in the search bar, and tap on the search button.
Overall, opening the App Store is the first step in sending an iPhone or iPad app as a gift. It provides you with access to a vast selection of apps and allows you to explore and find the perfect app to gift to your recipient.
Step 2: Find the App You Want to Gift
Once you have opened the App Store, the next step is to find the specific app that you want to gift. Whether it’s a game, a utility app, or a productivity tool, the App Store offers a wide range of options to choose from.
To find the app, you can start by browsing through the different sections of the App Store. Tap on the “Apps” or “Games” tab located at the bottom of the screen to explore the featured and top charts sections. Here, you can find collections of popular and trending apps, as well as curated lists based on different categories and themes.
If you have a specific app in mind, you can use the search function to quickly find it. Tap on the “Search” tab, located at the bottom of the screen, enter the name of the app in the search bar, and tap on the search button. The search results will display all relevant apps matching your search query.
As you browse through the app listings, take the time to read the app descriptions, user ratings, and reviews. This information can give you a better understanding of the app’s features, usability, and overall quality.
You can also tap on the app’s icon to view more details, including screenshots, videos, and additional information provided by the developer. This allows you to preview the app and determine if it meets your requirements and preferences.
If you are unsure which app to choose or need some inspiration, you can also consider checking out the “Top Charts” section. This section showcases the most popular and highly-rated apps, giving you an idea of what other users are enjoying.
Once you have found the app that you want to gift, make a note of its name and ensure that it is compatible with the recipient’s device. Some apps may be specific to iPhone or iPad, so double-checking this information is important to avoid any compatibility issues.
Step 3: Tap on the Share Button
After you have found the app you want to gift in the App Store, the next step is to tap on the Share button. This button allows you to access various sharing options, including the ability to gift the app to someone else.
To find the Share button, locate the app’s listing in the App Store. The Share button is usually represented by a square with an arrow pointing upward, commonly found near the top-right or bottom-right corner of the app’s page. Tap on this button to open the sharing menu.
Upon tapping the Share button, a menu will appear with different sharing options. These options may vary depending on your device and installed apps. Look for an option that specifically mentions gifting the app, such as “Gift App” or “Send Gift.” Tap on this option to proceed.
It’s important to note that some apps may not have the option to be gifted. If you don’t see the option to gift the app, it means that the developer has not enabled this feature for that particular app. In such cases, you may need to choose an alternative app that can be gifted, or consider other methods of gifting, such as digital gift cards or App Store credits.
By tapping on the Share button and accessing the gifting option, you are one step closer to sharing the app with your intended recipient. This action opens up a menu that provides further details and customization options for the gift, allowing you to add a personal touch to the gifting experience.
Once you have tapped on the Share button and selected the gifting option, it’s time to move on to the next step and proceed with the gift-giving process.
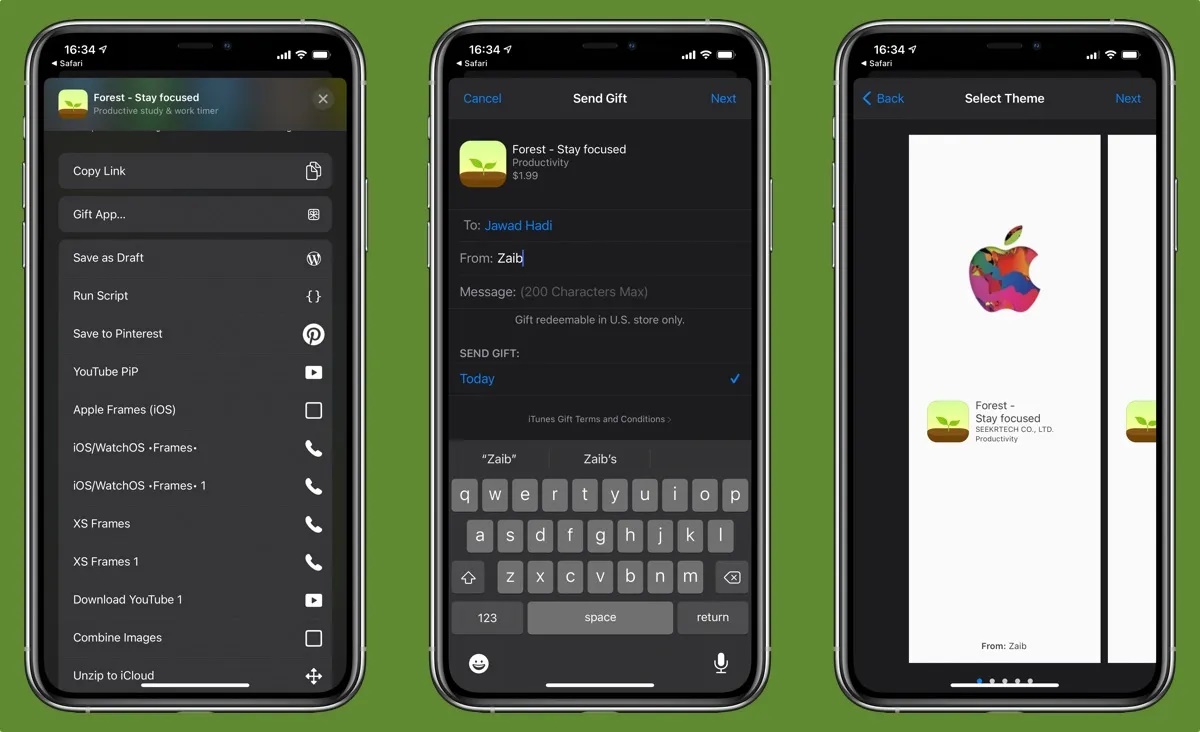
Step 4: Select “Gift App” from the Share Sheet
Once you have tapped on the Share button in the App Store, a Share Sheet will appear on your screen with various sharing options. To proceed with gifting the app, you need to select the “Gift App” option from this Share Sheet.
Scroll through the Share Sheet until you locate the option that says “Gift App” or something similar. This option is specifically designed for sharing apps as gifts and allows you to customize the gift before sending it to your recipient.
Tap on the “Gift App” option to select it. This action will take you to the next step in the gift-giving process, where you can further personalize the gift and provide the necessary details.
It’s important to note that the availability of the “Gift App” option may vary depending on your device and the apps you have installed. If you don’t see the option to gift the app, it’s possible that the app you selected does not support gifting. In this case, you may need to consider alternative methods of gifting, such as digital gift cards or App Store credits.
By selecting the “Gift App” option, you are indicating your intention to send the app as a gift to someone. This action signals to the App Store that you want to proceed with the gift-giving process and provides you with further opportunities to customize and personalize the gift for your recipient.
Once you have successfully selected “Gift App” from the Share Sheet, you are ready to move on to the next step and provide the necessary information about the recipient and the gift itself.
Step 5: Choose a Recipient and Enter Your Message
After selecting the “Gift App” option from the Share Sheet, the next step is to choose a recipient for the app and enter a personalized message. This allows you to add a thoughtful touch and make the gift feel more special and tailored to the recipient.
When prompted, select or enter the email address or phone number of the person you want to gift the app to. This can be a family member, friend, or anyone you wish to surprise with the app. Make sure to enter the correct contact information to ensure the app is delivered to the intended recipient.
Next, you will have the opportunity to enter a personalized message to accompany the gift. This message can be a heartfelt note, a playful remark, or any other message you want to convey to the recipient. Take a moment to think about what you want to say and express your thoughts in a meaningful way.
Consider personalizing the message by sharing why you chose this app specifically for them, or how you think it will enhance their digital experience. Highlight any features or benefits of the app that you think they will appreciate. Adding a personal touch to the message shows that you have taken the time and effort to make the gift more meaningful.
Some gifting options may also allow you to include your name or signature at the end of the message, allowing the recipient to easily identify you as the sender. This can be particularly useful if you wish to remain anonymous or surprise the recipient.
Once you have chosen a recipient and entered your message, review the information to ensure accuracy and clarity. Double-check the email address or phone number of the recipient, and read through your message to make sure it conveys the intended sentiment.
When you are satisfied with the recipient and the message, proceed to the next step to select the delivery date for the app.
Step 6: Select the Delivery Date
After choosing a recipient and entering your personalized message for the gifted app, the next step is to select the delivery date. This allows you to schedule when the recipient will receive the app, making it perfect for birthdays, holidays, or any other special occasion.
When prompted, you will be presented with different options for the delivery date. Depending on the gifting platform or service, you may have the choice of sending the app immediately or selecting a specific date in the future.
If you want the recipient to receive the app instantly, you can choose the “Send Now” or “Deliver Immediately” option. This will deliver the app directly to the recipient’s device as soon as they redeem the gift.
If you prefer to schedule the delivery for a specific date, you can select a future date from the available options. This is a great option if you want to surprise the recipient on their birthday, a holiday, or any other meaningful occasion. Simply choose the desired date from the calendar or dropdown menu provided.
It’s important to keep in mind that some gifting platforms or services may have limitations on how far in advance you can schedule the delivery. Make sure to check the available options and select a date that is within the allowed timeframe.
Take a moment to consider the significance of the chosen delivery date. Think about how it will impact the recipient’s experience and make the gift even more memorable. Whether you choose to send the app instantly or schedule it for a special day, the thoughtfulness behind the gesture will surely be appreciated.
Once you have selected the delivery date, review your choice to ensure accuracy. Double-check the date and make sure it aligns with your intentions. If everything looks correct, proceed to the next step to choose a theme for the gift.
Step 7: Choose a Theme for the Gift
As you continue the gift-giving process for the iPhone or iPad app, the next step is to choose a theme for the gift. This adds an extra touch of personalization and creativity to the overall presentation of the gifted app.
Depending on the gifting platform or service you’re using, there may be various themes available to choose from. These themes often include customizable visuals, animations, or digital cards that accompany the app and enhance the gifting experience.
When prompted, take some time to explore the different theme options and select one that resonates with the recipient’s interests or the occasion you are celebrating. For example, if the app is a game, you might choose a theme with vibrant colors and playful graphics. Alternatively, if the app is a productivity tool, a more professional-looking theme might be appropriate.
Consider the recipient’s personality and preferences when choosing a theme. Think about what they are passionate about or what style they tend to gravitate towards. By selecting a theme that aligns with their interests, you add an extra layer of thoughtfulness to the gift.
Furthermore, the theme you choose can help set the tone and create excitement when the recipient receives the gifted app. It adds a visually appealing and immersive element to the delivery, making the gift feel more special and memorable.
Some themes may also allow you to customize certain elements, such as the background image or text color. If customization options are available, take advantage of them to further personalize the theme and make it truly unique.
Once you have chosen the theme, review your choice to ensure it accurately represents the recipient’s taste and complements the gifted app. Double-check any customization options you may have selected to ensure they are to your liking.
With the theme chosen, you are now ready to move on to the next step and review and confirm your gift details before finalizing the transaction.
Step 8: Review and Confirm Your Gift
Once you have gone through the previous steps of choosing a recipient, entering a personalized message, selecting the delivery date, and choosing a theme for the gift, it’s time to review and confirm all the details of your gift before finalizing the transaction.
Take a moment to carefully review the information you have provided. Double-check the recipient’s contact details, ensuring that you have entered their email address or phone number correctly. Verify that the personalized message accurately conveys your thoughts and sentiments.
Next, review the selected delivery date. Confirm that it aligns with your intentions and that it falls within the timeframe allowed by the gifting platform or service. This will help ensure that the recipient receives the gift on the intended date.
Additionally, take a final look at the chosen theme for the gift. Make sure it reflects the recipient’s interests and provides a visually appealing and engaging presentation for the app. If any customization options were available, ensure that they are set to your liking.
If the gifting platform or service allows for a preview of the final gift presentation, take advantage of this feature. By previewing the gift, you can get a glimpse of how it will appear to the recipient and make any necessary adjustments or modifications.
Once you have thoroughly reviewed all the details, proceed to the confirmation step. This typically involves tapping on a “Confirm” or “Buy” button to finalize the transaction and complete the gift-giving process.
Before confirming your gift, it’s important to note that some platforms or services may require you to provide payment information or use existing credits in your account to complete the purchase. Ensure that you have the necessary payment method set up and that you are comfortable with the associated cost of the gift.
By reviewing and confirming your gift, you are taking the final step in the app gifting process. This ensures that all the information is accurate and that the gift is ready to be sent to the recipient. Once confirmed, the gifting platform or service will process the transaction, and the recipient will receive the gift as scheduled.
Step 9: Pay for the Gift App
After reviewing and confirming all the details of your gift, the next step is to pay for the app that you are gifting. This ensures that the recipient can redeem the gift and enjoy the app on their iPhone or iPad.
Depending on the gifting platform or service you are using, there may be different methods of payment available. Common options include credit or debit card payments, mobile payment services, or using existing credits in your account.
If you have not already done so, you may be prompted to provide your payment information. Enter the required details, such as your card number, expiration date, and security code, to complete the transaction. Some platforms may also require you to enter your billing address.
Ensure that you are comfortable with the cost of the app and that you have sufficient funds or credit on the selected payment method to complete the purchase. If necessary, you may need to top up your account or make other arrangements to ensure a successful payment.
Some gifting platforms or services may also provide options for redeeming gift cards or promotional codes. If you have a gift card or code that can be used towards the purchase of the app, follow the instructions provided to apply the associated credit or discount.
Once you have provided the necessary payment information and any applicable discounts or credits, review the payment summary to ensure accuracy. Make sure that the order total reflects the expected amount based on the app’s price and any other adjustments made.
When you are satisfied with the payment details, proceed to the final step of the gift-giving process: notifying the recipient about their gifted app and providing them with instructions on how to redeem it.
By paying for the gift app, you are ensuring a seamless and convenient experience for the recipient. Your payment enables them to enjoy the app without any additional steps or requirements on their part.
Step 10: Notify the Recipient about Their Gift
After completing the payment for the gifted app, the final step is to notify the recipient about their gift. This ensures that they are aware of the gift and provides them with instructions on how to redeem and enjoy the app on their iPhone or iPad.
Depending on the gifting platform or service you are using, there are different ways to notify the recipient. Some platforms may automatically send an email or notification to the recipient with the necessary details, while others may provide you with a confirmation email or code that you can share with the recipient manually.
If the gifting platform or service offers an automatic notification, you can be assured that the recipient will receive the necessary information without any additional steps from you. This notification may include the app’s name, a personalized message from you, and instructions on how to redeem the gift.
If you need to notify the recipient manually, you can forward the confirmation email or share the provided code with them. It’s important to ensure that the recipient receives all the relevant details, including the gift’s name, any personalized message you included, and any redemption instructions if available.
When notifying the recipient, consider adding a personal touch. You can reach out to them directly and let them know about the gift, expressing your excitement or the reasons why you chose the app for them. This additional communication can enhance the overall gift-giving experience and build anticipation for the recipient.
Furthermore, provide the recipient with clear instructions on how to redeem the gifted app. This may involve opening the App Store, navigating to the “Today” or “Profile” section, and locating the “Redeem Gift” option. If you have received any specific redemption instructions from the gifting platform or service, ensure that you pass those on to the recipient as well.
Lastly, let the recipient know that they can reach out to you if they have any questions or need assistance with the app or the redemption process. This shows your willingness to support their experience and demonstrates your thoughtfulness in the gift-giving process.
By notifying the recipient about their gifted app, you complete the gift-giving process and ensure that the recipient can enjoy their new app on their iPhone or iPad. It adds a personal touch to the gifting experience and allows the recipient to fully appreciate your thoughtful gesture.