
Why Use PNGs in GIMP
When it comes to saving images in GIMP, the PNG (Portable Network Graphics) format is a popular choice for many reasons. Whether you’re a professional designer or a hobbyist photographer, understanding the advantages of using PNGs in GIMP can greatly enhance your workflow and the quality of your images.
One of the main reasons to use PNGs in GIMP is the format’s ability to preserve the image’s transparency. Unlike other formats like JPEG, PNGs support an alpha channel, which means you can create images with transparent backgrounds. This is particularly useful when working on projects that require overlaying images or integrating them into different backgrounds.
Another advantage of PNGs is their ability to maintain high image quality while compressing the file size. GIMP allows you to adjust the compression settings when exporting an image as a PNG, ensuring that you can achieve the desired balance between file size and image quality. This is especially important when sharing images online or optimizing them for websites, as PNGs offer a great compromise between quality and file size.
Furthermore, PNGs support lossless compression, which means that the image quality remains intact even after multiple saves and edits. This makes PNGs a reliable format for preserving the original details and colors of your images. Whether you’re retouching a photo, creating digital artwork, or designing a logo, using PNGs in GIMP ensures that the image quality remains consistent throughout the editing process.
Additionally, PNGs support a wide range of colors, including 24-bit RGB and 32-bit RGBA. This versatility makes them suitable for all types of projects, from simple graphics to complex illustrations. Whether you’re working with photographs, digital paintings, or graphic designs, PNGs provide the color depth and accuracy needed to produce stunning visuals.
Lastly, PNGs are widely supported in various applications and web browsers. This ensures that your images will be easily accessible and viewable, regardless of the platform or device being used. Whether you’re showcasing your work on a website, sharing it with clients, or printing it for physical display, using PNGs in GIMP ensures that your images will be compatible with different mediums.
Step 1: Opening your image in GIMP
To begin saving an image as a PNG in GIMP, you’ll first need to open the image file within the software. GIMP supports a wide range of image file formats, including JPEG, PNG, BMP, and more. Here’s a step-by-step guide to help you open your image in GIMP:
- Launch GIMP on your computer. If you don’t have GIMP installed, you can download it for free from the official GIMP website.
- Once GIMP is open, go to the “File” menu at the top left corner of the window and click on it. A drop-down menu will appear.
- In the drop-down menu, click on the “Open” option. This will open a file explorer window where you can navigate to the location of your image file.
- Browse through your folders and locate the image file you want to save as a PNG. Select the file and click on the “Open” button at the bottom right corner of the window.
- After opening the image, it will appear in a new tab within the GIMP workspace. You can now view and edit the image using the various tools and features offered by GIMP.
Note that GIMP supports opening multiple images in separate tabs, allowing you to work on multiple images simultaneously. You can switch between tabs by clicking on the respective tab name at the top of the GIMP window.
Once you have successfully opened your image in GIMP, you can proceed to the next step to save it as a PNG. Remember to save your progress regularly to avoid losing any changes made to your image.
Step 2: Choosing the PNG format
After opening your image in GIMP, the next step is to select the PNG format as the desired file format for saving your image. GIMP provides a straightforward process for choosing the PNG format. Here’s how:
- In the GIMP window, click on the “File” menu at the top left corner of the screen.
- A drop-down menu will appear. From the menu, select the “Export As” option. This will open a new window where you can configure the export settings for your image.
- In the export window, you will see a list of different file formats. Scroll through this list and find the “PNG image” option.
- Click on the “PNG image” option to select it as the desired format.
By choosing the PNG format in GIMP, you ensure that your image will be saved in a lossless and high-quality format, suitable for various purposes such as web publishing, printing, and digital design.
It’s important to note that GIMP also supports other image formats such as JPEG, BMP, and TIFF. However, if you specifically intend to save your image with transparency or require a format that maintains the best image quality, PNG is the recommended choice.
Once you have selected the PNG format, you can proceed to the next step to configure the export settings for your image.
Step 3: Configuring the export settings
After choosing the PNG format in GIMP, you have the option to configure the export settings to meet your specific requirements. GIMP provides several export options that allow you to customize the file size, compression level, and other settings. Here’s how to configure the export settings for your PNG image:
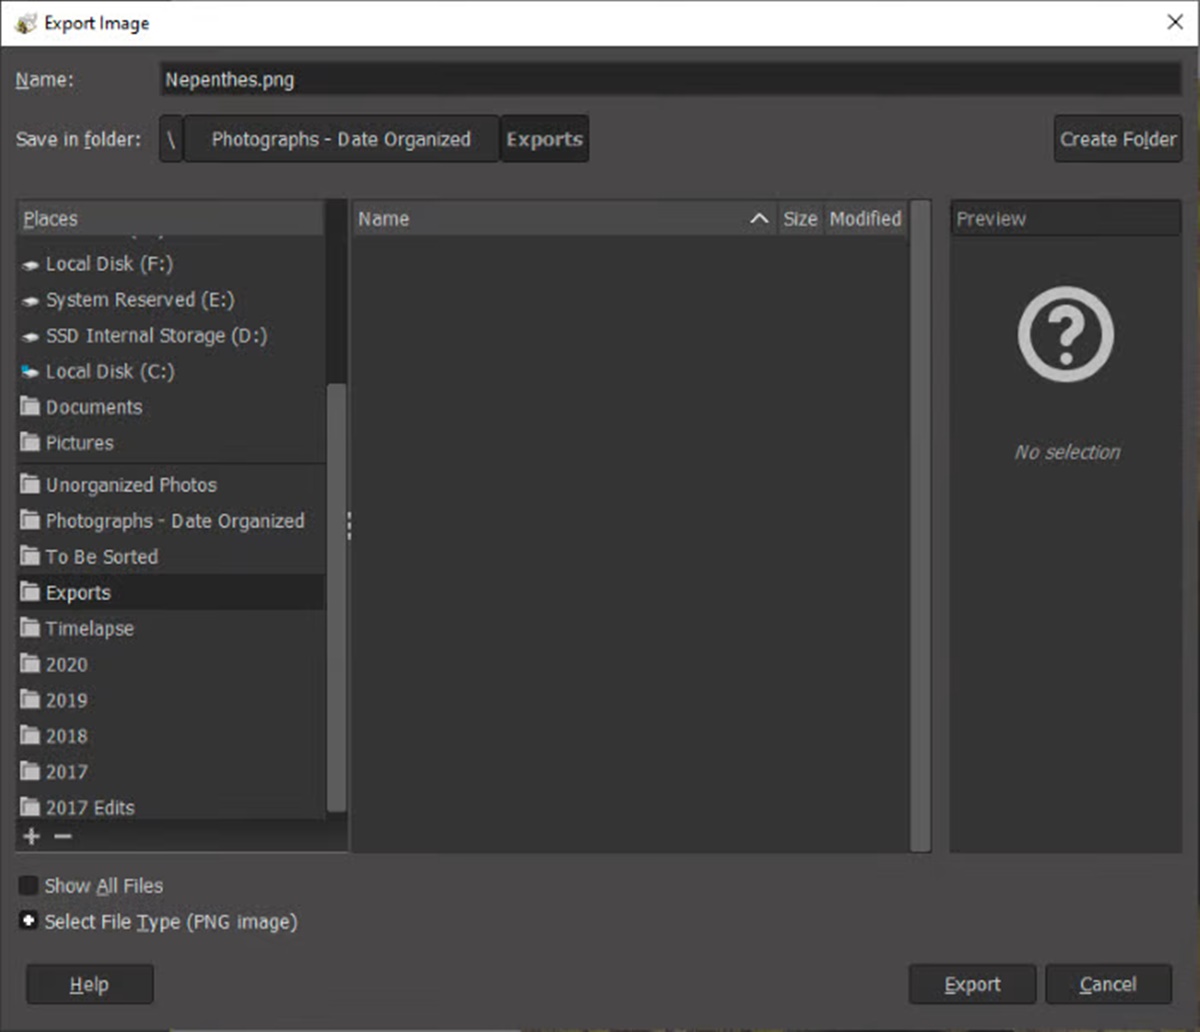
- In the “Export Image” window, you will see various options and settings for the PNG format.
- First, specify the destination folder where you want to save the PNG image. Click on the “Select File Type (By Extension)” drop-down menu and choose the desired folder.
- Next, you can set the file name for your PNG image. By default, GIMP suggests a name based on the original image file name, but you can change it to your preferred name.
- Under the “Advanced Options” section, you can adjust the settings to optimize the file size and image quality of the PNG. GIMP provides options for interlacing, compression level, and filtering settings.
- The interlacing option determines how the image loads on a web page. If you want the image to load progressively, select a suitable interlacing option.
- The compression level option allows you to choose the level of compression for the PNG image. Higher compression levels result in smaller file sizes but may slightly affect the image quality. You can experiment with different compression levels to find the right balance between file size and quality.
- Additionally, you can enable or disable the filtering option based on your preferences. Filtering helps to smooth out pixelation and artifacts in the image.
By configuring these export settings, you can tailor the PNG format to your specific needs, ensuring that the resulting image meets your desired file size and quality requirements.
Once you have adjusted the export settings to your satisfaction, you can proceed to the final step of saving your image as a PNG.
Step 4: Saving your image as a PNG
After configuring the export settings for your PNG image in GIMP, you are ready to save the image in the desired format. GIMP provides a simple process for saving your image as a PNG. Follow these steps to save your image:
- In the “Export Image” window, review the settings one last time to ensure they meet your requirements.
- Once you are satisfied with the settings, click on the “Export” button. This will initiate the saving process.
- A new window will appear, allowing you to make final adjustments if needed. Here, you can modify metadata, add comments, and choose the color profile for your image.
- After making any necessary adjustments, click on the “Export” button to finalize the saving process. GIMP will now save your image as a PNG in the specified destination folder.
- Depending on the size of your image and the speed of your computer, the saving process may take a few seconds to complete.
Once the saving process is finished, you can locate the saved PNG image in the destination folder you specified earlier. The image will be ready to use in various applications like web design, graphic design, and more.
Remember to keep a backup of your original image file to preserve the integrity of your work. This allows you to revert back to the original file if any modifications need to be made in the future.
By following these steps, you can successfully save your image as a PNG format using GIMP. Now you can enjoy the benefits of the PNG format, such as transparency, lossless compression, and high-quality imagery.
Extra Tips for Saving PNGs in GIMP
While the previous steps covered the essential process of saving images as PNGs in GIMP, there are some additional tips that can further enhance your workflow and improve the quality of your PNG images. Consider these tips when saving PNGs in GIMP:
- Utilize the Export Layers as PNG feature: If you have multiple layers in your image, GIMP allows you to export each layer as a separate PNG file. This can be useful when you want to create individual assets or elements from a larger composition.
- Experiment with different compression levels: Depending on the nature of your image, adjusting the compression level can significantly impact the file size without compromising too much on quality. Experiment with different compression levels to find the optimal balance for your specific needs.
- Consider using color profiles: If you’re working with specific color spaces or need to ensure color accuracy, GIMP allows you to embed color profiles when saving PNGs. This helps maintain consistent colors across different devices and software platforms.
- Use PNG filters wisely: GIMP offers various options for PNG filtering, such as none, sub, up, average, and paeth. Each filter has its own effect on the image quality and compression ratio. Try different filtering options to determine which one works best for your image.
- Optimize for web use: If you’re saving PNGs for web use, consider using tools like PNG Optimizer to further reduce the file size without a noticeable loss in quality. These optimization tools can help improve the loading time of your web pages.
By implementing these extra tips, you can gain more control over the PNG saving process in GIMP and achieve better results. Remember to always preview your images before saving to ensure they meet your desired standards.
With practice and exploration, you will become more proficient in saving PNGs in GIMP, allowing you to produce visually appealing, high-quality images for various purposes.