
Reasons to Install Kodi on Kindle Fire
If you own a Kindle Fire, you may already know that it is a powerful device that can serve as an e-reader, a tablet, and more. But did you know that you can also install Kodi on your Kindle Fire? Kodi is a free and open-source media player software that allows you to stream and play a wide range of media content. Here are some compelling reasons why you should consider installing Kodi on your Kindle Fire.
- Access to a Wide Range of Content: With Kodi installed on your Kindle Fire, you can access an extensive library of movies, TV shows, music, and even live sports events. Kodi supports a variety of addons and plugins that provide access to different streaming services, making it a versatile entertainment hub.
- Customizability: Kodi offers a high level of customization, allowing you to personalize the user interface according to your preferences. You can choose from various skins, themes, and addons to enhance the visual appeal and functionality of Kodi on your Kindle Fire.
- Easy Integration with Other Devices: Kodi is compatible with various devices and operating systems. It can be easily integrated with your existing media setup, enabling you to stream content from other devices like your smartphone, computer, or network-attached storage (NAS) device.
- Offline Viewing: One of the standout features of Kodi is its ability to download media content for offline viewing. This means that you can download your favorite movies or TV shows onto your Kindle Fire and enjoy them on the go, even without an internet connection.
- No Subscription Fees: Unlike many streaming services that charge monthly subscription fees, Kodi is completely free to use. It gives you access to a vast range of content without any ongoing costs, making it a cost-effective choice for entertainment.
In summary, installing Kodi on your Kindle Fire can offer you a wide variety of content, personalized customization options, easy integration with other devices, offline viewing capabilities, and all at no cost. With these benefits in mind, it’s easy to see why Kodi is a popular choice for media streaming on Kindle Fire devices.
Preparing Your Kindle Fire for Kodi Installation
Before you can install Kodi on your Kindle Fire, you need to make a few preparations to ensure a smooth and successful installation process. Follow these steps to get your Kindle Fire ready for Kodi installation.
- Check your Kindle Fire model: Before proceeding, confirm that your Kindle Fire is compatible with Kodi. While most Kindle Fire models support Kodi installation, it’s recommended to use a newer version for better performance and compatibility.
- Enable Apps from Unknown Sources: By default, the Kindle Fire restricts the installation of applications from unknown sources. To install Kodi, you need to enable this option. Go to Settings > Security & Privacy and toggle on the “Apps from Unknown Sources” option.
- Install a File Explorer: To access the Kodi APK file for installation, you’ll need a file explorer app on your Kindle Fire. There are several options available in the Amazon Appstore, like ES File Explorer or Total Commander. Install one of these apps to proceed.
- Clear Storage Space: Ensure that your Kindle Fire has enough storage space available for Kodi installation. If necessary, delete unnecessary files or apps to free up space.
Once you have completed these preparations, your Kindle Fire is now ready for Kodi installation. The next step is to download the Kodi APK file, which will be used to install the Kodi app on your device. In the next section, we will guide you through the process of downloading the Kodi APK file for your Kindle Fire.
Enabling Installation of Apps from Unknown Sources
By default, the Kindle Fire restricts the installation of applications from unknown sources as a security measure. Before you can install Kodi on your Kindle Fire, you need to enable the installation of apps from unknown sources. Here’s how you can do it:
- Go to Settings: Swipe down from the top of the screen to access the quick settings menu, and then tap on the “Settings” gear icon.
- Select Security & Privacy: In the settings menu, scroll down and tap on “Security & Privacy.”
- Enable Apps from Unknown Sources: On the Security & Privacy screen, you will find the “Apps from Unknown Sources” option. Toggle it on to allow the installation of apps from unknown sources. A warning message will appear, reminding you of the potential risks associated with this permission. Read the message and tap “OK” to proceed.
- Confirm your choice: A pop-up will appear, asking you to confirm your decision to enable apps from unknown sources. Tap “OK” to proceed.
Once you have successfully enabled the installation of apps from unknown sources, you can now proceed to download the Kodi APK file and install Kodi on your Kindle Fire. Enabling this option opens up more possibilities for app installations beyond the Amazon Appstore, allowing you to explore a wider range of applications for your device.
Downloading the Kodi APK File
To install Kodi on your Kindle Fire, you need to download the Kodi APK (Android Package) file. Follow the steps below to download the Kodi APK file for your device:
- Open a web browser: Launch the web browser on your Kindle Fire. You can use the default Silk Browser or any other browser of your choice.
- Visit the official Kodi website: In the address bar of the browser, type in “kodi.tv/download.” This will take you to the official Kodi website’s download page.
- Select the Android icon: On the Kodi download page, scroll down until you find the Android logo. Tap on it to proceed.
- Choose the “ARMV7A (32BIT)” version: On the Android download page, you’ll see different versions of Kodi. Look for the “ARMV7A (32BIT)” version, as it is compatible with most Kindle Fire devices. Tap on it to start the download.
- Wait for the download to complete: Once you tap on the download link, the Kodi APK file will start downloading to your Kindle Fire. The download time may vary depending on your internet connection speed.
After the download is complete, you will have the Kodi APK file saved on your Kindle Fire. In the next section, we will guide you through the installation process using the Downloader app, which allows you to easily install APK files on your device.
Installing Kodi on Your Kindle Fire via the Downloader App
Once you have downloaded the Kodi APK file on your Kindle Fire, you can proceed with the installation using the Downloader app. Follow the steps below to install Kodi on your device:
- Open the Downloader app: If you haven’t installed the Downloader app on your Kindle Fire yet, you can find it in the Amazon Appstore. Once installed, open the app on your device.
- Enable JavaScript: In the Downloader app, go to Settings and make sure that JavaScript is enabled. This is necessary for the app to function properly.
- Enter the download URL: In the Downloader app, you will see a text field where you can enter a URL. Tap on it and enter the following URL: “https://kodi.tv/download.” This will take you to the official Kodi download page.
- Download Kodi APK: On the Kodi download page, scroll down and select the Android logo. On the Android download page, choose the “ARMV7A (32BIT)” version. The APK file will start downloading to your Kindle Fire through the Downloader app.
- Install Kodi: Once the download is complete, you will be prompted to install the Kodi APK file. Select the “Install” option to proceed with the installation.
- Wait for the installation to complete: The installation process may take a few moments. Once it finishes, you will see a notification confirming that Kodi has been installed on your Kindle Fire.
- Launch Kodi: You can now launch Kodi on your Kindle Fire by selecting the “Open” option after installation or finding the Kodi app in your app library.
Congratulations! You have successfully installed Kodi on your Kindle Fire using the Downloader app. In the next section, we will explore how to launch and use Kodi on your device.
Launching and Using Kodi on Your Kindle Fire
Now that you have installed Kodi on your Kindle Fire, it’s time to explore how to launch and use this powerful media player. Follow the steps below to get started with Kodi on your device:
- Launch Kodi: You can find the Kodi app in your app library or the home screen of your Kindle Fire. Simply tap on the Kodi icon to open the application.
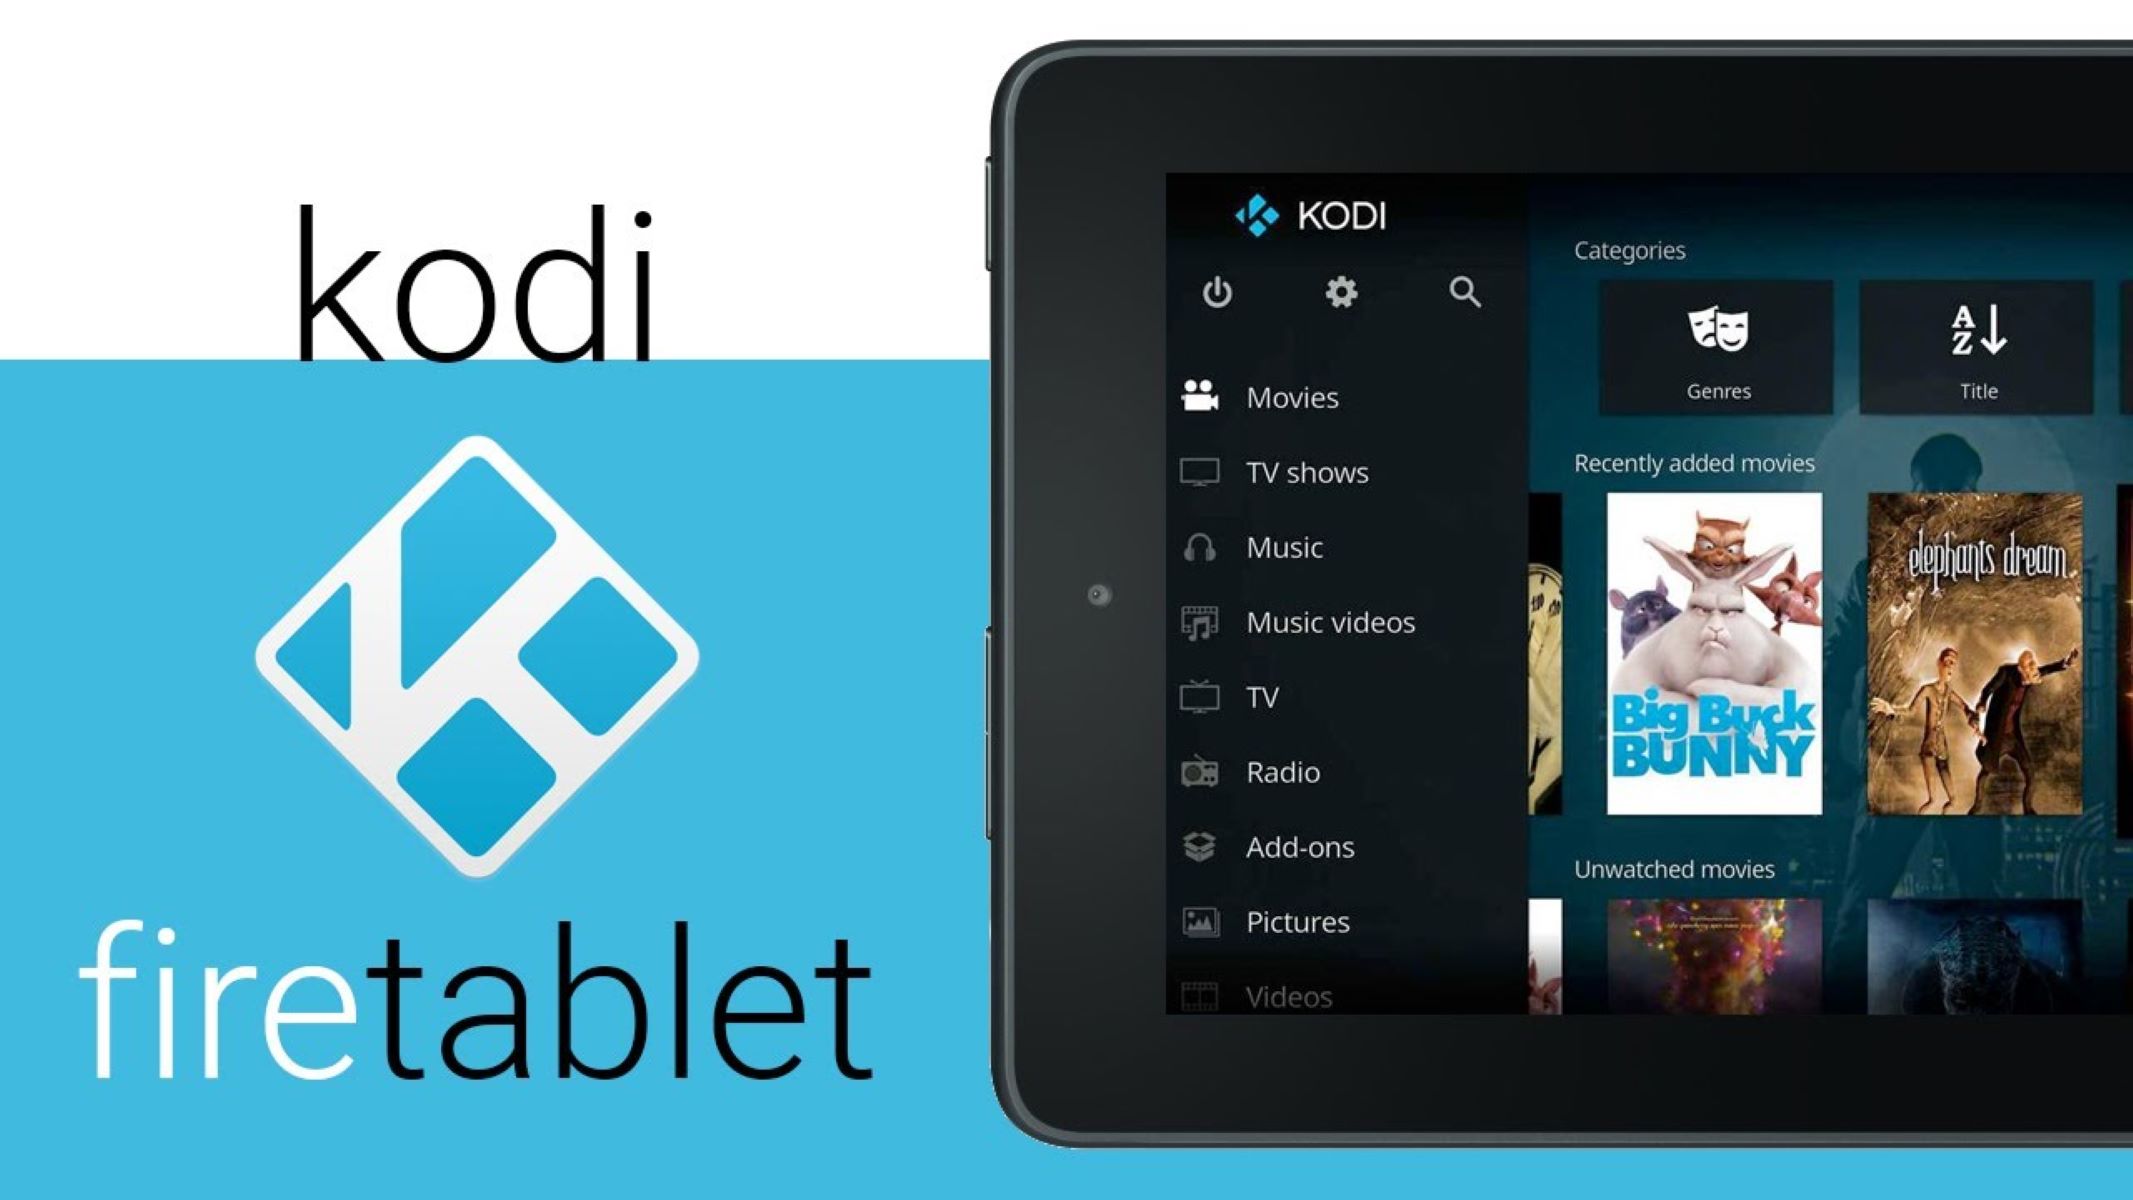
- Get familiar with the interface: When you first launch Kodi, you will be greeted with the default Estuary skin. Take a moment to familiarize yourself with the interface, which includes menus like Videos, Music, Pictures, and more.
- Configure settings: Before you start using Kodi, you may want to adjust some settings according to your preferences. Navigate to the Settings menu by selecting the gear icon in the top-left corner. Here, you can customize various aspects such as appearance, media libraries, add-ons, and more.
- Add media sources: To access your own media content in Kodi, you’ll need to add media sources. Navigate to the Videos, Music, or Pictures menu, depending on the type of media you want to add. Select “Add source” and follow the prompts to browse and add your media files or directories.
- Explore add-ons: With Kodi, you can enhance your media streaming experience by installing add-ons. These add-ons provide access to different streaming services, content libraries, and more. Navigate to the Add-ons menu to explore and install the available add-ons.
- Enjoy your media content: Once you have added media sources and installed add-ons, you can start enjoying your favorite movies, TV shows, music, and more through Kodi on your Kindle Fire. Navigate to the respective menus and explore your media libraries or streaming services to find and play your desired content.
With its intuitive interface and customization options, Kodi offers a user-friendly experience for accessing and enjoying media content on your Kindle Fire. Take your time to explore the features and settings to make the most out of Kodi’s capabilities.
Configuring Kodi on Your Kindle Fire
After installing Kodi on your Kindle Fire, you may want to configure the application to suit your preferences and enhance your media streaming experience. Here are some key configuration options to consider:
- Appearance: Kodi allows you to change the appearance of the interface through different skins. To customize the skin, go to Settings > Interface > Skin and choose a skin that best suits your style. You can also modify the color scheme, font size, and other visual elements.
- Media Libraries: To make the most of Kodi, you can create media libraries that organize and display your movies, TV shows, music, and other media files. Navigate to Settings > Media > Library and choose the appropriate settings to scan and update your media library automatically or manually. You can also set artwork preferences and customize the way your media files are displayed.
- Audio and Video Settings: Kodi offers various audio and video settings to enhance your playback experience. In the Settings menu, you can adjust audio output, enable or disable subtitles, configure video playback options, and more. Take some time to explore these settings and optimize your audio and video playback quality.
- Network Settings: If you plan to stream media from network-attached storage (NAS) devices or other devices on your home network, you may need to configure the network settings in Kodi. In the Settings menu, go to System > Settings > Connections > Network Access and choose the appropriate options for accessing and streaming media from your network.
- Add-Ons: Kodi is known for its extensive library of add-ons, which provide access to additional features and content. In the Add-Ons menu, you can explore and install various add-ons such as streaming services, custom skins, weather widgets, and more. Customize your Kodi experience by installing add-ons that meet your specific needs and interests.
By configuring Kodi on your Kindle Fire, you can personalize the user interface, optimize media libraries, fine-tune audio and video settings, set up network access, and expand functionality with add-ons. Take advantage of these configuration options to tailor Kodi to your preferences and create a seamless media streaming experience on your device.
Adding Add-ons to Kodi on Kindle Fire
One of the standout features of Kodi is the ability to extend its functionality by installing add-ons. Add-ons provide access to a wide range of content and services, expanding the capabilities of Kodi on your Kindle Fire. Here’s how you can add add-ons to Kodi:
- Navigate to the Add-Ons menu: From the Kodi home screen, go to the Add-Ons menu. This is where you can manage and install new add-ons.
- Select the Add-on Browser: Within the Add-Ons menu, you will find the Add-on Browser icon. Click on it to proceed.
- Choose the add-on category: In the Add-on Browser, you’ll see different categories such as Video add-ons, Music add-ons, Program add-ons, and more. Depending on the type of add-on you want to install, select the respective category.
- Browse for add-ons: Within the selected category, you can explore the available add-ons. Scroll through the list and select the add-on you wish to install. This will open a new window with more information about the selected add-on.
- Install the add-on: In the add-on information window, you will find an “Install” button. Click on it to start the installation process. Kodi will download and install the selected add-on on your Kindle Fire.
- Configure the add-on: After installation, you may need to configure the newly added add-on. Some add-ons require you to provide login credentials or personalize settings. Follow the on-screen prompts to configure the add-on according to your preferences.
- Access the add-on: Once the installation and configuration are complete, you can access the newly added add-on from the Add-Ons menu. Simply select it to start using the features or accessing the content provided by the add-on.
With add-ons, you can customize Kodi to cater to your specific media streaming needs. Whether you’re looking to explore new content, access streaming services, or enhance your overall Kodi experience, adding add-ons to Kodi on your Kindle Fire opens up a world of possibilities for entertainment and functionality.
Updating Kodi on Kindle Fire
Keeping Kodi up to date ensures that you have access to the latest features, bug fixes, and security updates. Here’s how you can update Kodi on your Kindle Fire:
- Check for updates: It’s a good practice to regularly check for updates to see if a new version of Kodi is available. You can do this by visiting the official Kodi website or checking the official Kodi forums for announcements.
- Download the latest version: If a new version of Kodi is available, download the latest APK file from the official Kodi website. Follow the same steps mentioned earlier in the “Downloading the Kodi APK file” section to download the latest version of Kodi.
- Uninstall the existing version: Before installing the updated version of Kodi, it’s recommended to uninstall the current version from your Kindle Fire. Go to Settings > Applications > Manage Installed Applications, locate Kodi in the list, and select the option to uninstall.
- Install the updated version: Once the previous version of Kodi is uninstalled, proceed with the installation of the updated version using the steps mentioned in the “Installing Kodi on your Kindle Fire via the Downloader App” section of this guide. This will install the latest version of Kodi on your Kindle Fire.
- Configure settings: After installing the updated version, you may need to reconfigure settings, such as appearance, media libraries, add-ons, etc., according to your preferences. Take some time to adjust the settings to optimize your Kodi experience.
By regularly updating Kodi, you can ensure that you are benefiting from the latest improvements and features, as well as keeping your media streaming experience secure and up to date. With these simple steps, you can easily stay on top of updates and enjoy the best possible version of Kodi on your Kindle Fire.
Troubleshooting Common Issues with Kodi on Kindle Fire
While Kodi is a fantastic media streaming platform, you may encounter some common issues when using it on your Kindle Fire. Here are some troubleshooting tips to help you resolve these issues and enjoy a smooth Kodi experience:
- Buffering or playback issues: If you experience buffering or playback issues with Kodi, try adjusting the video cache settings. In the Kodi settings, go to Player > Videos > Adjust display refresh rate, and toggle it to “Always” or “On start/stop.” You can also try clearing the cache by going to Settings > Applications > Manage Installed Applications > Kodi > Clear cache.
- Add-on errors or crashes: If you encounter errors or crashes with specific add-ons, it’s recommended to check for updates. Outdated add-ons can sometimes lead to compatibility issues. You can also try disabling and re-enabling the add-on, clearing the add-on cache, or reinstalling the add-on to resolve the issue.
- Slow performance or freezing: If Kodi is running slowly or freezing on your Kindle Fire, try clearing the app cache and data. Go to Settings > Applications > Manage Installed Applications > Kodi > Clear cache and Clear data. This will reset Kodi to its default state and can help resolve performance issues.
- Sound issues: If you’re experiencing sound problems with Kodi, check the audio settings in Kodi. Go to Settings > System > Audio and try changing the audio output device or adjusting other audio settings. You can also ensure that your Kindle Fire volume and media volume are turned up and not on silent mode.
- Network connection problems: If you’re having trouble connecting to your network or streaming media from network-attached storage (NAS) devices, ensure that your Kindle Fire is connected to a stable Wi-Fi network. You can also check firewall settings on your modem or router and temporarily disable them to rule out any restrictions on Kodi’s network access.
If you continue to experience issues with Kodi on your Kindle Fire, it’s worth checking online forums and support communities for additional troubleshooting tips. Kodi has a large user base, and chances are others have encountered similar issues and found solutions. Remember to keep your Kodi version up to date, as updates often come with bug fixes and improvements that can resolve common issues.