
The Importance of Protecting Data in Excel
Data protection is of utmost importance when it comes to Excel worksheets. Whether it is confidential business information, personal financial records, or sensitive data, ensuring the security of this information is crucial. Failure to protect data in Excel can lead to unauthorized access, manipulation, or even loss of critical information. Here are several reasons why data protection is essential for Excel:
1. Confidentiality: Excel often contains sensitive information that should only be accessible to authorized individuals. Protecting data in Excel prevents unauthorized users from viewing or tampering with confidential data, maintaining the confidentiality of sensitive information.
2. Data Integrity: Excel worksheets can undergo frequent modifications, which increases the risk of accidental changes or intentional manipulations. By implementing data protection measures, such as password encryption and restricted access, you can preserve data integrity and ensure that the information remains accurate and unaltered.
3. Compliance: Organizations must comply with various industry regulations and privacy laws, such as the General Data Protection Regulation (GDPR) or the Health Insurance Portability and Accountability Act (HIPAA). By protecting data in Excel, businesses can adhere to these regulations and avoid legal complications.
4. Preventing Data Loss: Data loss can occur due to system failures, accidental deletions, or even malware attacks. By implementing data protection measures, such as regular backups and password protection, you can minimize the risk of losing critical information stored in Excel.
5. Reputation and Trust: A breach of sensitive data can significantly damage an organization’s reputation and erode trust with its clients or customers. Protecting data in Excel demonstrates a commitment to information security, instilling confidence in stakeholders and maintaining a positive brand reputation.
In order to safeguard data in Excel, it is crucial to understand the various methods and techniques available for data protection. The next sections will delve into different ways to protect data, including password protection, encryption, hiding sensitive information, protecting formulas, controlling access, using data validation, and more. By applying these measures, you can ensure the security and integrity of your Excel data.
Understanding the Different Types of Data Protection in Excel
Excel offers several options for protecting data, each designed to address specific security needs. Understanding these different types of data protection will empower you to choose the most appropriate method for safeguarding your Excel worksheets. Here are the main types of data protection in Excel:
1. Password Protection: Password protection is one of the most common and straightforward methods to secure Excel worksheets. You can assign a password to an entire workbook or individual worksheets, preventing unauthorized users from opening or modifying the protected sheets. It’s important to choose a strong password with a combination of uppercase and lowercase letters, numbers, and special characters to enhance security.
2. Encryption: Encrypting an Excel workbook adds an additional layer of security by converting the data into a format that can only be read with the correct encryption key. Excel uses advanced encryption algorithms to protect the data, ensuring that even if someone gains access to the file, they won’t be able to decipher the information without the encryption key.
3. Hiding Sensitive Data: Excel provides various features to hide sensitive information without the need for encryption or passwords. You can choose to hide entire rows or columns that contain confidential data, or you can use cell formatting options to hide specific cells. Conditional formatting is another useful tool in Excel that allows you to hide data based on certain conditions or criteria.
4. Protecting Formulas: Excel formulas can contain valuable intellectual property or financial calculations that need to be hidden from unauthorized users. Excel allows you to protect formulas by locking specific cells or ranges, preventing users from modifying the formulas while still allowing them to input data into other unprotected cells.
5. Controlling Access: Excel offers options for controlling access to the workbook, allowing you to set permissions and restrictions for different users or user groups. You can specify who can open the workbook, modify the contents, or even limit access to specific worksheets. This level of control ensures that only authorized individuals can access and make changes to the Excel data.
6. Data Validation: Data validation rules and drop-down lists are powerful features in Excel that allow you to control the type and format of data entered into specific cells. By setting data validation rules, you can prevent users from entering invalid data, thus improving data accuracy and integrity.
How to Password Protect an Entire Excel Workbook
Password protecting an entire Excel workbook is a simple and effective way to secure your data. By assigning a password, you can restrict unauthorized access to the entire workbook. Here’s how to password protect an Excel workbook:
1. Open the Excel workbook that you want to protect.
2. Click on the “File” menu and select the “Protect Workbook” option.
3. In the drop-down menu, click on “Encrypt with Password”. This will open a dialog box where you can enter a password.
4. Enter a strong password in the dialog box. Make sure to choose a password that is not easily guessable and includes a combination of uppercase and lowercase letters, numbers, and special characters.
5. Click “OK” to apply the password to the workbook. You will be asked to confirm the password by re-entering it.
6. Save the workbook to ensure that the password protection is in effect.
From now on, whenever someone tries to open the workbook, they will be prompted to enter the password. Without the correct password, they will be unable to access the data in the workbook.
It’s important to remember the following when password protecting an Excel workbook:
– Choose a strong password that is difficult to guess but easy for you to remember.
– Do not share the password with unauthorized individuals.
– Keep a backup of the password in a secure location in case you forget it.
– Use a different password for each workbook to enhance security.
– Regularly change the password to minimize the risk of unauthorized access.
Password protecting an entire Excel workbook adds an extra layer of security, ensuring that only authorized individuals can access and modify the data. However, it’s important to note that password protection alone may not be sufficient for highly sensitive information. In such cases, you may consider using additional security measures like encryption or hiding sensitive data to further protect your Excel workbook.
How to Password Protect Individual Excel Worksheets
In addition to password protecting an entire Excel workbook, you can also apply password protection to specific worksheets. This allows you to control access to individual sheets within the workbook. Follow these steps to password protect individual Excel worksheets:
1. Open the Excel workbook that contains the worksheet you want to protect.
2. Right-click on the tab of the worksheet you wish to password protect. A context menu will appear.
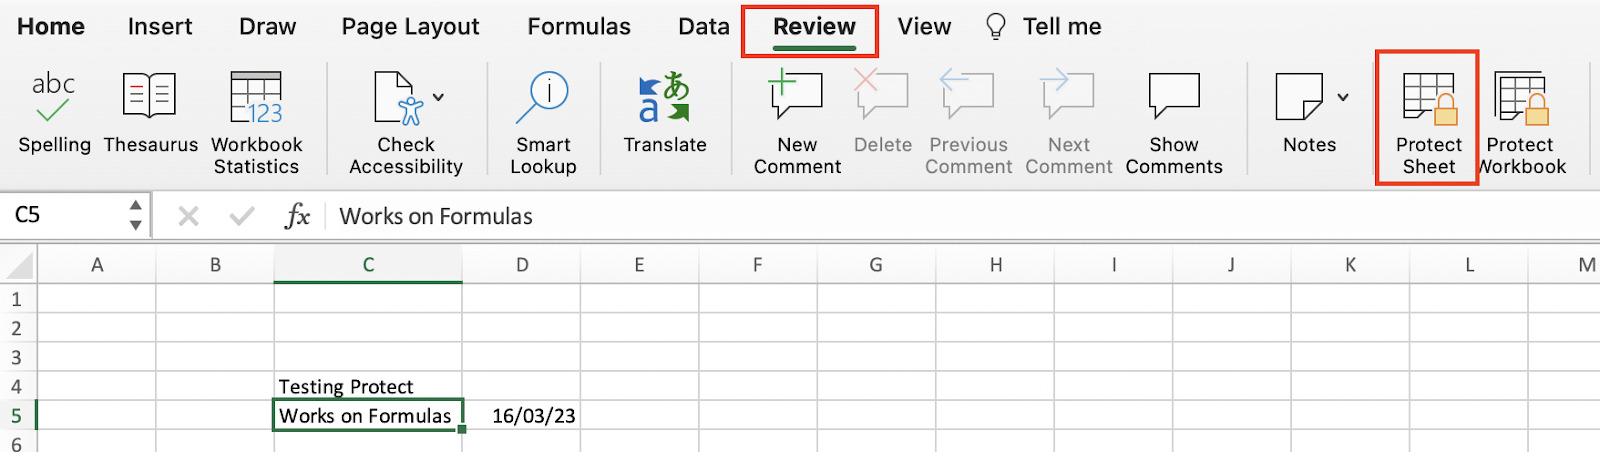
3. From the context menu, select the “Protect Sheet” option. This will open the “Protect Sheet” dialog box.
4. In the “Protect Sheet” dialog box, you have the option to provide a password. Enter a strong password in the password field.
5. Select any other options you wish to apply for sheet protection. These options include preventing users from selecting locked cells, formatting cells, or inserting/deleting columns and rows.
6. Click “OK” to apply the password protection to the selected worksheet.
Now, the protected worksheet will require a password to make any changes, such as adding or deleting data or formatting cells. Users will be able to view the contents of the worksheet but will be restricted from modifying it without entering the correct password.
Keep in mind the following tips when password protecting individual Excel worksheets:
– Use a strong, unique password for each protected worksheet.
– Store the passwords securely and do not share them with unauthorized users.
– Make sure to remember the passwords or keep a backup copy in a safe location.
– It’s recommended to use a combination of uppercase and lowercase letters, numbers, and special characters for enhanced security.
– Regularly change the passwords to minimize the risk of unauthorized access.
Password protecting individual Excel worksheets provides a granular level of security, allowing you to protect specific data within the workbook. Combined with password protection for the entire workbook, this ensures the confidentiality and integrity of your Excel data.
Encrypting an Excel Workbook for Added Security
Encrypting an Excel workbook is a powerful method for enhancing the security of your data. Encryption converts the contents of the workbook into a format that can only be read with the correct encryption key. This provides an additional layer of protection, even if someone gains unauthorized access to the file. Follow these steps to encrypt an Excel workbook:
1. Open the Excel workbook you want to encrypt.
2. Click on the “File” menu, then select the “Info” tab.
3. In the “Info” tab, click on the “Protect Workbook” option.
4. From the dropdown list, select “Encrypt with Password”. This will open a dialog box.
5. Enter a strong password in the dialog box. Make sure to choose a password that is difficult to guess and includes a combination of uppercase and lowercase letters, numbers, and special characters.
6. Click “OK” to apply the password and encrypt the entire workbook.
Upon encrypting the workbook, anyone who tries to open the file will be prompted to enter the password. Without the correct password, they will be unable to access the contents of the workbook, ensuring that your data remains secure.
Here are some important points to keep in mind when encrypting an Excel workbook:
– Use a strong, unique password for each encrypted workbook.
– Do not forget or lose the encryption password, as it cannot be recovered.
– Store the encryption passwords securely and do not share them with unauthorized individuals.
– Consider using a password manager to securely store and manage your passwords.
– Regularly update and change the encryption passwords to maximize security.
Encrypting an Excel workbook is an effective way to protect your data from unauthorized access. It adds an extra layer of security, ensuring that even if the workbook falls into the wrong hands, the information remains inaccessible without the correct encryption key. Combined with other data protection measures, such as password protection for sheets and using strong encryption algorithms, you can significantly enhance the security of your Excel workbooks.
Hiding Sensitive Data in Excel Using Cell Formatting and Conditional Formatting
Excel provides various methods to hide sensitive data without the need for encryption or passwords. These techniques allow you to control the visibility of specific cells or ranges, ensuring that confidential information remains hidden. Here’s how you can hide sensitive data in Excel using cell formatting and conditional formatting:
Cell Formatting:
1. Open the Excel worksheet containing the sensitive data.
2. Select the cell or range of cells containing the sensitive information that you want to hide.
3. Right-click on the selected cells and choose the “Format Cells” option from the context menu.
4. In the “Format Cells” dialog box, navigate to the “Number” tab.
5. Select the “Custom” category and enter three semicolons (;;;) or a custom format such as “;;;”.
6. Click “OK” to apply the cell formatting. The sensitive data will now be hidden, and only the empty cell will be displayed.
Conditional Formatting:
1. Open the Excel worksheet and select the cell or range of cells containing the sensitive data.
2. Go to the “Home” tab and click on the “Conditional Formatting” option.
3. Choose “New Rule” from the dropdown menu to open the “New Formatting Rule” dialog box.
4. In the “New Formatting Rule” dialog box, select the “Format only cells that contain” option.
5. Set the condition based on the sensitive data you want to hide. For example, you can choose to hide cells that contain specific text, numbers, or formulas.
6. Select the formatting style to be applied to the cells, such as setting the font color to match the background color.
7. Click “OK” to apply the conditional formatting. The sensitive data that meets the specified condition will now be visually hidden.
By using cell formatting or conditional formatting, you can control the visibility of sensitive data in Excel. These methods allow you to hide the content of cells without altering the underlying data. However, it’s important to note that these techniques do not provide strong security and can be easily bypassed by users with some knowledge of Excel. For more secure data protection, consider combining these techniques with password protection, encryption, or other advanced security measures.
Protecting Formulas and Preventing Users from Making Changes to Cell Values
Excel formulas are essential for performing calculations and data analysis. Protecting your formulas and preventing users from making unauthorized changes to cell values is crucial for maintaining data accuracy and integrity. Excel offers various methods to achieve this level of protection. Here’s how you can protect formulas and prevent changes to cell values:
Protecting Formulas:
1. Open the Excel worksheet that contains the formulas you want to protect.
2. Select the cell or range of cells containing the formulas.
3. Right-click on the selected cells and choose “Format Cells” from the context menu.
4. In the “Format Cells” dialog box, go to the “Protection” tab.
5. Uncheck the “Locked” option to prevent users from making changes to the formulas in the selected cells.
6. Click “OK” to apply the changes.
7. To enforce the protection, go to the “Review” tab and click on “Protect Sheet”. Enter a password to prevent unauthorized users from modifying the protected cells.
Preventing Changes to Cell Values:
1. Select the range of cells for which you want to prevent changes to cell values.
2. Right-click on the selected cells and choose “Format Cells” from the context menu.
3. In the “Format Cells” dialog box, go to the “Protection” tab.
4. Check the “Locked” option to prevent changes to the cell values in the selected range.
5. Click “OK” to apply the changes.
6. To enforce the protection, go to the “Review” tab and click on “Protect Sheet”. Enter a password to prevent unauthorized users from modifying the protected cells.
By protecting formulas and preventing changes to cell values, you can ensure that your calculations and data remain intact. However, it’s important to note that protecting formulas and cell values alone may not provide comprehensive security. Consider using additional protection measures such as password protection, encryption, or restricting access to further safeguard your Excel worksheets.
Controlling Access to an Excel Workbook by Setting Permissions and Restrictions
Controlling access to an Excel workbook is vital for maintaining the confidentiality and security of your data. Excel provides features that allow you to set permissions and restrictions, ensuring that only authorized individuals can open, edit, or modify the workbook. Here’s how to control access to an Excel workbook:
1. Open the Excel workbook that you want to set permissions for.
2. Click on the “File” menu, then select the “Info” tab.
3. In the “Info” tab, click on the “Protect Workbook” option.
4. From the dropdown menu, choose the desired level of protection:
- Mark as Final: This option will mark the workbook as read-only, preventing any further changes.
- Encrypt with Password: You can set a password to protect the workbook from unauthorized access.
- Restrict Access: This option allows you to restrict specific individuals or groups from accessing or modifying the workbook.
5. Select the desired protection option and follow the on-screen instructions to set permissions or enter the password.
6. Save the workbook to apply the permissions and restrictions.
When setting permissions and restrictions in Excel, consider the following:
- Strong Password: If using a password to restrict access, choose a strong password that is difficult to guess and include a combination of uppercase and lowercase letters, numbers, and special characters.
- Share with Trusted Individuals: Only share the workbook and its contents with individuals or groups whom you trust and require access.
- Regularly Review and Update Permissions: Regularly review the permissions and access settings to ensure they align with current requirements. Remove or update access for individuals who no longer need it.
- External Sharing: Be cautious when sharing the workbook externally, such as via email or cloud storage. Consider using secure file sharing methods and platforms.
- Backup Copies: Maintain backup copies of the protected workbook to prevent data loss in case of accidental modifications or password loss.
By controlling access to an Excel workbook through permissions and restrictions, you can ensure that only authorized individuals can open, modify, or view the workbook’s contents. This level of access control significantly enhances the security and confidentiality of your data.
Protecting Data in Excel by Using Data Validation Rules and Drop-Down Lists
Excel provides powerful features like data validation rules and drop-down lists to protect and control the data entered into cells. By implementing these tools, you can ensure the accuracy, consistency, and integrity of data in your Excel worksheets. Here’s how you can protect data in Excel using data validation rules and drop-down lists:
Data Validation Rules:
1. Select the cell or range of cells where you want to apply data validation.
2. Go to the “Data” tab and click on the “Data Validation” option.
3. In the “Data Validation” dialog box, choose the type of data validation you want to apply. Options include:
- Whole number: Restricts data input to whole numbers within a specified range.
- Decimal: Allows only decimal values with specific decimal places.
- List: Creates a drop-down list of predefined values for users to select from.
- Date: Ensures dates entered fall within a specified range.
- Text length: Controls the length of text input in a cell.
- Custom: Allows you to set your own validation criteria using formulas.
4. Configure the specific validation criteria and settings according to your requirements.
5. Click “OK” to apply the data validation to the selected cells.
Drop-Down Lists:
1. Select the cell or cells where you want to create a drop-down list.
2. Go to the “Data” tab and click on the “Data Validation” option.
3. In the “Data Validation” dialog box, choose the “List” option from the “Allow” dropdown menu.
4. In the “Source” field, enter the list of values you want to include in the drop-down list, separated by commas.
5. Check the “In-cell dropdown” option to enable the drop-down functionality.
6. Click “OK” to apply the drop-down list to the selected cells.
By using data validation rules and drop-down lists, you can prevent users from entering invalid data, ensure consistency, and streamline data entry. This not only improves data accuracy but also saves time by eliminating errors and the need for manual data corrections. Keep in mind that data validation is not a foolproof security measure, so it should be used in conjunction with other security features like password protection and encryption to provide comprehensive data protection.
Best Practices for Data Protection in Excel: Regularly Backing Up Your Files and Enforcing Good Password Habits
Ensuring the security and protection of your data in Excel is crucial to safeguard sensitive information and maintain the integrity of your work. By following best practices, you can mitigate the risk of data loss, unauthorized access, and other security threats. Here are two important best practices for data protection in Excel:
1. Regularly Backing Up Your Files:
Regularly backing up your Excel files is critical to protect against data loss. By creating backups, you can recover your data in the event of accidental deletion, system failures, or other unforeseen situations. Here are some best practices for backing up your files:
- Frequency: Back up your files on a regular basis, depending on the frequency of changes and the criticality of your data. Consider daily, weekly, or monthly backups.
- Multiple Storage Locations: Store your backup files in different locations, such as external hard drives, cloud storage services, or network drives. This ensures redundancy and decreases the risk of data loss.
- Automated Backup: Utilize backup solutions or software that automate the backup process. This helps to ensure consistent and timely backups without relying on manual actions.
- Regular Testing: Periodically test your backup files to confirm their integrity and accessibility. This allows you to identify any issues or errors and resolve them proactively.
2. Enforcing Good Password Habits:
Implementing strong password habits is essential to protect your Excel files from unauthorized access. Weak or easily guessable passwords can compromise the security of your data. Follow these guidelines to enforce good password habits:
- Strong Passwords: Use complex passwords that include a combination of uppercase and lowercase letters, numbers, and special characters. Avoid using obvious choices like your name or birthdate.
- Password Complexity: Set password complexity requirements that must be met when creating or changing passwords. This can be done through password policies or utilizing password managers with built-in complexity rules.
- Password Rotation: Regularly change your passwords, ideally every 60-90 days. Regular rotation reduces the risk of password compromise and unauthorized access.
- Secure Password Storage: Store passwords in a secure location, such as a reputable password manager, rather than writing them down or using easily accessible mediums.
- Multi-Factor Authentication: Implement multi-factor authentication (MFA) whenever possible. MFA adds an extra layer of security by requiring additional verification, such as a unique code sent to a mobile device.
By adhering to these best practices, you can significantly enhance the security and protection of your data in Excel. Regularly backing up your files and enforcing good password habits create multiple layers of defense against potential data loss and unauthorized access.