
What is Disk Utility?
Disk Utility is a built-in application on OS X El Capitan that allows you to manage your storage devices and perform various disk-related tasks. It offers a user-friendly interface to handle disk maintenance, partitioning, formatting, and repair. Disk Utility is a powerful tool for both novice and advanced users, providing them with the flexibility to manage their drives effectively.
With Disk Utility, you can partition your hard drive into multiple sections, each acting as a separate volume. This enables you to efficiently organize your data, install multiple operating systems, or create backups on a separate partition without affecting the main system. By partitioning your drive, you can optimize your storage and improve system performance.
Furthermore, Disk Utility allows you to format drives with different file system formats, such as APFS, HFS+, or exFAT. Each file system has its own advantages and compatibility, so you can choose the most suitable one based on your needs. Disk Utility also provides options for repairing disk errors, verifying disk integrity, and erasing data securely.
Whether you are a professional who needs to manage large amounts of data or a casual user looking to optimize your storage, Disk Utility is an essential tool in the OS X El Capitan operating system. It offers a wide range of capabilities to ensure the smooth functioning of your storage devices and provides a convenient way to manage your drives efficiently.
Why would you want to partition a drive?
Partitioning a drive involves dividing it into multiple sections, each acting as a separate volume. While it may seem like an unnecessary step for some users, there are several benefits to partitioning a drive that make it a valuable practice. Here are a few reasons why you might want to partition a drive:
- Organize your data: By creating separate partitions, you can organize your data more efficiently. Each partition can be dedicated to specific types of files, making it easier to locate and access them in the future. For example, you can have one partition for your personal documents, another for media files, and another for work-related files.
- Multiple operating systems: If you want to run multiple operating systems on your computer, such as macOS and Linux, partitioning your drive is essential. Each operating system can be installed on a separate partition, allowing you to switch between them without conflicts. This is particularly useful for developers, IT professionals, or individuals who want to explore different operating systems.
- Backup and recovery: Partitioning your drive enables you to create separate backup partitions. By dedicating a partition solely for backups, you can protect your important files and quickly restore them in case of system failures or data loss. This ensures that your data is secure and easily recoverable.
- Increased performance: Partitioning a drive can improve overall system performance. By allocating specific partitions for certain tasks or applications, you can reduce fragmentation and optimize data access speeds. Furthermore, if you encounter issues on one partition, it will not affect the entire drive, meaning your system can keep running smoothly.
- Security and privacy: Partitioning can also help enhance security and privacy. You can create a separate partition for sensitive data or confidential files, encrypt it, and add additional security measures. This adds an extra layer of protection and ensures that your private information remains secure.
Partitioning a drive provides a wide range of benefits, from improved organization and performance to better data management and security. It is a valuable practice for both personal users and professionals, allowing you to customize your storage space to suit your needs and optimize your computing experience.
Step 1: Open Disk Utility
To get started with partitioning a drive in OS X El Capitan, you need to open Disk Utility. Follow these steps:
- Click on the “Finder” icon in the Dock or press “Command + Space” to open Spotlight.
- Type “Disk Utility” in the Spotlight search bar and hit enter.
- The Disk Utility application will open on your screen.
Alternatively, you can also find Disk Utility in the “Utilities” folder within the “Applications” folder. Once you have located it, double-click on the Disk Utility icon to open it.
Opening Disk Utility is the first step in the partitioning process, as it provides you with the tools necessary to manage your storage devices effectively. Once Disk Utility is open, you can proceed to the next steps to partition your desired drive.
Step 2: Select the drive you want to partition
After opening Disk Utility, the next step is to select the drive that you want to partition. Follow these instructions:
- In the Disk Utility window, you will see a list of drives and volumes on the left-hand side. Locate the drive that you want to partition and click on it.
- The drive will be highlighted, and its details will be displayed on the right-hand side of the window.
- Ensure that you select the correct drive, as partitioning will affect the entire drive and all the data stored on it.
It’s essential to choose the right drive as selecting the wrong one can result in data loss or unintended consequences. Take a moment to double-check the drive you have selected before proceeding to the next steps.
If you are unsure about which drive to select, you can identify the drive you want to partition based on its name or size. Disk Utility provides information about the drive’s capacity and other details to help you make the right selection.
Once you have successfully selected the drive you want to partition, you are ready to move on to the next step and start creating the partitions according to your requirements.
Step 3: Click on the “Partition” tab
After selecting the drive you want to partition, the next step is to click on the “Partition” tab within the Disk Utility window. Here’s how:
- In the toolbar at the top of the Disk Utility window, you will see a row of tabs. Click on the “Partition” tab.
- The partition panel will appear, displaying the current partition scheme and available options for creating new partitions.
Clicking on the “Partition” tab is a crucial step as it allows you to access the partitioning options and configure the layout of your drive. This is where you can create and manage the individual partitions on the selected drive.
Once you have successfully clicked on the “Partition” tab, you can proceed to the next step and start adding new partitions to your drive according to your desired specifications.
Step 4: Click on the “+” button to add a new partition
After accessing the “Partition” tab in Disk Utility, the next step in the drive partitioning process is to add a new partition. This can be done by clicking on the “+” button. Here’s how:
- In the partition panel, you will see a graphical representation of your current partitions.
- Below the graph, you will find the “+” button. Click on it to create a new partition.
Clicking on the “+” button is a crucial step as it allows you to specify the size and other parameters for the new partition. This is where you can divide your drive into multiple sections and allocate storage space to each partition.
Once you have successfully clicked on the “+” button, you can proceed to the next step to adjust the size and name of the new partition according to your preferences.
Step 5: Adjust the size and name of the partition
After clicking on the “+” button to add a new partition in Disk Utility, the next step is to adjust the size and name of the partition. Follow these instructions:
- In the partition panel, you will see a new partition entry represented as a separate section.
- Click on the partition entry to select it and reveal the available options.
- Adjust the size of the partition by dragging the resize handle or by entering a specific value in the size field.
- Provide a suitable name for the partition in the Name field.
Adjusting the size and name of the partition is a crucial step as it allows you to allocate the desired amount of storage space and assign a meaningful name to the partition. The size can be adjusted based on your storage requirements, while the name can be customized to reflect the purpose or contents of the partition.
Take into consideration the total capacity of your drive, the existing partitions, and the intended usage of the new partition when determining the size and name. It is important to leave enough free space on the drive to store data on other partitions or for future expansion.
Once you have adjusted the size and named the partition, you are ready to proceed to the next step and choose the file system format for the partition.
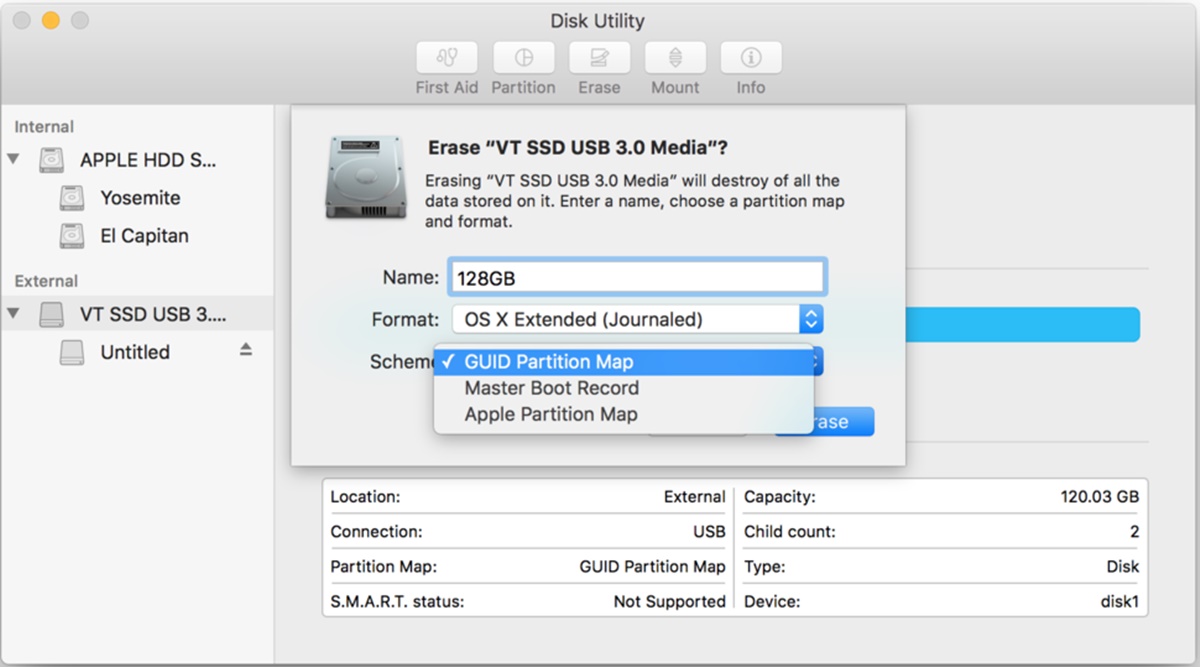
Step 6: Choose the file system format for the partition
After adjusting the size and name of the partition in Disk Utility, the next step is to choose the file system format for the partition. Follow these instructions:
- In the partition panel, select the new partition entry by clicking on it.
- Under the format dropdown menu, choose the desired file system format for the partition.
Choosing the file system format is an important step as it determines how the partition will be formatted and what type of files it can store. Disk Utility offers several file system formats to choose from, including:
- APFS (Apple File System): The default file system for macOS High Sierra and later versions. It provides improved performance, security, and compatibility with modern features.
- HFS+ (Mac OS Extended): The traditional file system used in older versions of macOS. It is compatible with most Mac computers and offers stability and support for large file sizes.
- exFAT: A file system that is compatible with both Mac and Windows operating systems. It allows for large file sizes and is suitable for sharing data between different platforms.
- NTFS: Widely used by Windows operating systems. macOS can read NTFS partitions but does not support writing to them by default.
- Other formats: Disk Utility also provides options for additional file system formats like FAT32 or UFS.
Consider the compatibility requirements and the intended use of the partition when choosing the file system format. If you are unsure, it is recommended to stick with the default file system format (APFS) or choose a format that is compatible with your specific needs.
Once you have selected the file system format for the partition, you are ready to apply the partition changes by proceeding to the next step.
Step 7: Apply the partition changes
After choosing the file system format for the partition in Disk Utility, the next step is to apply the partition changes. Follow these instructions:
- Double-check that the size, name, and file system format of the new partition are correct.
- Ensure that you have selected the appropriate drive and partition layout.
- Click on the “Apply” or “Partition” button to confirm the changes.
Applying the partition changes is a crucial step as it finalizes the partitioning process and creates the new partition on your selected drive. Before clicking the “Apply” button, take a moment to review all the settings and confirm that they meet your requirements.
Keep in mind that applying the changes will erase any existing data on the selected drive, so it is essential to have a backup of any important files before proceeding.
Once you are confident with your choices, click the “Apply” or “Partition” button to initiate the partitioning process. Disk Utility will then start creating the new partition based on the specified size, name, and file system format.
Depending on the size and speed of your drive, the partitioning process may take a few seconds to several minutes. Once completed, you will see the new partition listed in Disk Utility, ready to be used for storing data or installing an operating system.
With the partition changes successfully applied, you have completed the necessary steps to create a new partition on your drive using Disk Utility.
Step 8: Verify and finalize the partitioning process
After applying the partition changes in Disk Utility, the final step is to verify and finalize the partitioning process. Follow these instructions:
- Take a moment to review the new partition in Disk Utility. Ensure that the size, name, and file system format are correct.
- Verify that the new partition appears as expected in the graphical representation and the volume list on the left-hand side of the Disk Utility window.
- If desired, you can select the new partition and click the “Info” button to view additional details and statistics about the partition.
Verifying the partitioning process is an important step to ensure that the new partition has been created successfully and is ready for use. By reviewing the partition details, you can confirm that the size, name, and file system format meet your requirements.
If there are any unexpected issues or concerns, such as incorrect partition size or formatting errors, you can make adjustments by selecting the partition and using the available options in Disk Utility to resize or reformat it.
Once you have verified that everything is as expected, you can consider the partitioning process finalized. The new partition is now ready to be utilized for storing data, installing an operating system, or any other purpose you have in mind.
Congratulations! You have successfully followed the steps in Disk Utility to partition a drive in OS X El Capitan. Enjoy the benefits of an organized and optimized storage solution tailored to your needs.