
Why Organizing Emails is Important
As the digital age continues to evolve, email has become an essential tool for communication, both in personal and professional settings. However, the constant influx of emails can quickly lead to a cluttered inbox, making it challenging to find important messages when needed. This is where the importance of organizing emails comes into play.
Organizing emails offers several benefits that can greatly improve productivity and efficiency. Firstly, it allows for easier retrieval of information. By categorizing emails into specific folders, you can quickly locate important messages, saving valuable time and reducing frustration. Whether you need to access an important client communication or reference a specific document, having an organized email system ensures that everything is easily accessible.
Secondly, organizing emails provides a sense of order and control. When your inbox is filled with hundreds or even thousands of emails, it can be overwhelming and create a feeling of chaos. By sorting and labeling emails into folders, you regain control over your inbox and create a system that works for you. This sense of order can lead to reduced stress levels and increased focus on the tasks at hand.
Furthermore, organizing emails can help prioritize tasks and improve workflow. By assigning different folders for specific projects, clients, or topics, you can easily identify and prioritize which emails require immediate attention. This allows you to focus on the most important tasks, improving efficiency and preventing important messages from getting lost amidst the noise of a cluttered inbox.
In addition to personal benefits, organizing emails can also have an impact on professional collaboration. When working in a team or sharing an inbox with colleagues, having a well-organized email system ensures that everyone is on the same page. Team members can easily locate and reference important emails, leading to better collaboration and more effective communication.
How to Create Folders in Outlook
Organizing your emails in Outlook is made easy with the option to create folders. Follow the step-by-step guide below to create folders and keep your inbox well-organized.
- Open Microsoft Outlook and go to the “Mail” tab.
- Locate and click on the “Folder” tab in the ribbon at the top of the screen.
- In the “New” group, click on the “New Folder” button. Alternatively, you can right-click on an existing folder and select “New Folder” from the context menu.
- A dialogue box will appear, prompting you to enter a name for the new folder. Type in a descriptive name that reflects the purpose or category of the folder.
- Choose the location for the new folder. You can create it as a subfolder within an existing folder or as a top-level folder in your inbox.
- Click the “OK” button to create the folder.
- The newly created folder will now appear in the list of folders on the left-hand side of the Outlook window.
Remember to use meaningful names for your folders to make it easier to locate specific emails later on. For example, you could create folders for different clients, projects, or categories such as “Work,” “Personal,” or “Newsletters.”
It’s worth mentioning that you can also create subfolders within existing folders to further organize your emails. To create a subfolder, right-click on the parent folder, select “New Folder,” and follow the same steps as mentioned above.
By creating folders in Outlook, you can declutter your inbox and establish a system that suits your needs. Take some time to set up your folders initially and maintain them regularly to ensure an organized and efficient email management system.
How to Set Default Folder for Messages
Setting a default folder for messages in Microsoft Outlook can help streamline your email management process. When you compose a new email or receive a reply, it will automatically be saved to the designated default folder. Follow the steps below to set your default folder for messages.
- Launch Outlook and go to the “File” tab at the top-left corner of the screen.
- In the drop-down menu, click on “Options” to open the Outlook Options window.
- In the left-hand sidebar, select “Mail” to access the mail settings.
- Scroll down until you find the “Save messages” section.
- Select the drop-down menu next to the “Save replies with the original message” option.
- From the drop-down menu, choose the folder where you want to save the messages by default. You can select an existing folder or create a new one by clicking on the “New Folder” button.
- Click on the “OK” button to save your changes and close the Outlook Options window.
By setting a default folder, you can ensure that your emails are organized right from the start. For example, if you frequently receive client inquiries, you could set the default folder to your “Client Inquiries” folder. This way, all new messages related to client inquiries will be automatically saved in that folder, saving you the time and effort of manually moving them.
It’s important to note that setting a default folder for messages does not restrict you from manually saving emails to other folders. You can still move emails to different folders based on their specific categories or projects, depending on your needs. The default folder is simply a convenient feature to provide a starting point for organizing your emails.
Take advantage of this feature in Outlook to optimize your email management workflow. By setting a default folder for messages, you can reduce clutter in your inbox and save time by ensuring that emails are automatically stored in the appropriate location.
How to Move Emails to Folders using the Drag-and-Drop Method
One of the easiest and quickest ways to move emails to folders in Microsoft Outlook is by using the drag-and-drop method. This simple technique allows you to manually transfer emails from your inbox or any other folder to a specific destination folder. Follow the steps below to learn how to move emails to folders using the drag-and-drop method.
- Open Outlook and locate the email you want to move.
- Click and hold the left mouse button on the email you wish to move.
- While holding the mouse button, drag the email to the desired folder in the folder pane on the left-hand side of the Outlook window.
- Release the mouse button to drop the email into the selected folder.
You can use this drag-and-drop method to move multiple emails at once. Simply select multiple emails by holding down the ‘Ctrl’ key on your keyboard while clicking on each email, and then drag them to the folder you intend to move them to.
If you prefer to organize your emails using subfolders, you can also use the drag-and-drop method to move emails to subfolders. To do this, expand the parent folder to reveal its subfolders, and then drag the email into the desired subfolder.
This drag-and-drop method provides a convenient way to manually organize your emails and keep your inbox tidy. It’s particularly useful when you want to quickly categorize or prioritize emails based on specific projects, clients, or topics. By dragging emails into appropriately labeled folders, you can easily locate and access them whenever needed.
Whether you’re decluttering your inbox, archiving important messages, or simply maintaining a well-organized email system, the drag-and-drop method in Outlook makes it effortlessly to move emails to the desired folders.
How to Move Emails to Folders using the Right-Click Method
In addition to the drag-and-drop method, Microsoft Outlook offers an alternative way to move emails to folders using the right-click method. This method provides a convenient option for users who prefer using context menus to perform actions. Follow the steps below to learn how to move emails to folders using the right-click method.
- Launch Outlook and open the email that you want to move to a folder.
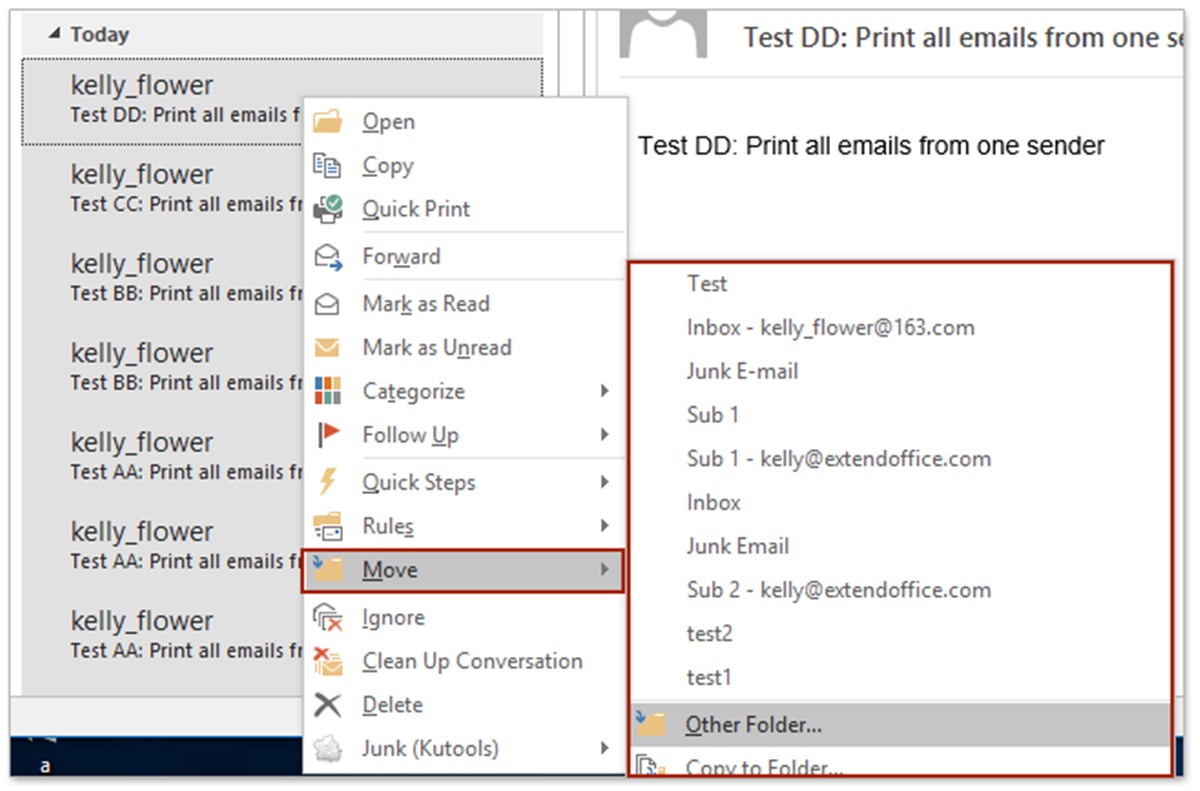
- Right-click on the email to open the context menu.
- In the context menu, hover over the “Move” option to expand the sub-menu.
- In the sub-menu, you will see a list of folders that you have already created in Outlook. Scroll down the list or use the arrow keys to navigate to the desired folder.
- Click on the folder name to which you want to move the email.
By using the right-click method, you can quickly and efficiently transfer emails to the desired folders without the need for dragging and dropping. This method is particularly useful when you have a long list of folders or specific folders buried within subfolders.
If the folder you want to move the email to is not visible in the sub-menu, you can select the “Other Folder” option at the bottom of the sub-menu. This will open a dialogue box where you can browse and select the destination folder.
It’s important to note that you can also use the right-click method to move multiple emails at once. Simply select multiple emails by holding down the ‘Ctrl’ key on your keyboard while clicking on each email. Then, follow the same steps as mentioned above to move the selected emails to the desired folder.
The right-click method in Outlook provides an efficient and straightforward way to move emails to folders. It offers an alternative option for organizing your inbox and maintaining a well-structured email system. Whether you prefer the drag-and-drop method or the right-click method, Outlook provides versatile options to suit your personal preference and workflow.
How to Use Rules to Automatically Move Emails to Folders
Microsoft Outlook offers a powerful feature called “Rules” that allows you to automate the process of moving emails to specific folders. With rules, you can define certain conditions and actions to apply to incoming emails, ensuring they are automatically sorted into the appropriate folders. Follow the steps below to learn how to use rules to automatically move emails to folders in Outlook.
- Open Outlook and go to the “File” tab.
- Click on “Manage Rules & Alerts” to open the Rules and Alerts window.
- In the Rules and Alerts window, click on the “New Rule” button to create a new rule.
- Choose “Apply rule on messages I receive” and click on “Next”.
- Select the conditions you want to apply to your rule. For example, you can choose to move emails from a specific sender or with certain keywords in the subject line.
- Once you have set the conditions, click on “Next”.
- Select the action you want to perform on the emails that meet the chosen conditions. In this case, choose “Move the item to folder”.
- Click on the “Select Folder” button to choose the destination folder where you want the emails to be moved.
- After selecting the folder, click on “Finish” to create the rule.
- Optionally, you can add any exceptions to the rule if needed.
- Click on “OK” to close the Rules and Alerts window.
By setting up rules, you can save time and effort in manually moving emails to folders. Outlook will automatically apply the rule to incoming emails, moving them to the designated folders based on your specified conditions.
You can create multiple rules to handle different types of emails and ensure that your inbox remains organized. It’s important to regularly review and update your rules as your email patterns and needs may change over time.
The use of rules in Outlook simplifies email management and reduces the manual effort required to keep your inbox organized. By automating the process of moving emails to folders, you can focus on more important tasks and ensure that important messages are easily accessible.
How to Enable Quick Steps in Outlook
Microsoft Outlook’s “Quick Steps” feature allows you to perform multiple actions on emails with just one click, streamlining your email management process. With Quick Steps, you can automate repetitive tasks and save time and effort. Follow the steps below to learn how to enable Quick Steps in Outlook.
- Launch Outlook and go to the “Home” tab.
- Locate the “Quick Steps” group in the ribbon at the top of the screen.
- If you don’t see the Quick Steps gallery, click on the “More” button in the Quick Steps group.
- In the drop-down menu, select “Manage Quick Steps” to open the Quick Steps window.
- In the Quick Steps window, you’ll find a list of pre-configured Quick Steps as well as the option to create custom Quick Steps.
- To enable a pre-configured Quick Step, simply select it from the list and click on the “Enable” button.
- If you want to create a custom Quick Step, click on the “New” button.
- In the “Edit Quick Step” window, you can assign a name to the Quick Step and specify the actions you want it to perform, such as forwarding, categorizing, moving, or responding to emails.
- Configure the settings of the Quick Step based on your preferences and needs.
- Click on “Finish” to save the Quick Step.
Once you have enabled Quick Steps in Outlook, you can simply click on a Quick Step in the gallery to perform the assigned actions on the selected email. The actions will be executed instantly, saving you time and reducing the need for manual intervention.
By creating custom Quick Steps, you can tailor the feature to suit your specific email management workflow. For example, you can create a Quick Step to move an email to a specific folder, mark it as important, and reply with a predefined message all with a single click.
Enabling and utilizing Quick Steps in Outlook allows for efficient and streamlined email management. With just one click, you can perform multiple actions on your emails, reducing repetitive tasks and improving productivity.
How to Use Quick Steps to Move Emails to Folders
Microsoft Outlook’s Quick Steps feature provides a convenient way to quickly move emails to specific folders with just one click. This allows you to streamline your email management process and keep your inbox organized. Follow the steps below to learn how to use Quick Steps to move emails to folders in Outlook.
- Open Outlook and go to the “Home” tab.
- Locate the Quick Steps gallery in the ribbon at the top of the screen.
- Hover your mouse over the Quick Steps gallery to see a list of pre-configured Quick Steps.
- Click on the Quick Step that corresponds to the desired folder you want to move the email to.
- The email will be automatically moved to the designated folder.
Outlook provides several pre-configured Quick Steps, such as “Move to Folder,” “Move to Archive,” or “Move and Reply,” which can be used to perform common actions with one click. If you want to create a custom Quick Step, you can do so by following these additional steps:
- Click on the “More” button in the Quick Steps group to open the Quick Steps gallery.
- At the bottom of the gallery, click on “Create New” to open the Edit Quick Step window.
- Specify a name for the Quick Step.
- In the “Actions” section, select “Move to Folder” from the drop-down menu.
- Click on the “Choose Folder” button to select the destination folder.
- Save the Quick Step by clicking on “Finish.”
After creating the custom Quick Step, it will be added to the Quick Steps gallery, allowing you to move emails to the specified folder with a single click.
Using Quick Steps in Outlook significantly reduces the time and effort required to organize your emails. By assigning specific Quick Steps to folders, projects, or categories, you can effortlessly move emails to their designated locations. This ensures a well-organized inbox, making it easier to locate and manage your messages efficiently.
Take advantage of the Quick Steps feature to create shortcuts for repetitive tasks and customize it according to your specific email management needs. Experiment with different Quick Steps to discover the most efficient workflows that work best for you.
Tips for Efficiently Managing Email Folders
Managing email folders effectively is crucial for maintaining a well-organized and streamlined inbox. Here are some tips to help you efficiently manage your email folders in Microsoft Outlook:
- Create a Clear Folder Structure: Establish a logical and intuitive folder structure that aligns with your specific needs. Consider organizing folders by clients, projects, priority levels, or categories that make sense to you. This will make it easier to locate and retrieve emails when needed.
- Use Descriptive Folder Names: Choose descriptive names for your folders that clearly indicate their purpose. Avoid generic or ambiguous folder names that may lead to confusion later on. Clear, concise names will help you quickly identify the folder you’re looking for.
- Maintain Regular Folder Cleanup: Periodically review your email folders and delete or archive any unnecessary or outdated emails. Keeping your folders clutter-free will ensure better organization and faster retrieval of important messages.
- Implement Automation with Rules: Take advantage of Outlook’s rules feature to automatically move emails to specific folders based on pre-defined criteria. This can be especially useful for filtering and organizing incoming emails, saving you time and reducing manual effort.
- Utilize Quick Steps: Enable and customize Quick Steps in Outlook to perform multiple actions on emails with a single click. Set up Quick Steps for frequently performed tasks, such as moving emails to specific folders or forwarding them to colleagues, to streamline your email management workflow.
- Consolidate Similar Folders: If you find yourself with multiple folders that serve a similar purpose, consider consolidating them into one universal folder. This will simplify your folder structure and make it easier to manage and navigate.
- Monitor and Adjust: Regularly review and evaluate your folder organization to ensure it still aligns with your changing needs. Make adjustments as necessary to optimize your email management system and improve efficiency.
- Use Search and Filter Functions: Take advantage of Outlook’s powerful search and filter functions to quickly locate specific emails within your folders. Utilizing keywords, senders, dates, or other criteria can help you narrow down your search and find the desired email faster.
- Backup Your Folders: Regularly back up your email folders to prevent data loss in case of unexpected events. Consider exporting and saving important emails or using a cloud-based backup solution for added security and peace of mind.
- Keep Important Emails Easily Accessible: Create a separate folder for important emails that require frequent access. This can include emails related to critical projects, ongoing conversations, or key contacts. Having a dedicated folder for important emails ensures they are readily available and prevents them from getting lost in the clutter.
By following these tips, you can effectively manage your email folders, improve productivity, and maintain a well-organized inbox in Microsoft Outlook.