
Clearing the Deleted Items Folder
The Deleted Items folder in Outlook serves as a temporary storage for all the emails you have deleted. While these emails can still be recovered from the folder, clearing it permanently removes them from your account, freeing up storage space and ensuring they cannot be accessed again.
To clear the Deleted Items folder in Outlook, follow these simple steps:
- Open Outlook on your computer and navigate to the Mail tab.
- On the left-hand side, locate the folder pane and click on the Deleted Items folder.
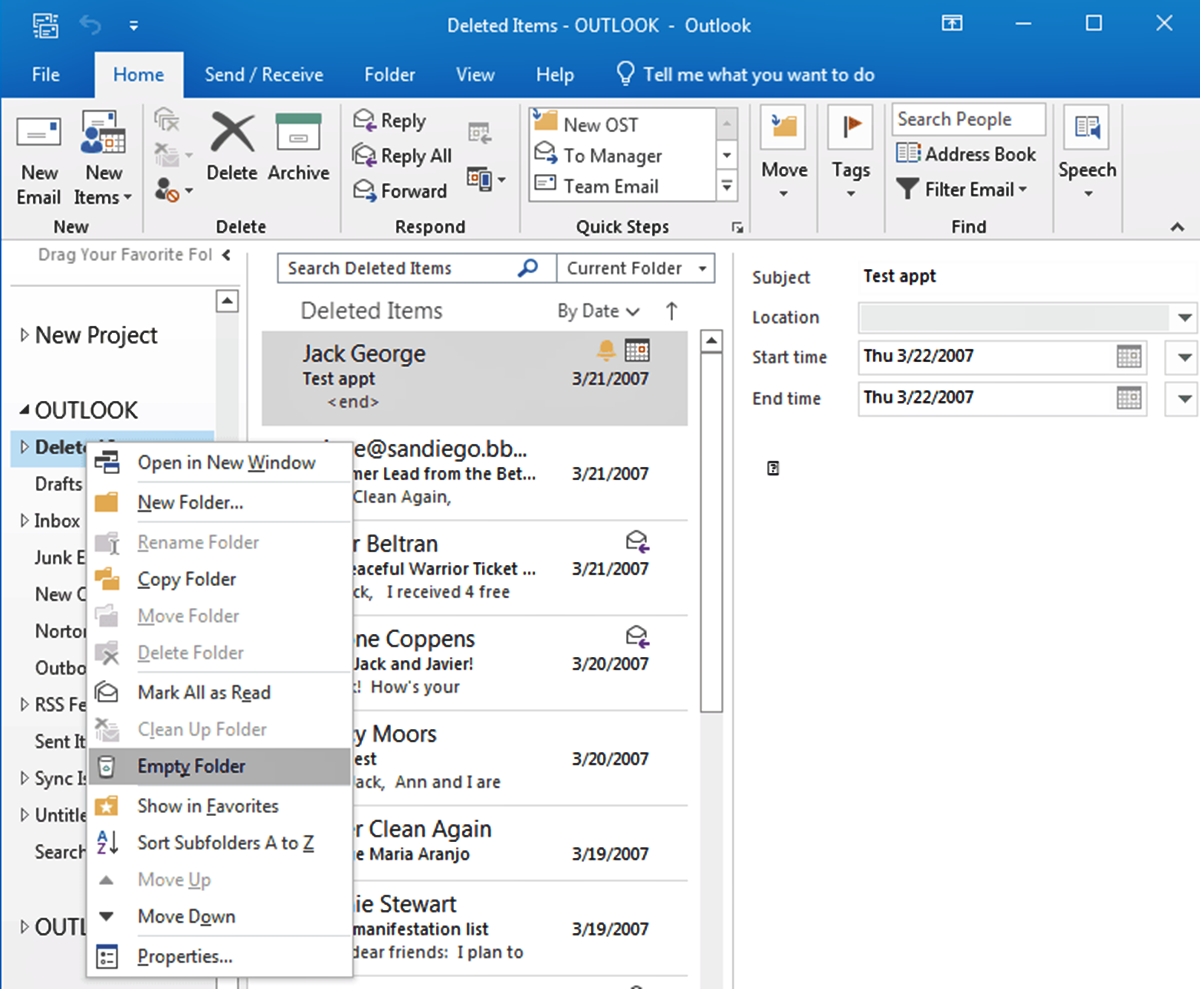
- In the toolbar at the top of the screen, you will find the “Empty Folder” option. Click on it.
- A confirmation message will pop up, asking if you want to permanently delete all the items in the folder. Click Yes.
Alternatively, you can right-click on the Deleted Items folder and select “Empty Folder” from the context menu. This will also permanently delete all the items in the folder.
It’s important to note that once items are permanently deleted from the Deleted Items folder, they cannot be recovered. Therefore, make sure you have reviewed the contents of the folder and have no intention of restoring any of the deleted emails before clearing the folder.
You can also configure Outlook to automatically clear the Deleted Items folder upon exiting the program. This ensures that no emails are left behind and reduces the risk of accidentally retaining sensitive information. To enable this option, go to the File tab, select Options, then navigate to the Advanced tab, and scroll down to the Outlook Start and Exit section. Check the box next to “Empty Deleted Items folders when exiting Outlook,” and click OK to save the changes.
By regularly clearing the Deleted Items folder, you can maintain an organized mailbox and ensure that unnecessary clutter is removed from your account. This not only improves your email management but also enhances the overall performance of Outlook.
Emptying the Junk Email Folder
The Junk Email folder in Outlook is designed to catch spam and other unwanted messages, keeping them separate from your regular inbox. However, it’s important to regularly empty this folder to ensure that it doesn’t become a storage space for unnecessary emails. Emptying the Junk Email folder not only helps declutter your mailbox but also improves the effectiveness of the spam filter. Here’s how to do it:
- Launch Outlook on your computer and switch to the Mail tab.
- In the folder pane on the left-hand side, locate the Junk Email folder, and click on it to open it.
- At the top of the screen, you will find the “Empty Folder” option in the toolbar. Click on it.
- A confirmation message will appear, asking if you want to permanently delete all the items in the folder. Click Yes to proceed.
You can also right-click on the Junk Email folder and choose “Empty Folder” from the context menu. This will immediately delete all the emails in the folder without any confirmation prompts.
It’s worth noting that the Junk Email folder may contain legitimate emails that have been mistakenly classified as spam. Before emptying the folder, make sure to review the emails to ensure that no important messages are being deleted. If you come across any legitimate emails, you can mark them as “Not Junk” to prevent them from being filtered into the Junk Email folder in the future.
Additionally, Outlook provides options to further enhance the effectiveness of the spam filter. You can adjust the level of filtering by going to the Home tab, clicking on the Junk dropdown menu, and selecting “Junk Email Options.” From there, you can choose to block or allow specific senders, domains, or even create custom filters to better manage unwanted emails.
Regularly emptying the Junk Email folder is a crucial step in maintaining a clean and organized mailbox. By doing so, you can efficiently manage spam and prevent unnecessary clutter from accumulating in your account, ensuring that you only see the emails that truly matter.
Deleting Emails from the Inbox
The Inbox in Outlook is the primary folder where all your incoming emails are stored. Over time, this folder can become cluttered with a large number of emails, making it necessary to regularly delete unwanted and outdated messages. Deleting emails from the Inbox not only helps in decluttering your mailbox but also improves overall email management. Here’s how you can delete emails from the Inbox in Outlook:
- Open Outlook and go to the Mail tab.
- In the folder pane on the left-hand side, locate the Inbox folder and click on it to view its contents.
- Review the emails in the Inbox and select the ones you want to delete. You can select multiple emails by holding down the Ctrl key while clicking on each email.
- Once you have selected the emails, click on the Delete button in the toolbar at the top of the screen. This will move the selected emails to the Deleted Items folder.
Alternatively, you can right-click on the selected emails and choose the Delete option from the context menu. This will also move the emails to the Deleted Items folder.
It’s important to note that when you delete emails from the Inbox, they are moved to the Deleted Items folder, where they can be recovered if needed. To permanently delete the emails and free up storage space, you need to clear the Deleted Items folder as mentioned earlier.
If you want to delete all emails in the Inbox at once, you can use the Ctrl+A shortcut to select all the emails and then click on the Delete button or right-click and select Delete from the context menu.
To manage your Inbox more efficiently, consider implementing email organization strategies such as creating folders to categorize and store important emails, setting up rules to automatically move specific emails to designated folders, or setting up filters to prioritize and flag important emails.
By regularly deleting unnecessary emails from the Inbox, you can keep your mailbox organized and ensure that important messages are easily accessible. This helps streamline your email workflow and contributes to a more productive and efficient work environment.
Deleting Emails from Sent Items
The Sent Items folder in Outlook stores copies of all the emails you have sent. While it can be handy to have a record of your outgoing messages, it’s essential to regularly delete unnecessary emails from the Sent Items folder to declutter your mailbox and manage your email storage effectively. Here’s how you can delete emails from the Sent Items folder in Outlook:
- Launch Outlook and switch to the Mail tab.
- In the folder pane on the left-hand side, locate the Sent Items folder and click on it to open it.
- Review the emails in the Sent Items folder and select the ones you want to delete. You can select multiple emails by holding down the Ctrl key while clicking on each email.
- Once you have selected the emails, click on the Delete button in the toolbar at the top of the screen. This will move the selected emails to the Deleted Items folder.
Alternatively, you can right-click on the selected emails and choose the Delete option from the context menu. This will also move the emails to the Deleted Items folder.
It’s important to note that when you delete emails from the Sent Items folder, they are moved to the Deleted Items folder, where they can still be retrieved if needed. To permanently delete the emails and free up storage space, you need to clear the Deleted Items folder as mentioned earlier.
If you want to delete all emails in the Sent Items folder at once, you can use the Ctrl+A shortcut to select all the emails and then click on the Delete button or right-click and select Delete from the context menu.
Deleting unnecessary emails from the Sent Items folder not only helps in managing storage space but also improves email organization. However, if you need to keep a record of your sent emails for future reference, you may consider creating email archive folders and moving important emails there instead of deleting them.
Remember to regularly review and delete outdated or irrelevant emails from the Sent Items folder to maintain a clutter-free and well-organized mailbox. This practice will not only improve your email management but also make it easier to find important messages when needed.
Permanently Deleting Emails from Drafts
The Drafts folder in Outlook is where your in-progress or unsent emails are saved. While the purpose of this folder is to provide a temporary storage space for unfinished emails, it is essential to periodically delete unnecessary drafts to keep your mailbox organized and free up storage space. Here’s how you can permanently delete emails from the Drafts folder in Outlook:
- Open Outlook and go to the Mail tab.
- In the folder pane on the left-hand side, locate the Drafts folder and click on it to view its contents.
- Review the emails in the Drafts folder and select the ones you want to delete. You can select multiple emails by holding down the Ctrl key while clicking on each email.
- Once you have selected the emails, click on the Delete button in the toolbar at the top of the screen. This will move the selected emails to the Deleted Items folder.
Alternatively, you can right-click on the selected emails and choose the Delete option from the context menu. This will also move the emails to the Deleted Items folder.
It’s important to note that deleting emails from the Drafts folder will move them to the Deleted Items folder, where they can still be retrieved if needed. To permanently delete the emails and free up storage space, you need to clear the Deleted Items folder, as mentioned earlier.
If you want to delete all the emails in the Drafts folder at once, you can use the Ctrl+A shortcut to select all the emails and then click on the Delete button or right-click and select Delete from the context menu.
Regularly reviewing and deleting unnecessary drafts from the Drafts folder helps in managing your mailbox efficiently and ensures that only relevant emails are saved. It’s a good practice to clean up the Drafts folder after sending or finalizing your emails to avoid clutter and maintain a streamlined email workflow.
Additionally, consider using features like AutoSave and AutoRecover in Outlook to automatically save your drafts at regular intervals, reducing the risk of losing your work and minimizing the need for manually managing the Drafts folder.
By permanently deleting unnecessary drafts, you can keep your mailbox organized and prevent it from becoming cluttered with unfinished emails. This not only improves email management but also contributes to a more efficient and productive work environment.
Deleting Emails from the Outbox
The Outbox folder in Outlook is where emails are temporarily stored before they are sent. Sometimes, you may encounter situations where emails get stuck in the Outbox or you need to delete unsent messages. Deleting emails from the Outbox not only helps in managing your mailbox but also ensures that only relevant and accurate content is sent out. Here’s how you can delete emails from the Outbox in Outlook:
- Launch Outlook and navigate to the Mail tab.
- In the folder pane on the left-hand side, locate the Outbox folder and click on it to open it.
- Review the emails in the Outbox and identify the ones you want to delete. You can select multiple emails by holding down the Ctrl key while clicking on each email.
- Once you have selected the emails, click on the Delete button in the toolbar at the top of the screen. This will delete the selected emails from the Outbox and move them to the Deleted Items folder.
Alternatively, you can right-click on the selected emails and choose the Delete option from the context menu. This will also move the emails to the Deleted Items folder.
It’s important to note that when you delete emails from the Outbox, they are moved to the Deleted Items folder where they can still be retrieved if needed. To permanently delete the emails and free up storage space, you need to clear the Deleted Items folder, as mentioned earlier.
If you encounter situations where emails are stuck in the Outbox and cannot be deleted, you can try the following steps to resolve the issue:
- Close Outlook and reopen it. Sometimes, a simple restart of the application can free up any temporary glitches causing the email to be stuck in the Outbox.
- Ensure that your Internet connection is stable. A weak or intermittent connection may prevent emails from being sent, resulting in them getting stuck in the Outbox.
- Delete any large attachments that may be causing the issue. Sometimes, emails with large attachments can fail to send, leading to them being stuck in the Outbox.
- If the issue persists, you may need to contact your email service provider or IT support for further assistance.
By deleting unnecessary emails from the Outbox, you can ensure that only accurate and relevant content is sent to recipients. This helps in maintaining a streamlined email communication process and reduces the chances of sending incorrect or incomplete information.
Regularly reviewing and managing the Outbox ensures that your emails are sent effectively and efficiently, contributing to a productive and professional communication experience.
Deleting Emails from Specific Folders
In addition to the Inbox, Sent Items, Drafts, and Outbox folders, Outlook allows you to create and use customized folders to organize your emails based on specific categories or projects. These folders can accumulate a significant number of emails over time, making it necessary to delete unnecessary messages to keep your mailbox organized. Here’s how you can delete emails from specific folders in Outlook:
- Launch Outlook and navigate to the Mail tab.
- In the folder pane on the left-hand side, locate the specific folder from which you want to delete emails and click on it to view its contents.
- Review the emails in the folder and select the ones you want to delete. You can select multiple emails by holding down the Ctrl key while clicking on each email.
- Once you have selected the emails, click on the Delete button in the toolbar at the top of the screen. This will move the selected emails to the Deleted Items folder.
Alternatively, you can right-click on the selected emails and choose the Delete option from the context menu. This will also move the emails to the Deleted Items folder.
It’s important to note that when you delete emails from specific folders, they are moved to the Deleted Items folder where they can still be retrieved if needed. To permanently delete the emails and free up storage space, you need to clear the Deleted Items folder, as mentioned earlier.
Deleting unnecessary emails from specific folders is essential to maintain an organized mailbox and ensure that only relevant information is kept. It’s recommended to regularly review and delete emails from these folders to prevent them from becoming cluttered and overwhelming.
If you have a large number of emails to delete from a specific folder, you can make use of the Search function in Outlook to quickly locate and select multiple emails. Simply enter relevant keywords or criteria in the search bar, select the desired emails, and then follow the steps mentioned earlier to delete them.
Remember to exercise caution when deleting emails from specific folders, especially if they contain important or sensitive information. Always double-check before deleting to ensure that you are not removing any critical emails by mistake.
By regularly deleting unnecessary emails from specific folders, you can create a streamlined and well-organized mailbox that helps improve your email management and overall productivity.
Permanently Deleting Emails Using Keyboard Shortcuts
In addition to using the mouse and toolbar options, Outlook provides convenient keyboard shortcuts that allow you to quickly and efficiently perform various actions, including deleting emails. By utilizing these keyboard shortcuts, you can save time and streamline your email management process. Here’s how you can permanently delete emails using keyboard shortcuts in Outlook:
- Delete: To permanently delete an email, simply select it in your mailbox and press the
Deletekey on your keyboard. This will move the email directly to the Deleted Items folder, bypassing the normal process of moving it to the Recycle Bin. - Shift + Delete: If you want to skip the Deleted Items folder and permanently delete an email without sending it to the Recycle Bin, you can use the
Shift + Deletekeyboard shortcut. This action will immediately remove the selected email, bypassing any potential recovery. - Delete All: To quickly delete all the emails in a folder, you can use the
Ctrl + Akeyboard shortcut to select all the emails and then press theDeletekey. This will move all the selected emails to the Deleted Items folder.
It’s important to note that when you permanently delete emails using these keyboard shortcuts, they are moved to the Deleted Items folder where they can still be retrieved if needed. To free up storage space and permanently delete the emails, you need to clear the Deleted Items folder as mentioned earlier.
Using keyboard shortcuts to permanently delete emails can significantly enhance your email management efficiency. With a few simple keystrokes, you can quickly clear your mailbox and keep it organized. It’s important, however, to exercise caution when using these shortcuts to avoid accidentally deleting important emails.
It’s also worth mentioning that different email clients may have variations in their keyboard shortcuts, so it’s a good idea to familiarize yourself with the specific shortcuts supported by your version of Outlook. You can find a list of keyboard shortcuts in the Outlook Help documentation or by searching for “Outlook keyboard shortcuts” online.
By incorporating keyboard shortcuts into your email management routine, you can save time, reduce reliance on the mouse, and maintain a well-organized mailbox. Whether you need to delete individual emails or clear an entire folder, these shortcuts make the process faster and more efficient.
Using the Search Function to Permanently Delete Emails
Searching for specific emails in Outlook can be a time-saving and efficient way to locate and manage your messages. The Search function in Outlook allows you to quickly find emails based on various criteria, such as sender, subject, keywords, or specific time periods. This search capability can also be utilized to selectively delete emails from your mailbox. Here’s how you can use the search function to permanently delete emails in Outlook:
- Launch Outlook and navigate to the folder where you want to search for emails.
- Locate the search box at the top of the Outlook window and click on it to activate it.
- Enter the search criteria or keywords for the emails you want to delete in the search box. You can search by sender, subject, specific keywords, or any other relevant information.
- As you type, Outlook will start displaying the search results in real-time based on your input.
- Review the search results and select the emails you want to permanently delete. You can use the Ctrl or Shift key to select multiple emails.
- Once you have selected the desired emails, press the Delete key on your keyboard to permanently delete them. The selected emails will be moved to the Deleted Items folder.
After deleting the emails using the search function, you can clear the Deleted Items folder to permanently delete them and free up storage space, as mentioned earlier.
The search function in Outlook is a powerful tool that enables you to quickly locate and manage emails based on specific criteria. It can also be used to find and delete emails that match certain search parameters. This functionality is particularly useful when dealing with a large number of emails or trying to locate specific messages within a folder.
Remember to exercise caution when using the search function to delete emails, as it searches and modifies the emails based on the criteria you specify. Double-check the search criteria to ensure that you are targeting the correct emails for deletion and that no important messages are accidentally removed.
By utilizing the search function to delete emails, you can efficiently manage your mailbox, reduce clutter, and ensure that only relevant and necessary messages are retained. This not only contributes to better email organization but also improves your overall productivity when working with Outlook.
Enabling the “Empty Deleted Items folders when exiting Outlook” option
Outlook provides a useful option that allows you to automatically empty the Deleted Items folder every time you exit the application. Enabling this option can help you manage your emails more effectively and ensure that unnecessary messages are permanently removed from your mailbox. Here’s how you can enable the “Empty Deleted Items folders when exiting Outlook” option:
- Open Outlook on your computer and navigate to the File tab at the top of the screen.
- In the menu that appears, select Options to open the Outlook Options window.
- In the Outlook Options window, click on the Advanced tab on the left-hand side.
- Scroll down until you find the Outlook Start and Exit section.
- Check the box next to “Empty Deleted Items folders when exiting Outlook.”
- Click on the OK button to save the changes.
With this option enabled, every time you exit Outlook, all emails in the Deleted Items folder will be permanently deleted, freeing up storage space and ensuring that they cannot be recovered. This helps in maintaining an organized mailbox and prevents the accumulation of unnecessary clutter.
It’s important to note that enabling this option means that emails in the Deleted Items folder will not be sent to the Recycle Bin or any other recovery location. Therefore, it’s essential to review the contents of the Deleted Items folder carefully before exiting Outlook, as any emails in that folder will be permanently deleted.
If you accidentally delete an important email and have the option enabled, there are a few steps you can take to recover it:
- Immediately check the Recoverable Items folder: Outlook moves deleted items to the Recoverable Items folder before permanently deleting them. To access this folder, go to the Folder tab, click on Recover Deleted Items, and look for the email you wish to recover.
- Check other potential recovery options: If you are using Exchange Server, you may have additional recovery options, such as using the Recover Deleted Items from Server feature or contacting your IT department for assistance.
- Regularly back up your mailbox: To further safeguard against permanent data loss, it’s a good practice to regularly back up your mailbox using Outlook’s export features or other backup solutions.
Enabling the “Empty Deleted Items folders when exiting Outlook” option provides a convenient way to keep your mailbox clutter-free and ensures that deleted emails are permanently removed from your account. However, it’s important to use this option with caution and have backup measures in place to protect against accidental permanent deletions.
Setting up AutoArchive to Permanently Delete Emails
AutoArchive is a feature in Outlook that allows you to automatically move older or unused items, including emails, to an archive folder or permanently delete them. By setting up AutoArchive, you can efficiently manage your mailbox, reduce clutter, and ensure that only relevant and necessary emails are retained. Here’s how you can set up AutoArchive to permanently delete emails in Outlook:
- Open Outlook on your computer and go to the File tab.
- In the menu that appears, select Options to open the Outlook Options window.
- Click on the Advanced tab on the left-hand side.
- Scroll down until you find the AutoArchive section.
- Click on the AutoArchive Settings button to open the AutoArchive dialog box.
- In the AutoArchive dialog box, you can specify the frequency and settings for archiving or permanently deleting emails.
- Check the box next to “Run AutoArchive every” and specify the time period, such as every X days or weeks.
- Choose whether to apply AutoArchive to the entire mailbox or specific folders.
- Set the desired actions for email items, including permanently deleting old or unused emails after a certain period of time.
- Configure any other desired settings, such as moving items to an archive folder before permanently deleting them.
- Click on the OK button to save the changes.
Once you have set up AutoArchive, Outlook will automatically perform the specified actions on emails based on the configured schedule. This ensures that older and unnecessary emails are either moved to an archive folder or permanently deleted from your mailbox, freeing up storage space and maintaining a clutter-free inbox.
It’s important to note that AutoArchive is a personal preference, and the settings can be customized to suit your specific needs. You can adjust the timeframe for archiving or permanent deletion, create specific rules for certain folders, or exclude certain emails or folders from the AutoArchive process.
It’s also worth mentioning that before enabling AutoArchive and permanently deleting emails, it’s recommended to review and back up any important or sensitive emails. This ensures that you have a copy of important information in case of accidental deletions.
By setting up AutoArchive to permanently delete emails, you can streamline your email management process and maintain an organized mailbox. It helps in reducing the clutter of old and unnecessary emails, allowing you to focus on the most relevant and recent messages in your inbox.
Creating Rules to Permanently Delete Emails Automatically
In Outlook, you have the ability to create rules that automatically perform actions on incoming or existing emails based on specific criteria. This includes the option to permanently delete emails that meet certain conditions. By creating rules to permanently delete emails automatically, you can streamline your email management process and keep your mailbox organized. Here’s how you can create rules to permanently delete emails in Outlook:
- Launch Outlook on your computer and go to the Home tab.
- In the toolbar, click on the Rules button and select “Create Rule” from the drop-down menu.
- In the Create Rule dialog box, you can specify the conditions that the emails need to meet for the rule to be applied. This can include criteria such as sender, subject, keywords, or specific recipients.
- Once you have specified the conditions, click on the “Advanced Options” button to further refine the rule.
- In the “Advanced Options” dialog box, you can select additional criteria such as message importance, specific words in the message body, or emails with attachments.
- Under the “Actions” section, check the box next to “Permanently delete it”. This ensures that the emails meeting the specified conditions are permanently deleted from your mailbox.
- Click on the OK button to save the rule.
- In the Create Rule dialog box, you can also choose to apply the rule to existing emails in your mailbox by selecting the appropriate option.
- Click on the Finish button to complete the rule creation process.
Once the rule is set up, Outlook will automatically apply it to incoming emails or existing emails based on the specified conditions. Any emails that meet the criteria will be permanently deleted from your mailbox, ensuring that clutter and unnecessary messages are effectively managed.
It’s important to double-check and test your rules to ensure they are properly configured. This helps avoid any unintended deletion of important emails. You can also review and edit the rules at any time by going to the Rules and Alerts section under the Home tab.
Creating rules to permanently delete emails is a powerful tool in managing your mailbox effectively. By automating the deletion of unwanted or irrelevant emails, you can maintain a clutter-free inbox and streamline your email workflow.
Additionally, it’s recommended to regularly review and update your rules to adapt to any changes in your email patterns or priorities. This ensures that the rules continue to function optimally and meet your evolving needs.