
Enable the Recover Deleted Items feature in Outlook
Accidentally deleting an important email in Outlook can be a frustrating experience. However, Outlook provides a built-in feature called “Recover Deleted Items” that can help you retrieve those mistakenly deleted messages. By enabling this feature, you can have peace of mind knowing that you have a way to recover your emails in case you need them in the future.
To enable the Recover Deleted Items feature in Outlook, follow these simple steps:
- Open Outlook and go to the “File” tab.
- Click on “Options” to access the Outlook Options menu.
- In the Options menu, select “Advanced” from the left-hand side.
- Scroll down to the “Outlook Start and Exit” section.
- Check the box next to “Empty Deleted Items folders when exiting Outlook” to activate the feature.
- Click on “OK” to save your changes and exit the Options menu.
Once you have enabled the feature, any deleted items will be moved to the “Recover Deleted Items” folder, which is located in the “Deleted Items” folder. This folder acts as a safety net, allowing you to easily recover any deleted emails.
Please note that the “Recover Deleted Items” feature is only available for certain email accounts, such as Microsoft Exchange accounts. If you are using a different type of email account, you may not have access to this feature. Additionally, the availability of this feature may depend on your Outlook version and configuration.
By enabling the Recover Deleted Items feature in Outlook, you can prevent the worry and frustration that comes with accidentally deleting important emails. It provides a simple and effective way to retrieve deleted messages, ensuring that you can always access the information you need, when you need it.
Access the Recover Deleted Items folder
Once you have enabled the “Recover Deleted Items” feature in Outlook, accessing the folder is the next step towards retrieving your deleted messages. The Recover Deleted Items folder acts as a temporary holding place for all the emails you have deleted. Follow the steps below to access this folder:
- Open Outlook and navigate to your email folders.
- Locate the “Deleted Items” folder on the left-hand side panel.
- Within the “Deleted Items” folder, you will find the “Recover Deleted Items” folder.
- Click on the “Recover Deleted Items” folder to access it.
Once you’re inside the Recover Deleted Items folder, you will see a list of all the emails that have been recently deleted. The messages will be displayed with information such as subject, sender, and date. To find the specific message you want to restore, you can use the search bar or scroll through the list using the scrollbar. Outlook also provides sorting and filtering options to help you organize and locate your deleted emails more efficiently.
Keep in mind that the Recover Deleted Items folder only retains deleted messages for a limited period of time, which can vary depending on your Outlook settings and server configuration. Once the retention period has expired, the deleted items may be permanently removed from the Recover Deleted Items folder.
It’s important to note that the availability of the Recover Deleted Items folder may vary depending on your Outlook version and email account type. If you do not see the folder, it could be due to limitations with your email setup.
By accessing the Recover Deleted Items folder, you have a convenient way to view and retrieve your deleted messages. Take advantage of this feature to recover important emails that may have been accidentally removed, ensuring that you don’t lose valuable information or correspondence.
Locate the deleted message
Once you have accessed the “Recover Deleted Items” folder in Outlook, you can start locating the specific message or messages that you want to recover. Here are a few methods to help you find and select the deleted message:
1. Scroll through the list: If you have a general idea of when the message was deleted, you can manually scroll through the list of deleted items in the “Recover Deleted Items” folder. Look for the email based on its subject, sender, or other identifying information.
2. Use the search bar: If you remember specific keywords or details about the deleted message, you can utilize the search bar at the top of the “Recover Deleted Items” folder. Enter relevant information such as the sender’s name, subject, or specific keywords to narrow down the search results.
3. Sort and filter: Outlook provides sorting and filtering options to help you organize and locate your deleted emails more efficiently. You can sort the messages by date, sender, subject, or other criteria by clicking on the corresponding column header. Filters can be applied to display messages from a specific time period or with specific characteristics.
4. Preview pane: To quickly preview the deleted messages without restoring them, you can enable the preview pane in Outlook. This allows you to view the content of the email without opening it, making it easier to identify the desired message.
Remember, the more specific details you can recall about the deleted message, the easier it will be to locate it in the “Recover Deleted Items” folder. Using a combination of scrolling, searching, sorting, and filtering, you can quickly find the email you need among the deleted items.
If you are having trouble locating a deleted message, it’s possible that it may have been permanently removed or cleared from the “Recover Deleted Items” folder if it has exceeded the retention period or if you have manually cleared the folder. In such cases, consider trying alternative methods such as searching other folders or retrieving from a backup.
By effectively locating the deleted message, you can retrieve it without any hassle and ensure that you have access to the critical information you need. Take the time to use the available tools and techniques in Outlook to make the search process more efficient.
Restore the message to your inbox
Once you have located the deleted message in the “Recover Deleted Items” folder, the next step is to restore it back to your inbox or another desired folder. Outlook provides a straightforward process to help you retrieve your deleted emails. Follow these steps to restore the message:
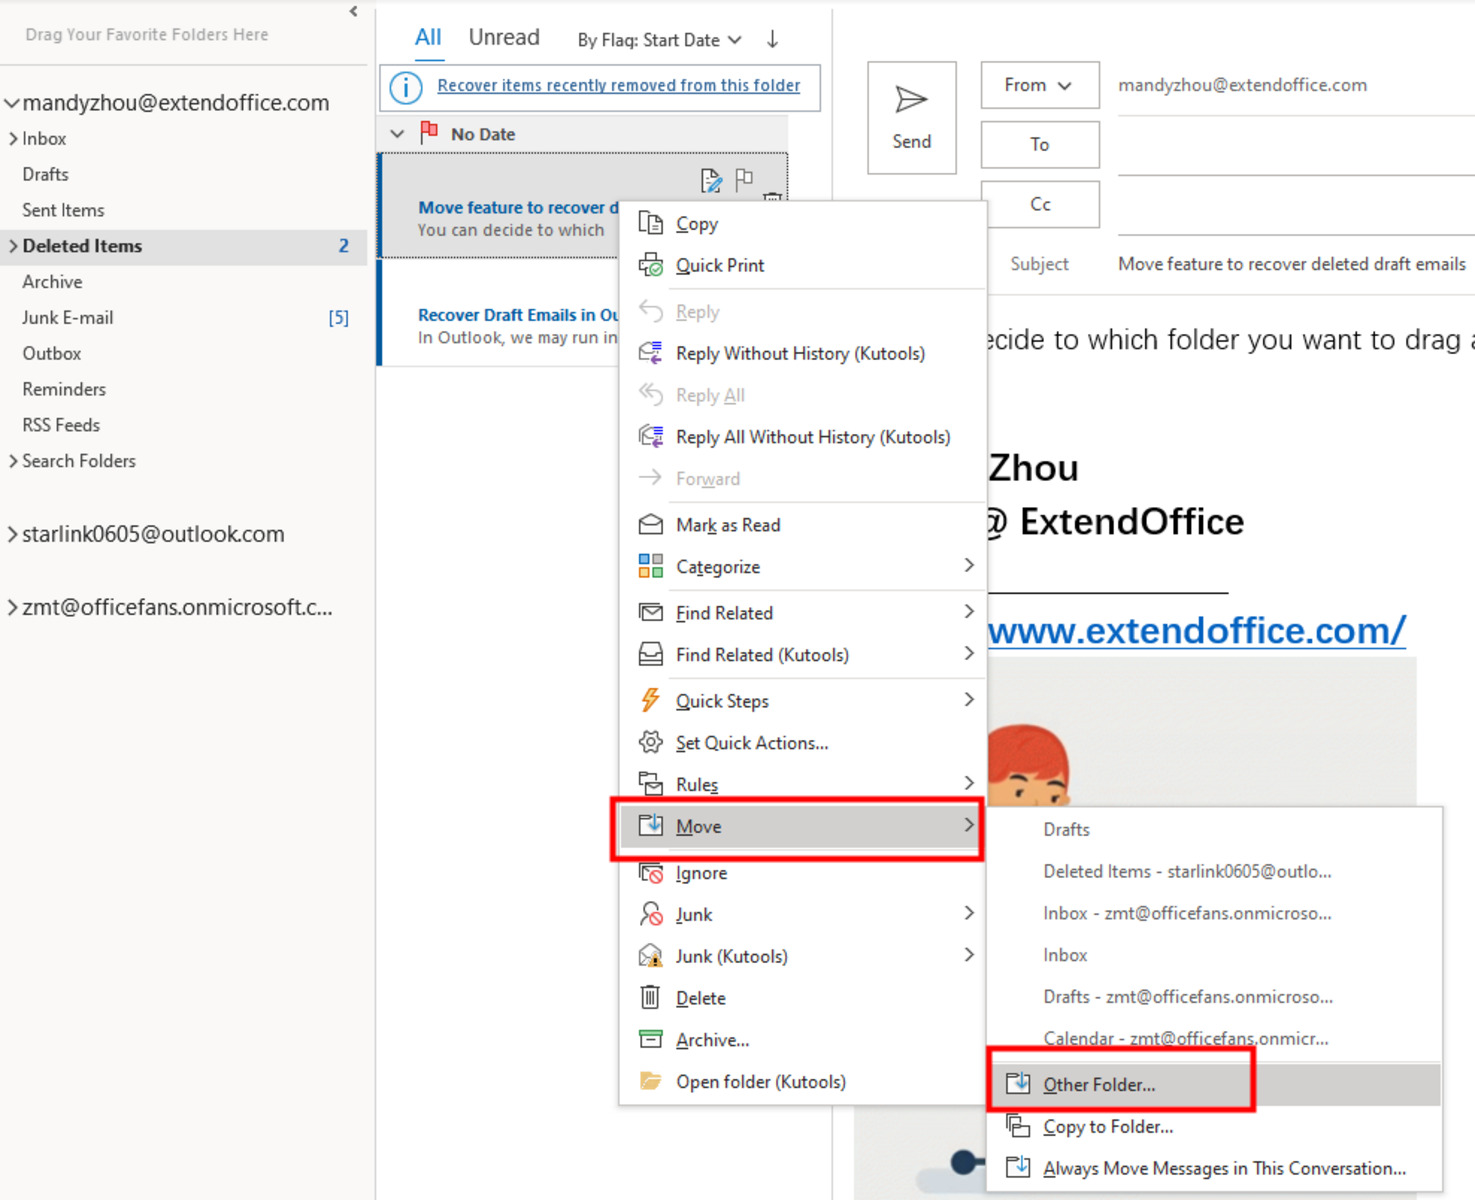
- Highlight or select the message you want to restore in the “Recover Deleted Items” folder.
- Right-click on the selected message and choose the option to “Move” or “Move to Folder”.
- In the dialog box that appears, select the destination folder where you want to move the message. This can be your inbox, a specific folder, or even a newly created folder.
- Click on “OK” or press Enter to complete the restoration process.
Outlook will now move the selected message from the “Recover Deleted Items” folder to the designated location. The message will no longer be considered deleted and will appear in the chosen folder, making it easily accessible within your mailbox.
It’s important to note that if you accidentally restore the message to the wrong location, you can still move it to the correct folder. Simply navigate to the incorrect folder, select the message, and then use the “Move” or “Move to Folder” option again to choose the desired destination.
Additionally, Outlook provides shortcuts to quickly move the deleted message back to your inbox. When you have the message selected in the “Recover Deleted Items” folder, you can use the keyboard shortcut Ctrl+Shift+V to move it to the default folder, which is typically your inbox. This can save you time when restoring multiple messages.
By following these steps, you can easily restore your deleted message to the desired location, allowing you to access it just like any other email in your inbox or folder structure. This ensures that you don’t lose valuable information or miss important correspondence due to accidental deletion.
Use the search function to find deleted messages
If you’re unable to locate the deleted message in the “Recover Deleted Items” folder or prefer a more efficient way to find specific deleted messages in Outlook, you can make use of the search function. Outlook’s search feature allows you to search for keywords, sender names, subjects, and other criteria to quickly find the deleted message you’re looking for. Here’s how to use the search function to find deleted messages:
- Click on the search bar located at the top of the Outlook window.
- Type in the keyword, sender name, subject, or any other relevant information related to the deleted message you want to find.
- As you type, Outlook will start displaying search results based on your input. If you see the desired message in the search results, click on it to open it.
- If you have a large number of search results, you can use the search tools provided by Outlook to narrow down your search. These tools allow you to filter the results based on criteria such as date, folder, or sender.
Outlook’s search feature is quite powerful and can help you quickly locate deleted messages, especially if you remember specific details about them. Whether it’s an important keyword, the sender’s name, or part of the subject, using the search function can save you time and effort compared to scrolling through folders manually.
It’s worth noting that the efficacy of the search function depends on the settings and indexing in your Outlook application. If you’re having trouble finding a deleted message, it could be due to indexing issues or a large mailbox size, which can affect the search performance. In such cases, you may need to rebuild the index or optimize your mailbox to ensure accurate search results.
By utilizing the search function in Outlook, you can easily find specific deleted messages without the need to browse through multiple folders. It streamlines the process and allows you to retrieve the information you need promptly and efficiently, saving you time and frustration.
Configure settings to prevent accidental deletion
Accidentally deleting important emails in Outlook can be avoided by configuring settings that provide an additional layer of protection against accidental deletions. By taking preventive measures, you can minimize the risk of losing crucial information. Here are some settings you can configure to prevent accidental deletion in Outlook:
1. Enable confirmation prompts: Outlook allows you to enable confirmation prompts that ask for your confirmation before permanently deleting an item. This extra step can help prevent accidental deletions by giving you a chance to double-check before the deletion is finalized. To enable this feature, navigate to the Outlook options, select the “Mail” category, and check the box next to “Prompt for confirmation before permanently deleting items”.
2. Use the “Undo” feature: Outlook has an “Undo” feature that allows you to revert actions immediately after performing them. For example, if you accidentally delete an email, you can quickly press Ctrl + Z or click on the “Undo” button to restore the message back to its original location.
3. Set up archive folders: Creating archive folders can provide a designated location for storing important emails that you want to keep but don’t need frequent access to. By moving these emails to archive folders, you can protect them from accidental deletion while still keeping your inbox organized. To set up archive folders, right-click on your mailbox, select “New Folder”, and specify the desired name for the archive folder.
4. Customize ribbon or toolbar: You can add the “Recover Deleted Items” option to the ribbon or toolbar in Outlook, making it easily accessible whenever you need to recover deleted items. Customizing the interface allows you to have a visible reminder of this important feature and can help prevent accidental deletions by promoting awareness of the recovery option.
5. Regularly back up your Outlook data: Creating regular backups of your Outlook data can protect against permanent loss in case of accidental deletion or other unforeseen circumstances. You can use Outlook’s built-in export feature or third-party backup tools to create backups of your emails, contacts, and other important data.
It’s important to note that while these settings and measures can help to prevent accidental deletions, human error can still occur. Therefore, it is advisable to exercise caution and double-check before performing any deletion actions in Outlook.
By configuring these settings to prevent accidental deletion and adopting precautionary measures, you can safeguard your important emails and minimize the risk of losing critical information in Outlook.
Recover messages from the Trash or Deleted folder
When you delete an email in Outlook, it is typically moved to the Trash or Deleted folder. This folder acts as a temporary holding place for deleted items, allowing you to easily restore them if needed. If you have accidentally deleted an email, follow these steps to recover it from the Trash or Deleted folder:
- Go to the “Trash” or “Deleted Items” folder located in the left-hand panel of Outlook.
- Scroll through the list of deleted items to find the email you want to recover.
- Once you have located the email, right-click on it and select the “Move” or “Move to Folder” option.
- In the pop-up window, choose the destination folder where you want to move the email. This can be your inbox or any other folder of your choice.
- Click on “OK” to complete the recovery process.
By following these steps, the deleted email will be restored to the selected folder, making it accessible again within your mailbox.
It’s worth noting that the name of the folder may vary depending on your email provider or configuration. Some email services use the term “Trash”, while others use “Deleted Items” or a similar name. If you’re unsure about the location of the deleted email folder, refer to the email provider’s support documentation or contact their support team for assistance.
Additionally, be aware that the retention period of deleted items in the Trash or Deleted folder may vary. Some email providers automatically clear out this folder after a certain period of time, permanently deleting the items. Therefore, it’s crucial to promptly recover any accidentally deleted emails to ensure they’re not permanently lost.
By utilizing the Trash or Deleted folder, you have a convenient and simple method to recover accidentally deleted emails in Outlook. Take advantage of this feature to avoid the loss of important information or valuable correspondence.
Recover messages from the Junk or Spam folder
Emails that are suspected to be spam or junk are often automatically filtered into the Junk or Spam folder in Outlook. However, sometimes legitimate emails can be mistakenly flagged as spam and end up in this folder. If you find that an important email has been placed in the Junk or Spam folder, here’s how you can recover it:
- In Outlook, locate the Junk or Spam folder on the left-hand side panel.
- Open the Junk or Spam folder to view its contents.
- Scroll through the list of emails to find the message you want to recover.
- Once you have located the email, right-click on it and select the option to “Move” or “Move to Folder”.
- In the dialog box that appears, choose the destination folder where you want to move the email. This can be your inbox or another appropriate folder.
- Click on “OK” to complete the recovery process.
By following these steps, the email will be moved from the Junk or Spam folder to the selected destination folder, making it easily accessible within your mailbox.
It’s important to remember that the Junk or Spam folder serves as a protective mechanism to filter out potentially harmful or unwanted emails. However, there may be instances when legitimate emails are incorrectly flagged as spam. To prevent this from happening in the future, you can mark the email as “Not Junk” or add the sender to your safe senders list.
When retrieving emails from the Junk or Spam folder, it’s essential to exercise caution and verify the content and sender of the message before opening any attachments or clicking on any links. This helps to protect against potential phishing attempts or malicious content.
By recovering emails from the Junk or Spam folder in Outlook, you can ensure that no important correspondence or valuable information is overlooked or inadvertently marked as spam. Take advantage of this feature to keep your inbox organized while minimizing the risk of missing out on essential messages.
Recover messages from the Archive folder
Archiving emails is a common practice to declutter your inbox and store older messages for future reference. In Outlook, when you archive emails, they are typically moved to the Archive folder. However, if you find that you need to retrieve a specific email from the Archive folder, you can easily recover it using the following steps:
- In Outlook, locate the Archive folder either in the left-hand panel or within your mailbox folder structure.
- Open the Archive folder to access its contents.
- Scroll through the list of archived emails to find the message you want to recover.
- Once you have located the email, right-click on it and select the option to “Move” or “Move to Folder”.
- In the dialog box that appears, choose the appropriate destination folder where you want to move the email. This can be your inbox or another relevant folder.
- Click on “OK” to complete the recovery process.
By following these steps, the email will be moved from the Archive folder to the selected folder, making it easily accessible within your mailbox.
It’s worth noting that the Archive folder provides a convenient way to store and organize older emails, allowing you to keep your inbox clutter-free. However, the location and name of the Archive folder may vary depending on your specific Outlook configuration. If you’re unsure about the location of your Archive folder, refer to the Outlook documentation or contact your IT support team for guidance.
When recovering emails from the Archive folder, it’s important to have a clear understanding of your archiving system and folder hierarchy. This will help you easily locate and retrieve specific emails as needed. It’s also recommended to regularly review the emails in your Archive folder to ensure that you’re not inadvertently overlooking any important messages.
By effectively recovering messages from the Archive folder in Outlook, you can access important emails that you may need for reference or other purposes. Take advantage of this feature to maintain an organized email system while preserving access to valuable information.
Restore messages from a backup file
Having a backup of your Outlook data is essential to ensure you can recover your messages in the event of data loss or accidental deletion. If you have a backup file of your emails, you can easily restore them back into Outlook. Here’s how to restore messages from a backup file:
- Open Outlook and go to the “File” tab.
- Select “Open & Export” and then choose “Import/Export”.
- In the Import and Export Wizard, select the option to “Import from another program or file” and click on “Next”.
- Choose the file type that matches your backup file format. For example, if you have a PST (Personal Storage Table) backup file, select “Outlook Data File (.pst)”.
- Click on “Browse” to locate the backup file on your computer or network drive.
- Once you’ve selected the backup file, choose how you want the imported items to be handled. You can either import them into your existing mailbox or create a new folder for the restored messages.
- Click on “Finish” to start the import process.
Outlook will then begin importing the messages from the backup file into the designated location. Once the import is complete, you should be able to access your restored messages within Outlook.
It’s important to ensure that you have a recent and reliable backup file before restoring your messages. If you don’t have a backup, it’s a good practice to regularly create backups of your Outlook data to protect against data loss.
Additionally, depending on the size of your backup file and the number of messages being restored, the process may take some time to complete. It’s recommended to be patient and avoid interrupting the import process to ensure a successful restoration.
By restoring messages from a backup file, you can recover your emails and other Outlook data, providing an additional layer of protection against accidental deletion or data loss. Regularly creating and maintaining backups is an important practice to ensure the safety and availability of your critical information.
Use third-party recovery software or services
If you are unable to recover deleted messages using built-in Outlook features or if your backup options are not sufficient, you may consider using third-party recovery software or services to retrieve your emails. These tools are designed specifically for email recovery and offer advanced features that can help you recover deleted messages. Here’s how you can utilize third-party recovery software or services:
1. Research available options: Conduct thorough research to identify reputable third-party recovery software or services. Read reviews, compare features, and choose a tool that suits your specific needs and budget.
2. Install and run the software: Download and install the selected recovery software on your computer. Follow the instructions provided to run the software on your system.
3. Connect to your Outlook account: Some recovery software may require you to connect to your Outlook account to scan and retrieve deleted messages. Provide the necessary credentials and permissions to allow the software to access your email data.
4. Scan for deleted messages: Once connected, initiate a scan to search for deleted messages in your Outlook account. The software will analyze your mailbox and identify any recoverable emails based on advanced algorithms and data recovery techniques.
5. Preview and select messages: After the scan is complete, you will typically be presented with a preview of the recovered messages. Take the time to review and verify the content before selecting the emails you want to restore. Some software may offer filtering and sorting options to help you identify specific messages.
6. Recover the selected messages: Once you have chosen the messages you wish to retrieve, follow the software’s instructions to initiate the recovery process. The software will restore the selected emails to your Outlook account, making them accessible in your mailbox.
It’s important to keep in mind that the effectiveness of third-party recovery software or services can vary, and some options may require a financial investment. Additionally, it’s crucial to choose reputable and trusted software to protect your data and privacy.
If you are unsure about using third-party software, consider consulting with IT professionals who are experienced in data recovery or contacting specialized recovery services that can assist you in recovering your deleted emails.
By exploring third-party recovery software or services, you can have additional means to recover your deleted messages in scenarios where built-in Outlook features or backups are insufficient. Ensure that you choose reliable and trusted tools to maximize the chances of successful email recovery.