
Setting up Outlook for Related Messages
Outlook is a powerful email management tool that can help you effectively organize and find related messages. By configuring a few settings and utilizing the various features that Outlook offers, you can streamline your email workflow and ensure that you never miss important conversations or lose track of related messages.
Here are some steps to help you set up Outlook for finding related messages:
1. Enable Conversation View: Outlook’s Conversation View groups all emails related to a particular conversation into a single thread. This allows you to view and access all messages in a conversation without searching through your inbox. To enable Conversation View, go to the View tab, click on the Conversations group, and select “Show Conversations.”
2. Sort Messages by Conversation: In addition to enabling Conversation View, you can also sort your messages by conversation. This consolidates all related messages in chronological order, making it easier to follow the flow of the conversation. To sort messages by conversation, click on the View tab, go to the Arrangement group, and select “Arrange By” > “Conversation.”
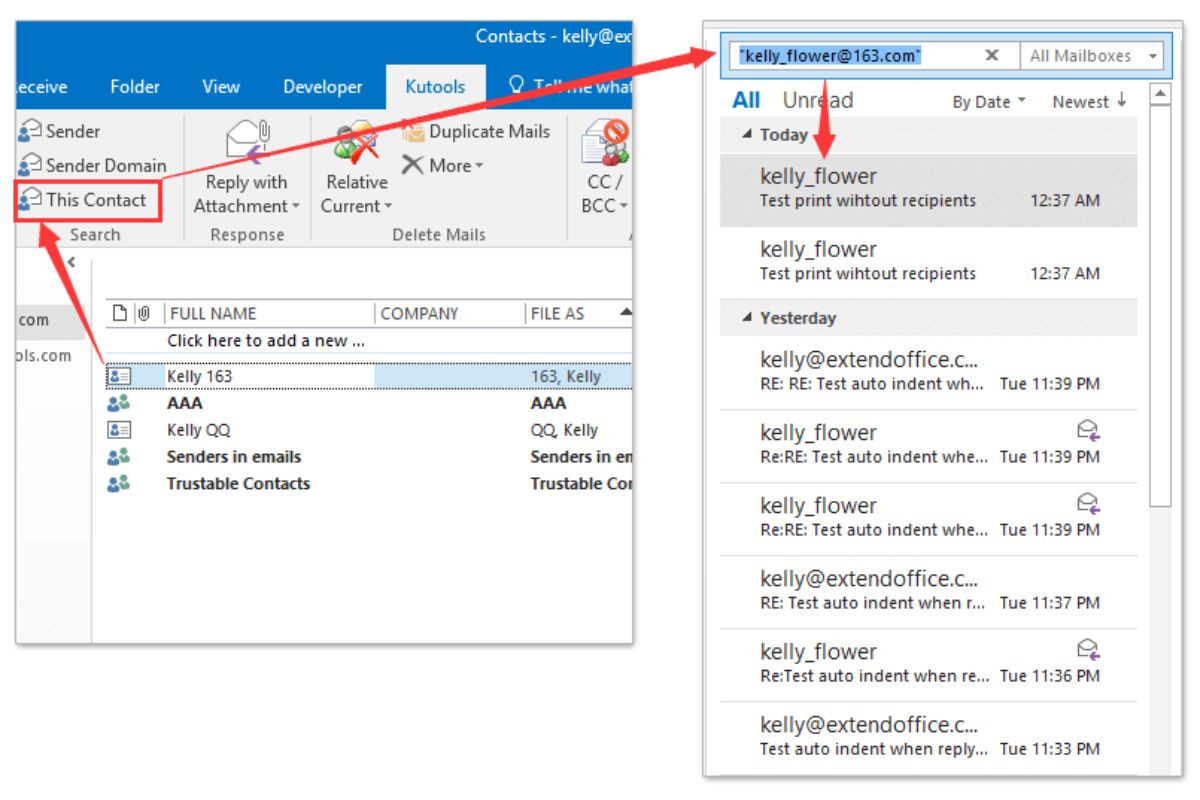
3. Search for Related Messages: Outlook’s search function is a powerful tool for finding specific emails or conversations. To search for related messages, simply enter relevant keywords, sender’s name, or other criteria into the search bar located at the top of the Outlook window. Outlook will display all matching messages, allowing you to quickly find the information you need.
4. Utilize Tags and Folders: Outlook allows you to assign tags and create folders to categorize your emails. By creating specific tags or folders for related messages, you can easily locate and access them whenever needed. For example, you can create a folder for project-related emails or assign a specific tag for urgent messages.
5. Create Rules for Related Messages: Outlook’s rules feature allows you to automate the organization of your emails. You can set up rules to automatically move specific emails to designated folders or apply tags based on criteria such as sender, subject, or keywords. This saves you time and ensures that related messages are properly organized.
6. Mark Messages as Important or Follow Up: Outlook provides options to mark messages as important or flag them for follow-up. By marking important messages, you can prioritize them and easily locate them later. Flagging messages for follow-up helps you keep track of action items and ensures that important tasks are not forgotten.
7. Configure Outlook for Threaded Conversations: Outlook allows you to display emails in a threaded conversation format, where responses and related messages are grouped together. To enable threaded conversations, go to the View tab, click on the Conversations group, and select “Show Messages from Other Folders.”
8. Customize View Settings: Outlook offers various view settings that allow you to personalize the way emails are displayed. You can choose to show or hide certain columns, adjust the preview pane, or change the reading order. Experiment with different view settings to find the configuration that works best for you.
9. Use Third-Party Add-ons for Related Messages: In addition to native Outlook features, there are also third-party add-ons available that can enhance Outlook’s functionality for finding and managing related messages. These add-ons offer advanced search capabilities, advanced filtering options, and more. Explore the available add-ons to see if any of them align with your needs.
By implementing these tips and utilizing the features Outlook provides, you can effectively set up Outlook for finding related messages. Streamlining your email management process will save you time, improve your productivity, and ensure that important conversations are never overlooked.
Using the Conversation View
Outlook’s Conversation View is a powerful feature that allows you to group related messages into a single thread. This makes it easier to follow the flow of a conversation and locate specific emails within that conversation. By utilizing the Conversation View, you can streamline your email management process and reduce clutter in your inbox.
Here are some ways you can effectively use the Conversation View in Outlook:
1. Improved Organization: With the Conversation View enabled, Outlook automatically groups all emails related to a particular conversation together. This means that instead of having multiple emails scattered throughout your inbox, you will see a single entry for each conversation. This makes it easier to locate and access all the messages related to a particular topic.
2. Chronological Order: The Conversation View also arranges the messages in chronological order, with the most recent conversation appearing at the top. This allows you to easily follow the progression of a conversation without having to search through your inbox for each individual message. It provides a more streamlined and logical flow of information.
3. Quick Email Navigation: When you open a conversation in the Conversation View, you will see a summary or snippet of each message. This allows you to quickly skim through the content and determine which emails are most relevant to you. You can then click on a specific email to read it in full or expand the conversation to see all the related messages.
4. Collapse and Expand Conversations: Outlook gives you the option to collapse or expand conversations. If you have a lengthy conversation with multiple messages, you can collapse it to free up space in your inbox. This allows you to focus on other conversations without being overwhelmed by a long thread. You can also expand collapsed conversations when you need to review the entire conversation history.
5. Efficient Message Management: With the Conversation View, you can perform actions on entire conversations rather than individual emails. For example, you can delete, archive, or move a whole conversation and all its related messages with just a few clicks. This helps you save time and ensures that you keep your inbox organized and clutter-free.
6. Conversation Cleanup: Outlook provides a Conversation Cleanup feature that allows you to remove redundant or unnecessary messages from a conversation. This is particularly useful for long email threads where multiple people have replied with similar content. The Conversation Cleanup feature helps declutter conversations and ensures that you are only seeing the most relevant messages.
7. More Focus, Less Distraction: The Conversation View in Outlook helps you stay focused on the topic at hand by reducing visual clutter in your inbox. Instead of seeing individual emails scattered throughout your inbox, you can see the entire conversation as a single entry. This reduces the chances of missing or overlooking important emails and helps you stay organized.
Sorting Messages by Conversation
Sorting messages by conversation is a valuable feature offered by Outlook that allows you to organize and view related emails in a coherent manner. By enabling this feature, you can easily locate conversations and follow their progression without the need to search through your entire inbox. Sorting messages by conversation enhances your email management experience and improves productivity.
Here are some reasons why sorting messages by conversation is beneficial:
1. Logical Grouping: When you sort messages by conversation, Outlook automatically groups all related emails into a single thread. This means that instead of seeing individual emails scattered throughout your inbox, you will have a consolidated view of each conversation. This logical grouping creates a cohesive and organized structure for managing your emails.
2. Easy Access to Conversation History: By sorting messages by conversation, you can access the entire conversation history with just a few clicks. You’ll no longer need to search for each individual email to get the full context. This streamlines the process of reviewing past conversations and allows you to quickly refer back to specific messages or responses.
3. Clear Conversation Flow: Sorting messages by conversation ensures that emails are displayed in a chronological order, making it easier to follow the flow of the conversation. You can easily see the progression of the discussion and understand the context of each message. This clear conversation flow eliminates confusion and saves time by providing a comprehensive view of the conversation in a single thread.
4. Efficient Message Organization: When you sort messages by conversation, you can manage entire conversations instead of individual emails. This allows you to perform actions such as archiving, deleting, or moving multiple messages at once. This efficient message organization helps to keep your inbox clutter-free and ensures that related emails are kept together.
5. Reduced Inbox Clutter: Sorting messages by conversation reduces inbox clutter by consolidating related emails into a single entry. Instead of having multiple messages scattered throughout your inbox, you can focus on the key points of each conversation. By decluttering your inbox, you can prioritize important conversations and respond to emails more effectively.
6. Easier Collaboration: When multiple people are involved in a conversation, sorting messages by conversation simplifies collaboration. Each participant can easily view the entire conversation history, see who said what, and understand the context. This promotes efficient collaboration, prevents miscommunication, and ensures that everyone is on the same page.
Enabling the option to sort messages by conversation is a straightforward process in Outlook. Simply go to the View tab, click on the Arrangement group, and select “Arrange By” > “Conversation.” You can also customize the conversation settings by choosing the level of indentations and showing or hiding specific emails within the conversation.
Sorting messages by conversation is a valuable feature that enhances your email management by providing a clear and organized view of related emails. By adopting this approach, you can streamline your workflow, improve productivity, and reduce the time spent searching for specific conversations in your inbox.
Searching for Related Messages
Outlook’s powerful search functionality allows you to easily find specific emails or conversations within your inbox. Searching for related messages is a quick and convenient way to locate specific information or track down past discussions. By utilizing the search feature effectively, you can save time and improve your overall email management experience.
Here are some tips for searching for related messages in Outlook:
1. Utilize Advanced Search Operators: Outlook supports various search operators that can help you refine your search and narrow down the results. For example, you can use quotation marks to search for an exact phrase, or use the OR operator to search for multiple keywords. Familiarize yourself with these operators to make your searches more precise and targeted.
2. Use Filters and Search Fields: Outlook offers filters and search fields that allow you to narrow down your search based on specific criteria. You can search by sender, subject, date, folder, or even specific words within the email body. By using these filters and search fields, you can quickly find the exact messages you are looking for without scrolling through an overwhelming number of results.
3. Save Search Queries: If you often search for the same type of messages, consider saving the search query as a search folder. This way, you can easily access the search results with just a few clicks, without having to enter the search criteria each time. This is particularly useful for ongoing projects or frequently referenced information.
4. Refine Your Search: If your initial search doesn’t yield the desired results, don’t give up. Outlook allows you to refine your search by adding additional criteria or adjusting the search terms. Experiment with different combinations of keywords and filters to find the related messages you are looking for.
5. Search in Specific Folders: If you know that the related messages you are looking for are located in a specific folder, you can limit your search to that folder only. This can help narrow down the search scope and provide more accurate results. To search within a specific folder, select the folder in the search bar before entering your search query.
6. Search All Outlook Items: If you are unsure of the location of the related messages or if you want to search across all folders and mailboxes, you can perform a search in “All Outlook Items.” This ensures that no message is overlooked and allows you to find related messages regardless of their location.
7. Reframe Your Search: If you are having trouble finding the desired messages using specific keywords, try reframing your search by using different terms or synonyms. Sometimes, using alternative keywords can yield better results and help you find the related messages you are looking for.
8. Search in Deleted Items: If you suspect that the related messages may have been accidentally deleted, you can also perform a search within the “Deleted Items” folder. This can help you retrieve deleted messages that are related to your search query.
Outlook’s search function is a powerful tool that can significantly improve your productivity by quickly locating related messages and important information. By mastering the search capabilities of Outlook and utilizing the tips above, you can efficiently search for and retrieve the specific emails or conversations you need, saving you time and ensuring you stay organized.
Utilizing Tags and Folders
Tags and folders are invaluable tools in Outlook that can help you efficiently organize and manage your emails. By utilizing tags and folders effectively, you can easily categorize and locate related messages, ensuring that you stay organized and save time when searching for specific emails or conversations.
Here are some ways you can make the most of tags and folders in Outlook:
1. Categorize Emails with Tags: Outlook allows you to assign tags or labels to your emails, providing an additional layer of organization. You can create custom tags based on projects, priority levels, or any other criteria that are relevant to your email management. Applying tags to related messages helps you quickly identify and group them together.
2. Create Folders for Specific Topics: Folders are a fundamental feature in Outlook that allow you to create a hierarchical structure for organizing your emails. Create folders for different projects, clients, or other categories that are relevant to your work. By assigning related messages to specific folders, you can easily locate them, reduce clutter in your inbox, and maintain a clear overview of your email correspondence.
3. Subfolders for Subcategories: If you have a large number of emails within a specific category, consider creating subfolders to further refine your organization. For example, within a project folder, you can create subfolders for different phases or workstreams. This hierarchical structure makes it easier to navigate and locate specific messages within broader categories.
4. Use Rules for Automatic Organization: Outlook’s rules feature allows you to automate the process of organizing your emails. You can create rules to automatically move incoming messages to specific folders or apply tags based on criteria such as sender, subject, or keywords. Utilizing rules helps you streamline your workflow and ensures that related messages are automatically organized upon arrival.
5. Color Coding for Visual Differentiation: Outlook offers the option to assign colors to both tags and folders, providing a visual differentiation and making it easier to identify specific categories or priorities. Color-coding can enhance your organization and help you quickly locate related messages based on their visual representation.
6. Quick Access to Tagged Messages: Outlook allows you to create search folders based on specific tags, making it easier to access all messages assigned to a particular tag. This provides a quick and convenient way to view all related messages without having to manually search for them.
7. Utilize the Favorites Section: Outlook’s Favorites section allows you to add frequently accessed folders for quick access. You can add important project folders, inbox folders, or any other folders that are essential to your workflow. This eliminates the need to navigate through multiple layers of folders, saving you time and effort.
8. Regular Folder Maintenance: To ensure that your email organization remains effective, it is important to regularly review and clean up your folders. Remove or archive any outdated or unnecessary emails to keep your folders streamlined and prevent clutter from accumulating.
By utilizing tags and folders in Outlook, you can create a structured and efficient system for organizing your emails. This saves you time when searching for specific messages and helps you maintain a clear overview of your email correspondence. Experiment with different tagging and foldering strategies to find the approach that works best for your workflow and ensures your emails are effectively organized.
Creating Rules for Related Messages
Outlook’s rules feature is a powerful tool for automating the organization and management of your emails. By creating rules for related messages, you can streamline your email workflow, save time, and ensure that important conversations or specific types of emails are properly categorized and easily accessible. With a few simple steps, you can set up rules in Outlook to automatically handle related messages.
Here’s how you can create rules for related messages in Outlook:
1. Open the Rules and Alerts Window: To create rules in Outlook, start by opening the “Rules and Alerts” window. You can access this window by clicking on the “File” tab, selecting “Manage Rules & Alerts,” and then clicking on “New Rule.”
2. Choose the Condition: In the “Rules Wizard” window, you need to specify the conditions that will trigger the rule. Depending on your requirements, you can select conditions such as specific words in the subject, sender’s address, or recipients. You can also choose from other conditions like message importance or whether the email is part of a specific conversation.
3. Define the Action: After selecting the condition, you need to define the action that the rule will perform when the condition is met. You can choose actions like moving the message to a folder, assigning a category or tag, flagging the message, forwarding it to another recipient, or even running a custom script.
4. Set Additional Conditions (Optional): Outlook also allows you to set additional conditions for your rules. These conditions can help you further refine the criteria for applying the rule. For example, you can add conditions based on specific time frames, message sizes, or if the email has attachments.
5. Name and Apply the Rule: Once you have defined the conditions and actions, you can name the rule and choose whether to apply it to messages currently in your inbox. It’s a good practice to give your rule a descriptive name that reflects its purpose. If you want the rule to be immediately active, make sure to check the box that applies it to existing messages.
6. Review and Modify Rules: After creating the rule, it’s important to regularly review and modify your rules as needed. As your email management needs change, you may need to adjust the conditions, actions, or priorities of your existing rules. Regularly checking and updating your rules ensures they remain effective and align with your evolving requirements.
By creating rules for related messages, you can automate the process of organizing your inbox, improving efficiency, and reducing the time spent manually categorizing emails. Rules can be especially useful for managing high volume or recurring email types, such as newsletter subscriptions, notifications, or specific project-related conversations.
It’s important to note that rules are specific to each Outlook profile and run on the client side. This means that rules will only be applied when Outlook is open and running on the computer where the rules are configured. If you use multiple devices or access your email through web-based interfaces, ensure that the rules are properly configured on each device.
Take advantage of Outlook’s rules feature to create automated workflows and ensure that related messages are organized and easily accessible within your inbox. With a little upfront configuration, you can save valuable time and improve your overall email management experience.
Marking Messages as Important or Follow Up
Outlook provides the option to mark messages as important or flag them for follow-up, allowing you to prioritize and keep track of important emails. By utilizing these features effectively, you can ensure that critical messages are not overlooked and important tasks are promptly addressed. Marking messages as important or setting follow-up flags helps you stay organized and stay on top of your email correspondence.
Here are some ways you can effectively mark messages as important or flag them for follow-up in Outlook:
1. Importance Markers: Outlook offers the option to mark messages with different levels of importance, such as high importance, low importance, or no importance. Use these importance markers to indicate the priority level of a message. For example, mark urgent emails as high importance to draw your attention to them and prevent them from getting buried in your inbox.
2. Follow-Up Flags: Outlook allows you to flag messages for follow-up, helping you keep track of important tasks or emails that require your attention. You can set a specific follow-up date or use customized follow-up options like “Today,” “Tomorrow,” or “This Week.” Flags provide a visual reminder that certain emails need action, ensuring they don’t get forgotten or missed amidst the volume of your inbox.
3. Customizing Follow-Up Categories: In addition to flags, Outlook also allows you to assign customized follow-up categories to messages. You can create your own categories based on your workflow or project requirements. For example, you can have categories like “Reply Needed,” “Waiting for Response,” or “Action Required.” Assigning these categories to related messages helps you quickly identify emails that require your attention or response.
4. Sorting and Grouping by Importance or Flags: Outlook’s sorting and grouping options allow you to organize your inbox based on importance markers or follow-up flags. You can sort your emails to display the most important messages at the top or group them by follow-up status. This visual organization helps you review and prioritize your emails more efficiently.
5. Reminders and Notifications: Outlook can be configured to provide reminders or notifications for important or flagged emails. Set up reminders to prompt you to take action on emails within a specified timeframe. You can also choose to receive notifications on your desktop or mobile devices to stay updated on time-sensitive emails. These reminders and notifications help ensure that important tasks are not overlooked.
6. Viewing Important or Flagged Messages: Outlook offers dedicated views or search folders to access important or flagged messages. Utilize these views or folders to quickly see a consolidated list of emails marked as important or flagged for follow-up. This saves you time and allows you to focus specifically on critical emails.
7. Regular Inbox Maintenance: As part of your email management routine, regularly review and remove the importance markers or follow-up flags from emails that are no longer relevant or actionable. This helps maintain the accuracy and relevance of your email prioritization system.
By marking messages as important or flagging them for follow-up, you can effectively prioritize your email workflow and ensure that important messages and tasks are not overlooked. These features in Outlook help you stay organized, improve productivity, and ensure that time-sensitive emails receive the attention they deserve.
Configuring Outlook for Threaded Conversations
Outlook offers the option to configure threaded conversations, which groups related messages together in a threaded format. With threaded conversations enabled, you can easily follow the flow of a conversation and locate specific messages within that conversation. Configuring Outlook for threaded conversations can enhance your email management experience, improve communication clarity, and streamline your inbox.
Here are the steps to configure Outlook for threaded conversations:
1. Enable the Conversation View: The Conversation View is the foundation for threaded conversations in Outlook. To enable the Conversation View, go to the “View” tab, click on the “Show as Conversations” option in the “Arrangement” group. This feature groups all emails related to a conversation into a single thread, providing a comprehensive and organized view.
2. Choose Conversation Settings: After enabling the Conversation View, you can customize the conversation settings to align with your preferences. Click on the “View” tab, then select “Arrange by” > “Conversation Settings.” From here, you can choose options like displaying messages from other folders, showing senders’ names, or selecting the level of indentation for messages within a conversation.
3. Expand or Collapse Conversations: Outlook allows you to expand or collapse individual conversations in the Conversation View. When a conversation is expanded, you can see all the messages within that conversation. On the other hand, collapsing a conversation minimizes it, showing only a summary of the conversation. Expanding or collapsing conversations can help you manage and focus on specific discussions within your inbox.
4. Review and Clean Up Conversations: As you start using threaded conversations, you may notice that some discussions have redundant or unnecessary messages. Outlook provides the Conversation Cleanup feature to remove redundant content, allowing for a more focused and streamlined view of the conversation. Simply right-click on a conversation, select “Clean Up Conversation,” and choose the desired option to remove redundant messages.
5. Multiple Conversations in One Email: In some situations, an email may contain multiple independent conversations. Outlook provides the option to split these conversations into separate threads, making it easier to follow and manage each discussion individually. Right-click on the email, select “Split Conversation,” and choose the appropriate option to split the conversations.
6. Establishing Clarity and Context: Threaded conversations in Outlook offer a clear and concise way to follow and respond to discussions. By grouping related messages together, threaded conversations provide better context, reduce clutter, and facilitate clearer communication between participants. This can improve collaboration and understanding within a team or project setting.
Configuring Outlook for threaded conversations enhances your ability to manage and navigate your inbox. By enabling this feature and customizing the settings to align with your preferences, you can easily track conversations, locate specific messages, and declutter your email workflow. Threaded conversations in Outlook provide a more efficient and organized approach to managing your email communications.
Customizing View Settings
Outlook allows you to customize your view settings, giving you the flexibility to personalize your email management experience. By customizing the view settings, you can optimize the layout, appearance, and functionality of Outlook to suit your preferences and enhance your productivity. Customizing view settings in Outlook provides a more tailored and efficient email workflow.
Here are some ways you can customize view settings in Outlook:
1. Choose the Right Layout: Outlook offers different layout options to suit your personal preference and workflow. You can select a compact view to maximize the screen space, or a relaxed view to have a more spacious layout. Experiment with different layout settings to find the one that suits your needs best.
2. Customize Columns: Outlook allows you to customize the columns displayed in various view modes, such as the inbox or folders. You can choose to display or hide specific columns, rearrange their order, or add custom columns to show additional information, such as the importance marker, sender’s email address, or attachment size. Customizing columns helps you view the relevant details at a glance.
3. Adjust the Reading Pane: The reading pane is where you can preview the content of your emails without opening them. Outlook lets you customize the reading pane to suit your preferences. You can position it on the right or bottom of the window, adjust its size or hide it altogether if you prefer to open emails in a separate window. Customize the reading pane to maximize your reading comfort and efficiency.
4. Change the Message Preview: Outlook allows you to change the message preview settings to control the amount of content displayed in the message list. You can choose to show a certain number of lines or disable the preview altogether. Customizing the message preview helps you quickly scan and assess the content of your emails without needing to open each one.
5. Customize Fonts and Colors: Outlook provides options to customize the fonts, font sizes, and text colors for various elements, such as email headers, folders, or the reading pane. Customizing fonts and colors can help improve readability, visual appeal, and overall aesthetics while using Outlook. Find a combination that suits your preferences and makes reading and working with emails more enjoyable.
6. Adjust the Zoom Level: Outlook allows you to adjust the zoom level, which determines the size of the text and images displayed in the interface. You can increase the zoom level for better readability or decrease it to fit more content on the screen. Adjusting the zoom level according to your preference ensures that you have a comfortable view while working in Outlook.
7. Customize AutoPreview: AutoPreview is a feature that displays a brief summary of email content in the message list. In Outlook, you can customize the AutoPreview settings to show more lines of preview text or disable it completely if you prefer not to have a preview. Customizing AutoPreview allows you to quickly scan email content and make more informed decisions without opening each email.
8. Apply Conditional Formatting: Outlook’s conditional formatting feature allows you to apply specific formatting rules to emails based on various criteria, such as sender, subject, importance, or category. You can set up rules to highlight or color-code emails to visually differentiate important messages, specific categories, or emails that require immediate attention. Applying conditional formatting helps you prioritize and navigate your email inbox more effectively.
By customizing your view settings in Outlook, you can tailor the email management experience to fit your specific needs and preferences. Experiment with different options and configurations to find the layout, appearance, and functionality that optimize your productivity and make working with Outlook more enjoyable.
Using Third-Party Add-ons for Related Messages
In addition to the native features offered by Outlook, there are also third-party add-ons available that can enhance your ability to manage related messages. These add-ons provide additional functionalities and features that go beyond what is provided out of the box by Outlook. By leveraging third-party add-ons, you can further streamline your email workflow and improve efficiency when managing related messages.
Here are some ways you can benefit from using third-party add-ons for related messages:
1. Advanced Search Capabilities: Third-party add-ons often provide advanced search capabilities, allowing you to perform more complex and targeted searches for related messages. These search enhancements can include the ability to search based on specific criteria such as metadata, attachments, or even by specific email components. With advanced search capabilities, you can quickly find the exact messages you are looking for.
2. Advanced Filtering and Sorting Options: Third-party add-ons can offer additional filtering and sorting options beyond what is available in Outlook. These enhancements allow you to fine-tune the way you organize and sort related messages, making it easier to locate and prioritize specific emails based on various criteria such as sender, subject, date, or importance.
3. Conversation Grouping and Threading: While Outlook provides its own conversation grouping and threading functionality, third-party add-ons can offer more advanced options and customizations. These add-ons may allow you to customize and configure the way conversations are grouped and threaded, providing a more tailored experience based on your preferences and work requirements.
4. Integrations with External Tools and Services: Third-party add-ons often have integrations with other external tools and services, expanding the range of functionalities available for managing related messages. These integrations can include syncing with project management tools, CRM systems, or other communication platforms, allowing for a more seamless and efficient workflow across various platforms.
5. Email Analytics and Insights: Some third-party add-ons provide email analytics and insights, helping you gain a deeper understanding of your email usage and patterns. These analytics can provide valuable data on email response times, email volume, or email productivity metrics. With these insights, you can identify areas for improvement and optimize your email management strategies.
6. Automation and Workflow Enhancements: Third-party add-ons often offer automation and workflow enhancements that can further streamline your email management process. These enhancements can include features such as automatically categorizing or tagging incoming emails based on specific criteria, setting up automatic reminders or follow-up notifications, or even creating custom rules for more complex email handling.
7. Enhanced Security and Privacy Measures: Certain third-party add-ons provide additional security and privacy measures that go beyond the built-in security features of Outlook. These measures can include advanced encryption methods, data loss prevention, or other security protocols that help safeguard your email communications and protect sensitive information.
When considering using third-party add-ons for related messages, it is important to research and choose reputable and trusted solutions. Ensure that the add-ons are compatible with your version of Outlook and consider reading reviews or seeking recommendations from other users before integrating them into your workflow.
By leveraging third-party add-ons, you can extend the capabilities of Outlook and enhance your ability to manage related messages. Whether it’s advanced search options, enhanced filtering capabilities, or integrations with external tools, these add-ons can provide valuable features that address specific needs and help you better navigate and organize your email communications.
Tips for Efficiently Managing Related Messages
Effectively managing related messages is essential to maintaining an organized and productive email workflow. By implementing some key strategies and following best practices, you can efficiently handle related messages, stay on top of important conversations, and prevent your inbox from becoming overwhelming. Here are some valuable tips to help you manage related messages more efficiently:
1. Set Clear Email Organization Rules: Define clear rules and guidelines for organizing your emails. Determine how you want to categorize and label related messages, create folders or tags accordingly, and ensure consistency in applying these rules. Consistent organization makes it easier to locate and retrieve related messages when needed.
2. Use Descriptive Subject Lines: When composing or replying to emails, use descriptive subject lines that accurately capture the essence of the message. This helps you and recipients quickly identify and understand the content of the message, making it easier to follow related threads and conversations.
3. Limit Email Response Time: Aim to respond to related messages in a timely manner to maintain the momentum of the conversation. Set aside dedicated time slots to attend to email correspondence and prioritize responses based on urgency or importance. Prompt replies help ensure efficient communication and prevent delays in ongoing conversations.
4. Archive or Delete Unnecessary Messages: Regularly review your inbox and archive or delete irrelevant or outdated messages. Keeping your inbox clutter-free helps optimize searchability and ensures that you can focus on important related messages without unnecessary distractions.
5. Utilize Quick Actions: Leverage the quick action buttons or shortcuts available in your email client to perform common actions efficiently. Use features like archive, flag, mark as read, or move to organize and manage related messages effortlessly without the need for manual dragging and dropping.
6. Keep Track of Important Conversations: Flag important or critical conversations for easy identification and quick access. Utilize the flagging feature or assign priority tags to ensure that you can easily find and attend to these conversations when needed.
7. Leverage Email Templates: If you frequently receive or send similar types of related messages, use email templates to save time and ensure consistency. Templates allow you to pre-create standardized responses or emails that can be easily customized and personalized as needed.
8. Take Advantage of Keyboard Shortcuts: Familiarize yourself with keyboard shortcuts to expedite email management tasks. Learn shortcuts for marking messages as read, deleting or archiving messages, and navigating between messages or conversations. Mastering keyboard shortcuts helps increase efficiency and saves valuable time.
9. Regularly Evaluate and Adjust Workflow: Continuously assess your email management workflow and identify areas for improvement. Look for ways to streamline processes, automate repetitive tasks, and incorporate new tools or features that enhance your ability to manage related messages more efficiently.
10. Practice Email Etiquette: Adhere to proper email etiquette by being concise, clear, and professional in your communication. Use bullet points or numbered lists when appropriate to make your messages more readable. Remember to proofread your emails for spelling and grammar errors before sending.
Implementing these tips for efficiently managing related messages will help you stay organized, respond promptly, and maintain control over your inbox. By establishing effective strategies and utilizing the available tools and features, you can effectively handle related messages and ensure that important conversations receive the attention they deserve.