
Understanding the Importance of Outlook Data Backup
Outlook is an essential tool for managing email, contacts, calendars, tasks, and notes. It holds valuable information that we rely on every day. However, unforeseen circumstances such as accidental deletion, hardware failure, or computer crashes can lead to the loss or corruption of this vital data. That is why it is crucial to understand the importance of backing up your Outlook data.
By regularly backing up your Outlook data, you ensure that you have a copy of all your emails, contacts, calendar entries, notes, and tasks stored safely. This backup acts as an insurance policy, providing you with a way to recover and restore your data in the event of any technical mishaps or data loss incidents.
Imagine a scenario where you accidentally delete an important email or a critical contact gets corrupted. Without a backup, recovering that data could be a painstaking and time-consuming process, if not impossible. However, with a backup in place, you can simply restore the lost or corrupted data and continue working seamlessly.
Moreover, backing up your Outlook data also provides a sense of security and peace of mind. It protects you from potential data loss caused by hardware failures, viruses, or other unforeseen disasters. Whether it’s a hard drive crash or a malware attack, having a backup ensures that you have a safety net to fall back on, minimizing the risk of losing valuable information.
Creating backups of your Outlook data is easier than you might think. Outlook provides built-in tools and features that allow you to perform regular backups or automate backups on a schedule. These backup files can be saved to an external hard drive, a network location, or even on cloud storage platforms for added convenience and accessibility.
Remember, data loss is not a matter of ‘if,’ but ‘when.’ It is always better to be prepared and proactive when it comes to safeguarding your Outlook data. By implementing a regular backup routine, you can protect yourself from the frustration and potential setbacks of losing critical information.
Locating Outlook Data Files on Your Computer
Your Outlook data, including emails, contacts, calendars, and other items, is stored in specific files on your computer. Knowing the location of these data files is essential, whether you want to manually back up your data or troubleshoot any issues that may arise. Let’s explore how to locate Outlook data files on your computer.
The default location of Outlook data files varies depending on the version of Outlook and the operating system you are using. However, there are common locations to check when searching for your Outlook data files.
In Windows, you can start by opening the File Explorer and navigating to the following location:
- Outlook 2016/2019/365: C:\Users\[your username]\Documents\Outlook Files
- Outlook 2013: C:\Users\[your username]\AppData\Local\Microsoft\Outlook
- Outlook 2010: C:\Users\[your username]\Documents\Outlook Files
If you cannot locate your Outlook data files in these default locations, you can also check the “Data Files” settings within Outlook itself to find the precise location. To do this, open Outlook and go to the “File” tab. Then, select “Account Settings” and click on “Account Settings” again from the drop-down menu. In the “Data Files” tab, you will see a list of all the data files associated with your Outlook profile, along with their respective storage locations.
It’s worth noting that Outlook data files have the file extension “.pst” for personal folders files and “.ost” for offline Outlook data files. You can perform a search on your computer using these file extensions to find any additional data files that may not be listed in the Outlook settings.
If you have multiple Outlook profiles, each profile will have its own set of data files. Therefore, it’s essential to identify the specific profile you want to locate the data files for before initiating the search.
Once you have located the Outlook data files, you can manually back them up by copying them to a secure location, such as an external hard drive or a cloud storage service. This ensures that you have a separate, independent copy of your valuable Outlook data.
Being able to locate Outlook data files on your computer provides you with the ability to manage, backup, and restore your Outlook data with ease. Whether you are migrating to a new computer, troubleshooting problems, or simply ensuring the safety of your data, having this knowledge is invaluable.
Recovering Deleted Emails in Outlook
We’ve all been there – accidentally deleting an important email in Outlook and instantly regretting it. But don’t panic! Outlook provides a simple method for recovering deleted emails, giving you a chance to retrieve that critical message. Let’s explore how you can recover deleted emails in Outlook.
When you delete an email in Outlook, it is typically moved to the “Deleted Items” folder. This acts as a temporary storage location before the email is permanently deleted. To recover a deleted email, start by navigating to the “Deleted Items” folder in Outlook.
Once you’re in the “Deleted Items” folder, you can search for the deleted email by using the search bar at the top of the window. Enter keywords related to the email you want to recover, such as the sender’s name, subject, or specific content. Outlook will then filter the results and display any matching emails.
If you locate the deleted email in the “Deleted Items” folder, simply right-click on it and select “Move” or “Move to Folder.” You can then choose to move the email back to your inbox or any other desired folder. This action restores the email to its original location, making it easily accessible once again.
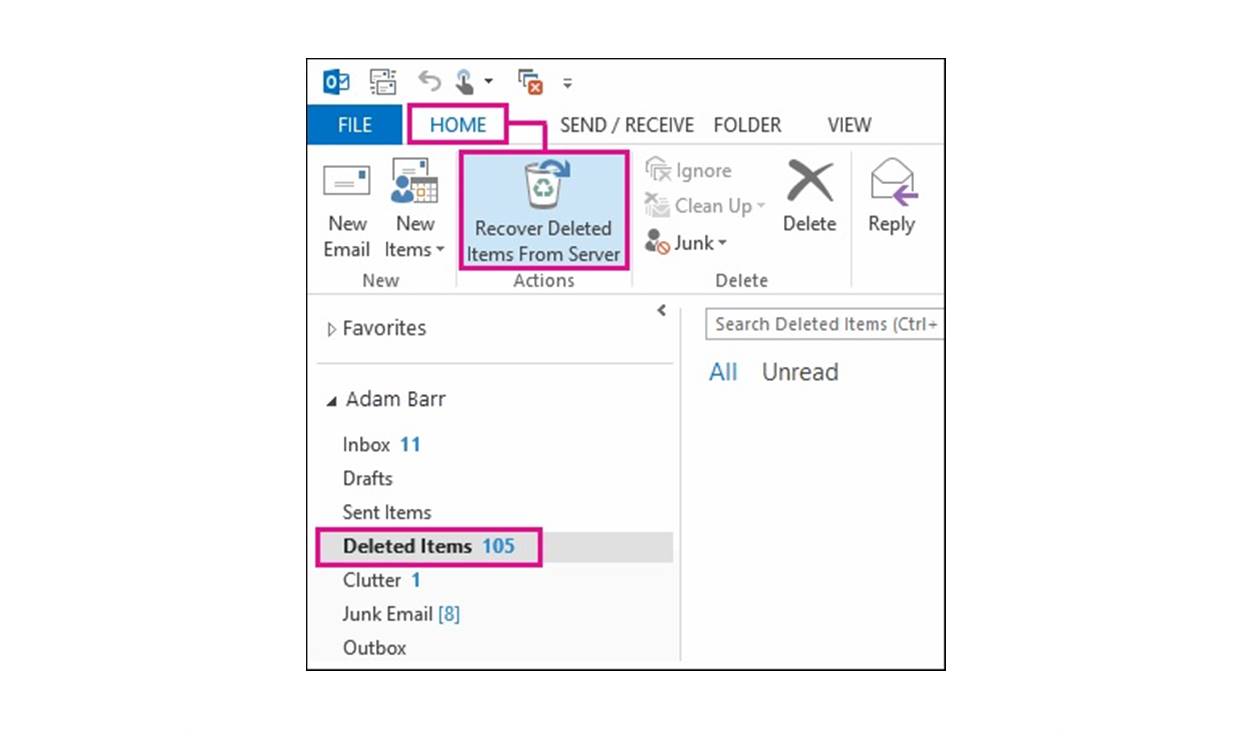
But what if you can’t find the deleted email in the “Deleted Items” folder? Don’t worry – Outlook provides a safety net called the “Recover Deleted Items” feature. This feature allows you to recover emails that have been permanently deleted from the “Deleted Items” folder.
To access the “Recover Deleted Items” feature, navigate to the “Folder” tab in Outlook and select “Recover Deleted Items” from the “Clean Up” group. A pop-up window will appear, displaying a list of all the items that have been permanently deleted.
In this window, you can search for the deleted email using keywords, just like in the “Deleted Items” folder. Once you locate the email, select it and click the “Recover Selected Items” button. The email will then be restored to the “Deleted Items” folder, allowing you to move it back to the desired location.
It’s important to note that the “Recover Deleted Items” feature has a limit on the number of items it can display. Therefore, if you don’t see the deleted email in the list, you may need to clear some items from the “Deleted Items” folder before trying again.
With these simple steps, you can quickly recover deleted emails in Outlook, saving you from the stress and frustration of losing valuable information. So, the next time you accidentally delete an email, remember to check the “Deleted Items” folder and utilize the “Recover Deleted Items” feature if necessary.
Restoring Lost or Corrupted Outlook Contacts
Outlook contacts play a crucial role in keeping track of important names, email addresses, and phone numbers. However, losing or encountering corruption in your Outlook contacts can be a significant setback. Fortunately, Outlook provides several methods to restore lost or corrupted contacts, allowing you to retrieve this vital information quickly. Let’s explore how you can restore lost or corrupted Outlook contacts.
If you accidentally delete a contact in Outlook, the first and simplest step is to check the “Deleted Items” folder. Deleted contacts are often moved to this folder, where you can easily recover them. Open the “Deleted Items” folder, locate the deleted contact, right-click on it, and then choose “Move” or “Move to Folder” to restore it to its original location, such as the “Contacts” folder.
But what if you can’t find the deleted contact in the “Deleted Items” folder? Don’t worry, Outlook has a built-in feature known as “Recover Deleted Items” that can help. To access this feature, go to the “Folder” tab in Outlook and click on “Recover Deleted Items” in the “Clean Up” group.
A new window will open, displaying all the items that have been permanently deleted from your Outlook contacts. You can use the search bar to locate the specific contact and select it. Then, click the “Recover Selected Items” button to restore the contact to the appropriate folder, such as “Contacts.”
If your Outlook contacts have become corrupted or are experiencing other issues, you can use the built-in “ScanPST” tool to repair the Outlook data file (PST) that contains your contacts. This tool scans the data file for any errors or inconsistencies and attempts to repair them.
The “ScanPST” tool is usually located in a default directory on your computer, depending on your Outlook version and operating system. You can search for “ScanPST” in the Windows Start menu or manually navigate to the Outlook installation folder to find the tool.
Once you’ve located the “ScanPST” tool, run it by double-clicking on the application file. You will be prompted to locate the Outlook data file that contains your contacts. After selecting the file, click the “Start” button to initiate the scanning and repair process.
Depending on the size of your Outlook data file, this process may take some time. Once the scan is complete, the tool will provide a summary of any detected errors and prompt you to repair them. Follow the instructions to complete the repair and allow the tool to fix any issues related to your Outlook contacts.
By utilizing these methods, you can restore lost or corrupted Outlook contacts quickly and efficiently, ensuring that you have access to this vital information once again. Whether the contacts were accidentally deleted or affected by corruption, Outlook’s built-in features and tools provide solutions to help you retrieve and restore your important contact details.
Retrieving Deleted Calendar Entries in Outlook
Accidentally deleting a calendar entry in Outlook can create confusion and disrupt your schedule. However, Outlook offers a range of options to help you retrieve deleted calendar entries and restore them to their original state. Let’s explore how you can retrieve deleted calendar entries in Outlook.
If you have recently deleted a calendar entry, the first place to look for it is the “Deleted Items” folder. Outlook moves deleted calendar entries to this folder, allowing easy recovery. Simply navigate to the “Deleted Items” folder, locate the deleted entry, right-click on it, and choose “Move” or “Move to Folder” to restore it to the appropriate calendar.
If the deleted calendar entry is not in the “Deleted Items” folder, you can use the “Recover Deleted Items” feature in Outlook. To access this feature, go to the “Folder” tab in Outlook and select “Recover Deleted Items” from the “Clean Up” group. A window will open, displaying all the items that have been permanently deleted from your calendar.
In this window, you can search for the deleted calendar entry using keywords or the start or end date of the event. Once you locate the entry, select it and click the “Recover Selected Items” button. Outlook will restore the calendar entry to its original location, ensuring that it reappears in your calendar.
In some cases, you may have accidentally deleted a recurring calendar series instead of a specific occurrence. If this happens, you can restore the entire series instead of individual occurrences. Simply follow the same steps as before and recover the deleted series from the “Recover Deleted Items” window.
Outlook also provides an additional layer of protection by saving deleted calendar entries in the “Recoverable Items” folder. This folder stores deleted items for a specified time period, usually 14 days. To access this folder, go to the “Folders” view in Outlook, expand the “Deleted Items” folder, and you will find the “Recoverable Items” folder. Deleted calendar entries can be found here and restored to the appropriate calendar.
If you are unable to find the deleted calendar entry using the methods mentioned above, another option is to restore your calendar from a previously created backup. Outlook allows you to import a calendar file (.pst or .ics) that contains all your calendar entries. By importing a backup file, you can recover any lost or deleted calendar entries and have them synced with your current calendar.
By utilizing these methods, you can effectively retrieve deleted calendar entries in Outlook, ensuring that your schedule remains intact. Whether it’s a single entry or a recurring series, Outlook’s built-in features and options give you the flexibility to recover and restore your important calendar events.
Recovering Missing Notes and Tasks in Outlook
Outlook’s notes and tasks are essential for keeping track of important information and managing your to-do list. However, sometimes notes or tasks can go missing or get accidentally deleted, causing inconvenience and potential loss of critical details. Fortunately, Outlook provides methods to recover missing notes and tasks, ensuring that you can retrieve and restore this valuable information. Let’s explore how to recover missing notes and tasks in Outlook.
If you notice that a specific note or task is missing from Outlook, the first step is to check the appropriate folder where it should reside. Notes are typically stored in the “Notes” folder, while tasks can be found in the “Tasks” or “To-Do List” folder. Open the respective folder and search for the missing note or task using related keywords or specific criteria.
If you accidentally deleted a note or task, you can try retrieving it from the “Deleted Items” folder. Deleted items are often moved to this temporary storage location before being permanently removed from Outlook. Simply navigate to the “Deleted Items” folder, locate the deleted note or task, right-click on it, and choose “Move” or “Move to Folder” to restore it to its original location.
In cases where the missing note or task is not found in the “Deleted Items” folder, you can use the “Recover Deleted Items” feature in Outlook. To access this feature, go to the “Folder” tab and click on “Recover Deleted Items” in the “Clean Up” group. A window will appear, displaying all the items that have been permanently deleted from your notes and tasks.
In this window, you can search for the missing note or task using keywords or other criteria. Once you locate the item, select it and click the “Recover Selected Items” button. Outlook will then restore the note or task to its original location, ensuring that it returns to the appropriate folder.
If you are unable to locate the missing note or task using the above methods, another option is to look for a backup of your Outlook data. If you have been regularly backing up your Outlook data, you may find a copy of the missing note or task in one of your backups. You can restore the backup by importing the relevant file (.pst or .ost) into Outlook and retrieving the missing item.
It’s important to note that recovering missing notes or tasks from a backup will replace your current data with the data from the backup file. Therefore, make sure to proceed with caution and consider creating a backup of your current Outlook data before performing the restore.
By utilizing these methods, you can effectively recover missing notes and tasks in Outlook, ensuring that you regain access to important information and stay organized. Whether it’s a misplaced note, accidentally deleted task, or lost data, Outlook’s built-in features and options provide solutions to help you retrieve and restore your valuable notes and tasks.
Restoring Outlook Settings and Preferences
Outlook settings and preferences play a crucial role in personalizing your email experience and optimizing productivity. However, there are instances when these settings may become corrupted or inadvertently changed, affecting the functionality and appearance of Outlook. Fortunately, Outlook provides options to restore settings and preferences, allowing you to revert back to a known working configuration. Let’s explore how you can restore Outlook settings and preferences.
If you notice that certain settings or preferences in Outlook are not working as expected, the first step is to check if there is a backup of your settings available. Outlook allows you to export your settings, including preferences, email accounts, and rules, into a backup file. You can then restore these settings from the backup file if needed.
To create a backup of your Outlook settings, go to the “File” tab, select “Options,” and choose “Advanced.” Under the “Export” section, click on “Export” to start the process. Follow the prompts to select the settings you want to backup and choose a location to save the backup file. Remember to choose a secure location, such as an external storage device or a cloud storage service, to protect your backup.
Once you have a backup file, you can restore your Outlook settings and preferences by going to the “File” tab, selecting “Options,” and choosing “Advanced.” Under the “Export” section, click on “Import” to start the restoration process. Browse for the backup file and follow the prompts to import the settings and preferences back into Outlook. This will restore your previous configuration and overwrite any current settings that may be causing issues.
If you don’t have a backup of your settings, there are still options to restore some aspects of Outlook. For example, you can reset the ribbon customizations in Outlook by right-clicking on the ribbon, selecting “Customize the Ribbon,” and choosing “Reset” from the options. This will restore the ribbon to its default settings, removing any modifications you made.
In addition, Outlook provides a built-in repair tool called “Office Repair” that can help fix problems with the application’s settings and preferences. To access Office Repair, open the Control Panel on your computer, navigate to the “Programs” or “Programs and Features” section, and find “Microsoft Office” or “Microsoft 365.” Right-click on it and choose “Repair” to initiate the repair process. Follow the prompts and allow the repair tool to restore any corrupted settings or preferences back to their default state.
Restoring Outlook settings and preferences is crucial for maintaining a smooth and personalized email experience. Whether it’s importing a backup file or utilizing built-in repair tools, Outlook provides options to help you restore your settings and preferences, ensuring that you can get back to using Outlook the way you prefer.
Importing and Exporting Outlook Data
Importing and exporting Outlook data is a powerful feature that allows you to transfer your emails, contacts, calendars, and other items between different accounts, computers, or versions of Outlook. Whether you are migrating to a new device, setting up a new email account, or simply backing up your data, understanding how to import and export Outlook data is essential. Let’s explore how you can easily manage your Outlook data through importing and exporting.
When it comes to importing data into Outlook, you have several options based on the type of data you want to import. For instance, if you have a PST (Personal Storage Table) file from a previous Outlook account or backup, you can import it by going to the “File” tab, selecting “Open & Export,” and choosing “Import/Export.” From there, follow the prompts to locate the PST file and select the specific data you want to import, such as emails, contacts, or calendar entries.
In addition to PST files, Outlook also allows you to import data from other file formats, such as CSV (Comma Separated Values) or vCard files. This is especially useful when you want to import contacts from other email clients or platforms. To do this, go to the “File” tab, select “Open & Export,” and choose “Import/Export.” From there, select the file type you want to import and follow the wizard to map the fields and import the data successfully.
Exporting data from Outlook is equally straightforward. You can export specific data, such as emails or contacts, by selecting the item or folder you want to export and choosing “Export” from the “File” tab. From there, you can select the desired file format, such as PST or CSV, and follow the prompts to save the exported data to a location of your choice.
Outlook also provides the option to export your entire mailbox or Outlook profile for backup or transfer purposes. This includes all email folders, contacts, calendar entries, and other items. To do this, go to the “File” tab, select “Open & Export,” and choose “Import/Export.” From there, select “Export to a file” and follow the steps to export your entire Outlook data as a PST file.
When it comes to importing and exporting data, it’s important to consider any potential compatibility issues between different versions of Outlook or different email platforms. It’s also worth noting that the specific steps and options may vary slightly depending on the version of Outlook you are using.
By mastering the art of importing and exporting Outlook data, you can easily manage and transfer your emails, contacts, calendars, and other items. Whether you’re transitioning to a new device, performing a backup, or setting up a new email account, these features empower you to have greater control over your Outlook data.
Using Recovery and Repair Tools for Outlook Data
Recovery and repair tools for Outlook data are invaluable assets when it comes to troubleshooting and resolving issues with your email, contacts, calendars, and other items. These tools are designed to help you recover lost or corrupted data, fix errors, and restore your Outlook functionality. Let’s explore how you can utilize recovery and repair tools to keep your Outlook data in optimal condition.
One of the most commonly used recovery tools for Outlook is the “ScanPST” tool. This tool is specifically designed to repair and recover corrupted or damaged Outlook data files (PST files). PST files are where Outlook stores all your emails, contacts, calendar entries, and other items. If you notice abnormalities in your Outlook data or encounter error messages, running the “ScanPST” tool can often resolve the underlying issues.
To access the “ScanPST” tool, you will need to locate its executable file on your computer. The location of the tool may vary depending on the version of Outlook and the operating system you are using. Once you find the tool, double-click on it to launch the “ScanPST” interface.
In the “ScanPST” interface, you will need to browse and specify the path to the PST file that requires repair. This file is typically located in a default directory on your computer, depending on your Outlook version and settings. After selecting the file, click the “Start” button to initiate the scanning and repair process.
Once the process is complete, the “ScanPST” tool will provide a summary of any detected errors and prompt you to repair them. It’s important to carefully follow the instructions and allow the tool to fix the identified issues. Once the repair is finished, restart Outlook to see if the problems have been resolved.
In addition to the “ScanPST” tool, there are other recovery and repair tools available for different scenarios. For example, if you are experiencing issues with specific Outlook features, such as search or indexing, you can use the built-in “Indexing Options” or “Search and Indexing” tool within the Windows Control Panel to troubleshoot and repair these problems.
If you are using the Microsoft 365 version of Outlook, there is a built-in repair tool called “Support and Recovery Assistant” (SARA). This tool helps diagnose and fix issues with your Outlook configuration and settings. It can automatically detect and resolve common problems, such as connectivity issues, authentication errors, or performance issues.
By utilizing these recovery and repair tools, you can effectively troubleshoot and resolve various issues with your Outlook data. Whether it’s repairing a corrupted PST file, fixing indexing problems, or resolving configuration issues, these tools provide options to help you regain full functionality and ensure the integrity of your Outlook data.