
Why Inserting Comments in Word is Useful
Inserting comments in Microsoft Word documents can be incredibly helpful for collaboration and enhancing productivity. Comments serve as a means of communication and feedback within a document, allowing multiple users to provide input and suggestions without altering the original text. Here are a few reasons why inserting comments in Word is useful:
- Collaboration: Comments facilitate collaboration by enabling users to share their thoughts, ideas, and suggestions on specific parts of a document. This allows for efficient teamwork, as team members can easily review and respond to comments, ensuring that everyone’s input is considered.
- Clarity and Explanation: Comments provide additional clarity and explanations regarding certain passages or sections of a document. When readers come across a complex or ambiguous part, they can refer to the comments to understand the intended meaning or seek further clarification.
- Document Review: Comments are invaluable during the review process. Reviewers can highlight areas that need improvement, address inconsistencies, or suggest changes, all within the document itself. This makes it easier to track and address specific issues, ultimately improving the overall quality of the document.
- Document Versioning: When multiple versions of a document go through iterations, comments become essential for tracking changes and progress. Teams can refer to previous comments to understand the evolution of the document and ensure that all revisions have been accurately incorporated.
- Easy Documentation: Comments serve as a record of discussions and decisions made during the document creation process. They provide an easily accessible reference for future use. Whether it’s for legal purposes, historical context, or to retrace thought processes, comments can be a valuable source of information.
Overall, inserting comments in Word provides a transparent and organized workflow, streamlining the editing and reviewing process. It encourages collaboration, fosters clear communication, and allows for a more structured approach to document editing. By leveraging the commenting feature in Microsoft Word, users can enhance productivity, minimize errors, and produce high-quality documents.
How to Insert a Comment in Word
Microsoft Word makes it simple to insert comments, allowing you to provide feedback or share your thoughts on specific sections of a document. Follow these steps to insert a comment in Word:
-
Step 1: Select the text you want to comment on
Highlight the specific portion of the document that you want to comment on. This selection can be as short as a single word or as long as multiple paragraphs. -
Step 2: Go to the “Review” tab
Locate the “Review” tab in the Microsoft Word toolbar. This tab contains various tools for reviewing and editing. -
Step 3: Click on “New Comment”
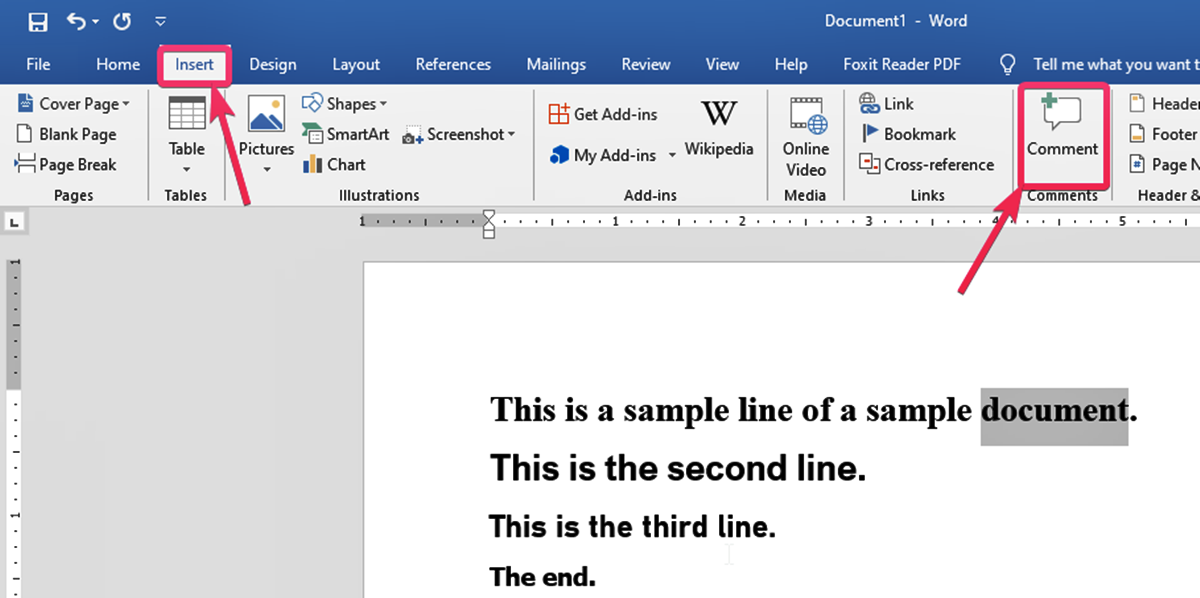
In the “Comments” section of the “Review” tab, click on the “New Comment” button. A comment box will appear in the right margin of the document. -
Step 4: Type your comment in the comment pane
In the comment pane, enter your feedback, suggestion, or any other comment you want to make about the selected text. You can type as much as needed to provide the necessary context and explanation. -
Step 5: Reply to or resolve comments
After inserting a comment, other users can reply to it, creating a threaded conversation. If the comment is addressed and no further action is required, it can be resolved to simplify the view. To reply or resolve a comment, right-click on the comment and select the appropriate action from the context menu.
By following these simple steps, you can easily insert comments in Word documents and start engaging in discussions, collaborating with others, and providing valuable feedback. Whether you’re working on a group project, reviewing a colleague’s work, or seeking input from a client, comments are an effective tool for enhancing communication and streamlining the editing process.
Step 1: Select the text you want to comment on
The first step in inserting a comment in Microsoft Word is to select the specific text you want to comment on. By selecting a particular portion of the document, you can provide feedback, raise questions, or share your thoughts on that specific section. Follow these guidelines to select the text:
-
Highlight the desired text:
To select the text you want to comment on, click at the beginning of the desired section, hold down the left mouse button, and drag the cursor until the entire text is highlighted. Alternatively, you can double-click a word to select it, triple-click to select a paragraph, or use keyboard shortcuts like Ctrl+A to select the entire document. -
Select non-contiguous text:
If you want to select multiple non-contiguous sections of text, hold down the Ctrl key as you click on each desired section. This allows you to comment on different parts of the document without having to select them all at once. -
Select large blocks of text:
If you need to select a large block of text spanning multiple pages, it’s more efficient to select the starting point, scroll to the end of the desired section while keeping the Shift key pressed, and click again to select all the text in between. This method is particularly useful when commenting on lengthy passages or entire chapters.
By selecting the specific text you want to comment on, you ensure that your feedback is targeted and relevant to the section under consideration. Remember, clear and concise selection is important to ensure that your comments are focused and can be easily understood by others. Whether it’s a sentence, a paragraph, or an entire page, selecting the appropriate text sets the stage for meaningful collaboration and effective communication within your Word document.
Step 2: Go to the “Review” tab
After selecting the text you want to comment on, the next step in inserting a comment in Microsoft Word is to navigate to the “Review” tab. This tab contains all the tools and features related to reviewing and editing a document. Follow these steps:
-
Locate the “Review” tab:
Look at the top of the Microsoft Word window for a series of tabs, including “Home,” “Insert,” “Design,” and others. Click on the “Review” tab to switch to the reviewing mode. -
Access the comment feature:
Once you’re on the “Review” tab, you’ll find a section labeled “Comments.” This section contains various tools and options related to comments, such as adding a new comment, replying to comments, and navigating through comments. This is where you can access the comment feature and begin inserting your comment. -
Review other comment-related features:
While on the “Review” tab, take a moment to explore the other comment-related features available to you. These may include options to track changes, edit comments, show or hide comments, and customize comment formatting. Familiarizing yourself with these options will enhance your overall commenting experience.
By going to the “Review” tab in Microsoft Word, you access the essential tools and settings required for inserting comments. This tab serves as the central hub for reviewing and editing activities, making it easy to navigate and manage comments effectively. Whether you’re collaborating on a complex project or simply sharing feedback, the “Review” tab provides you with the necessary functionality to make your comments and suggestions both clear and meaningful.
Step 3: Click on “New Comment”
After navigating to the “Review” tab in Microsoft Word, the next step in inserting a comment is to click on the “New Comment” button. This button allows you to create a new comment and attach it to the selected text. Follow these steps:
-
Locate the “New Comment” button:
In the “Comments” section of the “Review” tab, you will find the “New Comment” button. It is typically represented by an icon with a speech bubble and a plus sign. Clicking on this button will open a comment pane in the right margin of the document. -
Click on “New Comment”:
Once you have located the “New Comment” button, click on it to create a new comment. This action will generate a comment box alongside the selected text, where you can enter your feedback, thoughts, or questions related to that particular portion of the document. -
Consider keyboard shortcut:
Alternatively, you can use the keyboard shortcut Shift + F2 to create a new comment in Microsoft Word. This shortcut provides a quick way to insert comments without needing to navigate through the “Review” tab.
By clicking on the “New Comment” button, you initiate the process of inserting a comment in Microsoft Word. This action creates a designated space for capturing your thoughts and feedback, allowing you to contribute to the conversation surrounding the selected text. The comment pane provides a convenient and organized way to communicate your ideas, fostering collaboration and effective communication within your Word document.
Step 4: Type your comment in the comment pane
Once you have accessed the comment pane by clicking on the “New Comment” button in Microsoft Word, the next step is to type your comment. The comment pane is where you can provide your feedback, suggestions, or thoughts related to the selected text. Follow these guidelines to effectively enter your comment:
-
Enter your comment:
In the comment pane located in the right margin of the document, click inside the text box and start typing your comment. You can enter as much or as little text as necessary to convey your message, providing context and explanation for your feedback or suggestion. -
Format your comment:
Microsoft Word allows you to format your comment using various options available in the comment pane. You can use the formatting toolbar to change the font style, size, and color, or apply other formatting options such as bold, italic, or underline. Proper formatting can help make your comment more readable and impactful. -
Attach files or images:
If relevant to your comment, you can also attach files or images to provide further clarification or support your feedback. To do this, click on the “Attach File” or “Attach Image” option, usually represented by a paperclip icon, within the comment pane. This allows you to include additional resources along with your comment. -
Consider being concise:
While it’s important to provide sufficient information and context, try to be concise when typing your comment. Keep your comment focused and to the point, making it easier for others to read and understand. If your comment is long, consider breaking it into paragraphs for better readability.
By typing your comment in the comment pane, you contribute to the discussion and provide valuable insights related to the selected text. This allows for clear communication and collaboration among users, helping to improve the overall quality of the document. Remember to proofread your comment before finalizing it to ensure clarity and accuracy.
Step 5: Reply to or resolve comments
Once you have inserted a comment in Microsoft Word, you may need to reply to or resolve comments to continue the conversation or provide closure. Follow these steps to effectively manage and interact with comments:
-
Reply to a comment:
If you want to reply to a comment made by another user, right-click on the comment and select the “Reply” option from the context menu. This allows you to add your response below the original comment, creating a threaded conversation for easy reference. -
Resolve a comment:
When a comment has been addressed and no further action is required, you can choose to resolve it. Right-click on the comment and select the “Resolve” option from the context menu. This hides the resolved comment, declutters the view, and signifies that the matter has been resolved. -
Manage comments:
To navigate through comments in your document, you can use the “Previous” and “Next” buttons in the “Comments” section of the “Review” tab. This allows you to easily find and review comments one by one, ensuring that all comments are addressed and responded to appropriately. -
Make revisions as needed:
Comments often lead to revisions in the document. When you receive feedback or suggestions in a comment, you can make corresponding changes by selecting the specific text or sections and applying the necessary modifications. This helps ensure that the document reflects the discussions and improvements made through commenting.
By replying to or resolving comments, you maintain an organized and collaborative discussion within your Word document. This allows multiple users to engage in a constructive dialogue, address any concerns, and reach consensus on the content. It’s essential to keep track of comments and actively participate in the conversation to foster effective collaboration and produce a polished final document.
How to Change the Formatting of a Comment
Microsoft Word provides flexibility when it comes to changing the formatting of a comment. You can modify the appearance of a comment to make it stand out or align it with your preferred style. Follow these steps to change the formatting of a comment:
-
Step 1: Right-click on the comment:
To access formatting options, right-click on the comment that you want to modify. A context menu will appear with various options. -
Step 2: Select “Edit Comment”:
From the context menu, select the “Edit Comment” option. This will open the comment pane, where you can make changes to the comment’s content and formatting. -
Step 3: Make the desired formatting changes:
Within the comment pane, you can apply various formatting changes to enhance the appearance of the comment. Some common formatting options include:- Changing font style, size, and color
- Applying bold, italic, or underline formatting
- Adding bullet points or numbered lists
- Adjusting alignment (e.g., left, center, right)
Use the formatting toolbar at the top of the comment pane or the right-click context menu within the pane to access these formatting options.
-
Step 4: Save the changes:
After making the desired formatting changes, click outside the comment pane or press the Enter key to save the modifications. The comment will now reflect the updated formatting.
By customizing the formatting of a comment, you can make it more visually appealing, emphasize important points, or match the overall style of your document. Remember, consistent formatting can enhance readability and provide a professional appearance to your comments. Experiment with different formatting options to find the style that best suits your preferences and keeps your comments clear and engaging.
Step 1: Right-click on the comment
To change the formatting of a comment in Microsoft Word, the first step is to right-click on the comment you want to modify. By right-clicking, you can access a context menu that contains various options for editing and customizing the comment’s appearance. Follow these steps to begin formatting your comment:
-
Locate the comment:
Look for the comment you want to modify in the right margin of your Word document. Comments are typically displayed as speech bubbles alongside the corresponding text. -
Right-click on the comment:
Once you have found the comment, right-click directly on the comment bubble. This action will open a context menu with several options related to managing and editing comments. -
Explore the available options:
Upon right-clicking the comment, a context menu will appear. This menu may include options such as “Edit Comment,” “Delete Comment,” “Resolve Comment,” or other related actions depending on the version of Word you are using. You can select the appropriate option based on the changes you want to make to the comment’s formatting.
By right-clicking on the comment, you initiate the process of accessing the comment’s specific editing options. This step allows you to make changes to the comment’s content, formatting, or other properties, giving you the flexibility to customize the appearance of the comment according to your preferences.
Step 2: Select “Edit Comment”
Once you have right-clicked on the comment you want to modify in Microsoft Word, the next step is to select the “Edit Comment” option from the context menu. This option allows you to access the comment pane and make changes to the comment’s content and formatting. Follow these steps to proceed with editing the comment:
-
Right-click on the comment:
Locate the comment you want to edit in the right margin of your Word document. Right-click directly on the comment bubble to initiate the context menu. -
Select “Edit Comment”:
From the context menu that appears after right-clicking, find and click on the “Edit Comment” option. This action will open the comment pane, where you can modify the content and formatting of the comment. -
Review and make desired changes:
Once the comment pane is open, you have the freedom to review the existing comment and make necessary modifications. This includes editing the text, changing the formatting, adding or removing content, or adjusting any other aspects of the comment.
By selecting “Edit Comment” from the context menu, you gain access to the comment pane, which allows you to refine and customize the comment according to your preferences. This step is vital for fine-tuning the comment’s content and formatting, ensuring that it conveys your intended message effectively. Take advantage of this option to make any necessary revisions and ensure that your comment aligns with the overall style and formatting of your document.
Step 3: Make the desired formatting changes
After selecting the “Edit Comment” option from the context menu in Microsoft Word, you can begin making the desired formatting changes to the comment. This step allows you to enhance the appearance of the comment, align it with your document’s style, and make it more visually appealing. Follow these guidelines to effectively format your comment:
-
Access the formatting options:
Within the comment pane, you will find a toolbar with various formatting options. Use this toolbar to modify the font style, size, color, and other formatting elements of your comment. Alternatively, right-click within the comment pane to access additional formatting options from the context menu. -
Modify font style and size:
To change the font style, select the text within the comment and choose a different font from the formatting toolbar or context menu. Similarly, adjust the font size to make the comment more readable or to match the rest of your document’s text. -
Apply text formatting:
You can apply various formatting options such as bold, italic, underline, or strikethrough to emphasize certain words or phrases within the comment. Use these formatting tools selectively to highlight important information or convey emphasis where necessary. -
Customize alignment and spacing:
Adjust the alignment of the comment text to left, center, or right using the alignment options in the formatting toolbar. Additionally, utilize line spacing and paragraph spacing options to ensure the comment is neatly organized and easy to read. -
Consider adding bullet points or numbered lists:
If your comment includes multiple points or suggestions, it may be helpful to use bullet points or numbered lists for clarity and structure. Use the relevant options in the formatting toolbar to create a well-organized and visually appealing comment.
By making the desired formatting changes to your comment, you can enhance its visibility and impact within the document. Proper formatting enables clear communication and helps draw attention to important information or suggestions. Experiment with different formatting options to find the style that best suits your needs and ensure that your comment stands out effectively.
How to Delete a Comment in Word
If you no longer need a comment or want to remove it from your document, Microsoft Word provides a straightforward process for deleting comments. Follow these steps to delete a comment in Word:
-
Step 1: Locate the comment:
Look for the comment you want to delete in the right margin of your Word document. Comments are typically represented as speech bubbles alongside the corresponding text. -
Step 2: Right-click on the comment:
Once you have identified the comment, right-click directly on the comment bubble to open the context menu. -
Step 3: Select “Delete Comment”:
From the context menu that appears after right-clicking, find and click on the “Delete Comment” option. This action will remove the comment from your document.
By following these simple steps, you can easily delete any unwanted or unnecessary comments within your Word document. Deleting a comment allows you to streamline the reviewing process, remove clutter, and focus on the final content without distractions. It is important to note that once a comment is deleted, it cannot be retrieved, so double-check before proceeding with the deletion.
Step 1: Right-click on the comment
To delete a comment in Microsoft Word, the first step is to locate the comment you want to remove and then right-click on it. By right-clicking, you can access a context menu that contains options for managing and deleting comments. Follow these steps to proceed with deleting a comment:
-
Identify the comment:
Look for the comment you wish to delete in the right margin of your Word document. Comments are displayed as speech bubbles next to the corresponding text, indicating where they are located. -
Right-click on the comment:
Once you have located the comment, right-click directly on the comment bubble. This action will open a context menu with various options related to managing comments. -
Select “Delete Comment”:
From the context menu that appears after right-clicking, find and click on the “Delete Comment” option. This will permanently remove the comment from your document.
By right-clicking on the comment, you initiate the process of deleting it from your Word document. This step allows you to access the specific options related to managing comments, providing you with the capability to remove any unnecessary or outdated comments. It is important to double-check the comment before deleting it, as the deletion cannot be undone.
Step 2: Select “Delete Comment”
After right-clicking on the comment you wish to delete in Microsoft Word, the next step is to select the “Delete Comment” option from the context menu. This option allows you to permanently remove the comment from your document. Follow these steps to proceed with deleting the comment:
-
Right-click on the comment:
Locate the comment you want to delete in the right margin of your Word document. Right-click directly on the comment bubble to open the context menu. -
Select “Delete Comment”:
From the context menu that appears after right-clicking, find and click on the “Delete Comment” option. This action will remove the comment from your document.
By selecting the “Delete Comment” option, you confirm your decision to permanently remove the comment from your Word document. This step ensures that any unnecessary, outdated, or unwanted comments are eliminated. It is important to exercise caution when deleting comments, as once deleted, they cannot be recovered. Therefore, verify the comment you want to delete before selecting this option.
How to Print a Document with Comments
Printing a document with comments in Microsoft Word allows you to review and share feedback in a physical format. Whether you need a hard copy for editing purposes or want to provide comments to others, you can easily print your document with the included comments. Follow these steps to print a document with comments:
-
Step 1: Go to the “File” tab:
Locate and click on the “File” tab in the upper-left corner of the Microsoft Word window. This will open the File menu. -
Step 2: Click on “Print”:
In the File menu, find and click on the “Print” option. This action will open the Print settings and preview window. -
Step 3: Select the desired print settings:
In the Print settings and preview window, you can customize the print options according to your preferences. This includes selecting the desired printer, choosing the number of copies, adjusting the page range, and other advanced settings. -
Step 4: Click on “Print”:
Once you have configured the print settings, click on the “Print” button to start the printing process. Your document, along with the included comments, will be sent to the selected printer and a hard copy will be produced.
By following these simple steps, you can easily print your document with the included comments. It’s important to preview the document before printing to ensure that everything appears as intended. Moreover, you can adjust the print settings as needed to fit your desired layout and printing requirements. Printing a document with comments allows for efficient offline reviewing and provides a convenient way to share feedback and suggestions with others.
Step 1: Go to the “File” tab
To print a document with comments in Microsoft Word, the first step is to navigate to the “File” tab. This tab contains various options and settings related to managing and printing your document. Follow these steps to proceed with printing a document with comments:
-
Locate the “File” tab:
Look at the top-left corner of the Microsoft Word window for a series of tabs, including “Home,” “Insert,” “Design,” and others. Click on the “File” tab to access the File menu. -
Access the Print settings:
Once you are on the File menu, you will find a range of options related to document management and printing. Look for the “Print” option in the menu and click on it to proceed to the Print settings and preview window.
By navigating to the “File” tab, you initiate the process of accessing the necessary settings to print your document with the included comments. This step allows you to access the Print settings and preview window, where you can customize the print options and ensure that your document and comments are accurately reproduced on paper. It’s essential to take your time and review the available print settings before proceeding to the next step in printing your document with comments.
Step 2: Click on “Print”
After accessing the File menu in Microsoft Word, the next step in printing a document with comments is to click on the “Print” option. This will open the Print settings and preview window, where you can customize the print options before sending the document to the printer. Follow these steps to proceed:
-
Locate the “Print” option:
Within the File menu, look for the “Print” option. This option is typically located near the top of the menu or may be represented by a printer icon. Click on it to open the Print settings and preview window. -
Access the Print settings and preview window:
After clicking on the “Print” option, the Print settings and preview window will open. This window provides a visual representation of how the document will appear when printed, and includes various settings that can be customized prior to printing.
By clicking on the “Print” option in the File menu, you gain access to the Print settings and preview window. This window allows you to review and configure the print options based on your preferences and requirements. It’s important to take a moment to familiarize yourself with the available settings and preview how the document will look when printed. This step ensures that you can make any necessary adjustments before proceeding to print the document with the included comments.
Step 3: Select the desired print settings
After clicking on the “Print” option in Microsoft Word, the Print settings and preview window will open. In this step, you can customize the print settings according to your preferences before proceeding to print the document with the included comments. Follow these guidelines to select the desired print settings:
-
Choose the printer:
From the available options in the Print settings and preview window, select the printer you want to use. If you have multiple printers connected to your device, ensure that you choose the correct one. -
Specify the number of copies:
Enter the desired number of copies you want to print in the “Copies” section of the Print settings window. Adjust this number according to your requirements. -
Adjust the page range:
If you only need to print specific pages of the document, customize the page range settings in the Print settings window. You can choose to print all pages, select a range of pages, or print a subset of pages. -
Review advanced settings:
Explore the advanced settings available in the Print settings window. This includes options to print double-sided, choose paper size and type, and adjust print quality. Adjust these settings based on your printer capabilities and document requirements. -
Preview the document:
Take a moment to preview the document in the Print settings and preview window. This allows you to ensure that the comments are visible and aligned correctly before finalizing the print settings.
By selecting the desired print settings, you customize the printing process according to your specific preferences and requirements. Take the time to review and adjust the settings to ensure that the final printed document meets your expectations. Previewing the document helps you avoid any potential issues and makes certain that the comments are accurately reproduced in the printed version.
Step 4: Click on “Print”
Once you have selected the desired print settings in Microsoft Word, the final step is to click on the “Print” button to initiate the printing process. Follow these steps to proceed:
-
Review the selected print settings:
Double-check the print settings in the Print settings and preview window to ensure that they match your requirements. Take the time to verify the selected printer, the number of copies, the page range, and any other custom settings you have configured. -
Click on the “Print” button:
Once you are satisfied with the print settings, click on the “Print” button in the Print settings and preview window. This action will send the document with the included comments to the selected printer for printing. -
Wait for the printing process to complete:
Depending on the size of the document and the printer’s speed, the printing process may take some time. Exercise patience and allow the printer to complete the task. -
Collect the printed document:
Once the printing process is finished, retrieve the printed document from the printer’s output tray. Check that the document is printed correctly, with the comments included as intended.
By clicking on the “Print” button, you start the printing process and ensure that the document, along with the included comments, is sent to the printer for physical reproduction. It’s important to review the selected print settings before proceeding, as this step ensures that the document is printed with the desired specifications. Verify the printed document for accuracy and quality to ensure that the comments are clearly visible and aligned correctly.
How to Manage Comments in Word
Managing comments in Microsoft Word allows you to effectively review, organize, and navigate through the feedback and suggestions provided by yourself and others. With the built-in comment management features, you can easily track, respond to, and resolve comments within your document. Here are the steps you can follow to manage comments:
-
Step 1: Go to the “Review” tab:
Locate and click on the “Review” tab in the Microsoft Word toolbar. This tab contains various tools and options related to reviewing and editing a document. -
Step 2: Click on “Show Markup”:
In the “Tracking” section of the “Review” tab, click on the “Show Markup” dropdown arrow. This will reveal a list of markup options that you can enable or disable for better comment management. -
Step 3: Select or deselect the desired options:
In the “Show Markup” dropdown, you can turn on or off different types of markup, such as comments, insertions and deletions, and formatting changes. To manage comments specifically, ensure that the “Comments” option is selected.
By following these steps, you can effectively manage comments in Microsoft Word, enabling you to review and respond to feedback, track changes, and maintain an organized workflow. Customizing the display of comments using the “Show Markup” feature allows you to focus on the specific type of feedback you want to address, improving the efficiency of your document review process.
Step 1: Go to the “Review” tab
To effectively manage comments in Microsoft Word, the first step is to navigate to the “Review” tab. This tab contains various tools and options specifically designed for reviewing and organizing comments within your document. Follow these steps to access the “Review” tab:
-
Locate the “Review” tab:
Look at the top of the Microsoft Word window for a series of tabs, including “Home,” “Insert,” “Design,” and others. Click on the “Review” tab to switch to the review mode. -
Access the “Review” features:
Once you are on the “Review” tab, you will find a range of tools and options related to reviewing and managing comments. These features include creating and editing comments, replying to comments, resolving comments, and navigating through comments.
By navigating to the “Review” tab in Microsoft Word, you gain access to essential tools and options that enable you to effectively manage comments within your document. This step allows you to easily track and address feedback, collaborate with others, and maintain an organized workflow. The “Review” tab is the central hub for comment management, making it a vital component of the document review process.
Step 2: Click on “Show Markup”
After accessing the “Review” tab in Microsoft Word, the next step in managing comments is to click on the “Show Markup” feature. This feature allows you to customize the display of comments and other markup elements within your document. Follow these steps to access the “Show Markup” options:
-
Locate the “Show Markup” dropdown:
In the “Tracking” section of the “Review” tab, you will find the “Show Markup” dropdown. This dropdown is typically represented by an icon with a checkmark and downward-pointing arrow. Click on this dropdown to open the options menu. -
View the available markup options:
Upon clicking the “Show Markup” dropdown, a list of markup options will be displayed. These options include comments, insertions and deletions, formatting changes, and more. Each option can be enabled or disabled based on your preferences. -
Select or deselect the desired options:
In the “Show Markup” dropdown menu, you can select or deselect the markup options you want to be displayed. To focus on managing comments, ensure that the “Comments” option is selected. This will show all comments within the document.
By clicking on the “Show Markup” feature and selecting the desired options, you gain control over which elements are displayed within your document. This step allows you to manage comments specifically, ensuring that they are visible while other markup elements may be hidden. Customizing the display of markup enhances your ability to review and respond to comments efficiently, maintaining a clear and organized document review process.
Step 3: Select or deselect the desired options
After opening the “Show Markup” menu in Microsoft Word, the next step in managing comments is to select or deselect the desired options. This allows you to customize the display of comments and other markup elements within your document. Follow these steps to proceed:
-
Open the “Show Markup” menu:
In the “Review” tab, locate and click on the “Show Markup” dropdown menu. This action reveals a list of available markup options. -
Review the available markup options:
Within the “Show Markup” dropdown, you will find a list of options that can be enabled or disabled. These options include comments, insertions and deletions, formatting changes, and more. Each option represents a different type of markup element within the document. -
Select or deselect the desired options:
To manage comments specifically, ensure that the “Comments” option is selected. This will display all comments within the document. You can also select or deselect other markup options based on your preferences. Enabling or disabling these options allows you to focus on the specific markup elements you want to view or hide.
By selecting or deselecting the desired options in the “Show Markup” menu, you have control over what markup elements are displayed within your document. This step allows you to manage comments effectively while customizing the visibility of other markup elements for a cleaner view. Adjusting the options based on your specific needs enhances your ability to review, respond to, and navigate through comments, facilitating a more streamlined and organized document review process.