
Why use indentation in Google Docs?
Indentation is a formatting technique used to create visual structure and hierarchy in a document. It helps to organize information, improve readability, and give your document a professional look. In Google Docs, indentation can be particularly useful when writing essays, reports, or any other type of document that requires clear organization and structure.
Here are a few reasons why using indentation in Google Docs is beneficial:
- Visual clarity: Indenting paragraphs visually separates different sections or ideas, making it easier for readers to understand the structure of your document.
- Emphasize important points: By indenting specific paragraphs, you can draw attention to key information or highlight important points in your text.
- Differentiate quotes and citations: Indentation is commonly used to distinguish quotes, citations, or block texts from the rest of the content, helping to indicate that they are separate from the main body of the text.
- Navigate longer documents: In lengthy documents, indentation can help readers navigate through different sections and subsections more easily.
- Comply with formatting guidelines: Indentation is often required or recommended by specific style guides or formatting requirements for academic papers, reports, or professional documents.
Overall, indentation enhances the structure and organization of your document, making it more professional, readable, and visually appealing. It can guide the reader’s attention, improve comprehension, and help convey complex ideas in a clear and concise manner.
How to indent a paragraph in Google Docs?
Indenting paragraphs in Google Docs is a simple process that can be done using various methods. Here are three different ways to indent paragraphs in Google Docs:
Using the indent markers in the ruler:
1. Open your Google Docs document and select the paragraph you want to indent.
2. Locate the ruler at the top of the document. If the ruler is not visible, go to “View” in the menu bar and make sure “Show ruler” is checked.
3. On the ruler, you’ll find two triangular indent markers: a blue inverted triangle for the left indent and a gray triangle for the hanging indent.
4. Click and drag the blue triangle to the right to adjust the left indent. This will move the selected paragraph’s first line to the right.
Click and drag the gray triangle to adjust the hanging indent. This will move all the lines of the selected paragraph, except the first line, to the right.
5. Release the mouse button when you’ve achieved the desired indent.
Adjusting the indentation using the Format menu:
1. Open your Google Docs document and select the paragraph you want to indent.
2. Go to the “Format” menu at the top of the screen.
3. Select “Align & Indent,” and a drop-down menu will appear.
4. Choose either “Increase Indent” or “Decrease Indent” to adjust the paragraph’s indentation accordingly.
5. Repeat this process for any other paragraphs you wish to indent.
Using keyboard shortcuts for indentation:
1. Open your Google Docs document and select the paragraph you want to indent.
2. To increase the left indent, press “Tab” on your keyboard. Each press of the “Tab” key will move the paragraph further to the right.
3. To decrease the left indent, press “Shift + Tab” on your keyboard. Each press of this key combination will move the paragraph back to the left.
4. Use these keyboard shortcuts to adjust the indentation of multiple paragraphs in your document.
These methods allow you to easily indent paragraphs in Google Docs, giving your content a well-organized and professional look.
Using the indent markers in the ruler
The ruler in Google Docs provides convenient indent markers that allow you to adjust the indentation of paragraphs precisely. By using these markers, you can easily create consistent and visually appealing formatting in your document. Here’s how you can use the indent markers in the ruler:
- Select the paragraph or paragraphs that you want to indent.
- If the ruler is not visible, you can enable it by going to the “View” menu and selecting “Show ruler.”
- Locate the triangular markers on the ruler. The blue inverted triangle represents the left indent, and the gray triangle represents the hanging indent.
- Click on the blue triangle and drag it to the right to increase the left indent of the selected paragraph. This will move the first line of the paragraph to the right.
- To adjust the hanging indent, click on the gray triangle and drag it to the right. The hanging indent moves all lines of the paragraph except the first line.
- Release the mouse button when you have achieved the desired indentation.
To remove an indent, simply click on the indent marker and drag it back to its original position on the ruler. Alternatively, you can use the “Decrease Indent” option under the “Format” menu to remove the indent.
Using the indent markers in the ruler provides a visual and intuitive way to adjust paragraph indentation in Google Docs. It allows you to create consistent formatting and improve the organization and readability of your document.
Adjusting the indentation using the Format menu
In addition to using the indent markers in the ruler, Google Docs also offers the option to adjust paragraph indentation through the “Format” menu. This method provides an alternative way to modify indentation settings in your document. Here’s how you can adjust the indentation using the Format menu:
- Select the paragraph or paragraphs that you want to modify the indentation for.
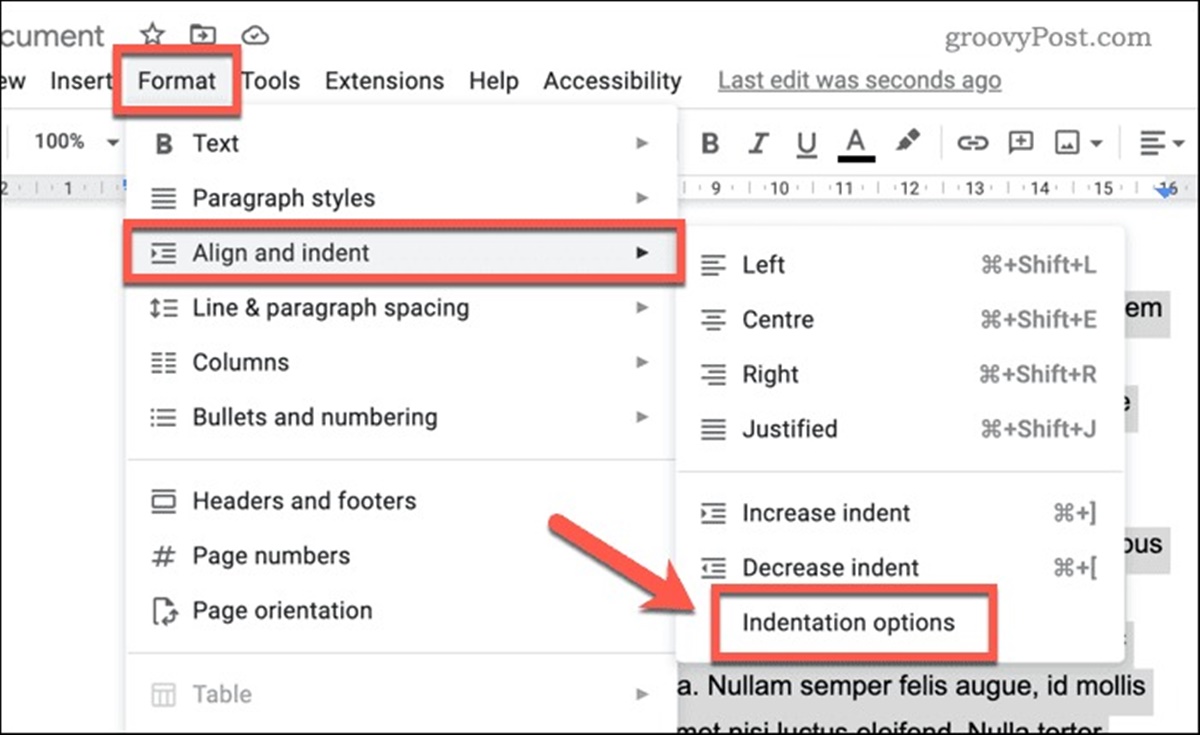
- Go to the “Format” menu at the top of the Google Docs interface.
- Hover your cursor over the “Align & Indent” option, and a submenu will appear.
- From the submenu, select either “Increase Indent” or “Decrease Indent” to adjust the indentation according to your preference.
- The “Increase Indent” option moves the selected paragraph(s) further to the right, increasing the indent.
- The “Decrease Indent” option moves the selected paragraph(s) back to the left, reducing the indent.
By using the Format menu, you can easily adjust the indentation of paragraphs in your Google Docs document. This method is particularly useful when you need to modify the indentation of multiple paragraphs simultaneously, providing a quick and efficient way to align and format your content.
Using keyboard shortcuts for indentation
In Google Docs, you can quickly and conveniently adjust paragraph indentation using keyboard shortcuts. These shortcuts provide a time-saving way to modify the indentation without needing to navigate through menus or use the mouse. Here’s how you can use keyboard shortcuts for indentation:
- Select the paragraph or paragraphs that you want to modify the indentation for.
- To increase the left indent, press the “Tab” key on your keyboard. Each press of the “Tab” key will move the paragraph further to the right, increasing the indent.
- To decrease the left indent, press “Shift + Tab” on your keyboard. Each press of this key combination will move the paragraph back to the left, reducing the indent.
- Use these keyboard shortcuts to adjust the indentation of multiple paragraphs in your document. Simply select the desired paragraphs and press the appropriate keyboard shortcut.
Keyboard shortcuts for indentation offer a quick and efficient way to align your content in Google Docs. They are particularly useful when you need to adjust indentation on the fly or when working with large documents that require frequent indentation modifications.
Changing the default indentation settings in Google Docs
If you find yourself frequently adjusting paragraph indentation in your Google Docs documents and would like to save time by having your preferred indentation settings applied automatically, you can change the default indentation settings. Here’s how you can do it:
- Open a Google Docs document and ensure that the ruler is visible. You can enable the ruler by going to the “View” menu and selecting “Show ruler.”
- Select a paragraph with the indentation settings that you want to make the default.
- On the ruler, adjust the indent markers (blue triangle for left indent, gray triangle for hanging indent) to match your desired indentation.
- Once you have set the indentation to your liking, go to the “Format” menu at the top of the screen.
- Hover over the “Paragraph styles” option, and a submenu will appear.
- Click on the arrow next to “Normal text,” and a drop-down menu will appear.
- From the drop-down menu, select “Update ‘Normal text’ to match.” This will apply your chosen indentation settings to the default paragraph style.
By following these steps, you can customize the default indentation settings in Google Docs. Now, whenever you start a new document or create a new paragraph using the “Normal text” style, it will automatically apply your chosen indentation settings.
This time-saving customization allows you to work more efficiently by avoiding the need to manually adjust indentation for every new paragraph or document you create.
Troubleshooting common indentation issues
While working with indentation in Google Docs, you may encounter some common issues that can affect the appearance and formatting of your document. Here are a few troubleshooting steps to resolve these indentation issues:
- Inconsistent indentation: If your paragraphs have varying levels of indentation or erratic spacing, select the affected paragraphs and use the “Increase Indent” or “Decrease Indent” options under the “Format” menu to standardize the indentation.
- Indentation not being applied: If you’re trying to indent a paragraph, but the indentation doesn’t seem to take effect, make sure that you have selected the correct paragraph, and try applying the indentation method again, such as using the indent markers in the ruler or the keyboard shortcuts.
- Hanging indent not working: If you’re attempting to create a hanging indent but the subsequent lines in the paragraph are not moving, ensure that you have selected the entire paragraph before adjusting the hanging indent marker in the ruler or using the appropriate keyboard shortcut.
- Misalignment on different devices: Indentation may appear differently on various devices or when printing. Double-check your document’s preview or print preview to ensure that the indentation looks consistent across different platforms.
- Unwanted automatic indentation: If you’re experiencing unexpected automatic indentation or the system is automatically adjusting the indentation without your input, check if any paragraph styles or formatting settings are causing the issue. Remove any unwanted formatting or reset the style to the default settings to regain control over indentation.
By troubleshooting these common indentation issues, you can ensure a consistent and visually appealing formatting in your Google Docs documents. Remember to double-check your indentation after making adjustments to ensure that it meets your desired formatting requirements.
Best practices for using indentation in your documents
Indentation is a powerful tool for organizing and improving the readability of your documents. To make the most of indentation in Google Docs, consider the following best practices:
- Consistency: Maintain consistency in your indentation throughout the document. Use the same indentation style for paragraphs within the same section or level of hierarchy.
- Use indentation selectively: Indentation is most effective when used purposefully. Indent paragraphs that begin new sections, quotes, or citations to visually separate them from the main text.
- Avoid excessive indentation: Too much indentation can make your document appear cluttered or distract readers. Use indentation sparingly and reserve it for significant breaks in your content.
- Consider readability: When indenting paragraphs, ensure that the text remains easy to read. Avoid using excessive widths for indentation that may cause lines to become too long or difficult to follow.
- Follow style guidelines: If you are working on a document that follows a specific style guide or formatting requirements, adhere to the guidelines provided for indentation style, such as hanging indents or specific indentation measurements.
- Review on different devices: Preview your document on different devices or platforms to ensure that the indentation appears as intended. What looks good on your computer screen may appear differently on mobile devices or when printed.
- Consider the audience: Take into account the preferences and expectations of your target audience. Certain industries or publications may have specific indentation conventions, so adapt accordingly.
- Test with sample prints: If you plan to print your document, ensure that your indentation looks correct on physical copies. Print a sample page to review before printing large quantities.
By following these best practices, you can effectively utilize indentation in your Google Docs documents. Remember that indentation serves as a guide to help readers navigate and understand your content. When used thoughtfully and consistently, indentation can greatly enhance the organization and readability of your documents.