
Overview of Hanging Indent in Google Docs
A hanging indent is a formatting technique used in documents to create a visually appealing and organized layout. It is commonly used to create bibliographies, reference lists, and outlines. In Google Docs, a hanging indent refers to the indentation of the second and subsequent lines of a paragraph, while the first line is left aligned with the margin. This indentation helps to differentiate and highlight each entry or point in the document.
Hanging indents are particularly useful when you have a list of items with longer descriptions or citations. By indenting the subsequent lines, it makes it easier for readers to quickly scan the information and identify different entries.
In Google Docs, it is easy to implement a hanging indent using either the ruler or the paragraph settings menu. Both options allow you to customize the indentation size and alignment based on your specific requirements. Furthermore, Google Docs provides additional styling and customization options to enhance the visual impact of your hanging indents.
By using hanging indents in your Google Docs, you can create professional-looking documents and improve the readability of your content. Whether you are working on a research paper, a presentation, or a simple document, incorporating hanging indents can help you present your information in a clear and organized manner.
Step-by-Step Guide to Add a Hanging Indent
Adding a hanging indent in Google Docs is a simple process that can be done in two different ways. Below is a step-by-step guide for each method:
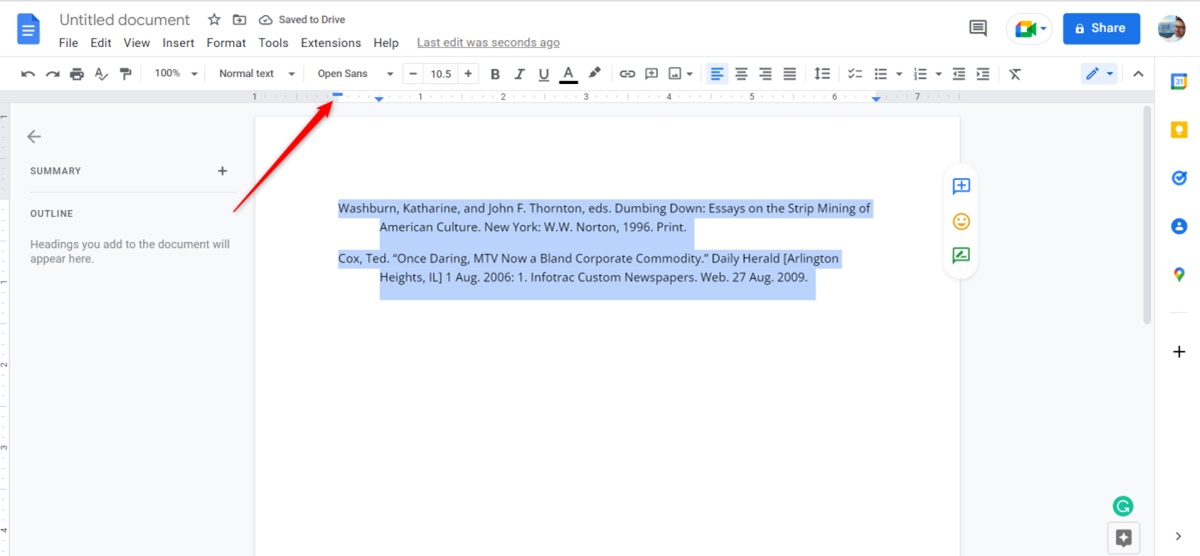
Method 1: Using the Ruler
- Open your document in Google Docs.
- Highlight the paragraph or section that you want to apply the hanging indent to.
- Locate the ruler at the top of the document. If the ruler is not visible, go to the “View” menu and make sure “Show ruler” is checked.
- Click and hold the left indent marker on the ruler, which is the blue triangle-shaped marker.
- While holding the left indent marker, drag it to the right to set the desired indentation for the first line.
- Release the left indent marker and locate the downward facing square marker on the ruler.
- Click and hold the square marker, then drag it to the right to set the desired indentation for the subsequent lines.
- Release the square marker, and the hanging indent will be applied to the selected paragraph or section.
Method 2: Using the Paragraph Settings Menu
- Open your document in Google Docs.
- Highlight the paragraph or section where you want to add the hanging indent.
- Go to the “Format” menu and select “Paragraph styles”.
- In the “Paragraph styles” menu, click on the “Align & indent” option.
- Choose “Indentation options”.
- In the “Indentation options” dialog box, adjust the “First line indent” to set the desired indentation for the first line.
- Adjust the “Left indent” to set the indentation for the subsequent lines.
- Click “Apply” to save the changes and apply the hanging indent to the selected paragraph or section.
Using either method, you can easily add a hanging indent in Google Docs to create a well-structured and visually appealing document.
Method 1: Using the Ruler
Google Docs provides a user-friendly and intuitive way to add a hanging indent using the ruler feature. Here is a step-by-step guide on how to use the ruler to apply a hanging indent:
- Open your document in Google Docs and navigate to the paragraph or section you want to format with a hanging indent.
- Highlight the text or paragraph that you want to apply the hanging indent to. You can select multiple paragraphs if needed.
- Locate the ruler, which is at the top of the document. If the ruler is not visible, you can go to the “View” menu and make sure “Show ruler” is selected.
- Identify the left indent marker on the ruler, which is a blue triangle-shaped marker.
- Click and hold the left indent marker, and then drag it to the right to set the desired indentation for the first line of the paragraph.
- Next, locate the downward-facing square marker on the ruler.
- Gradually drag the square marker to the right to set the desired indentation for the subsequent lines of the paragraph.
- Once you have set the hanging indent to your preference, release the square marker.
- The hanging indent will be applied to the selected text or paragraph, with the first line aligned with the left margin and the subsequent lines indented.
This method allows you to visually adjust the hanging indent by utilizing the ruler’s markers. It provides a straightforward way to customize the indentation for both single paragraphs and multiple paragraphs within your document. Make sure to apply the changes accordingly and preview how the hanging indent appears in your document to ensure it meets your formatting needs.
Method 2: Using the Paragraph Settings Menu
If you prefer to use the menu options to add a hanging indent in Google Docs, you can achieve this by following these steps:
- Open your document in Google Docs and navigate to the paragraph or section you want to format with a hanging indent.
- Select the text or paragraph that you want to apply the hanging indent to. You can also choose multiple paragraphs if needed.
- Go to the “Format” menu at the top of the screen.
- Select “Paragraph styles” and then choose “Align & indent”.
- A dropdown menu will appear with the “Indentation options” as one of the choices. Click on it.
- In the “Indentation options” dialog box, you will see two options: “First line indent” and “Left indent”.
- Adjust the “First line indent” to set the desired indentation for the first line of the paragraph.
- Similarly, adjust the “Left indent” to set the indentation for the subsequent lines of the paragraph.
- Click “Apply” to save the changes and apply the hanging indent to the selected text or paragraph.
By using the paragraph settings menu, you have more precise control over the exact measurements of the hanging indent. This method is particularly useful if you need to apply consistent indentations across multiple paragraphs or if you prefer to input specific numerical values for the indentations.
Remember to experiment with the “First line indent” and “Left indent” options until you achieve the desired formatting for your hanging indent. This flexibility allows you to create professional-looking documents with clear and organized content.
Tips for Adjusting the Hanging Indent
When working with hanging indents in Google Docs, you may encounter situations where you need to fine-tune the formatting or make specific adjustments. Here are some helpful tips to assist you in adjusting the hanging indent:
1. Experiment with indentation sizes: Depending on the formatting requirements or personal preferences, you can adjust the size of the hanging indent by moving the markers on the ruler or modifying the values in the paragraph settings menu. Try different indentation sizes to achieve the desired visual effect.
2. Preview with sample text: Before applying the hanging indent to an entire document, it’s a good idea to use a sample paragraph or section to preview how the formatting looks. This allows you to make any necessary adjustments before applying the hanging indent to the rest of the content.
3. Consider readability: Ensure that the hanging indent does not make the text too cramped or difficult to read. Keep in mind that readability is crucial, so find a balance between the indent size and the spacing between lines to maintain a visually pleasing and legible document.
4. Apply consistency: If you have multiple paragraphs or sections that require a hanging indent, try to maintain consistent formatting throughout the document. Consistency helps create a polished and professional appearance.
5. Format after content completion: It is generally recommended to apply hanging indents after you have finished writing or formatting your content. This helps avoid potential complications or inconsistencies when making changes or additions to the text.
6. Use keyboard shortcuts: To speed up the process of adding or adjusting hanging indents, familiarize yourself with the keyboard shortcuts available in Google Docs. For example, to access the paragraph settings menu, you can use the shortcut Ctrl + Alt + T (or Command + Option + T on a Mac).
7. Check the appearance on different devices: After applying the hanging indent, check how the document appears on different devices or platforms to ensure it maintains the desired formatting. This step is especially important if you plan to share or distribute the document to others.
By following these tips, you can effectively adjust hanging indents in Google Docs to create visually appealing and well-organized documents.
Common Issues and Troubleshooting
While working with hanging indents in Google Docs, you may encounter certain issues or face challenges in achieving the desired formatting. Here are some common issues and troubleshooting tips to help you overcome them:
1. Inconsistent indentations: You may notice that the indentations are inconsistent or not aligning properly. To resolve this issue, make sure to use the same method (ruler or paragraph settings) and indent size consistently throughout the document. Additionally, double-check that the formatting is applied to the correct paragraphs or sections.
2. Overlapping or uneven indents: If the hanging indent is overlapping or unevenly spaced, try adjusting the indent size or spacing settings. Ensure that there is adequate space between the first line and the subsequent lines to maintain readability and clarity.
3. Indents applying to unrelated text: If the hanging indent is being applied to unintended text or paragraphs, carefully review your selection before applying the formatting. Make sure you have selected only the desired paragraphs or sections.
4. Loss of formatting during collaboration: When collaborating on a document with others, there might be instances where the hanging indents are unintentionally altered or lost. To avoid this, communicate with your collaborators and ensure everyone is familiar with the formatting requirements. You can also use the “Suggesting” or “Commenting” modes to collaborate without directly modifying the formatting.
5. Handling long paragraphs: Long paragraphs with excessive text may result in a cramped appearance when applying a hanging indent. In such cases, consider breaking up the text into smaller, more manageable paragraphs to maintain readability. Alternatively, you can adjust the indent size or reduce the line spacing to make the content more visually appealing.
6. Exporting to other file formats: When exporting a Google Docs document to other file formats, such as PDF or Word, the hanging indents may not appear as intended. Double-check the formatting after exporting, and make any necessary adjustments in the converted file to ensure consistency and the desired visual effect.
7. Compatibility with different devices: The appearance of hanging indents may vary on different devices or platforms. Test the document on various devices and adjust the indentations if needed to maintain proper formatting and readability.
By troubleshooting these common issues, you can overcome challenges and ensure that your hanging indents appear correctly in your Google Docs document.
How to Remove a Hanging Indent
If you have applied a hanging indent in Google Docs and later decide to remove it, you can easily do so by following these steps:
- Open your document in Google Docs.
- Navigate to the paragraph or section that contains the hanging indent.
- Select the text or paragraph from which you want to remove the hanging indent. You can also choose multiple paragraphs if needed.
- Go to the “Format” menu at the top of the screen.
- Select “Paragraph styles” and then choose “Align & indent”.
- In the “Indentation options” dialog box, set the “First line indent” value to 0.
- Similarly, adjust the “Left indent” value to 0.
- Click “Apply” to save the changes and remove the hanging indent from the selected text or paragraph.
By setting both the “First line indent” and “Left indent” values to 0, you effectively remove the hanging indent formatting. This will leave the text or paragraph aligned with the left margin of the document, without any indentation.
It’s important to note that removing the hanging indent will affect only the selected text or paragraph. If you have multiple paragraphs with hanging indents, you will need to repeat the above steps for each paragraph that requires removing the formatting. Alternatively, you can use the “Clear Formatting” option from the “Format” menu to remove all formatting from the selected text or paragraph, including the hanging indent.
Removing a hanging indent in Google Docs is a simple process and allows you to easily revert back to standard formatting whenever needed.
Styling and Customization Options for Hanging Indents
Google Docs offers various styling and customization options to enhance the appearance and visual impact of hanging indents. These options allow you to customize the formatting according to your preferences and document requirements. Here are some key customization options you can explore:
1. Font Styles: Customize the font style, size, and color of the text within the hanging indent. Choose fonts that align with the overall theme and tone of your document to create a cohesive and visually pleasing look.
2. Line Spacing: Adjust the line spacing between the text within the hanging indent. Experiment with different line spacing options to strike the right balance between readability and visual appeal.
3. Bullets and Numbering: Customize the bullets or numbering style for lists within the hanging indent. You can choose from a variety of bullet styles or customize the numbering format to align with the document’s overall design.
4. Alignment Options: Apart from the default left alignment, you can experiment with other alignment options for the hanging indent. For example, you may want to align the hanging indent to the right or center it within the document for a unique visual effect.
5. Background Color: Customize the background color of the hanging indent to make it stand out or create a visual distinction from the rest of the content. This can be particularly useful when highlighting specific sections or important points within the document.
6. Border Styles: Add borders to the hanging indent to further emphasize its presence. You can choose different border styles, colors, and thicknesses to suit the overall design and aesthetic of your document.
7. Special Characters: Incorporate special characters or symbols within the hanging indent to enhance its visual appeal. This can be helpful when creating documents with decorative or artistic elements.
By exploring these styling and customization options, you can elevate the visual impact of your hanging indents and create documents that are not only well-structured but also visually engaging.