
What is Pages for Mac?
Pages for Mac is a word processing and page layout application developed by Apple Inc. It is part of the iWork productivity suite and is designed specifically for macOS and iOS devices. Pages offers a wide range of features and tools that enable users to create professional-looking documents, whether it’s a simple letter, a report, or even a multimedia-rich e-book.
With Pages, users can easily format and style their text, add images, charts, and tables, and collaborate with others in real-time. It provides a user-friendly interface with a variety of templates to jumpstart your document creation process. Whether you’re a student, professional, or simply someone who wants to create visually appealing documents, Pages is a versatile tool that caters to all levels of users.
One of the key advantages of Pages is its seamless integration with other Apple devices. You can start working on a document on your Mac and continue editing it on your iPhone or iPad, thanks to iCloud syncing. This makes Pages a convenient choice for those who frequently switch between different devices or need to collaborate with others.
Additionally, Pages offers export options that allow you to save your documents in various formats, including Microsoft Word, PDF, and EPUB. This ensures compatibility with different operating systems and devices, making it easy to share your work with others regardless of the software they use.
Overall, Pages is a powerful and versatile word processing application that provides an intuitive and feature-rich environment for creating stunning documents. Whether you’re a student, professional, or casual user, Pages for Mac offers the necessary tools to bring your ideas to life.
How to Open Pages on Mac?
Opening Pages on your Mac is a quick and straightforward process. Here’s how you can do it:
- Click on the “Finder” icon in your Dock or press Command + Spacebar to open Spotlight search.
- Type “Pages” in the search bar and press Enter.
- From the search results, click on the “Pages” application icon.
- Alternatively, you can locate the Pages application in your “Applications” folder. Open a Finder window, navigate to “Applications,” and double-click on the “Pages” icon.
- Once you click on the Pages icon, the application will launch, and you’ll be ready to start creating or editing your documents.
If you have previously worked on a Pages document, the application may open with a list of recent projects. You can select a document from the list by double-clicking on it, or you can choose to create a new document by clicking on the “New Document” button.
It’s worth noting that Pages is a pre-installed application on most Macs. However, if you don’t have it installed or accidentally deleted it, you can download it for free from the Mac App Store.
By following these simple steps, you can easily open Pages on your Mac and begin utilizing its powerful features to create stunning documents, reports, and more.
How to Create a New Document in Pages?
Creating a new document in Pages allows you to start fresh and begin crafting your content. Here are the steps to follow:
- Open Pages on your Mac by following the instructions in the previous section.
- Once the application is launched, you will be greeted with a welcome screen. Here, you can choose from various pre-designed templates to jumpstart your document creation process. Simply click on a template to select it, or click on “Blank” to create a document from scratch.
- If you select a template, you will be presented with a preview and the option to customize its content and layout. Make any necessary modifications, such as changing the title or adding/removing sections, and then click on “Choose” to start working with that template.
- If you choose to start with a blank document, Pages will open a new document window with a default blank canvas for you to begin typing or inserting content.
- To save your new document, go to the “File” menu in the top menu bar and select “Save” or press Command + S. Alternatively, you can click on the floppy disk icon in the top-left corner of the Pages window.
- Give your document a descriptive name and choose a location on your Mac to save it. Click “Save” to confirm.
Once you’ve created a new document in Pages, you can start adding text, images, tables, and other elements to customize it according to your needs. Take advantage of Pages’ formatting and styling options to make your document visually appealing and professional.
Remember to save your document frequently to avoid losing any work. You can also choose to enable iCloud syncing to access and edit your document across multiple devices.
With these steps, you can easily create a new document in Pages and begin your writing journey with a clean and personalized canvas.
How to Import a File into Pages?
If you have an existing document in a different file format, such as Microsoft Word or PDF, you can easily import it into Pages for further editing or formatting. Here’s how:
- Launch Pages on your Mac.
- In the top menu bar, click on “File” and select “Open.” Alternatively, you can press Command + O on your keyboard as a shortcut to open the file.
- Navigate to the location on your Mac where the file is stored. Select the file you want to import and click on “Open.”
- Pages will automatically import the file and convert it into the native Pages format.
- Once the file is imported, you can view and edit its contents using the various tools and features available in Pages.
- To save the imported file as a Pages document, go to the “File” menu and select “Save” or press Command + S.
- Provide a new name for the document if desired, choose a save location, and click on “Save” to complete the process.
It’s important to note that the imported file may not retain its original formatting entirely, especially if it contains complex elements or specific fonts not available in Pages. You’ll need to review and adjust the formatting as needed.
Pages also allows you to import files in other formats, such as ePub, HTML, and plain text. The process of importing these files follows a similar approach, where you’ll go to the “File” menu, select “Open,” and choose the desired file for import.
By following these steps, you can easily import files from various formats into Pages, enabling you to continue working on your documents without any compatibility issues.
How to Select Text in Pages?
When working in Pages, you’ll often need to select and manipulate text to apply formatting, make edits, or perform other actions. Here’s how you can select text in Pages:
- Launch Pages on your Mac and open the document containing the text you want to select.
- Using your mouse or trackpad, position the cursor at the beginning of the text you want to select.
- Click and hold the left mouse button, then drag the cursor across the text to highlight it. You’ll notice the selected text changing color or being outlined.
- If you want to select consecutive paragraphs or lines of text, press and hold the Shift key on your keyboard while dragging the cursor.
- To expand your selection to include additional text, hold down the Shift key and use the arrow keys on your keyboard to move the cursor in the desired direction.
- If you want to select a large block of text, you can use the keyboard shortcut Command + A to select all the text in the active document.
- If you only want to select a word, double-click on it with your mouse or trackpad. Triple-clicking will select the entire paragraph.
Once you’ve selected the desired text, you can perform various actions, such as applying formatting styles, changing font attributes, or deleting the selected content. You can also copy the selected text to the clipboard using the keyboard shortcut Command + C and paste it elsewhere using Command + V.
If you make a mistake while selecting text, you can quickly undo the selection by pressing Command + Z or going to the “Edit” menu and selecting “Undo Select All.”
By mastering the art of selecting text in Pages, you’ll have greater control over your document’s content, enabling you to make precise edits and formatting changes with ease.
How to Format Text in Pages?
Formatting text is essential for creating visually appealing and readable documents in Pages. Whether you want to change the font, adjust the size, or apply text effects, Pages provides a variety of formatting options. Here’s how to format text in Pages:
- Open Pages on your Mac and open the document containing the text you want to format.
- Select the text you want to format by following the steps outlined in the previous section.
- In the top menu bar, you’ll find the formatting options. These include font style, size, alignment, color, and more.
- To change the font style, click on the font dropdown menu and select a different font from the list. You can also use the keyboard shortcut Command + T.
- To adjust the font size, click on the font size dropdown menu and choose a size that suits your preference. You can also use the keyboard shortcut Command + Shift + > or Command + Shift + < to increase or decrease the size.
- For additional font formatting options, such as bold, italics, underline, and strikethrough, you can use the respective buttons in the formatting toolbar or select the desired option from the “Format” menu.
- To align text, use the alignment buttons in the formatting toolbar. These buttons allow you to align text left, center, right, or justify it evenly.
- Changing the color of the selected text can be done by clicking on the color picker button in the formatting toolbar. Select the color you want to apply to the text.
- If you want to apply more advanced formatting, such as drop caps, text shadows, or character spacing, navigate to the “Format” menu and select “Text,” where you’ll find additional options.
Remember to experiment with different formatting options to achieve the desired look and feel for your document. You can always preview your changes before finalizing them.
By mastering text formatting in Pages, you’ll be able to create documents that are not only visually appealing but also emphasize key points and improve readability.
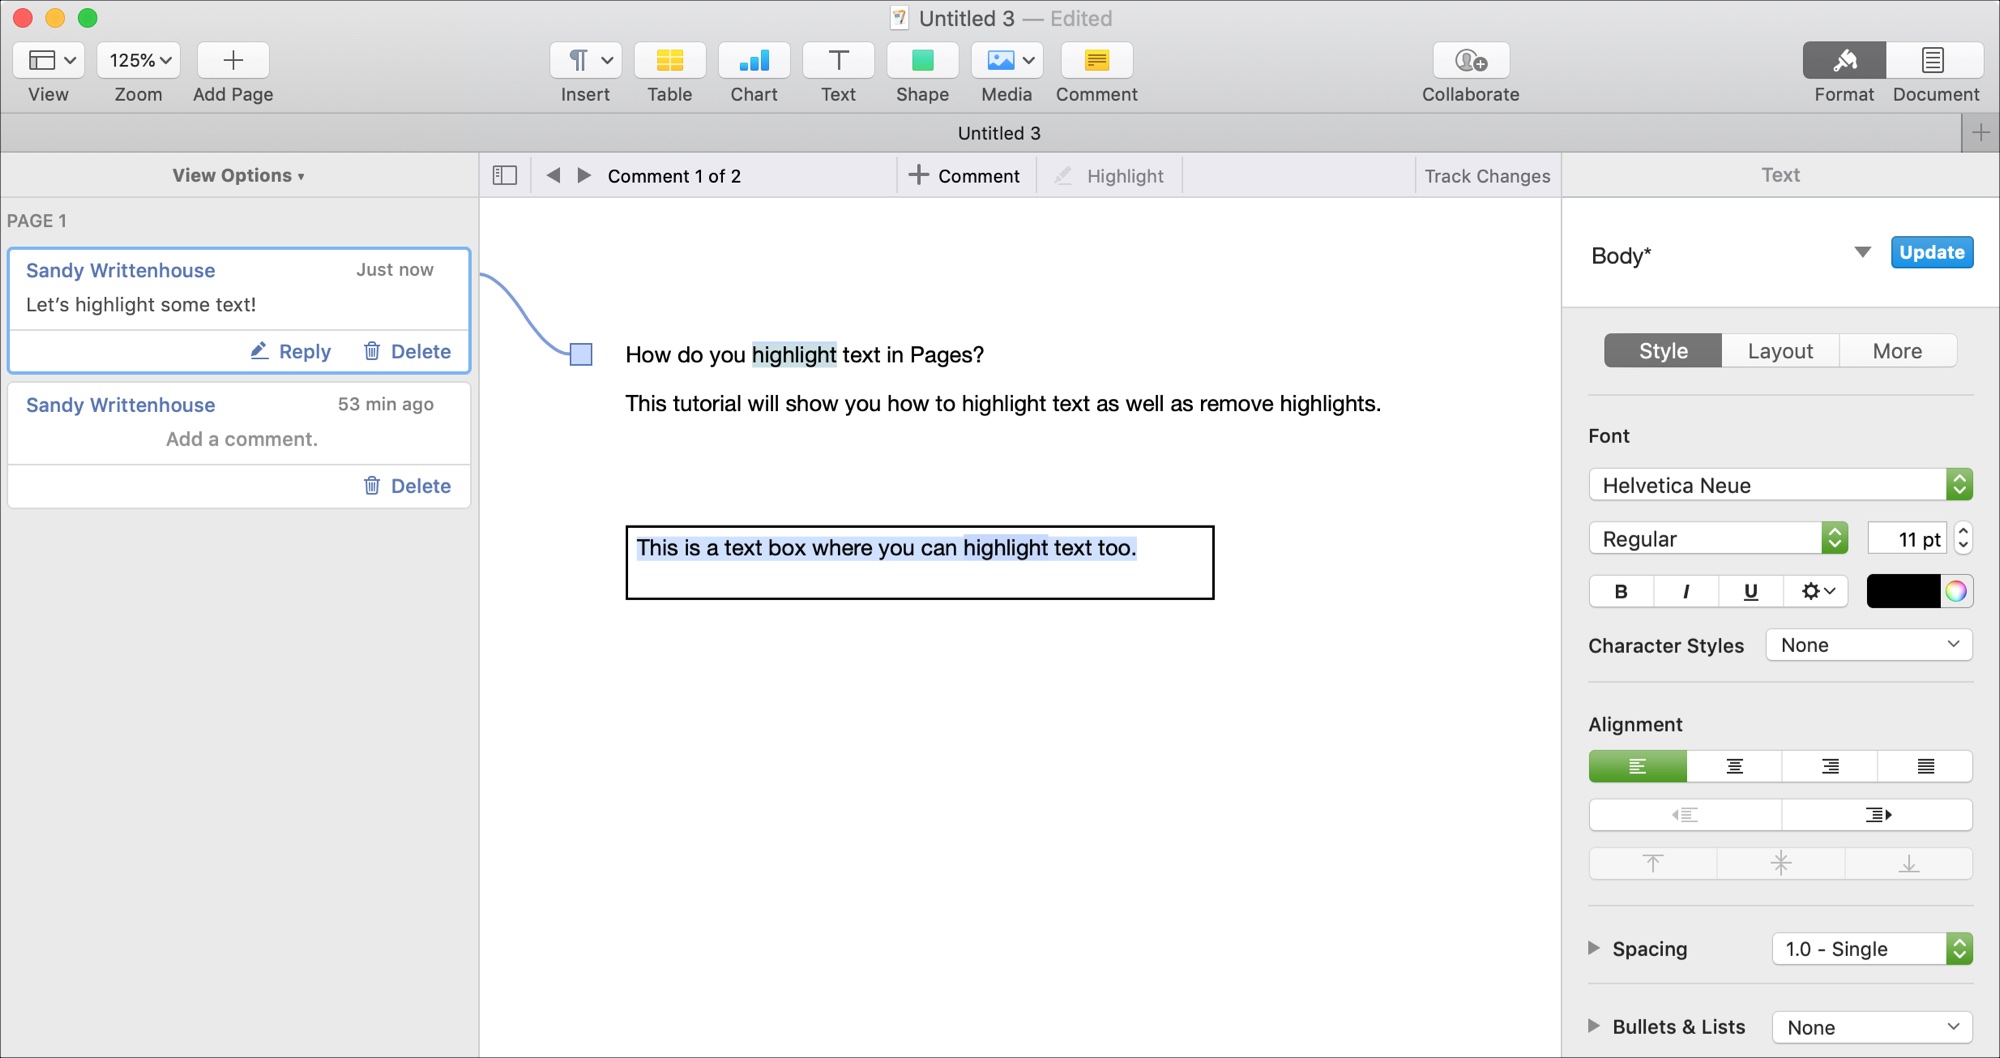
How to Highlight Text in Pages?
Highlighting text is a useful way to draw attention to important information or make specific sections stand out in your document. In Pages, you can easily highlight text to add emphasis or categorize content. Here’s how:
- Launch Pages on your Mac and open the document containing the text you want to highlight.
- Select the specific text you want to highlight by following the steps outlined in the previous section.
- In the top menu bar, go to the “Format” menu and select “Highlight.”
- A color palette will appear, displaying a variety of highlight color options. Choose the desired color by clicking on it.
- The selected text will now be highlighted with the chosen color.
- If you want to highlight additional text, repeat the selection and color selection process.
You can also use a keyboard shortcut to quickly highlight text in Pages. After selecting the text, press Shift + Command + H, and the selected text will be highlighted using the default highlight color. To change the default highlight color, go to the “Format” menu, select “Highlight,” and choose a new color from the palette.
It’s important to note that the highlight feature in Pages is non-destructive, meaning it doesn’t permanently change the text color. If you decide to remove the highlight later or change the highlight color, you can do so without affecting the text itself.
Highlighting text in Pages is an effective way to visually organize your document and make important information stand out. Whether you’re studying, reviewing, or simply want to add a touch of color to your document, highlighting text in Pages gives you the flexibility to customize your content and improve readability.
How to Change the Highlight Color of Text in Pages?
The ability to change the highlight color of text in Pages allows you to customize your documents and make them visually appealing. If you want to modify the default highlight color or experiment with different color options, follow these steps:
- Open Pages on your Mac and open the document containing the text with the existing highlight.
- Select the highlighted text by following the steps outlined in the previous section.
- In the top menu bar, go to the “Format” menu and select “Highlight.”
- A color palette will appear, displaying various highlight color options.
- To change the highlight color of the selected text, choose a new color from the palette by clicking on it.
- The selected text will now be highlighted with the newly chosen color.
- If you want to change the highlight color for future selections, without any specific text selected, go to the “Format” menu, select “Highlight,” and choose a new default color from the palette.
It’s important to note that the changes made to the highlight color only affect the selected text or future selections. Previously highlighted text will retain its original color unless you specifically modify it.
The ability to change the highlight color in Pages provides flexibility to match your document’s style or create visual hierarchies. Whether you want to use a consistent highlight color throughout the entire document or differentiate sections with various colors, Pages allows you to seamlessly customize the appearance of your text.
Experiment with different highlight colors to find the one that suits your needs, taking into consideration readability, accessibility, and overall document aesthetics.
By changing the highlight color in Pages, you can create visually engaging documents that catch the eye and effectively convey your message.
How to Remove Highlight from Text in Pages?
Removing the highlight from text in Pages is a simple process that allows you to revert the text back to its original appearance. Whether you want to remove a specific highlight or clear all highlights in your document, here’s how you can do it:
- Open Pages on your Mac and open the document containing the text with the highlight you want to remove.
- Select the text with the highlight by following the steps outlined in the previous sections.
- In the top menu bar, go to the “Format” menu and select “Highlight.”
- In the color palette that appears, click on the option labeled “None” or “No Fill.”
- The highlight will be removed from the selected text, and it will revert to its original appearance.
If you want to remove highlights from multiple sections or clear all highlights from your document, you can use the “Find & Replace” feature in Pages:
- Go to the “Edit” menu in the top menu bar and select “Find,” then choose “Find & Replace” or press Command + Option + F on your keyboard.
- In the Find & Replace dialog box, leave the “Find” field blank.
- Click on the “Replace” tab.
- In the “Replace” field, enter a space character (” “) to replace the highlighted text with a blank space.
- Click on the “Replace All” button.
- All the highlights in your document will be removed, and the affected text will have a blank space in place of the highlight.
By removing highlights from text in Pages, you can ensure that your documents have a clean and professional appearance. Whether you need to remove individual highlights or clear all highlights at once, Pages offers the flexibility to modify your text and refine its visual presentation.
How to Copy Highlighted Text in Pages?
In Pages, copying highlighted text allows you to easily duplicate and transfer important information. Whether you want to paste it in another location within the same document or into a separate application, here’s how you can copy highlighted text:
- Open Pages on your Mac and open the document containing the highlighted text you want to copy.
- Select the text with the highlight by following the steps outlined in the previous sections.
- Once the highlighted text is selected, right-click on it and choose “Copy” from the context menu. Alternatively, you can use the keyboard shortcut Command + C.
The selected text, including the highlight, will now be copied to your clipboard.
If you want to copy multiple sections of highlighted text within the same document, you can repeat the selection and copying process for each section.
After copying the highlighted text, you can proceed to paste it into the desired location. Simply position the cursor where you want the text to be inserted and right-click, then choose “Paste” from the context menu. You can also use the keyboard shortcut Command + V to paste the text.
By copying highlighted text in Pages, you can easily extract and reuse important information, saving you time and effort in retyping or recreating content.
Remember, when copying highlighted text, it’s important to ensure proper citation and attribution if you’re using it in a different context or sharing it with others.
With the ability to copy highlighted text in Pages, you can seamlessly integrate and transfer valuable content across your documents and applications.
How to Search for Highlighted Text in Pages?
In Pages, searching for highlighted text enables you to quickly locate and navigate to specific sections of your document that are marked with highlights. This can be particularly useful when you’re dealing with large documents or when you want to revisit important information. Here’s how to search for highlighted text in Pages:
- Open Pages on your Mac and open the document you want to search within.
- In the top menu bar, go to the “Edit” menu and select “Find,” or use the keyboard shortcut Command + F.
- A search bar will appear at the top-right corner of the Pages window. Enter the text you want to find in the search bar.
- Click on the magnifying glass icon or press Enter on your keyboard to start the search.
- Pages will highlight the first occurrence of the searched text in the document.
- If there are multiple occurrences of the searched text, you can navigate between them using the arrows in the search bar.
- To find the next occurrence, click on the right arrow or press Command + G on your keyboard. To find the previous occurrence, click on the left arrow or press Command + Shift + G.
- After you find the desired highlighted text, you can perform various actions, such as copying it or making additional edits.
By using the search feature in Pages to locate highlighted text, you can efficiently navigate through your document and easily access the specific sections that are marked for attention.
Remember, if you want to search for text that is highlighted with a specific color, you can apply the highlight color before beginning the search process. This will limit the search results to the desired text sections.
With the ability to search for highlighted text in Pages, you can efficiently manage and access the important information within your documents, saving you time and effort in locating specific content.
How to View a List of All Highlighted Text in Pages?
In Pages, viewing a list of all highlighted text allows you to get a comprehensive overview of the sections that are marked with highlights in your document. This feature is particularly useful when you want to quickly identify and review important information. Here’s how to view a list of all highlighted text in Pages:
- Open Pages on your Mac and open the document you want to view.
- In the top menu bar, go to the “View” menu and select “Highlights & Comments” or use the keyboard shortcut Option + Command + H.
- A sidebar will appear on the right side of the Pages window, showing a list of all highlighted text in your document.
- Scroll through the list to see the different sections that are highlighted.
- If you click on an item in the list, Pages will automatically navigate to the corresponding location in the document, making it easy to jump to the highlighted section.
- You can also use the search bar at the top of the sidebar to search for specific text within the highlighted sections.
Using the list of all highlighted text in Pages, you can quickly reference important information, review specific sections, or ensure consistency across your document.
Additionally, the highlighted text list in the sidebar is interactive, allowing you to interact with each item. You can add comments, reply to comments, or navigate to the next or previous item using the arrow buttons at the bottom of the sidebar.
By viewing a list of all highlighted text in Pages, you gain an organized and efficient way of accessing and managing the important content within your documents.
Tips and Tricks for Highlighting Text in Pages
Highlighting text in Pages can be a powerful tool for emphasizing important information and organizing your document. Here are some tips and tricks to make the most out of the highlighting feature in Pages:
- Choose appropriate highlight colors: Consider the purpose of the highlight and the overall aesthetics of your document when selecting highlight colors. Use a color that provides good contrast with the text and is visually appealing.
- Use multiple highlight colors: To categorize different types of information or create visual hierarchies, use different highlight colors. For example, use one color for key points, another color for references, and a different color for important quotes.
- Combine with other formatting options: Experiment with combining highlights with other formatting options, such as bold or italics, to further emphasize specific sections or make them stand out.
- Create a highlight key: If you’re using different highlight colors for different purposes, consider creating a key at the beginning or end of your document to explain what each color represents. This will assist readers in understanding the highlighted sections.
- Remove or modify highlights when necessary: If you find that the highlighting becomes distracting or no longer serves its purpose, you can easily remove or modify the highlight color using the steps outlined earlier. This will help maintain the readability and clarity of your document.
- Use highlights for collaboration: If you’re working on a document with a team, consider using highlights to indicate sections that require review, edits, or comments. This can help streamline the collaboration process and ensure everyone is on the same page.
- Use keyboard shortcuts: Familiarize yourself with the keyboard shortcuts for highlighting text in Pages to increase your productivity. For example, use Command + H to highlight selected text with the default highlight color.
- Customize highlight styles: Try customizing the highlight styles in Pages to match your personal preferences. You can adjust the opacity or intensity of the highlight color to create a unique look for your document.
By utilizing these tips and tricks, you can effectively highlight text in Pages to enhance readability, emphasize key information, and create visually appealing documents.