
Why Do You Need to Hide and Show Labels in Gmail?
Labels in Gmail are a useful organizational tool that allows you to categorize and manage your emails effectively. They act as virtual folders, enabling you to assign specific tags to your messages based on their content, sender, or importance. This makes it easier to locate and track important emails without the need to search through your entire inbox.
However, as your email volume increases, you may find yourself overwhelmed with an ever-growing list of labels cluttering your Gmail sidebar. This can make it challenging to find the labels you frequently use and can hinder your productivity. That’s where the ability to hide and show labels in Gmail comes in handy.
By hiding labels that you don’t frequently need, you can streamline your Gmail interface and reduce clutter. This helps you focus on the labels that are most relevant to your current tasks, making it easier to navigate and find important emails.
Furthermore, hiding labels can provide a cleaner and more organized view, making your overall Gmail experience more pleasant. Whether you’re using Gmail for personal or professional purposes, being able to customize the visibility of your labels can greatly enhance your productivity and efficiency.
On the other hand, there are times when you may want to show hidden labels in Gmail. Perhaps you have temporarily hidden a label that you now need to access or have accidentally hidden a label and need to restore it. Being able to easily show hidden labels ensures that you have quick access to all your categorized emails, regardless of whether they are currently visible or not.
Ultimately, the ability to hide and show labels in Gmail provides you with the flexibility to tailor your Gmail interface to your unique preferences and workflow. It empowers you to optimize your email management by customizing which labels are visible at any given time, helping you stay organized, focused, and in control of your inbox.
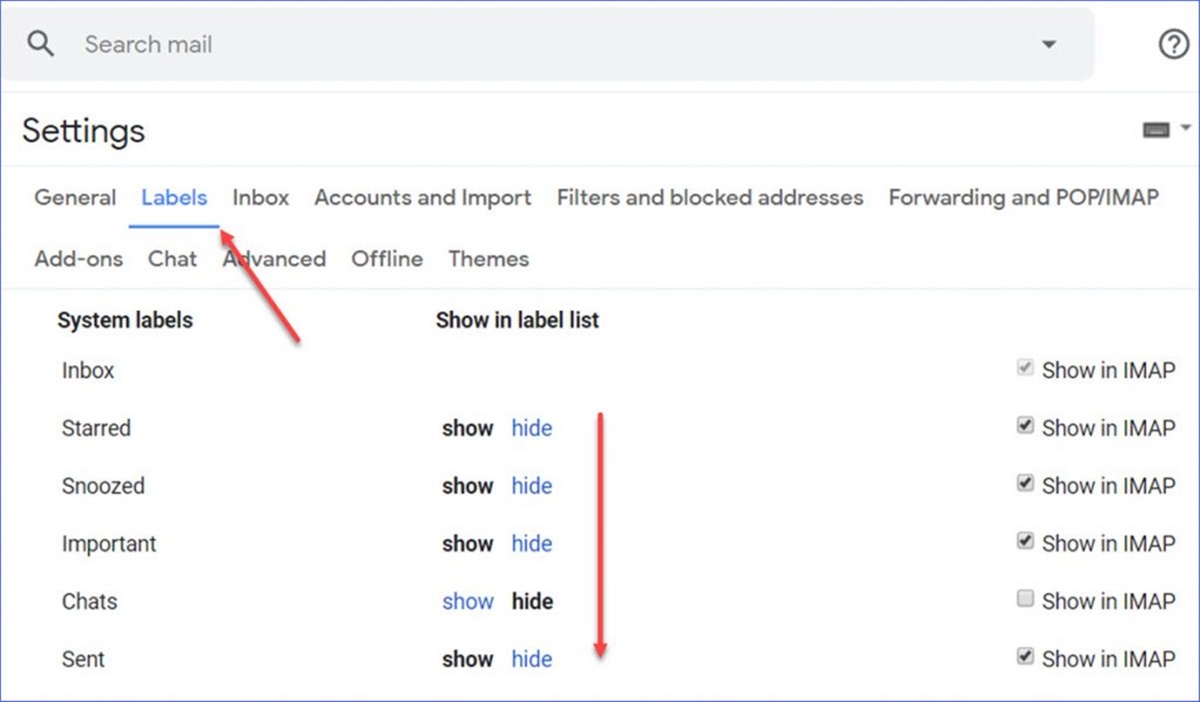
How to Hide Labels in Gmail
Hiding labels in Gmail is a straightforward process that allows you to declutter your sidebar and focus on the labels that matter most to you. Here’s a step-by-step guide on hiding labels in Gmail:
- Log in to your Gmail account.
- On the left side of the Gmail interface, locate the “Labels” section.
- Click on the downward-facing arrow next to a label that you want to hide.
- A dropdown menu will appear. From the options provided, click on “Hide” to hide the selected label.
- The label will now disappear from your Gmail sidebar.
- If you want to hide multiple labels, repeat steps 3-5 for each label you wish to hide.
- Your Gmail sidebar will now be decluttered, displaying only the labels that are visible.
It’s important to note that hiding a label in Gmail does not delete or remove the label or the associated emails. It simply makes the label invisible in the sidebar. You can always access hidden labels and their corresponding emails by using the search function or by showing the hidden labels (as we’ll discuss in the next section).
By selectively hiding labels that you don’t frequently use, you can create a cleaner and more focused Gmail interface. This allows you to prioritize and access the labels that are most important for your workflow, boosting your productivity and reducing visual distractions.
The process of hiding labels can be easily reversed if you decide to make a hidden label visible again. Follow the steps below to show hidden labels in Gmail:
- Log in to your Gmail account.
- Scroll down to the bottom of the Gmail sidebar. Click on “More” to expand the menu.
- A list of hidden labels will appear. Click on a hidden label that you want to show.
- The label will now reappear in your Gmail sidebar.
- If you want to show multiple hidden labels, repeat steps 3-4 for each label you wish to show.
- Your Gmail sidebar will now display the previously hidden labels alongside the visible ones.
By utilizing the hide and show labels feature in Gmail, you have the flexibility to personalize your inbox and optimize it according to your specific needs and preferences. Take advantage of this capability to create a workspace that suits your organization and productivity style.
How to Show Hidden Labels in Gmail
If you have previously hidden labels in Gmail and want to access them again, you can easily show hidden labels with just a few simple steps. Here’s how to show hidden labels in Gmail:
- Sign in to your Gmail account using your login credentials.
- Scroll down to the bottom of the Gmail sidebar. Locate and click on the “More” option, which is represented by three vertical dots.
- A dropdown menu will appear with a list of hidden labels. Click on the label that you want to show.
- The selected label will now become visible in your Gmail sidebar, along with the other visible labels.
- If you want to show multiple hidden labels, repeat steps 3-4 for each label you wish to display.
- Your Gmail sidebar will now include all the labels you chose to show, ensuring easy access to emails categorized under these labels.
Once you have shown hidden labels in Gmail, these labels will remain visible in your sidebar until you decide to hide them again or customize their visibility settings.
It’s important to note that showing hidden labels doesn’t impact the organization or structure of your email account. It simply restores the visibility of labels that you previously chose to hide. The emails associated with these labels will still be accessible and categorized as they were before hiding them.
Customizing the visibility of your labels in Gmail allows you to have a clutter-free and efficient workspace, ensuring that you only see the labels that are relevant at any given time. By showing hidden labels when you need them, you can easily locate specific emails and manage your inbox more effectively.
Whether you accidentally hid a label or need to access a label that you temporarily hid, the ability to show hidden labels in Gmail provides you with the flexibility to customize your inbox and organize your emails according to your preferences and workflow.
How to Customize Visibility Settings for Labels in Gmail
Gmail offers a convenient feature that allows you to customize the visibility settings for your labels. By adjusting these settings, you can control which labels are shown or hidden in your Gmail sidebar. Here’s how you can customize the visibility settings for labels:
- Log in to your Gmail account.
- On the left side of the Gmail interface, locate the “Labels” section.
- Click on the downward-facing arrow next to a label that you want to customize the visibility for.
- A dropdown menu will appear with various options. Select “Label settings.”
- A new window will open, displaying the settings for the selected label.
- In the “Label visibility” section, you can choose one of the following options:
- Show: This option will display the label in your Gmail sidebar.
- Show if unread: This option will only show the label if it contains unread emails.
- Hide: This option will hide the label from your Gmail sidebar.
- Select the desired visibility option for the label and click “Save” to apply the changes.
- If you want to customize the visibility settings for multiple labels, repeat steps 3-7 for each label.
- Your Gmail sidebar will now reflect the updated visibility settings for the labels you’ve customized.
By customizing the visibility settings for your labels, you can have better control over the organization of your Gmail interface. Tailoring the visibility of labels based on their importance or unread status enables you to have a streamlined and focused workspace.
It’s important to note that customizing the visibility settings for labels in Gmail doesn’t affect the actual organization or structure of your emails. It only changes whether the labels are shown or hidden in the sidebar. The emails associated with these labels will still be accessible and categorized as they were before customizing the visibility settings.
Take advantage of this feature to personalize your Gmail experience and make it more suited to your specific needs and preferences. By customizing the visibility settings for labels, you can optimize your email management, improve efficiency, and maintain a clutter-free inbox.
Tips for Using Labels in Gmail Effectively
Labels in Gmail are a powerful way to organize and manage your emails. To make the most out of this feature, consider the following tips for using labels effectively:
- Use descriptive and specific labels: When creating labels, choose names that accurately reflect the content or purpose of the emails you plan to assign to them. This will make it easier to navigate and locate specific emails later on.
- Create hierarchies and sub-labels: Organize your labels into hierarchies or categories to further classify your emails. This can help you achieve a more structured and organized inbox, especially if you receive a large volume of emails.
- Color-code your labels: Assign different colors to your labels to visually distinguish them. This can provide a quick and visual way to identify and process emails based on their associated labels.
- Automate label assignments: Take advantage of Gmail’s filters and rules to automatically assign labels to incoming emails based on specific criteria. This can save you time and ensure that emails are consistently categorized without manual intervention.
- Utilize nested labels: Gmail allows you to create sub-labels, also known as nested labels. This feature can be handy when you need to categorize emails into more specific subcategories within a broader label.
- Archive or delete irrelevant emails: Regularly review your inbox and archive or delete emails that are no longer relevant or needed. This will prevent your labels from becoming cluttered and ensure that you can easily locate important emails in the future.
- Use search filters: Gmail’s search function supports advanced filters and operators. This comes in handy when you need to locate specific emails across multiple labels or apply complex search criteria.
- Set up label notifications: For labels that require immediate attention, you can set up notifications to receive alerts whenever new emails are assigned to those labels. This helps you stay on top of important emails and prevents them from getting buried in your inbox.
- Maintain consistency: Establish and stick to a labeling system that works well for you. Consistently applying labels to your emails will make it easier for you to find, sort, and manage your inbox efficiently.
By implementing these tips, you can harness the full potential of labels in Gmail and transform your email management. Stay organized, reduce clutter, and streamline your workflow by effectively utilizing labels to categorize and access your emails with ease.