
Overview of iPhone Text Grouping Feature
The text grouping feature on the iPhone allows users to organize their text messages into distinct groups, making it easier to manage and find specific conversations. This feature is especially beneficial for individuals who receive numerous text messages from different contacts and want to stay organized.
When enabled, the text grouping feature groups messages based on the contact or topic, allowing users to quickly access and navigate through their conversations. Instead of scrolling through a long list of individual messages, users can simply tap on the desired text group to view all related messages.
This feature also offers various customization options, such as changing the color and name of text groups, as well as archiving and muting conversations. Additionally, users can manage notifications for specific text groups, ensuring that they stay informed without being overwhelmed by constant alerts.
With the text grouping feature, users can easily create new groups, add messages to existing groups, and edit or delete groups as needed. This functionality provides a convenient and efficient way to organize and streamline text message conversations on the iPhone.
Whether you want to distinguish between work-related messages, family conversations, or specific topics of interest, the text grouping feature on the iPhone offers a practical solution for keeping your messages organized and easily accessible.
Next, we will explore how to enable and access the text grouping feature on your iPhone.
How to Enable and Access the Text Grouping Feature on iPhone
The text grouping feature is available on iPhones running iOS 14 and later versions. To enable and access this feature, follow the steps below:
- Open the Settings app on your iPhone.
- Scroll down and tap on “Messages” to access the messaging settings.
- In the Messages settings, find the “Threaded Conversations” option and toggle it on.
- Once enabled, return to the Messages app on your home screen.
- You should now see your text messages grouped based on contacts or topics.
- To access a specific text group, simply tap on it to view the associated messages.
Enabling and accessing the text grouping feature is a straightforward process and can greatly enhance your messaging experience on the iPhone. By default, your messages will now be organized into separate groups, making it easier to locate and manage conversations.
It’s important to note that after enabling the text grouping feature, new messages from existing contacts or topics will automatically be added to their respective groups. However, if you have a long history of text messages on your iPhone, it may take some time for the device to organize them all into their respective groups.
If you prefer to disable the text grouping feature at any point, simply revisit the Messages settings and toggle off the “Threaded Conversations” option. Disabling this feature will revert your messages to the traditional chronological order without grouping.
Now that you’ve enabled and accessed the text grouping feature on your iPhone, let’s explore how to create new text groups.
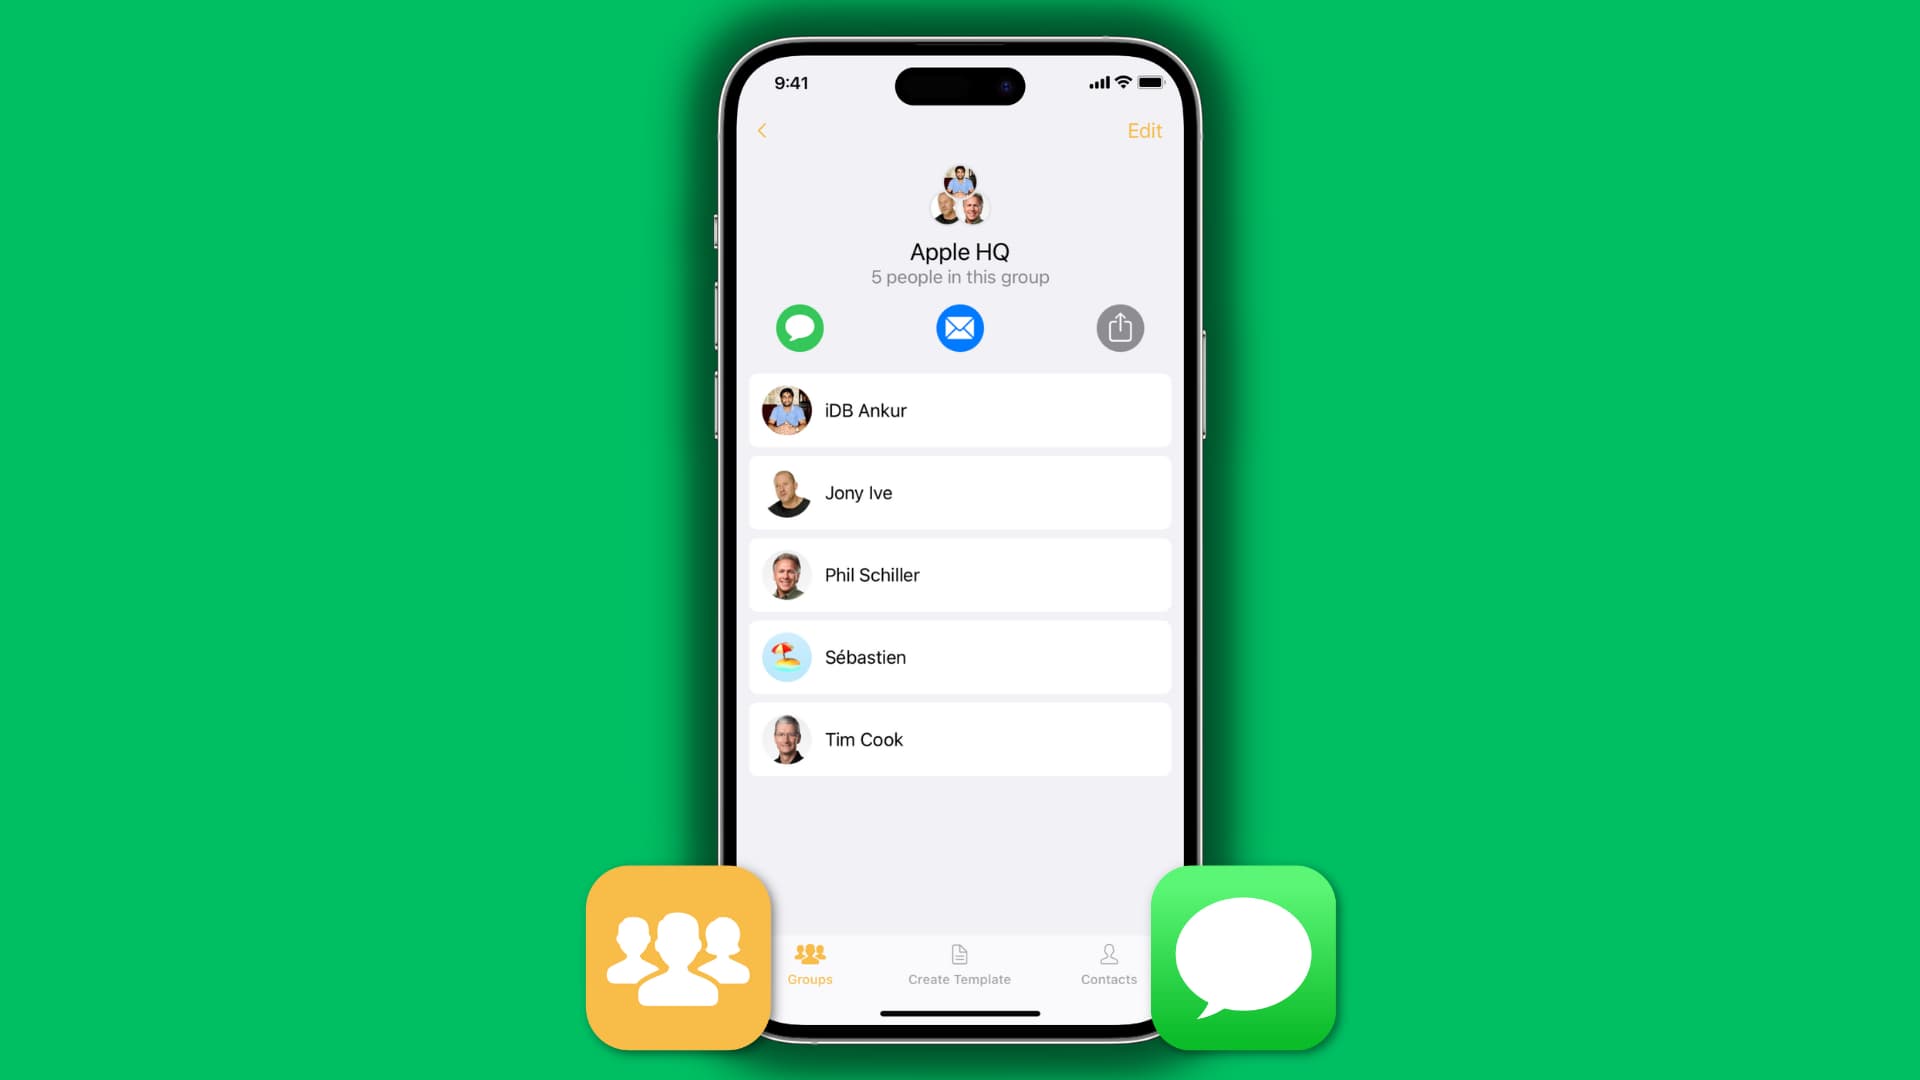
Creating New Text Groups on iPhone
Creating new text groups on your iPhone allows you to categorize and organize your conversations based on specific contacts or topics. Follow the steps below to create a new text group:
- Open the Messages app on your iPhone.
- Tap on the “New Message” icon in the top right corner to compose a new message.
- In the “To” field, enter the contact or contacts you want to add to the new text group. You can type in their names or tap on the “+” button to select from your contacts list.
- After adding the desired contact(s), you will notice a new group created with their names or numbers as the title.
- You can now start sending messages within this newly created text group.
Alternatively, you can also create a new text group by following these steps:
- Open the Messages app on your iPhone.
- Locate an existing conversation from the desired contact or topic.
- Tap on the conversation to open it.
- In the top right corner, tap on the three dots (…) to access additional options.
- Select “Info” from the menu.
- On the info screen, tap on “Add Contact” to add more contacts to the group.
- A new text group will be created, and you can now message the participants within this group.
By creating text groups, you can easily manage and keep track of multiple conversations related to a particular contact or topic. This feature is particularly useful for organizing work-related discussions or group chats with friends and family.
Now that you know how to create new text groups on your iPhone, let’s move on to the next step: adding messages to existing text groups.
Adding Messages to Existing Text Groups on iPhone
Once you have created text groups on your iPhone, you can easily add messages to existing groups. This allows you to keep all relevant conversations organized and easily accessible. Here’s how you can add messages to existing text groups:
- Open the Messages app on your iPhone.
- Scroll through your list of conversations and locate the desired text group.
- Tap on the text group to open the conversation.
- In the text input field at the bottom, type your message or select a media attachment to send.
- Tap the send button to add the message to the group.
By sending messages within the existing text group, you ensure that all related conversations are consolidated and easily accessible in one place.
If you receive a message from an individual contact or group that belongs to an existing text group, the message will automatically be added to the corresponding group. This ensures that conversations are kept organized and easy to find.
Additionally, you can also add multiple contacts to an existing text group by following these steps:
- Open the Messages app on your iPhone.
- Find the existing text group you want to add contacts to.
- Tap on the text group to open the conversation.
- In the conversation, tap on the group name or contact names at the top of the screen.
- Select “Add Contact” to include more participants in the text group.
- A new contact will be added to the existing text group, and they can now send and receive messages within the group.
Adding messages to existing text groups helps you maintain clear and organized communication with multiple contacts or within specific topics. It ensures that all relevant conversations are easily accessible and reduces clutter in your Messages app.
Now that you know how to add messages to existing text groups, let’s explore how to edit or delete text groups on your iPhone.
Editing and Deleting Text Groups on iPhone
Editing and deleting text groups on your iPhone allows you to manage and organize your conversations more effectively. Whether you want to update the group name, change the group color, or remove a group altogether, you have the flexibility to customize your messaging experience. Here’s how you can edit and delete text groups on iPhone:
Editing Text Groups:
- Open the Messages app on your iPhone.
- Scroll through your list of conversations and locate the desired text group.
- Tap on the text group to open the conversation.
- In the conversation, tap on the group name or contact names at the top of the screen.
- On the next screen, you will find options to edit the group name, change the group color, and add or remove participants.
- Select the option you want to edit and make the desired changes.
- Tap “Done” to save the changes.
By editing text groups, you can customize them to better reflect the purpose or participants of the conversation. Changing the group name and color can help you differentiate between various groups and make it easier to locate them.
Deleting Text Groups:
- Open the Messages app on your iPhone.
- Scroll through your list of conversations and locate the text group you want to delete.
- Swipe left on the text group to reveal the “Delete” option.
- Tap “Delete” to remove the text group from your conversations.
Deleting a text group will permanently remove it from your Messages app and cannot be undone. Be cautious when deleting text groups, as it will also delete all the messages within that group.
By editing and deleting text groups, you can keep your messaging app organized and clutter-free. It allows you to have better control over your conversations and customize your messaging experience to suit your preferences.
Now that you know how to edit and delete text groups on your iPhone, let’s move on to managing notifications for text groups.
Managing Notifications for Text Groups on iPhone
Managing notifications for text groups on your iPhone allows you to stay informed about important conversations while avoiding unnecessary distractions. With the ability to customize notification settings for individual text groups, you can prioritize certain groups and control the frequency of notifications. Here’s how you can manage notifications for text groups:
- Open the Messages app on your iPhone.
- Scroll through your list of conversations and locate the desired text group.
- Tap on the text group to open the conversation.
- In the conversation, tap on the group name or contact names at the top of the screen.
- On the next screen, you will find options to manage notifications for the group.
- Select “Hide Alerts” to mute notifications for the group. This will prevent the group from sending alerts or appearing as unread.
- If you want to receive notifications for the group, ensure that “Hide Alerts” is toggled off. You can also customize the alert style, sounds, and other notification settings.
- Tap “Done” to save the changes.
By managing notifications for text groups, you can prioritize your conversations and reduce distractions. Muting certain groups allows you to focus on other important tasks without being constantly interrupted by notifications.
In addition to muting text groups, you can also customize notification settings for specific individuals within the group. For example, you may want to receive alerts from your boss or close family members, while muting notifications from other participants.
To customize individual settings for a text group:
- Open the Messages app on your iPhone.
- Scroll through your list of conversations and locate the desired text group.
- Tap and hold on a specific contact within the group.
- In the pop-up menu, select “Info”.
- On the info screen, you will find options to manage notifications and customize settings for that specific contact.
- Choose the desired notification settings for the individual.
- Tap “Done” to save the changes.
Managing notifications for text groups allows you to stay in control of your messaging experience on the iPhone. It ensures that you can prioritize important conversations while minimizing distractions from less critical ones.
Now that you know how to manage notifications for text groups, let’s move on to changing the color and name of text groups on iPhone.
Changing the Color and Name of Text Groups on iPhone
Changing the color and name of text groups on your iPhone allows you to personalize and differentiate your conversations for easy identification. This feature allows you to assign a unique color and name to each text group, making it easier to locate and distinguish them from others. Here’s how you can change the color and name of text groups on iPhone:
- Open the Messages app on your iPhone.
- Scroll through your list of conversations and locate the desired text group.
- Tap on the text group to open the conversation.
- In the conversation, tap on the group name or contact names at the top of the screen.
- On the next screen, you will find options to change the group name and color.
- To change the group name, tap on the current group name and enter the desired name.
- To change the group color, tap on the colored circle next to the group name and select a new color from the available options.
- Tap “Done” to save the changes.
By customizing the color and name of text groups, you can easily identify and locate specific conversations at a glance. Assigning different colors to different groups can help you visually categorize and organize your messages, making it easier to navigate through your conversations.
It’s important to note that when you change the color or name of a text group, these changes will only apply to your device. The recipients of your messages will not see the changed name or color on their devices.
Changing the color and name of text groups provides a personalized touch to your messaging experience and allows for better organization and visual distinction of your conversations on the iPhone.
Now that you know how to change the color and name of text groups, let’s explore how to sort and view your text groups on the iPhone.
Sorting and Viewing Text Groups on iPhone
Sorting and viewing text groups on your iPhone allows you to organize and access your conversations in a way that suits your preferences. The Messages app provides options for sorting your text groups based on different criteria, making it easier to locate and prioritize specific conversations. Here’s how you can sort and view your text groups on the iPhone:
- Open the Messages app on your iPhone.
- In the bottom menu, tap on “Groups” to access your text groups.
- In the top right corner, tap on the “Sort” button to reveal sorting options.
- Choose from the available sorting options, such as “Recent”, “Name”, or “Unread”.
- Your text groups will now be sorted based on your selected criteria.
- To switch between different views, tap on the “View” button in the top left corner.
- You can choose between “Grid” view, which displays text groups as icons, or “List” view, which shows text groups as a list.
Sorting your text groups allows you to prioritize important conversations or locate specific groups more easily. For example, if you frequently communicate with a particular contact or have an important group chat, you can sort by “Recent” to keep those conversations at the top for quick access.
Switching between different views, such as the grid or list view, gives you flexibility in how you prefer to view and navigate through your text groups. You can choose the view that best suits your visual preferences and makes it easier for you to locate and manage your conversations.
It’s worth noting that the sorting and viewing options may vary depending on the version of iOS that your iPhone is running. Newer versions of iOS may offer additional options or a different user interface for managing and viewing text groups.
By sorting and viewing your text groups on the iPhone, you can effectively manage and access your conversations based on your preferences. It provides a customizable and organized approach to navigating through your messages.
Now that you know how to sort and view your text groups, let’s explore how to mute specific text groups on iPhone.
Muting Text Groups on iPhone
Muting text groups on your iPhone allows you to temporarily silence notifications from specific conversations while still having access to them. This feature is especially useful when you want to reduce distractions or temporarily pause notifications from less important group chats. Here’s how you can mute text groups on your iPhone:
- Open the Messages app on your iPhone.
- Scroll through your list of conversations and locate the text group you want to mute.
- Swipe left on the text group to reveal the “More” option.
- Tap on “More” to access additional options for the group.
- Select “Hide Alerts” to mute notifications for that specific group.
By muting a text group, you will no longer receive banner notifications, sounds, or vibrations for new messages within that group. However, you will still see the messages in the Messages app and receive notifications for other conversations.
It’s important to note that muting a text group is temporary and can be reversed whenever you want to receive notifications again. To unmute a muted text group, follow the same steps and toggle off the “Hide Alerts” option.
Muting text groups provides you with more control over your notifications and allows you to prioritize important conversations while minimizing distractions from less critical ones. It allows you to focus on work, personal tasks, or quiet periods without being constantly interrupted by notifications.
Now that you know how to mute text groups on your iPhone, let’s explore how to archive and unarchive text groups.
Archiving and Unarchiving Text Groups on iPhone
The option to archive and unarchive text groups on your iPhone provides a convenient way to temporarily hide and restore conversations. When you archive a text group, it is removed from your main inbox, decluttering your messages while still keeping them accessible. Here’s how you can archive and unarchive text groups on your iPhone:
Archiving Text Groups:
- Open the Messages app on your iPhone.
- Scroll through your list of conversations and locate the text group you want to archive.
- Swipe left on the text group to reveal the “Archive” option.
- Tap on “Archive” to move the text group to the archived section.
By archiving a text group, it will no longer appear in your main inbox. However, it can still be accessed by tapping on the “Archived” section at the top of the Messages app.
Unarchiving Text Groups:
- Open the Messages app on your iPhone.
- Scroll to the top of the conversation list and tap on “Archived” to access your archived text groups.
- Swipe left on the text group you want to unarchive.
- Tap on “Unarchive” to bring the text group back to your main inbox.
Unarchiving a text group will restore it to your main inbox, allowing you to view and receive new messages within that group as usual.
Archiving text groups can be useful for decluttering your Messages app without permanently deleting conversations. You can quickly retrieve archived conversations whenever needed, keeping your messaging experience organized and efficient.
It’s worth noting that archived text groups will be automatically unarchived when a new message is received in that group, ensuring that important conversations are not missed.
Now that you know how to archive and unarchive text groups on your iPhone, let’s move on to addressing some frequently asked questions about the iPhone text grouping feature.
Frequently Asked Questions about iPhone Text Grouping Feature
Here are some commonly asked questions about the iPhone text grouping feature:
Q: Can I enable text grouping on older iPhone models?
A: No, the text grouping feature is available on iPhones running iOS 14 and later versions. If your iPhone is not running iOS 14 or a later version, you will not have access to this feature.
Q: Can I have different names and colors for the same contact in different text groups?
A: No, the name and color assigned to a contact in one text group will apply to all instances of that contact in other groups. Changing the name or color of a contact within one text group will automatically update it across all text groups.
Q: Can I remove someone from a text group without deleting the entire conversation?
A: Yes, you can remove individual participants from a text group without deleting the entire conversation. To do this, open the text group, tap on the group name or contact names, and select “Info”. From there, you can remove specific participants from the group.
Q: Can I organize my text groups into folders or categories?
A: No, the Messages app on iPhone does not currently support organizing text groups into folders or categories. You can, however, use the text grouping feature to group conversations based on contacts or topics.
Q: Will muting a text group also mute calls and FaceTime from that group?
A: No, muting a text group only applies to text message notifications. Calls and FaceTime notifications will still come through as usual, unless you specifically mute or block those contacts separately.
Q: Are archived text groups backed up when I perform an iCloud backup?
A: Yes, archived text groups are included in iCloud backups. When you restore your iPhone from an iCloud backup, archived text groups will also be restored along with your other conversations.
These are some of the frequently asked questions about the iPhone text grouping feature. With this knowledge, you can make the most of the text grouping functionality and organize your conversations effectively.
Now that you have a better understanding of the iPhone text grouping feature and how to utilize its various functions, you can optimize your messaging experience and stay well-organized within your text groups.