
Enable Email Forwarding in Outlook
If you find yourself managing multiple email addresses, it can be time-consuming to constantly switch between accounts. Luckily, Outlook offers a convenient solution by allowing you to forward your emails to another email address. This means that you can receive all of your incoming messages in one central location, saving you both time and effort.
To enable email forwarding in Outlook, follow these simple steps:
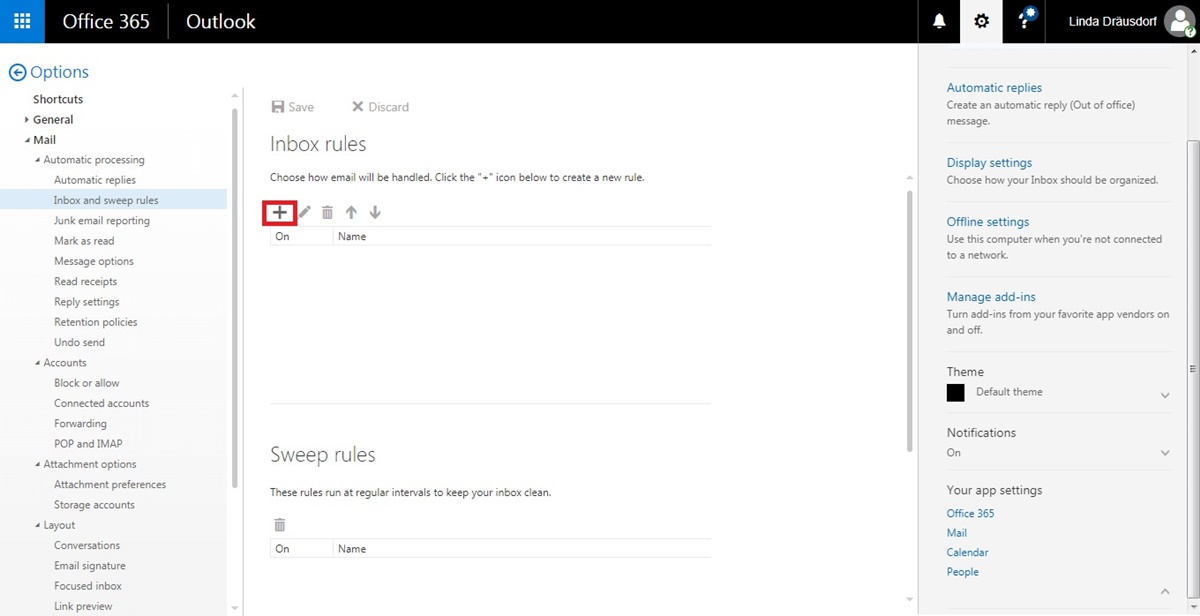
- Open Outlook and go to the File tab.
- Select “Options” from the drop-down menu.
- In the Outlook Options window, click on “Mail” in the left-hand column.
- Scroll down to the “Forwarding” section.
- Check the box next to “Enable forwarding”.
- Enter the email address to which you want to forward your emails.
- Choose whether you want to keep a copy of each forwarded message in your Outlook inbox or delete it after forwarding.
- Click “OK” to save your changes.
Once you have completed these steps, all incoming emails will be forwarded to the specified email address. This ensures that you never miss an important message, even if you are not actively checking your Outlook account.
It’s important to note that enabling email forwarding in Outlook is not a one-size-fits-all solution. You may have different requirements for forwarding emails based on specific criteria. In the following sections, we will explore advanced methods for forwarding emails in Outlook.
Choose the Forwarding Method
In Outlook, there are two main methods for forwarding emails: forwarding all incoming emails or forwarding emails based on specific criteria. Each method has its own benefits and considerations, so it’s important to choose the option that best suits your needs.
Forward All Incoming Emails:
If you want to forward every incoming email to another email address, the “Forward all incoming emails” method is the simplest solution. With this method, all emails that land in your Outlook inbox will be automatically forwarded to the specified email address without any filtering or sorting.
This method is ideal for individuals who want a seamless email forwarding experience, without the need for any additional configurations. However, keep in mind that forwarding all incoming emails may result in a higher volume of forwarded messages, which could potentially clutter your forwarded mailbox.
Forward Emails Based on Specific Criteria:
If you only want to forward specific emails that meet certain criteria, such as emails from a particular sender or with specific keywords, you can set up forwarding rules in Outlook. This method allows for more control and customization over the forwarding process.
To set up forwarding rules, go to the “Rules” section in the Outlook Options window. Here, you can create rules based on various criteria, such as sender, subject, recipient, and more. You can specify whether to forward the emails to another email address or a distribution list.
By using the forwarding rules method, you can ensure that only relevant emails are forwarded, reducing the clutter in your forwarded mailbox and keeping your inbox well-organized.
Choosing the right forwarding method depends on your specific needs and preferences. If you want a straightforward forwarding process, without any filtering or sorting, the “Forward all incoming emails” method is the way to go. However, if you want more control and customization over which emails are forwarded, setting up forwarding rules is the recommended approach.
Forward All Incoming Emails
Forwarding all incoming emails in Outlook is a convenient option to ensure that every message you receive is automatically forwarded to another email address. This method is particularly useful if you want to consolidate all your emails in a single inbox or if you have a designated email account for receiving forwarded messages.
To forward all incoming emails in Outlook, follow these steps:
- Open Outlook and go to the File tab.
- Select “Options” from the drop-down menu.
- In the Outlook Options window, click on “Mail” in the left-hand column.
- Scroll down to the “Forwarding” section.
- Check the box next to “Enable forwarding”.
- Enter the email address to which you want to forward your emails.
- Choose whether you want to keep a copy of each forwarded message in your Outlook inbox or delete it after forwarding.
- Click “OK” to save your changes.
Once you’ve completed these steps, all incoming emails will be automatically forwarded to the specified email address. This ensures that you can access all your messages in one centralized inbox, regardless of the email account they were originally sent to.
It’s important to note that when forwarding all incoming emails, you may want to consider organizing the forwarded messages in the recipient’s inbox. This can be achieved by creating folders or using filters to automatically sort and categorize the forwarded emails. By doing so, you can maintain a well-organized and easily accessible forwarded mailbox.
Keep in mind that forwarding all incoming emails may result in a higher volume of forwarded messages, which could potentially clutter the recipient’s inbox. Therefore, it’s important to regularly review and manage the forwarded mailbox to avoid overwhelming the recipient with unnecessary or redundant emails.
By using the “Forward all incoming emails” method, you can streamline your email management process and ensure that all your messages are efficiently forwarded to the desired email address.
Forward Emails Based on Specific Criteria
If you prefer to have more control over which emails are forwarded in Outlook, you can set up forwarding rules based on specific criteria. This method allows you to filter incoming emails and forward only those that meet specific conditions, such as emails from a particular sender, with specific keywords in the subject line, or sent to a specific group of recipients.
To forward emails based on specific criteria in Outlook, follow these steps:
- Open Outlook and go to the File tab.
- Select “Options” from the drop-down menu.
- In the Outlook Options window, click on “Mail” in the left-hand column.
- Click on the “Rules” button.
- In the Rules and Alerts window, click on “New Rule”.
- Select “Apply rule on messages I receive” and click “Next”.
- Define the conditions for the rule by selecting various options such as sender, recipient, subject, keywords, etc.
- Choose the action “Forward it to people or public group” and specify the email address to which you want to forward the emails.
- Click “Finish” to save the rule.
Once you’ve set up the forwarding rule, Outlook will automatically forward any incoming emails that meet the specified criteria to the designated email address. This allows you to selectively forward only the relevant messages, while keeping your inbox well-organized and reducing unnecessary clutter in the forwarded mailbox.
It’s important to regularly review and update your forwarding rules to ensure they align with your changing needs. By fine-tuning the criteria and actions of your rules, you can optimize the forwarding process and ensure that important emails are promptly forwarded while minimizing the forwarding of irrelevant or spam messages.
When forwarding emails based on specific criteria, it’s a good practice to periodically check your forwarded mailbox to ensure that the filter criteria are working effectively. This will help you detect any false positives or missed emails that should have been forwarded. By regularly maintaining and adjusting your forwarding rules, you can ensure that only the most relevant emails are forwarded and prevent any potential disruptions in your email workflow.
By utilizing the “Forward emails based on specific criteria” method in Outlook, you can have greater control over which emails are forwarded, allowing you to customize the forwarding process to suit your specific needs and preferences.
Set Up Forwarding Rules
In Outlook, setting up forwarding rules allows you to customize the forwarding process by specifying specific criteria and actions for forwarding emails. This gives you more control over which emails are forwarded and allows you to tailor the forwarding rules to your specific needs and preferences.
To set up forwarding rules in Outlook, follow these steps:
- Open Outlook and go to the File tab.
- Select “Options” from the drop-down menu.
- In the Outlook Options window, click on “Mail” in the left-hand column.
- Click on the “Rules” button.
- In the Rules and Alerts window, click on “New Rule”.
- Select the desired template for the rule, such as “Apply rule on messages I receive” or “Apply rule on messages I send”.
- Define the conditions for the rule by selecting various options, such as sender, recipient, subject, keywords, time frame, etc.
- Choose the desired action for the rule, such as “Forward it to people or public group” or “Move it to a specified folder”.
- Specify any additional settings or exceptions for the rule.
- Click “Finish” to save the rule.
Once you’ve set up the forwarding rule, Outlook will automatically apply it to incoming or outgoing emails that meet the defined criteria. This ensures that the specified action, such as forwarding the email to a specific address or moving it to a designated folder, is executed accordingly.
By setting up multiple rules, you can create a hierarchy of conditions and actions to further refine the forwarding process. For example, you can create rules with different criteria to handle different types of emails or prioritize certain actions over others.
It’s important to regularly review and manage your forwarding rules to ensure they align with your evolving needs and preferences. This includes updating or deleting outdated rules, modifying existing rules, or creating new rules as necessary.
By effectively setting up and managing your forwarding rules in Outlook, you can streamline your email management process, ensure relevant emails are forwarded to the appropriate recipients or folders, and maintain a well-organized inbox and forwarded mailbox.
Disable Email Forwarding
If you no longer wish to forward your emails in Outlook, disabling the email forwarding feature is a simple process. Whether you have been forwarding all incoming emails or using specific forwarding rules, here’s how you can disable email forwarding:
- Open Outlook and go to the File tab.
- Select “Options” from the drop-down menu.
- In the Outlook Options window, click on “Mail” in the left-hand column.
- Scroll down to the “Forwarding” section.
- Uncheck the box next to “Enable forwarding”.
- Click “OK” to save your changes.
By following these steps, you will effectively disable the email forwarding feature in Outlook, ensuring that no further emails are automatically forwarded to another email address.
It’s worth noting that disabling email forwarding does not delete or remove any previously forwarded emails from the recipient’s inbox or forwarded mailbox. It simply stops the forwarding process for any future incoming messages.
If you want to remove any existing forwarding rules, you can do so by going to the Rules and Alerts window in Outlook. Here, you can review, modify, or delete specific rules that were set up for email forwarding.
Disabling email forwarding can be useful in scenarios where you no longer need emails to be forwarded to another address or if you want to switch to a different email management strategy. By disabling the forwarding feature, you regain control over your email flow and decide on the appropriate actions for managing incoming messages.
Remember, it’s essential to periodically review your email management practices to ensure they align with your current needs. If the need for email forwarding arises again in the future, you can easily enable the feature and configure your forwarding settings according to your requirements.